background image


MISURO HD LCD TV 

 WITH DVD PLAYER 


GLCD3206HDV Series 


The Gold Technical Support Line: 1902 215 259 

Personal Product Support 

(Charges will apply at $2.95 per minute) 

Summary of Contents for MISURO GLCD3206HDV Series

Page 1: ...MISURO HD LCD TV WITH DVD PLAYER GLCD3206HDV Series The Gold Technical Support Line 1902 215 259 Personal Product Support Charges will apply at 2 95 per minute...

Page 2: ...features and to ensure you get the very best from your purchase Safety is important Your safety and the safety of others is important Therefore please ensure you read the Safety Instructions before y...

Page 3: ...es 6 Wall Mount Bracket Installation Guidelines 7 View of TV Monitor 8 Remote Control 10 Installation and Connection 13 TV Monitor Screen Operation 14 TV Channel Menu and Adjustment 16 DVD Player Oper...

Page 4: ...apparatus during lightning storms or when unused for long periods of time 8 Refer all servicing to qualified service personnel Servicing is required when the apparatus has been damaged in any way suc...

Page 5: ...prevent possible damage to the cabinet or premature component failure Do not cover the ventilation openings when using the TV Additional Safety notes Never tamper with any components inside the TV or...

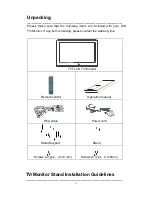
Page 6: ...ded with your LCD TV Monitor If any item is missing please contact the warranty line TFT LCD TV Monitor Remote control Operation manual RCA cable Power cord Stand Support Stand Screws a Type 4 x14 mm...

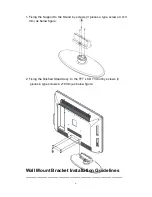
Page 7: ...pieces a type screws 4 x14 mm as below figure 2 Fixing the finished Stand Assy to the TFT LCD TV Unit by screws 4 pieces b type screws 4 x16mm as below figure Wall Mount Bracket Installation Guidelin...

Page 8: ...e Support to the TFT LCD TV Unit by screws 4 pieces b type screws 4 x16mm as below figure 2 Using 6 screws to fix the TFT LCD TV Unit on the Wall Mount Bracket Please find there are 6 holes on the bac...

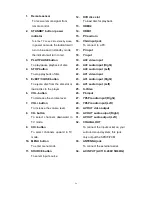
Page 9: ...8 I View of the TV Monitor Front view Back view...

Page 10: ...e 9 CH button To select channels upward in TV mode 10 MENU button To enter menu mode 11 SOURCE button To select input source 12 DVD disc slot To load disc for playback 13 HDMI 2 14 HDMI 1 15 PC audio...

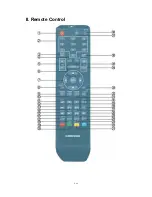
Page 11: ...10 II Remote Control...

Page 12: ...program setting in DVD mode display red subject in Teletext mode and select DVB program in DVB mode 20 INTRO To INTRO play play the first 10 seconds of each track when playing CD discs and display gre...

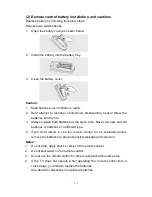
Page 13: ...Always replace both batteries at the same time Never mix new and old batteries or batteries of a different type 4 If you don t intend to use the remote control for an extended period remove the batter...

Page 14: ...na Outdoor Antenna Connection Use 75 coaxial cable plug or 300 75 impedance converter to plug in antenna input terminal on the rear of the cabinet 2 Connect the audio sources Including DVD VCDR etc to...

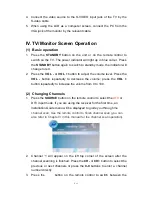
Page 15: ...epeatedly to decrease the volume press the VOL button repeatedly to increase the volume from 0 to 100 2 Changing Channels 1 Press the SOURCE button on the remote control to select the ATV or DTV input...

Page 16: ...button then press the or button to select the available input sources as follow 4 View the TELETEXT program 1 Press the SOURCE button to select the DTV mode Then press the CH or CH button on the remot...

Page 17: ...ect DTV or TV input Press LCD MENU button and the CHANNEL menu will appear Press to select the items Auto Tuning DTV Manual Tuning ATV Manual Tuning Program Edit Press ENTER button to confirm Press th...

Page 18: ...17 DTV Manual tuning Press to select the channel then press ENTER to start scan ATV manual tuning...

Page 19: ...e to System Press the or button to select the TV sound system Current CH Press the or button to select the current channel Search Press the or button to search forward backward press the LCD MENU or E...

Page 20: ...1 And press yellow button to confirm SWAP mark will be shown on the current channel Then press or button firstly to move cursor to target program channel 2 SWAP mark will be shown also And press yello...

Page 21: ...to exit Picture Mode Press the or button to select picture modes Contrast Press the or button to adjust the contrast Brightness Press the or button to adjust the brightness Colour Press the or button...

Page 22: ...ion function on or off SOUND menu Press the LCD MENU button to display the OSD menu then press the or button to select SOUND menu Press the or button to select the items in SOUND menu press the or but...

Page 23: ...ress the LCD MENU button to display the OSD menu then press the or button to select TIME menu Press the or button to select the items in TIME menu press the or button to enter the sub menu press the L...

Page 24: ...on the unit will turn to standby mode automatically if there is no signal input for a period of about 5 minutes Time Zone Press the or button to set the time zone OPTION menu Press the LCD MENU button...

Page 25: ...store this operation will reset the unit to factory default and all previous settings will be cleared LOCK menu Press the LCD MENU button to display the OSD menu then press the or button to select LOC...

Page 26: ...e green button again the lock icon will disappear Parental Guidance Press the or button to set program rating to block some of programs Hotel Mode Press the ENTER or button to enter the hotel mode lis...

Page 27: ...TION a Basic operation 1 Press the SOURCE button on the remote control to select the DVD function mode Insert a disc into the slot of the DVD player and it will start to read the disc automatically 2...

Page 28: ...ence at x2 x4 x8 or x20 Press the button to return playing at normal speed Note The sound is not available while playing in this mode SKIP TO NEXT PREVIOUS TRACK Press the or buttons to select the nex...

Page 29: ...on The unit will now repeat playing from A to B If you want to cancel the repeat section please press the A B button once again Note Some discs will not respond to the A B repeat function e Mute Press...

Page 30: ...the menu will appear on the screen as following PROG T C T C T C T C 1 _ _ _ _ 5 _ _ _ _ 9 _ _ _ _ 13 _ _ _ _ 2 _ _ _ _ 6 _ _ _ _ 10 _ _ _ _ 14 _ _ _ _ 3 _ _ _ _ 7 _ _ _ _ 11 _ _ _ _ 15 _ _ _ _ 4 _ _...

Page 31: ...he camera angle changes to the new settings The angle icon indicator will illuminate while playing back a title that contains at least one scene recorded with multiple angles k Selecting Subtitles Thi...

Page 32: ...MP3 or JPEG file will be played automatically 2 Press the or buttons to select the folders MP3 JPEG files or modes and press the ENTER button on the remote control to enter the folder or start playbac...

Page 33: ...ils Press the DVD SETUP button to enter the SETUP MENU Press the or buttons to select and highlight the category Then press the ENTER button to confirm Press the DVD SETUP button again to return to th...

Page 34: ...disc contents For discs with 4 3 contents using any mode would only display 4 3 screen Screen ratio selection should be according to the connected TV or display aspect ratio PASSWORD This is used to...

Page 35: ...ect the AUDIO OUT setup icon press ENTER button to confirm SPDIF OFF No output is sent to the coaxial output Use this option if you have not connected the coaxial output to any decoder or amplifier SP...

Page 36: ...the or buttons to Move the cursor Press ENTER button to confirm You could choose the available range as displayed on the screen menu 5 Speaker Setup DOWNMIX Press the or buttons to select available on...

Page 37: ...to find out the possible problem If you still can not solve the problem please contact the Grundig Warranty line a DVD player SYMPTOM CAUSE POSSIBLE CURE No sound Wrong connection or loose connection...

Page 38: ...n 1 Ensure that the equipment is connected properly 2 Ensure that the AV video signal input is connected properly Picture sound have interference 1 Check whether the equipment is connected properly 2...

Page 39: ...forms inside the unit may not function well Once condensation disappears the unit will return to normal functions Placing the unit in a warm room will help to dry up condensation This should take 1 t...

Page 40: ...isc becomes dirty clean it with a cleaning cloth Wipe the disc from the centre outwards Do not use solvents such as benzine thinners commercially available cleaners or antistatic spray intended for an...

Page 41: ...t MP HL DTV de mod Demodulator COFDM OFDM Mod 2K 8K FFT SFN and MFN Packed Carries 2K 8K Guard Interval 1 4 1 8 1 16 1 32 TV Tuner Integrated and frequency synthesis DVD Compatible with CD MP3 WMA JPE...

Page 42: ...2 You have 13 available modes compatible with windows 3 It can happen that the image is disrupted This can occur as result of a signal from the VGA card which does not correspond with the usual stand...

Page 43: ...259 New Zealand and have your receipt of purchase on hand This guarantee is subject to the following provisions It is only valid within boundaries of the country of purchase The product must be corre...

Page 44: ...43 PO BOX 6287 Silverwater NSW 1811 www grundig net au Ver 2 13 August 2009...

Reviews: