background image

507961-01G / 31-5000653

Page 1 of 57

Issue 2128


(P) 507961-01G

*P507961-01G*

GE Appliances

A Haier Company

Appliance Park

Louisville, KY 40225

This manual must be left with the homeowner for future reference.

This is a safety alert symbol and should never be ignored. When you see this symbol on labels or in manuals, be alert to 

the potential for personal injury or death.

Improper installation, adjustment, alteration, service 

or maintenance can cause property damage, personal 

injury or loss of life. Installation and service must be 

performed by a licensed professional installer (or 

equivalent), service agency or the gas supplier.

 WARNING

As with any mechanical equipment, personal injury can 

result from contact with sharp sheet metal edges. Be 

careful when you handle this equipment. 

 CAUTION

Table of Contents

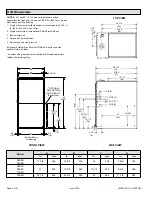
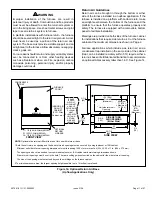
Unit Dimensions ..........................................................2

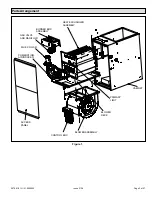
Parts Arrangement.......................................................3

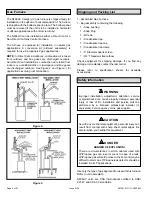
Gas Furnace ................................................................4

Shipping and Packing List ...........................................4

Safety Information .......................................................4

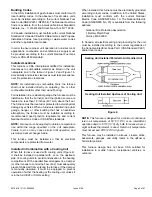
General ........................................................................6

Installation .................................................................10

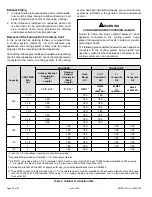
Filters .........................................................................13

Duct System ..............................................................14

Venting Practices .......................................................15

Condensate Piping ....................................................33

Gas Piping .................................................................36

Electrical ....................................................................39

Blower Performance ..................................................47

Unit Start-Up ..............................................................51

Other Unit Adjustments..............................................53

Service.......................................................................54

Repair Parts List ........................................................56


INSTALLATION INSTRUCTIONS

NF96UV

Warm Air Gas Furnace Upflow/

Horizontal Left/Right Air Discharge


Direct Vent & Non-Direct Vent

Summary of Contents for GE NF96UV

Page 1: ...e performed by a licensed professional installer or equivalent service agency or the gas supplier WARNING As with any mechanical equipment personal injury can result from contact with sharp sheet metal edges Be careful when you handle this equipment CAUTION Table of Contents Unit Dimensions 2 Parts Arrangement 3 Gas Furnace 4 Shipping and Packing List 4 Safety Information 4 General 6 Installation ...

Page 2: ... or greater must have one of the following 1 Single side return air with transition to accommodate 20 x 25 x 1 in 508 x 635 x 25 mm air filter 2 Single side return air with optional RAB Return Air Base 3 Bottom return air 4 Return air from both sides 5 Bottom and one side return air 2 Optional External Side Return Air Filter kit is not for use with optional Return Air Base Consider sizing requirem...

Page 3: ...ge 3 of 57 Issue 2128 Figure 1 CONTROL BOX BLOWER ASSEMBLY ACCESS PANEL COMBUSTION AIR INDUCER FLUE COLLAR BURNER BOX ASSEMBLY BLOWER DECK PRIMARY LIMIT CABINET HEAT EXCHANGER ASSEMBLY GAS VALVE AND MANIFOLD Parts Arrangement ...

Page 4: ...ng the following 1 Snap bushing 1 Snap Plug 1 Wire tie 1 Condensate trap 1 Condensate trap cap 1 Condensate trap clamp 1 2 Diameter debris screen 1 3 4 Threaded street elbow Check equipment for shipping damage If you find any damage immediately contact the last carrier Please refer to specification sheets for available accessories Safety Information Improper installation adjustment alteration serv...

Page 5: ...ted to obtain a temperature rise within the range specified on the unit nameplate Failure to do so may cause erratic limit operation and premature heat exchanger failure This furnace must be installed so that its electrical components are protected from water Installed in Combination with a Cooling Coil When this furnace is used with cooling units Figure 4 it shall be installed in parallel with or...

Page 6: ...SULT OF FAILURE TO FOLLOW THE ABOVE INSTALLATION INSTRUCTIONS FAILURE TO FOLLOW THE ABOVE INSTALLATION INSTRUCTIONS VOIDS THE MANUFACTURER S EQUIPMENT LIMITED WARRANTY GEA DISCLAIMS ALL LIABILITY IN CONNECTION WITH INSTALLER S FAILURE TO FOLLOW THE ABOVE INSTALLATION INSTRUCTIONS General These instructions are intended as a general guide and do not supersede local codes in any way Consult authorit...

Page 7: ...ficial position of ANSI on the referenced subject which is represented only by the standard in its entirely In Canada refer to the CSA B149 Installation codes Do not install the furnace in a corrosive or contaminated atmosphere Meet all combustion and ventilation air requirements as well as all local codes CAUTION All gas fired appliances require air for the combustion process If sufficient combus...

Page 8: ... opening shall be within 12 305 mm of the top of the enclosure and one within 12 305 mm of the bottom These openings must communicate directly or by ducts with the outdoors or spaces crawl or attic that freely communicate with the outdoors or indirectly through vertical ducts Each opening shall have a minimum free area of 1 square inch per 4 000 Btu 645 mm per 59 kW per hour of the total input rat...

Page 9: ...and metal louvers and grilles will have 60 to 75 percent free area Louvers and grilles must be fixed in the open position or interlocked with the equipment so that they are opened automatically during equipment operation Figure 10 Equipment in Confined Space Inlet Air from Ventilated Crawlspace and Outlet Air to Outside Roof Terminated Exhaust Pipe Furnace Ventilation Louvers Crawl Space Intake De...

Page 10: ...n connections and installation and service clearances 24 inches 610 mm at unit front The unit must be level from side to side Tilt the unit slightly maximum 1 2 in from level from back to front to aid in the draining of the heat exchanger See Figure 13 Allow for clearances to combustible materials as indicated on the unit nameplate Figure 12 Installation Clearances Top Right Side Left Side Bottom ...

Page 11: ...ge 2 Furnace applications which include side return air and a condensate trap installed on the same side of the cabinet trap can be installed remotely within 5 ft require either a return air base or field fabricated transition to accommodate an optional IAQ accessory taller than 14 5 See Figure 14 Figure 14 Optional Return Air Base Upflow Applications Only FRONT VIEW 1 Unit side return air Opening...

Page 12: ...left hand air discharge Refer to Figure 18 for clearances in horizontal applications Figure 18 Horizontal Application Installation Clearances Top Bottom floor Air Flow Air Flow Right Hand Discharge Left Hand Discharge Bottom floor Top Right End Left End Air Flow Air Flow Right End Left End Top 0 Front 0 Back 0 Ends 0 Vent 0 Floor 0 Front clearance in alcove installation must be 24 in 610 mm Mainta...

Page 13: ...sheet If unit is installed above finished space fabricate an auxiliary drain pan to be installed under unit Set unit in drain pan as shown in Figure 20 Leave 8 inches for service clearance below unit for condensate trap 3 Provide a service platform in front of unit When installing the unit in a crawl space a proper support platform may be created using cement blocks 4 Route auxiliary drain line so...

Page 14: ...ng or equivalent sealing method between the plenum and the furnace cabinet to ensure a tight seal If a filter is installed size the return air duct to fit the filter frame Pipe Fittings Specifications All pipe fittings primer and solvent cement must conform withAmerican National Standard Institute and theAmerican Society for Testing and Materials ANSI ASTM standards The solvent shall be free flowi...

Page 15: ...t 5 minutes before placing unit into operation DANGER 1 Measure and cut vent pipe to desired length 2 Debur and chamfer end of pipe removing any ridges or rough edges If end is not chamfered edge of pipe may remove cement from fitting socket and result in a leaking joint 3 Clean and dry surfaces to be joined 4 Test fit joint and mark depth of fitting on outside of pipe 5 Uniformly apply a liberal ...

Page 16: ...nnected to the venting system being placed into operation while all other appliances connected to the venting system are not in operation WARNING Capacity VENT PIPE DIA in STANDARD CONCENTRIC Outdoor Exhaust Accelerator Dia X Length Outdoor Exhaust Accelerator Dia X Length Flush Mount Kit 1 1 2 Concentric Kit 2 Concentric Kit 3 Concentric Kit 1 1 2 X 12 2 X 12 51W11 71M80 or 44W92 69M29 or 44W92 6...

Page 17: ...products the existing vent pipe is probably oversized for the single water heater or other appliance The vent should be checked for proper draw with the remaining appliance Exhaust Piping Route piping to outside of structure Continue with installation following instructions given in piping termination section Do Not discharge exhaust into an existing stack or stack that also serves another gas app...

Page 18: ...ted metal in exhaust or intake terminations Doing so will cause freeze ups and may block the terminations IMPORTANT Table 4 Minimum Vent Pipe Lengths Capacity Min Vent Length 045 070 090 110 135 15 ft or 5 ft plus 2 elbows or 10 ft plus 1 elbow Any approved termination may be added to the minimum length listed Use the following steps to correctly size vent pipe diameter 045 070 090 110 135 btuh St...

Page 19: ... 74 9 36 21 70 70 48 13 93 92 73 73 69 10 31 16 65 65 43 8 88 87 68 68 64 Standard Termination Elevation 4 501 10 000 ft Number of 90 Elbows Used 1 1 2 Pipe 2 Pipe 2 1 2 Pipe 3 Pipe Capacity Capacity Capacity Capacity 45 70 90 110 135 45 70 90 110 135 45 70 90 110 135 45 70 90 110 135 1 25 20 n a n a n a 76 61 39 n a n a 110 110 88 53 n a 133 132 113 113 109 2 20 15 71 56 34 105 105 83 48 128 127 ...

Page 20: ... 65 9 28 13 60 60 44 9 76 76 69 69 60 10 23 8 55 55 39 n a 71 71 64 64 55 Concentric Termination Elevation 4 501 10 000 ft Number of 90 Elbows Used 1 1 2 Pipe 2 Pipe 2 1 2 Pipe 3 Pipe Capacity Capacity Capacity Capacity 45 70 90 110 135 45 70 90 110 135 45 70 90 110 135 45 70 90 110 135 1 25 20 n a n a n a 68 53 37 n a n a 100 100 84 49 n a 116 116 109 109 100 2 20 15 63 48 32 95 95 79 44 111 111 ...

Page 21: ...3 72 53 53 49 10 21 6 50 50 28 68 67 48 48 44 Standard Termination at Elevation 4 501 10 000 ft Number of 90 Elbows Used 1 1 2 Pipe 2 Pipe 2 1 2 Pipe 3 Pipe Capacity Capacity Capacity Capacity 45 70 90 110 135 45 70 90 110 135 45 70 90 110 135 45 70 90 110 135 1 25 20 n a n a n a 66 51 29 n a n a 95 95 73 38 n a 113 112 93 93 89 2 20 15 61 46 24 90 90 68 33 108 107 88 88 84 3 15 10 56 41 19 85 85 ...

Page 22: ...ct Vent Applications TYPICAL EXHAUST PIPE CONNECTIONS IN HORIZONTAL DIRECT OR NON DIRECT VENT APPLICATIONS RIGHT HAND DISCHARGE SHOWN SIDE VIEW 45 MAX 45 MAX 2 2 2 2 or 2 12 max EXHAUST TRANSITION 3 2 2 EXHAUST TRANSITION 1 1 2 2 2 EXHAUST or NOTE 1 1 2 Vent Pipe Diameter Allowed Only on 045 070 Units DO NOT transition from larger to smaller pipe in horizontal runs of exhaust pipe EXHAUST DO NOT t...

Page 23: ...ht Hand Discharge Shown Intake Piping Figure 27 through Figure 30 This gas furnace may be installed in either direct vent or non direct vent applications In non direct vent applications when intake air will be drawn into the furnace from the surrounding space the indoor air quality must be considered and guidelines listed in Combustion Dilution and Ventilation Air section must be followed Follow t...

Page 24: ...a platform Ensure that the intake air inlet will not be obstructed by loose insulation or other items that may clog the debris screen 2 If intake air is drawn from a ventilated attic Figure 31 or ventilated crawlspace Figure 32 the exhaust vent length must not exceed those listed in Table 5C If 3 diameter pipe is used reduce to 2 diameter pipe at the termination point to accommodate the debris scr...

Page 25: ...tructions and 12 above the average snow accumulation At vent termination care must be taken to maintain protective coatings over building materials prolonged exposure to exhaust condensate can destroy protective coatings It is recommended that the exhaust outlet not be located within 6 feet 1 8 m of a condensing unit because the condensate can damage the painted coating NOTE See Table 6 for maximu...

Page 26: ... A N A N A 3 in N A N A N A N A 8 8 7 7 13 13 1 Refer to 99 Minimum Design Temperature table provided in the current edition of the ASHRAE Fundamentals Handbook 2 Poly Propylene vent pipe PP by Duravent and Centrotherm 3 Vent length in table is equivalent length Each elbow is equivalent to 5ft of straight pipe and should be included when measuring total length NOTE Concentric terminations are the ...

Page 27: ...arance under veranda porch deck or balcony 12 Equal to or greater than soffit depth 3 feet 9m 12 3 feet 9m within a height 15 feet 4 5m above the meter regulator assembly 3 feet 9m 6 inches 152mm for appliances 10 000 Btuh 3kw 12 inches 305mm for appliances 10 000 Btuh 3kw and 100 000 Btuh 30kw 36 inches 9m for appliances 100 000 Btuh 30kw 3 feet 9m above if within 10 feet 3m horizontally 6 feet 1...

Page 28: ... 152mm for appliances 10 000 pliances 10 000 Btuh 3kw and 50 000 pliances 50 000 Btuh 15kw 6 inches 152mm for appliances 10 000 Btuh 3kw 12 inches 305mm for appliances 10 000 Btuh 3kw and 100 000 Btuh 30kw 36 inches 9m for appliances 100 000 Btuh 30kw 3 feet 9m above if within 10 feet 3m horizontally 6 feet 1 8m 7 feet 2 1m 12 inches 305mm 1 In accordance with the current ANSI Z223 1 NFPA 54 Natur...

Page 29: ...e intake piping should terminate straight down using two 90 elbows see Figure 36 4 Exhaust piping must terminate straight out or up as shown A reducer may be required on the exhaust piping at the point where it exits the structure to improve the velocity of exhaust away from the intake piping See Table 7 Figure 36 Direct Vent Roof Termination Kit UNCONDITIONED ATTIC SPACE SIZE PER EXHAUST PIPE TER...

Page 30: ...Figure 41 Direct Vent Concentric Wall Termination 71M80 69M29 OR 60L46 US 41W92 or 41W93 Canada 12 305mm Min above grade or average snow accumulation INTAKE AIR INTAKE AIR INTAKE AIR OUTSIDE WALL GRADE CLAMP Not Furnished FIELD PROVIDED REDUCER MAY BE REQUIRED TO ADAPT DIFFERENT VENT PIPE SIZE TO TERMINATION EXHAUST VENT 1 1 2 38mm accelerator provided on 71M80 44W92 kits for 045 and 070 models EX...

Page 31: ... above grade or average snow accumulation B Horizontal separation between intake and exhaust C Minimum from end of exhaust to inlet of intake D Exhaust pipe length E Wall support distance from top of each pipe intake exhaust 12 305 mm Min 12 305 mm Min 6 152 mm Min 24 610 mm Max 9 227 mm Min 12 305 mm Min 16 405 mm Max 6 152 mm Max 6 152 mm Min 24 610 mm Max 9 227 mm Min 12 305 mm Min 20 508 mm Ma...

Page 32: ...ACCUMULATION SIZE PER EXHAUST PIPE TERMINATION SIZE REDUCTION TABLE Figure 46 Non Direct Vent Field Supplied Wall Termination SIZE TERMINATION PER EXHAUST PIPE TERMINATION SIZE REDUCTION TABLE FIELD PROVIDED REDUCER MAY BE REQUIRED TO ADAPT DIFFERENT VENT PIPE SIZE TO TERMINATION SIZE TERMINATION PER EXHAUST PIPE TERMINATION SIZE REDUCTION TABLE Use wall support every 24 610 mm Use two supports of...

Page 33: ...ope from the furnace to the drain Do not use copper tubing or existing copper condensate lines for drain line CAUTION 5 Figure 51 and Figure 52 show the furnace and evaporator coil using a separate drain If necessary the condensate line from the furnace and evaporator coil can drain together See Figure 53 and Figure 54 Upflow furnace Figure 50 In upflow furnace applications the field provided vent...

Page 34: ...on Evaporator drain line required Trap at coil is optional Figure 52 Furnace with Evaporator Coil Using a Separate Drain 1 min to 2 Max above condensate drain connection Condensate Drain Connection Evaporator drain line required Trap at coil is optional Field Provided Vent Figure 53 Furnace with Evaporator Coil Using a Common Drain Unit shown in horizontal left hand discharge position Condensate D...

Page 35: ...507961 01G 31 5000653 Page 35 of 57 Issue 2128 Figure 55 Trap Drain Assembly Using 1 2 PVC or 3 4 PVC ...

Page 36: ...neys or gas vents dumb waiters or elevator shafts Center gas line through piping hole Gas line should not touch side of unit See Figure 58 and Figure 59 4 Piping should be sloped 1 4 per 15 feet 6 mm per 5 6 m upward toward the gas meter from the furnace The piping must be supported at proper intervals every 8 to 10 feet 2 44 to 3 05 m using suitable hangers or straps Install a drip leg in vertica...

Page 37: ...e 58 Upflow Applications Possible Gas Piping Configurations Figure 59 Horizontal Applications Possible Gas Piping Configurations NOTE BLACK IRON PIPE ONLY TO BE ROUTED INSIDE OF CABINET FIELD PROVIDED AND INSTALLED GROUND JOINT UNION DRIP LEG MANUAL MAIN SHUT OFF VALVE Horizontal Application Right Side Air Discharge Gas Valve GROUND JOINT UNION DRIP LEG MANUAL MAIN SHUT OFF VALVE GROUND JOINT UNIO...

Page 38: ...69 580 16 42 530 15 01 490 13 87 460 13 03 430 12 18 400 11 33 1 1 2 38 1 1 610 40 894 2100 59 46 460 41 34 1180 33 41 990 28 03 900 25 48 810 22 94 750 21 24 690 19 54 650 18 41 620 17 56 2 50 8 2 067 52 502 3950 111 85 2750 77 87 2200 62 30 1900 53 80 1680 47 57 1520 43 04 1400 39 64 1300 36 81 1220 34 55 1150 32 56 2 1 2 63 5 2 469 67 713 6300 178 39 4350 123 17 3520 99 67 3000 84 95 2650 75 04...

Page 39: ...nnect switch near the furnace so that power can be turned off for servicing Table 9 Capacity Maximum Over Current Protection Amps 045 3B 070 3B 090 3C 15 090 5C 110 5C 135 5D 20 4 Before connecting the thermostat check to make sure the wires will be long enough for servicing at a later date Make sure that thermostat wire is long enough to facilitate future removal of blower for service 5 Complete ...

Page 40: ...s other than wiring for the thermostat the wiring to be done and any replacement of wire shall conform with the temperature limitation for Type T wire 63 F 35 C rise Connect a sufficiently sized wire with ground to the furnace s line voltage connections and ground wire Refer to the furnace rating plate for electrical characteristics to be used in sizing field supply wiring and overcurrent protecti...

Page 41: ...humidification Both the passive and active dehumidification methods described above can be utilized on the same furnace Circulating Airflow Adjustments Cooling Mode The units are factory set for the highest airflow for each model Adjustments can be made to the cooling airflow by repositioning the jumper plug marked COOL A B C D see Figure 63 To determine what CFM the motor is delivering at any tim...

Page 42: ...lating blower remains energized until the limits are closed Fan On When the thermostat is set for continuous fan operation and there is no demand for heating or cooling a call for fan closes the R to G circuit and the circulating blower motor runs at 38 of the selected cooling CFM until switched off When the call for fan is turned off the control de energizes the circulating blower Cooling The uni...

Page 43: ...d Stage W1 W2 Heat Call Figure 65 Indoor Blower Operation High Heat W2 Call Figure 66 Indoor Blower Operation Call for Fan Percentage of High Stage Cooling Figure 67 Indoor Blower Operation Single Stage Cooling Figure 68 Indoor Blower Operation Two Stage Cooling Percentage of High Stage Cooling ...

Page 44: ...e is shown by a red LED on the control board The control continuously monitors its own operation and the operation of the system If a failure occurs the LED will indicate the failure code The flash codes are presented in Table 10 Fault Code History Button The control stores the last five fault codes in memory A push button switch is located on the control When the push button switch is pressed and...

Page 45: ... CAN CAUSE INJURY OR DEATH UNIT MUST BE GROUNDED IN ACCORDANCE WITH NATIONAL AND LOCAL CODES NOTE IF ANY WIRE IN THIS APPLIANCE IS REPLACED IT MUST BE REPLACED WITH WIRE OF LIKE SIZE RATING INSULATION THICKNESS AND TERMINATION FIELD SUPPLIED ACC WIRE S145 IS USED WITH HONEYWELL GAS VALVE WHEN APPLIED IN LP GAS UNITS ...

Page 46: ...H WIRING MATERIAL HAVING A TEMP RATING OF AT LEAST 90 c 3 PROPER POLARITY MUST BE OBSERVED FOR FIELD LINE VOLTAGE SUPPLY IGNITION CONTROL WILL LOCK OUT IF POLARITY IS REVERSED 4 FOR TEMPORARY SERVICE REPLACEMENT OF CIRCULATING BLOWER MOTOR WITH PSC MOTOR CONNECT DESIRED SPEED TAP TO EAC TERMINAL AND NEUTRAL TAP TO NEUTRAL TERMINAL ON IGNITION CONTROL 5 DO NOT CONNECT C COMMON CONNECTION BETWEEN IN...

Page 47: ... 905 1075 1210 1370 Normal 815 980 1120 1255 720 885 1020 1135 1st Stage 595 760 865 980 Normal 540 660 785 890 485 600 695 790 NF96U070V3B Temp Rise Speed Adjustment Heating CFM 0 0 8 w c Setting D Setting C Setting B Setting A High Fire 50 80 965 1130 1255 1400 Normal 880 990 1140 1295 810 890 1030 1170 Low Fire 25 55 940 1070 1195 1345 Normal 830 965 1100 1235 755 840 975 1130 Cooling Stage Coo...

Page 48: ...0 1360 Normal 800 945 1100 1245 720 840 970 1115 1st Stage 625 710 830 950 Normal 565 670 760 860 520 610 685 785 NF96U090V5C Temp Rise Speed Adjustment Heating CFM 0 0 8 w c Setting D Setting C Setting B Setting A High Fire 40 70 1450 1565 1725 1865 Normal 1310 1450 1585 1690 1155 1305 1450 1545 Low Fire 30 60 1120 1265 1420 1520 Normal 965 1120 1285 1395 865 950 1120 1235 Cooling Stage Cooling C...

Page 49: ...955 Normal 1220 1405 1570 1795 1075 1270 1430 1635 1st Stage 935 1065 1245 1405 Normal 865 970 1145 1280 790 890 1025 1165 NF96U135V5D Temp Rise Speed Adjustment Heating CFM 0 0 8 w c Setting D Setting C Setting B Setting A High Fire 55 85 1650 1845 2000 2195 Normal 1495 1660 1880 1985 1360 1500 1670 1850 Low Fire 40 70 1300 1435 1630 1715 Normal 1190 1325 1465 1620 1095 1190 1340 1430 Cooling Sta...

Page 50: ...V3C 10 Allowed Allowed Allowed Allowed Norm Allowed Allowed Factory Setting Allowed 10 Allowed Allowed Allowed Allowed NF96U090V5C 10 Allowed Allowed Allowed Allowed Norm Allowed Allowed Factory Setting Allowed 10 Allowed Allowed Allowed Allowed NF96U110V5C 10 Allowed Allowed Allowed Allowed Norm Allowed Allowed Factory Setting Allowed 10 Allowed Allowed Allowed Allowed NF96U135V5D 10 Allowed Allo...

Page 51: ...ally light burners on this furnace Each time the thermostat calls for heat the burners will automatically light The ignitor does not get hot when there is no call for heat on these units Gas Valve Operation 1 STOP Read the safety information at the beginning of this section Figure 71 2 Set the thermostat to the lowest setting 3 Turn OFF all electrical power to the unit 4 This furnace is equipped w...

Page 52: ...djustment Gas Flow Approximate Capacity Seconds for One Revolution Natural LP 1 cu ft Dial 2 cu ft Dial 1 cu ft Dial 2 cu ft Dial 045 80 160 200 400 70 55 110 136 272 90 41 82 102 204 110 33 66 82 164 135 27 54 68 136 Natural 1000 btu cu ft LP 2500 btu cu ft Table 15 Gas Meter Clocking Chart Furnace should operate at least 5 minutes before checking gas flow Determine time in seconds for two revolu...

Page 53: ... reset switches are located on the front of the burner box Pressure Switches The pressure switches are located in the heating compartment on the cold end header box These switches check for proper combustion air inducer operation before allowing ignition trial The switches are factory set and must not be adjusted Temperature Rise After the furnace has been started and supply and return air tempera...

Page 54: ... and Condensate Trap Care 1 Turn off power to the furnace 2 Have a shallow pan ready to empty condensate water 3 Remove the clean out cap from the condensate trap and empty water Inspect the trap then reinstall the clean out cap Cleaning Heat Exchanger If cleaning the heat exchanger becomes necessary follow the below procedures and refer to Figure 1 when disassembling unit Use papers or protective...

Page 55: ...junction box 37 Reinstall the combustion air inducer and flexible no hub connector Reconnect the 2 pin plug to the wire harness 38 Reconnect drain tubes between flue collar and cold end header box 39 Secure burner assembly to vestibule panel using four existing screws Burners are self aligning to center of clam shells 40 Reconnect gas supply line to gas valve 41 Reconnect flame rollout switch wire...

Page 56: ...pecifications Problems detected during the inspection may make it necessary to temporarily shut down the furnace until the items can be repaired or replaced Instruct the homeowners to pay attention to their furnace Situations can arise between annual furnace inspections that may result in unsafe operation For instance items innocently stored next to the furnace may obstruct the combustion air supp...

Page 57: ...minimum height of eight 8 feet above grade directly in line with the exhaust vent terminal for the horizontally vented gas fueled heating appliance or equipment The sign shall read in print size no less than one half 1 2 inch in size GAS VENT DIRECTLY BELOW KEEP CLEAR OF ALL OBSTRUCTIONS 4 INSPECTION The state or local gas inspector of the side wall horizontally vented gas fueled equipment shall n...

Reviews: