background image

Fuzzy Computerized Automatic 
Washing Machine

User's   manual

This manual is for

HWM50-10H

Please read this manual 
carefully before using. 
Retain it for future reference.

Summary of Contents for HWM50-10H

Page 1: ...Fuzzy Computerized Automatic Washing Machine User s manual This manual is for HWM50 10H Please read this manual carefully before using Retain it for future reference ...

Page 2: ... to the set temperature then it begins normal washing for water levels above 6 the cycle is after water reaching level 2 it begins to heat meanwhile water supply continues until level 6 water supply stops and it continues heating to the set temperature then it begins to wash while water supply is resuming the hot water temperature then is good for detergent active enzyme function and for the cloth...

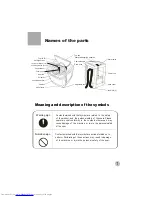
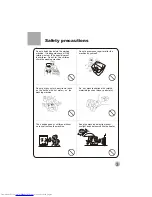
Page 3: ...njure the personal safety of the user Contents marked with that symbol are actions forbidden to perform Performing of those actions may result in damage of the machine or injure the personal safety of the user Adjustable foot fixed foot 3 back cover Cabinet base frame Drain hose Control panel film Control panel Filter cover Power line Pulsator Inner tub Detergent box Top lid B Cabinet handle Water...

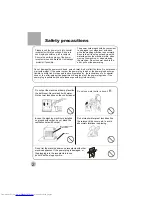
Page 4: ...machine Do not use wet hand to ins ert or pull out the power plug In case the washing machine is installed on ground with carpet do not block the ventilation hole with carpet Do not let the machine share one receptacle with other electric appliances If the power plug is damaged or the plugging into the receptacle is loose do not use the plug any more Do not wash water proof laundries like the rain...

Page 5: ...ries with volatile materials such as thinner petrol etc The handicapped or children without care shall not use the machine Keep the machine away from direct sunlight and heat source like the heater Do not stretch hands into the working machine It is dangerous even if the rotation is slow Take special care of the children Do not let the children climb the washing machine Petrol Thinner ...

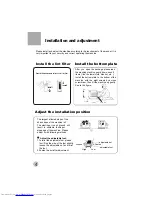
Page 6: ...machine with the eight screws by a cross screwdriver then lift the machine up gently See to the figure Adjust the installation position Please install and adjust the machine according to the requirement of the manual It is very important to your security and correct operating the machine 1 To twist the adjustable foot please first lift up the side of the foot slightly loosen the adjustable nut and...

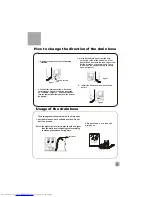
Page 7: ...ing drain 0 7m H 1 2m 1 Dismount the back cover of the washing machine 3 protrude the drain hose from the hole on the right side of the bottom and fast it onto the bottom with the rack and screws Set the bracket on the drain hose There is a hole on the cabinet to hang the drain hose as figure 3 2 Take off the drain hose frame Put down the drain hose Take off the drain hose rack As indicated in Fig...

Page 8: ... to Figure 1 Remarks Before twisting the fastening nut the thread is 4mm above the upper surface of the nut After twisting the fastening nut the thread is 2mm above the upper surface of the nut See to Figure 6 5 Take off the nameplate Twist the fastening nut as per the indication of the figure See to Figure 5 4 Fasten the four screws evenly See to Figure 4 10mm Outlet end surface Nut About 4mm bef...

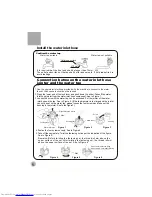
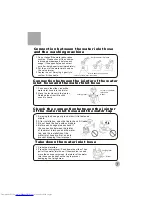
Page 9: ...r to the jointer Release the slider till a click sound is heard Locking lever Slider Water absorption cushion Nut of the water inlet hose Jointer of the water inlet valve Slider Jointer of the water inlet hose Locking lever Connection between the water inlet hose and the washing machine Connection between the jointer of the water inlet hose and the water inlet hose Check the connection between the...

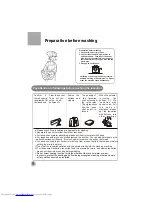
Page 10: ...h serious soil directly It is much easier to remove the soil by that mean e For laundries likely to get lint ball or with long fiber please first turn the inside out before putting them into the water f Do not put the laundries polluted with chemicals directly into the washing machine G For those small laundries laundries likely to be twisted or worn and woolen laundries please put them into mesh ...

Page 11: ...lute the whitener with container Pour it slowly into the washing tub Avoid using whitener on laundries with color or pattern as they are prone to lose color The whitener shall not touch the laundries directly Refer to the user s manual for the usage and quantity of the whitener For powder whitener please dissolve it before use Inlet box of the detergent How to use the washing powder Direct dissolv...

Page 12: ...or 1 min pressing Water level button will enable supplemental water filling which will stop automatically upon the water reaching overflow level WATER LEVEL button Normal wash Large thick or heavily soiled laundry Woolen textiles or underwear 10 min quick wash for load below 1 kg PROGRAM button You can select from the following four programs Program Jeans Gentle Quick Standard With it you can sele...

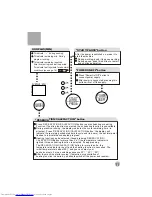
Page 13: ...heating function is selected the scheduling function is unavailable During machine running the display indicates the cycle remaining time in minutes Press button the display will Indicate the remaining scheduled time to cycle end in hours the decimal point flashes to indicate the scheduled progress Heating function can be selected if keep pressing Button for more than 2 s If the temperature indica...

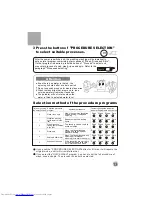
Page 14: ...r flow and wash duration according to the cloth nature and weight Page 10 1 Press the POWER ON OFF button to switch on the power supply 2 Press the button of to select a suitable full automatic program PROGRAM POWER ON OFF 12 SELECTION PROCEDURE After switching on the washing machine heating function will be automatically set inactive In order to select heating function the RESERVATION CALEFACTION...

Page 15: ... laundries need washing rinsing and spinning Soak Wash Rinse Spin Soak Wash Rinse Spin Soak Wash Rinse Spin Soak Wash Rinse Spin Soak Wash Rinse Spin Soak Wash Rinse Spin Repeat using the washing liquid When the laundries need rinsing and spinning after manual washing When the laundries need only spinning after manual washing first drain then spin If the laundries are very dirty or the sleeve and ...

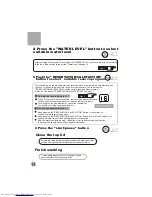
Page 16: ... washing Except water filling excluding heating function and draining process if the top lid is opened the machine will stop running and alarm The washing machine cuts off thepower supply automatically when wash cycle ends After switching on the power press the button WATER LEVEL to select a water level according to the load Please refer to the button Water level on page 10 Page 10 4 Press the WAT...

Page 17: ...f the power plug before maintenance 2 Do not store water in the washing machine for a long period Drain the water completely after each using If the cabinet is dirty wipe it with wet cloth Do not flush it directly with water Wipe it with neutral detergent Do not wipe it with thinner petrol alcohol etc Thinner Alcohol Petrol The filter screen of the water inlet valve is likely to be blocked by fore...

Page 18: ...roperly Insert the power plug tightly Clean the water inlet valve Open and close the top lid once Fasten the buttons and zipper Re order the laundries Close the top lid Clean the foreign material Open and close the top lid once Level the machine in right position Open and close the top lid once Phenomena Reason How to settle Is the drain hose frozen Clean the frozen material After long running of ...

Page 19: ...bag Inside the accessory bag Between the upper cushion of the washing machine package and the upper seal of the package carton Packing list Lint filter One Inside the document bag 17 Specification Water level Water quantity about Water inlet pressure 0 03MPa 0 78MPa Rated washing spinning capacity kg 5 0 kg weight of standard dry cloth Lint filter A One Inside the document bag Warranty Card One In...

Reviews: