background image

SERVICE MANUAL

LED TV

Chassis

6308N

This service information is designed for experienced repair technicians only and is not designed for use by the general public. 
It does not contain warnings or cautions to advise non-technical individuals of potential dangers in attempting to service a product.
Products powered by electricity should be serviced or repaired only by experienced professional technicians. Any attempt to 
service or repair the product or products dealt with in this service information by anyone else could result in serious injury or death.

WARNING

LE32K5000T

Model No.

Summary of Contents for LE32K5000T

Page 1: ...s or cautions to advise non technical individuals of potential dangers in attempting to service a product Products powered by electricity should be serviced or repaired only by experienced professional technicians Any attempt to service or repair the product or products dealt with in this service information by anyone else could result in serious injury or death WARNING LE32K5000T Model No ...

Page 2: ...sassemble and Assemble 4 1 Remove the Pedestal 6 8 8 8 8 10 12 12 4 2 Remove the Back Cover 12 4 3 Remove the Adhesive Tape 12 4 4 Remove the Main Board 13 4 5 Remove the Speaker 13 4 6 Remove the Remote Control Board 14 5 Installation Instructions 15 5 1 External Equipment Connections 15 5 2 HDMI Connections 19 6 Operation Instructions 22 6 1 Front Panel Controls 6 2 Back Panel Controls 6 3 Unive...

Page 3: ...le shooting 54 9 1 Simple Check 54 9 2 Main Board Failure Check 9 3 Panel Failure 55 63 8 1 How to enter into the factory model 8 2 How to update software 51 52 8 Measurements and Adjustments 42 8 3 How to enter into the Hotel Model 53 ...

Page 4: ...instructions in the literture accompanying the appliance 1 3 2 Be careful to the electrical shock 7R SUHYHQW GDPDJH ZKLFK PLJKW UHVXOW LQ HOHFWULF VKRFN RU UH GR QRW H SRVH WKLV 79 VHW to rain or excessive moisture This TV must not be exposed to dripping or splashing water DQG REMHFWV OOHG ZLWK OLTXLG VXFK DV YDVHV PXVW QRW EH SODFHG RQ WRS RI RU DERYH WKH 79 1 3 3 Electro static discharge ESD Som...

Page 5: ... UHFHLYHU RQO WKH WHVW WXUHV VSHFL HG LQ WKLV VHUYLFH PDQXDO CAUTION R QRW FRQQHFW WKH WHVW WXUH JURXQG VWUDS WR DQ KHDW VLQN LQ WKLV UHFeiver 3 Do not spray chemicals on or near this receiver or any of its assemblies 4 Unless specified otherwise in this service manual clean electrical contacts only by applying the following mixture to the contacts with a pipe cleaner cotton tipped stick or compar...

Page 6: ... static electricity Such components commonly are called Electrostatically Sensitive ES Devices Examples of typical ES devices are integrated circuits and some field effect transistors and semiconductor chip components The following techniques should be used to help reduce the ncidence of component damage caused by static by static electricity 4 Use only an anti static type solder removal device So...

Page 7: ...ibed in the table below Note A note provides information that is not indispensable but may nevertheless be valuable to the reader such as tips and tricks Caution A caution is used when there is danger that the reader through incorrect manipulation may damage equipment loose data get an unexpected result or has to restart part of a procedure Warning A warning is used when there is danger of persona...

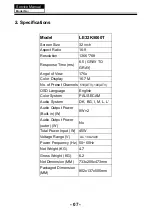
Page 8: ...or Display 16 7M No of Preset Channels OSD Language English Color System PAL SECAM Audio System DK BG I M L L Audio Output Power Built in W 8W 2 Audio Output Power outer W No Total Power Input W 45W Voltage Range V Power Frequency Hz 50 60Hz Net Weight KG 4 7 Gross Weight KG 6 2 Net Dimension MM 733x200x473mm Packaged Dimension MM 802x137x505mm AC 100 240V 510 DTV 100 ATV ...

Page 9: ... 08 Service Manual Model No 3 Location of Controls and Components 3 1 Board Location No Description A Board Integration Mainboard 3 2 Main Board A Board ...

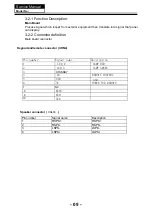
Page 10: ...nel can display RQQHFWRU GH QLWLRQ Main board connector Keypad andremote connector CON4 Pin number Signal name Description 1 LED_R LAMP RED 2 LED_G LAMP GREEN 3 4 IR REMOTE CONTROL 5 GND GND 6 5V POWER FOR REMOTE KEY1 KEY0 GND 7 8 9 10 NC STANDBY Speaker connector Pin number Signal name Description 1 RSPK RSPK 2 RSPK RSPK 3 LSPK LSPK 4 LSPK LSPK XS403 ...

Page 11: ...3 3 LED Panel 10 Service Manual Model No ST3151A05 5 ...

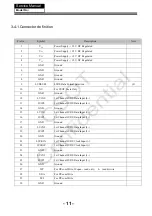
Page 12: ... LV1N0 1st Channel LVDS Data Input 0 13 LV1P0 1st Channel LVDS Data Input 0 14 GND Ground 15 LV1N1 1st Channel LVDS Data Input 1 16 LV1P1 1st Channel LVDS Data Input 1 17 GND Ground 18 LV1N2 1st Channel LVDS Data Input 2 19 LV1P2 1st Channel LVDS Data Input 2 20 GND Ground 21 LVCK1N 1st Channel LVDS Clock Input 22 LVCK1P 1st Channel LVDS Clock Input 23 GND Ground 24 LV1N3 1st Channel LVDS Data Inp...

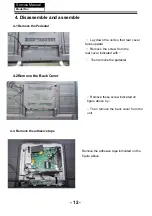
Page 13: ...WKDW UHDU FRYHU faces upward 5HPRYH WKH VFUHZ IURP WKH UHDU FRYHU LQGLFDWHG ZLWK ż 7KHQ UHPRYH WKH SHGHVWDO 4 2Remove the Back Cover 5HPRYH WKHVH VFUHZ LQGLFDWHG RQ JXUH DERYH E ż 7KHQ UHPRYH WKH EDFN FRYHU IURP WKH unit Service Manual Model No 12 4 1 Remove the Pedestal 4 3 Remove the adhesive tape ...

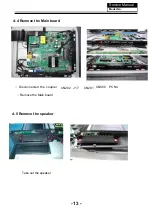
Page 14: ...4 4 Remove the Main board 5HPRYH WKH 0DLQ ERDUG Service Manual Model No 13 CN202 CN800 LVFRQQHFWHG WKH FRXSOHU J17 CN201 4 5 Remove the speaker Take out the speaker PCN4 ...

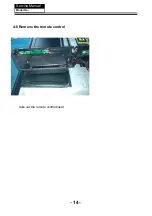
Page 15: ...4 6 Remove the remote control take out the remote controlboard Service Manual Model No 14 ...

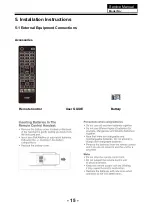
Page 16: ...5 Installation Instructions 5 1 External Equipment Connections Accessories Remote Control User GUIDE Battery Service Manual Model No 15 ...

Page 17: ...o cable 2 Connect power cord 3 Power on the TV switch to PC mode 4 Power on the PC This sequence is very important PC Note Aerial connections IEC female Input impendance 75 unbalanced The TV appearance subject to material object 8 16 AC INPUT 100 240V 50 60Hz PC AUDIO VGA HDMI2 ARC HDMI3 SCART LAN ...

Page 18: ...eq Hz not more than 60Hz 1 2 3 640 480 800 600 60 60 31 47 37 88 RESOLUTION V Freq Hz H Freq KHz 1024 768 60 48 36 PRESET MODE HDMI 1 2 3 800 600 1024 768 60 60 37 88 48 36 RESOLUTION V Freq Hz H Freq KHz 1366 768 60 47 71 4 1280 768 60 47 3 5 1920 1080 60 67 5 4 5 1366 768 60 47 71 1280 1024 60 63 98 6 1920 1080 Only for 40 60 67 5 17 ...

Page 19: ...IO VGA HDMI2 ARC HDMI3 SCART LAN RF HDMI1 YPbPr AV IN HEADPHONE COMMON INTERFACE CI USB USB OPTICAL CVBS DVD Player or other machine with YPbPr YCbCr G R B Audio Video machine with HDMI interfaces R Y W CVBS DVD Player or other machine with CVBS S Video 1 WAN 2 3 4 Audio Receiver Service Manual Model No 18 ...

Page 20: ... menu When the source device DVD player or Set Top Box supports DVI How To Connect 1 Connect the source device to HDMI port of this TV with a HDMI to DVI cable not supplied with this product 2 A separated audio connection is necessary 3 If the source device has an analog audio output connector connect the source device audio output to DVI Audio In port located on the PC port How To Use If the sour...

Page 21: ...Cable sample HDMI Cable not supplied with the product HDMI to DVI Cable not supplied with the product Analog Audio Cable Stereo to RCA type not supplied with the product Service Manual Model No 20 ...

Page 22: ... Use the attached power cord only Ŷ I WKH SRODUL HG FRUG GRHV QRW W LQWR D QRQ SRODUL HG RXWOHW GR QRW DWWHPSW WR OH RU FXW WKH EODGH W LV WKH XVHUCV UHVSRQVLELOLW WR KDYH DQ electrician replace the obsolete outlet Ŷ I RX FDXVH D VWDWLF GLVFKDUJH ZKHQ WRXFKLQJ WKH XQLW DQG WKH XQLW IDLOV WR IXQFWLRQ simply unplug the unit from the AC outlet and plug it back in The unit should return to normal oper...

Page 23: ...nput 3 VGA input 4 input 5 input 10 HEADPHONE input 11 AV IN analogue audio output 12 LAN input 13 14 input 15 Output HDMI2 ARC 6 input HDMI3 YPbPr COMMON INTERFACE CI USB OPTICAL 3 1 7 8 9 10 11 15 4 5 6 2 13 14 7 input output SCART 8 input ANT 9 input HDMI1 PC AUDIO 3 2 30 30 1 8m SOURCE MENU V V CH CH Standby 1 2 3 4 5 RF HDMI1 YPbPr AV IN HEADPHONE COMMON INTERFACE CI USB USB OPTICAL AC INPUT ...

Page 24: ...ess to display the channel information In teletext mode press to revealthe hidden information Press to open the channel list In teletext mode press to switch the image to top bottom or full These model don t support 3D future Press to close the on screen menu In teletext mode press to hide the text 16 17 18 19 20 21 22 23 24 25 26 Press to select previous or next file previous next Press to stop m...

Page 25: ...tically displayed successively This key is used to stop or resume sub page acquisition The indication appears top left To freeze the page To display or hide the concealed information games solutions This is used to call or exit teletext modes The summary appears with a list of items that can be accessed Each item has a corresponding 3 digit page number If the channel selected does not broadcast te...

Page 26: ...471 5V_Normal 950mA STB_EN 12V 1 38A RT9108N AMS1117 3 3V 3 3V_STBY 320MA 3 3V_Normal 150MA AMS1117 3 3V 5V_Normal 150mA AMS1117 3 3V 3 3V_TU 300MA 5V_Normal 300mA FUSE 5V_USB 1A 5V_USB 1A 1 5V_DDR 500mA 8008B 1A 5V_MHL 1A SWITCH IN 1A MSDXXX 12V 1 5A 5V_Normal 200mA MOS YUV MHL AV_L R SCART SCARTX1 EARPHONE L R MOS LVDS 1 5A 1A 1 18V 2A MP1471 12V_Normal 350mA MP1470 5V_USB 12V 1A 12V 1A 5V_USB 1...

Page 27: ......

Page 28: ......

Page 29: ...3 DQSUB B DDR3 DQU7 B DDR3 DQU1 B DDR3 DQL5 AGND GND AVDD_DDR0 AVDD_DDR0 AVDD_DDR0 AVDD_DDR0 1 5V_DDR GND 2 3 4 5 6 7 8 9 10 11 12 13 14 15 16 GND 2 3 4 5 6 7 8 9 10 11 12 13 14 15 16 C317 0 1uF 16V Y5V 7 5 3 1 8 6 4 2 RN305 22R 7 5 3 1 8 6 4 2 RN317 22R R308 1K 1 7 5 3 1 8 6 4 2 RN316 22R 7 5 3 1 8 6 4 2 RN308 22R 7 5 3 1 8 6 4 2 RN315 22R 7 5 3 1 8 6 4 2 RN307 22R 7 5 3 1 8 6 4 2 RN311 22R C310 ...

Page 30: ...GND LVB2N LVA2P LVB1N AGND GND GND LVB0P LVB1P LVB2P LVBCLKP LVB3P LVB4P GND LVA0P LVA1P LVA2P LVACLKP LVA3P LVA4P GND GND V_Panel V_Panel V_Panel GND LVB0N LVB1N LVB2N LVBCLKN LVB3N LVB4N GND LVA0N LVA1N LVA2N LVACLKN LVA3N LVA4N GND V_Panel V_Panel V_Panel V_Panel 5V_USB 12V_PWR V_Panel PANEL_ON OFF 3 LVBCLKP 3 LVB1N 3 LVB0N 3 LVB1P 3 LVB3P 3 LVB2P 3 LVBCLKN 3 LVB2N 3 LVB4P 3 LVB3N 3 LVACLKN 3 L...

Page 31: ......

Page 32: ...R D824 ESD_0402_10pF 1 2 R615 12K R612 10K D820 ESD_0402_10pF 1 2 R613 10K R153 0R NC R6811 75R D811 ESD_0402_10pF 1 2 R619 75R R614 12K R626 10K D819 ESD_0402_10pF 1 2 D821 ESD_0402_10pF 1 2 R611 10K P6 PJ 313B Y1 5 PR 2 PB 3 Y2 4 G1 1 G2 6 NC1 7 NC2 8 R38 0R R0603 D812 ESD_0402_10pF 1 2 D806 ESD_0402_10pF 1 2 R608 75R D822 ESD_0402_10pF 1 2 CON2 COAX NC 1 2 3 4 D827 ESD_0402_10pF 1 2 R607 75R C6...

Page 33: ..._RIN 3 GND 2 3 4 5 6 7 9 10 11 12 13 14 15 16 R706 10K R703 75R R702 75R R701 75R R705 100R R1411 12K R L P4 PHONE_JACK G_EARPHONE5 A 3 5 2 4 1 R1409 10K D838 ESD_0402_10pF 1 2 R704 100R D842 ESD_0402_10pF 1 2 R707 10K D840 ESD_0402_10pF 1 2 R1410 12K D844 ESD_0402_10pF 1 2 D841 ESD_0402_10pF 1 2 D843 ESD_0402_10pF 1 2 R1408 10K D837 ESD_0402_10pF 1 2 D829 ESD_0402_10pF 1 2 P701 VGA W 1 6 2 7 3 8 ...

Page 34: ... X5R C803 0 1uF 16V Y5V Y3 12MHz D803 NC 1pF DM8 NS EZJZ0V800AA 1 2 DM11 NS EZJZ0V800AA 1 2 C1559 10uF 10V X5R DM9 NS EZJZ0V800AA 1 2 D804 NC 1pF P803 USB W VBUS 4 D 3 D 2 GND 1 SHELL 5 SHELL 6 C1556 0 1uF 16V Y5V C804 10uF 10V X5R C600 10uF 10V X5R C802 10uF 10V X5R R803 5 1R D801 NC 1pF C7 16pF NC P802 USB W VBUS 4 D 3 D 2 GND 1 SHELL 5 SHELL 6 DM7 NS EZJZ0V800AA 1 2 C1558 0 1uF 16V Y5V C1560 10...

Page 35: ... 4 R1463 10K NC R290 1K C0402 330uF 25V C296 RT9108NB TSSOP 28EP_0 65 N16 SD 1 FAULT 2 LINP 3 LINN 4 GAIN0 5 GAIN1 6 AVCC 7 AGND 8 GVDD 9 PLIMIT 10 RINN 11 RINP 12 NC 13 PBTL 14 PVCCR 15 PVCCR 16 BSPR 17 OUTPR 18 PGND 19 OUTNR 20 BSNR 21 BSNL 22 OUTNL 23 PGND 24 OUTPL 25 BSPL 26 PVCCL 27 PVCCL 28 GND 29 CA16 10uF 25V X5R 12K R283 R413 10K 22 0uH_1 8A L16 0 47uF 25V X7R C1456 0 22uF 25V X5R C1448 L...

Page 36: ... RF_JACK PAL RF 2 GND 1 GND 3 GND 4 GND 5 C1021 10uF 10V X5R R1010 0R R1005 100R C1048 0 1uF 16V Y5V C1032 150pF C1031 100pF C1022 0 1uF 16V Y5V L1005 330nH SDWL1608CR33JSTFM01 C1034 1uF 16V Y5V D201 BAV99W NC C1043 6800pF C1035 82pF R1017 10K C1038 0 1uF 16V Y5V C1050 33pF C1013 NC 100pF C1033 1uF 16V Y5V C1044 6800pF R1006 100R C1047 0 1uF 16V Y5V C1046 0 1uF 16V Y5V C1051 33pF C1024 0 1uF 16V Y...

Page 37: ...A0 3 13 PCM_A1 3 13 PCM_A2 3 13 PCM_A3 3 13 PCM_A4 3 13 PCM_A5 3 13 PCM_A6 3 13 PCM_A7 3 13 GND 2 3 4 5 6 7 8 9 10 11 13 14 15 16 C1205 0 1uF 16V Y5V NC C1208 NC 33pF C1207 NC 33pF C1204 0 1uF 16V Y5V 7 5 3 1 8 6 4 2 RN1201 22R 7 5 3 1 8 6 4 2 RN1203 22R 7 5 3 1 8 6 4 2 RN1202 22R C1210 0 1uF 16V Y5V 7 5 3 1 8 6 4 2 RN1204 22R C1203 10uF 10V X5R R1225 1K C1209 0 1uF 16V Y5V R1233 0R U1202 NANDFLAS...

Page 38: ...5V_Normal 5V_PCMCIA TS1_SYNC 3 PCM_IOWR_N 3 PCM_CE_N 3 TS1_VLD 3 TS1_CLK 3 PCM_WAIT_N 3 PCM_RESET 3 PCM_A 14 0 3 12 TS0_CLK 3 PCM_REG_N 3 PCM_D 7 0 3 PCM_IRQA_N 3 PCM_WE_N 3 PCM_OE_N 3 PCM_CD_N 3 TS0_VLD 3 TS0_SYNC 3 TS0_D 7 0 3 PCM_IORD_N 3 TS1_D0 3 TS1_D1 3 TS1_D2 3 TS1_D3 3 TS1_D4 3 TS1_D5 3 TS1_D6 3 TS1_D7 3 PCM_A0 3 12 PCM_A1 3 12 PCM_A2 3 12 PCM_A3 3 12 PCM_A4 3 12 PCM_A5 3 12 PCM_A6 3 12 PC...

Page 39: ...401 0 1uF 16V Y5V CB1401 1000pF 2KV NC Green Yellow P1401 RJ45 W TD 1 TD 2 RD 3 TDCT 4 RDCT 5 RD 6 NC 7 CH_GND 8 GRN 9 GRN 10 ORG 12 ORG 11 GND1 13 GND2 14 R1404 75R 1 R1401 75R 1 CB1402 1000pF 2KV U1401 RJ45 J0011D21B TD 1 TCT 2 TD 3 NC1 4 NC2 5 RD 6 RCT 7 RD 8 RX 9 TCM 10 RX 11 NC3 12 NC4 13 TX 14 TCM 15 TX 16 C1403 0 1uF 16V Y5V R1403 75R 1 R1402 75R 1 38 ...

Page 40: ...EN 5 GND 1 VIN 3 FB OUT 4 SW 2 BST 6 RP5 10K R1499 3K_1 C1476 10uF 10V X5R C40 10uF 25V X5R RP17 10K C1499 10uF 25V X5R R1496 7 5K_1 Q504 MEM2303M3G 1 2 3 CP21 0 1uF 16V Y5V R1494 39K_1 RP18 10K C1493 1uF 25V X5R Q503 MEM2303M3G 1 2 3 L1016 120R FBI NC 1 2 QP3 MMBT3904 1 3 2 C1483 1uF 25V X5R R1508 7 68K_1 C1498 10uF 25V X5R QP2 MMBT3904 1 3 2 R1507 40 2K_1 C1497 0 1uF 50V X5R CE42 470uF 16V lowES...

Page 41: ... PR63 PR76 PFU1 T3 15AL 250AC PR29 PR80 PR61 PR67 PR12 PC15 PD8 PC23 PR43 PR51 PR84 PC6 PCX1 PC29 PCX2 PR85 PC16 PC12 PC7 PR19 68R 1206 PC42 PR32 PR9 PD14 RS1M PR14 PR35 PCY1 PC62 PR49 PD5 PR31 PD3 PL9 1 1 2 2 3 3 PL104 PC8 100NF 0805 PR74 PR13 PJ3 3962R 3P 1 2 PL103 FB PC14 PNTC1 1 2 U1413 1 PT4 1 2 3 4 PR6 PR25 J19 CON6 NC 1 2 3 4 5 6 PR73 NC 3R3_1206 PCY3 PR66 PR53 PQ3 1 3 2 PCY4 PD24 PR70 PQT4...

Page 42: ...ight Service Manual Model No 7 3 Wiring Connection Diagram NO Name 1 2 3 4 5 Connection Wire For Keyboard and Remote Connection Wire For Speaker LVDS Wire Connection Wire Power Wire 5 2 3 4 1 41 6 6 Connection Wire For WIFI ...

Page 43: ...ct the Cancel button then press the OK button to go back the previous menu 2 Press the buttons to select DVB T DVB C and then press the OK button to confirm Press the Menu button to back to the previous menu Select DVB C press the OK button to enter the Operator menu press the buttons to select operator then press the OK button to enter the country menu press the buttons to select the country then...

Page 44: ...nder the current mode General Step for Menu Setup For each main menu first press button to enter the submenu Press buttons to select the desired adjustable option After the selection of option is completed press Menu to be able to quit the menu Note Auto volume only available when the input signal volume is too large or distortion Source DVBT DVBC ATV AV SCART Component PC HDMI1 HDMI2 HDMI3 USB Mo...

Page 45: ...ns to select the Full Tuning or Quick Tuning In the other operator press and OK buttons to select the Full Tuning or Network Tuning SCENE ENERGY TUNER SYSTEM Auto Tuning SCALE Antenna Type Manual Tuning Program Edit Signal CI Info DVB Antenna Type Air Cable MENU Channel Tuning France Italy Netherlands Germany Poland UK Spain Russia DTV Czech MENU Channel Tuning France Italy Netherlands Germany Pol...

Page 46: ...el and the press the OK button to commence the search of that channel When the signal has been tuned the picture and signal strength will be display on the screen 4 Press the MENU button to return back to the main menu 4 2 2 DTV Manual Tuning DVB C 1 Press the buttons to select the Manual Tuning menu and then press the OK button 2 Press the buttons to select DTV Manual Tuning and then press the OK...

Page 47: ...em Advanced Option and then press OK to confirm 5 1 Language 1 Press the buttons to select the Language menu then press the OK button to enter the language submenu 2 Press buttons select the OSD language 5 2 Network 1 Press the buttons to select the Network menu then press the OK button to enter the Network submenu 2 Press the buttons to select submenu Network Wired Network Wi Fi Network and then ...

Page 48: ...ion Press the button to enter the home network menu press the buttons to select the device then press OK button to confirm Press the buttons to select the desired option in the file list then press the OK button to play it Network Network Wired Network Wired Network Not Conneted Wi Fi Network Move Enter OK MENU Wi Fi Network WLAN Off To get the available network Please open Wlan Wi Fi Network WLAN...

Page 49: ...o channel in the day To access the EPG menu press the GUIDE button the following menu will be displayed to enter the PROGRAMME GUIDE PROGRAMME GUIDE 19 Nov 2004 16 00 16 30 SD Multiple Audio The show with lots of ideas for what to cook tonight or any night Quick simple and delicious ways to achieve the best in your kitchen With host Jeni Barnett 19 Nov 2004 16 02 19 Nov 2004 18 The HITS 16 00 16 3...

Page 50: ...USB storage device and to resume to the point where it was paused Note Formatting a USB2 0 storage device will be needed Save your original data before formatting All the data stored in the USB device will be erased after formatting USB Driver Storage Format Select to format the USB device and allocate the amount of space for the Time Shift function Note The format process will take at least 2 min...

Page 51: ...1 Return Exit usb sda1 LOST DIR Tencent _MSTPVR MIDE_0 9 1 USB1 Movie Photo Music 00 00 40 00 02 24 90 Pause 1 big big world 2 Just One Last big big world mp3 00 00 39 00 03 26 Pause Since then all of above will be skipped Press the buttons to select the APP and press the ok button to enter into the application what you want Press the Exit button to exit the application 3 Select the Browser to ent...

Page 52: ...h is on Off the unit will stand by when the AC switch is on Last when the AC switch is on the unit will be the same as the last time 6 Other 6 1 PICTURE MODE change the parameters of contrast brightness color sharpness 6 2 W B ADJUST change the value of R G B of color temperature mode Normal Cool Warm User 6 3 Over Scan Change Repetition rate proportional mode for every signal 6 4 Special Func adj...

Page 53: ... update You should reset TV after update Note When Upgrade on the process please don t Power Off Haier 6308N upgrade with USB SOP Step 1 Ready for F W Upgrade 1 1 Prepare a USB memory RS WKH VRIWZDUH OH PHUJ ELQ IURP RXU FRPSXWHU WR WKH 86 PHPRU DQG UHPRYH it from computer s USB port Step 2 F W Upgrade 2 1 AC ON 8 2 How to update software ...

Page 54: ...Source Lock is on you can choose 7 Panel key Lock set keypad locked or not 8 OSD Lock Set OSD menu display or not when press menu key 9 Standby LED Power Set Indicating lamp display or not 10 USB Cloning clone OSD settings channel data to USB disk 11 Reset All Lock restore the default setting of hotel mode 12 Hotel Logo Welcome Message update the welcome message Make sure that the file hotel txt N...

Page 55: ...Service Manual Model No 9 Trouble shooting 9 1 Simple check 54 ...

Page 56: ...Service Manual Model No 9 2 Main board failure check 55 ...

Page 57: ...l having problems Check if there is sound input signal Check the P8 JACK Yes No Check if there is signal at L201 and L202 Check if there is signal at C222and C223 No Yes Check HEADPHONE have sound Check the speakers Yes Check P1402 JACK Replace U201 No 56 ...

Page 58: ... J19 ON OFF High Remote ON No Yes Check CE39 5VSB Change U1403 No Yes Check U104 3 3Vsb Change U104 U201 No Yes Check C512 1 18V CE38 1 5V Change U109 U501 U201 No Yes Check Y201 24MHz Change Y201 No Yes Check U110 3 3V Change U110 No Yes Change mainchip U201 No Change Mainboard 57 ...

Page 59: ...nput No Update the software and make the reboot Still having problems For ease of use recommend that customer format the picture and sound settings in the automatic option Yes Change L L16 L25 L18 L19 No Change Amplifier N16 Change Speaker is OK No Change MainBoard No 58 ...

Page 60: ...efer to relative instructions in the Manual for color adjust No No Yes Yes Check out of picture and sound system of this channel Change the channel to the right sound system PAL D K No color for some channel program black and white Still having problems Updata the software and make the reboot or change the maiboard No Change TDA18275 U1004 59 ...

Page 61: ... adj to high then check blacklight is shine How to know whether the Power Module is broken Still having problems Check if Main board LVDS wire Panel are in good condition No Power Module is broken Yes No Yes Power Board is ok pls theck mainboard 60 ...

Page 62: ... Power Module not work 61 ...

Page 63: ...Ğůů 4 Verify if the FLASH U1202 has the right software and work well 5 Verify if the Y201 Crystal has the right frequency Panel not work 1 ŚĞĐŬ ƚŚĞ ĂĐŬ ůŝŐŚƚ ƐĞƚ ƵƉ output and input are working 2 Verify if the Mainboard output the right On Off signal to power board 3 Verify if the Mainboard output the LVDS singal to panel T con board 4 Verify if the software is the right version of this model ϱ ŚĂ...

Page 64: ...or cracking Dim or L D TCP Sunken TCP lead cracking ACF bonding short Awful environment and something electric enter into LCD Mis align between TCP and Panel Panel failure TCP failure V Dim Vertal gray line V L D Vertical color line light or dark forever H B D Horizontal bar H Dim Horizontal gary line H L D H o r i z o n t a l line light or dark forever ...

Page 65: ...er Bubble Bladder in Polarizer Bladder between Polarizer and top glass Polarizer Scratch Polarizer Scratch Tine or rigidity arose F M i n s i d e Polarizer Eyewinker inside Polarizer Eyewinker inside Polarizer Circuit Abnormal Display Abnormal Display 1 Chip lose action 2 IC or bad 3 Pannel and vsc connect bad shot jointion Flashing B r i g h t a n d d a r k display alternately 64 ...

Page 66: ...display Maybe caused by surge current and EDS Black Screen B L normal only Black screen display FIIcker Crosstalk LCD Vcom imbalance Abnormal Color Only color abormal Capacitance improper bring crosstalk inside LCD pannel Abnormal Color Only color abnormal 1 Chip lose action 2 I C s h o r t o r jointion bad 3 Pannel and vsc connect bad ...

Page 67: ...ss between wire and electrode B L dark B L brightness darker than normal Connect badnessShort between wire and electrode B L wire damaged B L wire damaged Operation abnormal or systemic noise B L wire open Without backlight Operation abnormal or systemic noise B L shut down B L shutdown in sometime Short bitween lamp housing and wire Because consume power too much F M F M inB L white balck Rotundi...

Page 68: ...ription Phenomena Failure cause Mechanlcal or B L Light leakage Brightness at bottom of LCM brighter than normal B L unit badness Uniformity B L brightness asymmetric Sheet in B L unit is uneven Mount hole Lack screw or screw damage Lack screw Screw damage ...

Reviews: