background image

Operation and Maintenance Instructions

Hako-Citymaster 2000 (1411.22) Euro 4

Edition: 88-

1

0-2744/11 2010

Clean ahead

Summary of Contents for Citymaster 2000

Page 1: ...Operation and Maintenance Instructions Hako Citymaster 2000 1411 22 Euro 4 Edition 88 10 2744 11 2010 Clean ahead...

Page 2: ...mbH The technical data special equipment options as well as the figures in this Operation Manual are not binding Certain special equipment options in this Operation Manual may not yet be available at...

Page 3: ...1 3 2 Controls overview 3 1 3 2 1 Front View of Vehicle 3 1 3 2 2 Rear View of Vehicle 3 3 3 2 3 Vehicle doors 3 5 3 2 4 Roof console controls 3 7 3 2 5 Centre console controls 3 9 3 2 6 Controls on v...

Page 4: ...4 1 Introduction 4 1 4 1 1 Accessibility to assemblies 4 1 4 1 2 Removing the cover 4 2 4 2 Fuel system 4 3 4 2 1 Specific safety instructions 4 3 4 2 2 Specification of diesel fuel 4 3 4 2 3 Refuell...

Page 5: ...g track 4 38 4 11 Suction port 4 39 4 11 1 Adjust suction port 4 39 4 12 Superstructure 4 40 4 12 1 Hand held suction hose SO 4 40 4 12 2 Refill and empty clear water tank 4 41 4 12 3 Refill Recircula...

Page 6: ...5 7 Weights and loads 5 3 5 8 Brakes 5 4 5 9 Cab 5 4 5 10 Sweeping unit Dirt hopper 5 4 5 11 Vehicle dimensions 5 5 5 12 Noise levels 5 6 5 13 Vibration 5 6 5 14 Tightening torques 5 6 5 14 1 General...

Page 7: ...p to familiarise yourself more easily with the vehicle thereby enabling you to use it more safely and efficiently Prior to the first drive carefully read Section 2 Safety Instructions as well in order...

Page 8: ...e passages in the text describing the effects or results of an activity 1 3 Abbreviations Symbols Abbreviation Symbol Explanation This symbol shows the direction of travel for better orientation in fi...

Page 9: ...one inquiries Vehicle type Serial no WMU _ _ _ _ _ _ _ _ _ _ _ _ _ _ Hako article no Commissioning date of registration Operating hours kilometre reading Engine no Hydraulic pump no Hydraulic motor no...

Page 10: ...e offset and inclined in the front part High driving comfort due to helical springs auxiliary rubber springs and hydraulic oscillation stabilisers Rigid axles on 4 trailing arms each and panhard rod f...

Page 11: ...r assembly Your authorised Hako dealer workshop will be pleased to inform you which implements and superstructures are possible and allowed for your vehicle All implements must have been released by H...

Page 12: ...the Citymaster used as a machine or other motor vehicle tool carrier must be bearer of a driving licence of the following classes Class C Motor vehicle of 3 5 tons and more with trailer of up to 750 k...

Page 13: ...ng licenses general certifications vehicle registrations etc Vehicle registration certificate Valid driving licence of vehicle driver Observe the relevant national regulations in your country Vehicle...

Page 14: ...le ID on chassis The Vehicle ID is stamped on the vehicle frame on the front right side behind the foothold Example WMU2X560V4W000001 Engine number The engine number is located on the diving groove en...

Page 15: ...ed Before working under a lifted dirt hopper make sure to have properly fastened the foldable safety stand The pinching hazard labels are located left and right on the tipper assembly Maximum vehicle...

Page 16: ...es Burning hazard due to heated surfaces of the cooling system The label is located at the radiator Rotating parts Risk of injury due to rotating parts of the cooling system The label is loca ted at t...

Page 17: ...the vehicle Measures for avoiding danger for the vehicle Important This symbol identifies instructions for a more efficient and economi cal use of the vehicle Environment Failure to observe the instr...

Page 18: ...not be liable for damage resulting from the failure to observe these regulations The safety of the vehicle can be negatively affected by carrying out vehicle modifications without proper authority and...

Page 19: ...ust therefore be kept in the storage compartment provided for in the cab Immediately complete or replace an incomplete or illegible operation manual Also read carefully all additional instructions whi...

Page 20: ...ified in the operation manual for routine checks inspections and maintenance work For the execution of service inspection maintenance or repair work tools and workshop equipment adapted to the task on...

Page 21: ...y barriers separating the work site from public roads Take the necessary precautions to ensure that the vehicle is used only when in a safe and reliable state Operate the vehicle only if all protectiv...

Page 22: ...downhill On sloping terrain always adapt your driving speed to the prevailing ground conditions Never change to a lower gear on a slope but always before reaching it Before leaving the operator seat...

Page 23: ...f the vehicle Adapt the handling accor dingly Fix the implements and the trailers with the specially required devices only Secure trailers and implements to prevent them from rolling away Trailer oper...

Page 24: ...aintenance Apart from the regular main inspection and according to 57 of the BGV 29 accident prevention regulations vehicles by German employer s liabi lity insurance association the Citymaster is to...

Page 25: ...ives PTO shaft drives blowers etc Prior to performing assembly work on the vehicle make sure all movable parts will not roll away or start moving Never work or stand under suspended loads Never use ve...

Page 26: ...uses with the specified current rating Switch off the vehicle immediately and rectify malfunction if trouble occurs in the electrical system Work on the electrical system may only be carried out by a...

Page 27: ...lations Safety Data Sheet Be careful when handling hot consumables risk of burning or scalding Battery When handling the battery observe the specific safety instructions and regulations relevant to ac...

Page 28: ...handling accordingly Empty the hopper and install the safety strut whenever working under the dirt hopper Nobody is allowed to stay in the zone of danger during the lifting or lowering of the dirt ho...

Page 29: ...trols contains information on the function and the handling of the individual telltales and controls of the vehicle The controls always have the same position numbers across all sections You can fold...

Page 30: ...3 Working light front option 4 Numberplate bracket front 5 Auxiliary headlight for low beam high beam headlight left 6 Additional turn indicator left 7 Wiper 8 Turn indicator left 9 High beam headligh...

Page 31: ...X56b310 fm 3 3 Operation Operation X56b310 fm 3 2 2 Rear View of Vehicle See inside...

Page 32: ...hopper 25 Sweeping unit 26 Suction port 27 Toolbox 28 Not used 29 Numberplate bracket rear 30 Brake light rear light turn indicator group rear fog light left with numberplate light 31 Not used 32 Safe...

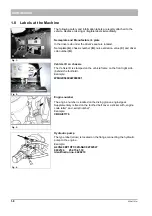
Page 33: ...X56b310 fm 3 5 Operation Operation X56b310 fm 3 2 3 Vehicle doors See inside...

Page 34: ...peration manual behind passenger s seat control device 53 Operator s seat 54 Brake pedal service brake 55 Accelerator pedal 56 Leg room air vent left 57 Lever on steering column left for steering colu...

Page 35: ...X56b310 fm 3 7 Operation Operation X56b310 fm 3 2 4 Roof console controls See inside...

Page 36: ...engine preheater yellow 86 Warning light brake fluid level red 87 Not used 88 Not used 89 Not used 90 Telltale rear fog light yellow 91 Telltale window heating and mirror heating option green 92 Tip s...

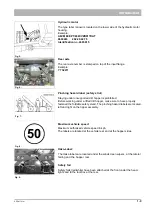
Page 37: ...X56b310 fm 3 9 Operation Operation X56b310 fm 3 2 5 Centre console controls See inside...

Page 38: ...d 118 Warning light parking brake 119 Tip switch dirt hopper LIFT LOWER 120 Tip switch dirt hopper flap OPEN CLOSED 121 Potentiometer for ground pressure of left brush 122 Potentiometer for ground pre...

Page 39: ...X56b310 fm 3 11 Operation Operation X56b310 fm 3 2 6 Controls on vehicle exterior See inside...

Page 40: ...t left brush 144 Water connection spray nozzles at right brush 145 23pin socket for superstructure 146 Advance to external control block green 147 LS demand dependent fluid supply to external control...

Page 41: ...ccor dance with its designated use and the instructions set out in the operation manual and only by persons who are fully aware of the risks involved in operating the vehicle Go through the Start up c...

Page 42: ...fficient fuel in the tank 3 20 2 Coolant level OK 4 16 3 Engine oil level OK 4 10 4 Oil level in hydraulic oil tank OK 4 24 5 Oil level in brake fluid tank OK 4 37 6 Water level in windscreen washer t...

Page 43: ...3 28 8 Select riding mode switch on transport ride mode 3 31 For workrides sweeping operation 1 Select riding mode switch on work ride mode 3 31 2 Select steering mode 3 28 3 Press Hako key 3 61 4 Se...

Page 44: ...ess Hako key 3 61 2 Parking brake applied 3 54 3 Cab locked especially if the vehicle cannot be supervised 3 54 When parking on public roads 4 Vehicle adequately secured 3 54 When parking on uphill an...

Page 45: ...ically when the direction indicator is set lever 60 81 Green Direction indica tor of trailer Periodically when the direction indicator is set lever 60 and there is an electric connection to the traile...

Page 46: ...Lights 85 Yellow Preheating system and engine control Lights when the key in ignition switch 58 is in pos 1 Does not light when the engine is already at operating temperature The engine can be started...

Page 47: ...itch 92 94 Green Transport mode When the transport mode is switched on tip switch 92 101 Green Front wheel stee ring When the front wheel steering is switched on tip switch 99 only in working mode tip...

Page 48: ...s displayed for more than four seconds this status is saved and displayed when the ignition is turned on again Operating parameters in the top area of the multifunction display In the middle area next...

Page 49: ...filter soiled Tipping construction rised Front implement carrier not in transport position Overload of the axial piston pump of the work hydraulics low supply Error message of hydrostatic control unit...

Page 50: ...forma tion Message con cerning an uncriti cal vehicle status only sounds in the case of undersupply and must be acknow ledged Pay attention to the information and correct the error Warning Message con...

Page 51: ...election is possible by pressing button A up or B down The selection arrow is confirmed by pressing button C means return to the next higher menu level Fig 20 A B C 126 Changes Reset Settings 85 4 km...

Page 52: ...tch back to position 0 Stop before switching again from position 1 to position 2 Fig 21 132 1 2 58 0 Fig 22 Stop Posi tion Function Power consumer 0 Stop Ignition OFF parking posi tion Insert or remov...

Page 53: ...ffect of diesel engine During long downhill stretches additionally brake in intervals Drive carefully and observe traffic conditions Danger In specific operating states as for example after riding thr...

Page 54: ...diately checked by a specialist Danger The brake power of the parking brake depends on the rear wheel with the lowest friction factor When the vehicle is parked on a slope with one rear wheel placed o...

Page 55: ...able braking effect of a loaded vehicle is reduced as compared to an unloaded vehicle Danger When a brake circuit fails brake warning light 86 lights the pedal can be pressed through much further and...

Page 56: ...mergency steering feature Do not lock the steering wheel in fully for more than 15 seconds A conti nuous full lock causes the servo pump to heat the hydraulic oil quite stron gly This can damage the s...

Page 57: ...r wheel drive stop the vehicle and move slowly the steering wheel to the left or the right by getting over the straight line ride point Select new steering mode Front wheel steering Generally used ste...

Page 58: ...ltale 100 four wheel steering flashes until the front axle reaches the straight ahead position Four wheel steering is switched on automatically Telltale 100 four wheel steering lights Front wheel stee...

Page 59: ...vehicle with accelerator pedal 55 in the selected direction until reaching the preset maximum speed at full throttle Cruise control Tip switch 129 allows riding the vehicle at constant driving speed A...

Page 60: ...When the vehicle is braked abruptly with the hydrostatic drive or when abruptly taking the foot from the accelerator pedal the brake lights are switched on to warn the following traffic Drive lever D...

Page 61: ...ngine speed is constant working mode The driving speed will regulated over the accelerator pedal In the case of cold hydraulic oil 30 C or soiled pressure filter the top speed limit is no longer reach...

Page 62: ...formed with combined switch 60 on the right of the steering column Operation of headlights low beam high beam Headlight flasher Direction indicator Horn Operation of wipers and washer system see page...

Page 63: ...by your authorised Hako workshop Headlight beam adjustment 130 must be in basic position 0 for this adjustment 0 Fig 37 60 1 2 Low beam high beam headlight flasher 0 Lever 60 in home position High be...

Page 64: ...trailer L R 0 Fig 39 60 Turn indicators LEFT L Press combined switch 60 to the front Telltale 80 flashes in trailer operation telltale 81 also flashes RIGHT R Pull combined switch 60 to the rear Tell...

Page 65: ...ear fog light can also be switched off by switching off the lights When the lights are switched on again the rear fog light also has to be switched on again Hazard warning system rocker switch Fig 41...

Page 66: ...king lights light only with the low beam or high beam swit ched on but not the parking light The working lights can also be switched off by switching off the lights The working lights must only be use...

Page 67: ...not adjust the auxiliary headlights Interior light Fig 45 108 1 0 A Auxiliary headlight change over switch option ON 1 Push lock A downwards and press rocker switch 108 on symbol Telltale in rocker s...

Page 68: ...the windscreen washer unit is located behind the passenger s seat see page 4 46 Fig 47 60 1 B 0 3 2 Wiper 0 Combined switch 60 in home position Wiper OFF 1 Turn combined switch 60 to the 1st position...

Page 69: ...with a warm water fan heating The heater of the vehicle can be set to 2 operating conditions Ventilation Heating A 3 stage fan blows air to the heater nozzles 61 of the windscreen and via the legroom...

Page 70: ...creen outside rearview mirror off again when the windows outside rearview mirrors are free High current consumption After approx 10 minutes the heated windscreen outside rearview mirror are switched o...

Page 71: ...ct switch In case of excessive seat springing adjustment travel drive cannot be activated Use handwheel D to continuously adjust the seat suspension to the operator s weight possible ranges from 50 13...

Page 72: ...belt before moving or working with the vehicle Do not twist the seat belt The seat belt must run across the pelvis not the stomach and always sit firmly Do not place the seat belt over hard edged or...

Page 73: ...t belt by pulling at the end The seat belt must always rest firmly on the pelvis Taking off the seat belt Take off seat belt 49 as follows Hold the seat belt Press red button B on lock 50 Buckle latch...

Page 74: ...losing doors Door openers inside To open the doors pull lever 43 or 44 Important The doors can be unlocked and locked only with the door key from the outside Side window left right The left right side...

Page 75: ...the driving and rest times driving speeds and distances Data are digitally recorded in parallel by vehicle related digital tachograph and by driver related chip card The tachograph 69 is located in th...

Page 76: ...er Press in cigarette lighter 132 Cigarette lighter 132 returns to its initial position after a couple of seconds and can be pulled out to light a cigarette When using as socket Pull out cigarette lig...

Page 77: ...vehicle serve for com munication and control between the control panel in the cab and imple ments Sockets at the front 12 23 polig for sweeping unit Socket at the rear Socket at the rear 154 13 polig...

Page 78: ...witched off Parking brake 63 is applied Press down brake pedal 54 to check after a maximum of half the pedal travel firm resistance can be felt on the pedal 3 5 2 Starting the engine General The engin...

Page 79: ...p Turn the ignition key to position 2 and hold it in this position until the engine starts Release the ignition key When the engine has started Check that the following warning lights have gone off Wa...

Page 80: ...steering mode Service brake Danger The brake lights at the rear of the vehicle do not light up when the Parking brake is applied When driving on public roads and during work operation use the brake pe...

Page 81: ...tyres the maximum speed on even ground is reached at engine revolutions of 2700 to 2900 rpm This means that after the acce leration phase accelerator pedal 55 can be released somewhat when dri ving on...

Page 82: ...Pull parking brake lever 63 Warning light 87 lights 3 5 7 Parking the vehicle Danger Vehicles parked on slopes may roll away Use the parking brake to park the vehicle safely and to pre vent it rolling...

Page 83: ...load the wheels are not spinning and Differential lock tip switch 97 Switch on the differential lock of the rear axle with tip switch 97 Important The differential lock can be switched on while drivi...

Page 84: ...ng Danger Turning the steering wheel requires greater effort if the diesel engine breaks down The power brakes do not work when the engine is at a standstill The brake pedal has to be pressed much har...

Page 85: ...Switch on the front wheel steering Switch drive range selector 92 to transport mode Switch on towing operation switch 72 Fit an adequately sized towing bar to the towing facilities If possible run the...

Page 86: ...ge appears on the multi functional display and a warning signal sounds If the fluid temperature in the circuit rises to 85 C the main consumer axes are additionally switched off If the fluid temperatu...

Page 87: ...sonnel only is authorised to operate the manual EMERGENCY control in emergencies The electro magnetically operated Load Sensing control blocks with manual EMERGENCY control are located behind the driv...

Page 88: ...e brush and fan speeds are again aligned to the set potentiometer value no limit In the case of cold oil when switching to Work mode the engine remains at 1100 rpm no power is supplied to the ECO swit...

Page 89: ...s running only after dirt hopper has been lowered and the hop per flap closed 3 6 4 Front Power Lift Use tip switch 140 on the central panel to operate the front power lift 11 Fig 72 1 0 138 Tip switc...

Page 90: ...for recirculation water supply Service operation for cleaning the recirculation water supply To open the recirculation water supply for cleaning lift up the lifter hopper The sweeping process startet...

Page 91: ...weeping unit so as to direct a water jet in front of the brushes to bind the dust and to humidify the sur face in front of the brushes to be cleaned Tip switch 116 lows to switch on and off the clean...

Page 92: ...rush is pressed down Fig 80 124 123 Potentio meter 123 Effect 0 10 Left brush drive supplied with hydraulic fluid Potentio meter 124 Effect 0 10 Right brush drive supplied with hydraulic Fig 81 116 1...

Page 93: ...an water tank 23A is located below the dirt hopper and holds 350 litres The clean water pump 23B delivers the clean water to the spray nozzles at the sweeping brushes and to the pipe at the suction po...

Page 94: ...by 1 4 open lock direction flap is unlocked Plug the lever extension 3 which is stored inside the cabin onto lever 1 Press the locking plate 2 and pull lever downwards If bottom flap is closed use han...

Page 95: ...lap of the dirt hopper Caution Set engine to increased idling speed before emptying the dirt hopper Tip switch for lifting lowering dirt hopper Tip switch for opening closing hopper flap Fan drive pot...

Page 96: ...f when the Faster Winter Service function is activated To start the engine the Faster Winter Service function must be switched off Start lock If a brush system is attached when Faster Winter Service i...

Page 97: ...seat The potentiometer 124 continuously modifies the flow volume of the hydraulic fluid in the cylindrical broom drive The joystick 137 controls the lift lower cylindrical broom drive ON OFF and swive...

Page 98: ...e driver s seat Potentiometer 125 continuously controls the flow volume of the hydraulic fluid in the spreader cylinder drive The work tip switch Hako key is used to switch the spreader cylinder drive...

Page 99: ...ting brush is simply replaced by the weed brush The angle of the weed brush head is adjusted by means of two buttons in longitudinal direction by button 113 and in lateral direction by button 139 139...

Page 100: ...cture guidelines must be mounted and opera ted Unintentional actuation of the operating elements for work hydraulics especially when driving on public road may cause Attachment of extremely heavy impl...

Page 101: ...er implement has been safely lifted Turn off engine Engage parking brake Mount protection of front device A M16 hexagonal screw and washer Connect hydraulic connections if required Connect electric sy...

Page 102: ...ng instructions of the implement If required connect additional lighting by socket SO If existent remove support stands of the implement Dismount implement Lift implement Turn off engine Engage parkin...

Page 103: ...e GmbH or imple ments offered as retrofit variants and complying with the superstructure guidelines may be mounted and operated Unintentional actuation of the operating elements for work hydraulics es...

Page 104: ...3 76 X56b350 fm Operation...

Page 105: ...ctive help The maintenance plans see page 4 63 state when the maintenance work mentioned below must be carried out 4 1 1 Accessibility to assemblies Assemblies to be serviced are accessed as follows W...

Page 106: ...engine cover A To do this Loosen snap clip B Remove engine cover A Install the engine cover in reverse order after completing maintenance and repair work Removing the radiator cover For maintenance an...

Page 107: ...tion of diesel fuel Only use high grade fuels according to DIN EN1 590 with a Cetan num ber2 of at least 49 Winter operation With decreasing outside temperatures the flow property of the diesel fuel i...

Page 108: ...General If possible only refuel from stationary fuel pumps Fuel from drums or canisters is usually soiled Even the smallest particles of dirt can cause Increased engine wear Malfunctions in the fuel...

Page 109: ...he fuel system drained by an authorised workshop with consideration of the environmental standards and fill again with diesel fuel Cleaning the fuel tank Environment Use a suitable container to collec...

Page 110: ...runs on hot engine parts or on the exhaust pipe Risk of fire Never bleed the fuel system when the engine is hot Bleed the fuel system as follows Important Volkswagen supply with special tools test con...

Page 111: ...amage and correct seat and replace if necessary Place filter cover A on filter housing E Make sure that the centring pins fit into the recesses arrows in filter cover A Attach filter cover A using scr...

Page 112: ...s not possible to clean the fuel filter Replace the fuel filter for the first time after 50 operating hours Replace the fuel filter at regular intervals every 600 operating hours or at the latest ever...

Page 113: ...housing E with fuel Replace seals F and G check for correct seat Place filter cover A on filter housing E Make sure that the centring pins fit into the recesses arrows in filter cover A Attach filter...

Page 114: ...ery day preferably before you start working with the oil dipstick Engine oil dipstick A is located on the left side of the vehicle behind the fuel tank and is accessible from the outside Check the eng...

Page 115: ...el as follows Park vehicle on level ground and secure against rolling away Switch off the engine pull the ignition key Raise the dirt hopper and check the position of the safety strut see page 3 65 Re...

Page 116: ...r Specification see page 4 62 Change the engine oil as follows Warm up the engine As soon as the oil temperature is about 80 C Park vehicle on level ground and secure against rolling away Raise the di...

Page 117: ...operating hours as well as after the first 300 operating hours then every 300 operating hours at the latest every year see page 4 62 Change the filter as follows Drain the engine oil see page 4 12 Loo...

Page 118: ...e Clean the outside of the radiator at regular intervals Cleaning inter vals see page 4 63 In dusty or dirty work conditions clean more frequently than indicated in the maintenance plans An insufficie...

Page 119: ...em must be filled with a mixture of water and coolant agent G 12 plus observe instructions on container or an additive with the specification TL VW 774 D The cooling system contains approx 12 l coolan...

Page 120: ...ightly above the middle if the engine is warm If the coolant level is below the MIN mark Add coolant Check the mixing ratio of the coolant Topping up the coolant level Raise the dirt hopper and check...

Page 121: ...well filtered water with a low content of lime to fill the cooling system after it has been cleaned The coolant must always be refined with 50 coolant agent G 12 plus or an additive with specification...

Page 122: ...radiator at regular intervals for outside contamination see page 4 63 Completely remove all foreign bodies from the radiator fins Exterior cleaning of charge air cooler and radiator Park vehicle on ev...

Page 123: ...erating hours as well as after the first 300 operating hours as well as regularly every 300 operating hours Change the V ribbed belt and the tensioning pulley every 600 operating hours Check new V bel...

Page 124: ...at the base of ribs a Dirt or stones b Wear on flanks ribs are pointed d new ribs have a trapezoidal shape c and fibres are visible at the base of the ribs brighter spots e Fibres torn out at sides f...

Page 125: ...l Caution Check the toothed belt for the first time after 300 operating hours then every 300 operating hours for dirt damage and correct tension Change the toothed belt every 1200 operating hours The...

Page 126: ...nt Replace the filter element If the warning message is displayed Every 600 operating hours see page 4 63 4 5 1 Replacing the filter cartridge Replace as follows Park vehicle on even ground and secure...

Page 127: ...is reason Only use authorised oils Always top up the hydraulic oil before the level gets too low If the hydraulic system is filled with biodegradable oil then only use biodegradable oil of the same ty...

Page 128: ...for the hydraulic oil is made of plastic material Be careful when opening or closing the filter housing risk of breakage Do not tilt the lock as this could damage the thread Do not top up the hydrauli...

Page 129: ...tank The oil drains into the container Remove complete filter element D with filter pot E Clean filter pot E Flush out the hydraulic oil tank with a little fresh hydraulic oil Install filter pot E and...

Page 130: ...oil see page 4 63 The condensation water in the hydraulic oil tank must be drained every 600 operating hours but in any case before the cold season starts The water content should not exceed 0 1 by w...

Page 131: ...off the engine Unscrew screw plug B of the return filter Remove complete filter element D with filter pot E Dispose of filter element D according to local or national environment protection regulatio...

Page 132: ...gine pull the ignition key Unscrew breather filter H Screw on new breather filter H 4 6 7 Breather filter of the vacuum valves A breather filter to ventilate the vacuum valves is located in the cab on...

Page 133: ...the hydraulic pump of the vehicle and is accessible from below the vehicle Change the filter element of the pressure filter as follows Switch off the engine Place a drip pan under the hydraulic pump...

Page 134: ...minor leaks Never use an unprotected light or open flame Make sure hose lines are not twisted when they are repla ced Leakage and damaged lines must be repaired or replaced as quickly as possible This...

Page 135: ...p when you notice leaks Environment Collect drained or spilt gearbox oil in a suitable container and dispose of it according to local or national environment protec tion regulations Important Only use...

Page 136: ...t overflows specification see page 4 62 Check the oil levels again after a couple of minutes and add oil as required Screw in oil filler plugs E with new sealing rings to make oil tight seals Changing...

Page 137: ...w the oil drain plug Environment Collect drained or spilt gearbox oil in a suitable container and dispose of it according to local or national environment protec tion regulations Important Only use ne...

Page 138: ...ust overflows specification see page 4 62 Check the oil levels again after a couple of minutes and add oil as required Screw in oil filler plugs E with new sealing rings to make oil tight seals Changi...

Page 139: ...er the first 50 operating hours as well as after the first 300 operating hours Then regularly every 300 operating hours or more often as necessary There are 2 grease nipples on either side of the axle...

Page 140: ...drained or spilt brake fluid in a suitable container and dis pose of it according to local or national environment protection regulations Important Maintenance intervals for the hydraulic brake syste...

Page 141: ...p original brake fluid see page 4 62 up to the MAX mark Firmly screw filler cap B back on Make sure there is no leakage 4 9 3 Parking brake camshafts Lubricating the parking brake camshaft The parking...

Page 142: ...the lift out arms have been set in the factory With the lowered sweeping unit the sweeping track on the floor see draft X should be as follows R h brush 10 to 4 o clock L h brush 8 to 2 o clock As we...

Page 143: ...o the dirt hopper through the suction pipe 26A Clearance of the sealing strip 26B around the suction port has to amount to 10mm Before ground clearance adjustment loosen the caster roller holder 26C I...

Page 144: ...tion hose SO The hand held suction hose is used for effective cleaning of grass verges and beds as well as for emptying dirt baskets etc Lift dirt hopper 24 with tip switch 119 and place the insertion...

Page 145: ...he sensor 23C and shown on multi function display 126 The pump 23B delivers clear water to the spray nozzles at the sweeping unit and to the handheld suction hose Open valve 23E for emptying the clear...

Page 146: ...o open the hopper flap 24A hinge a water hose into the hopper and fill with water Refer to draft X for water level Use the valve on the soiled water tank 24D to drain the recirculatory water system 4...

Page 147: ...ed tyre types and the correct tyre pressures New tyres do not have optimum adhesion and therefore should be run in for about 100 kilometres whilst driving carefully Worn tyres mean worse grip on the r...

Page 148: ...agonally front right with rear left and front left with rear right 4 13 2 Changing wheels Caution All repair work on tyres and rims may only be carried out by authorised specialist workshops The wheel...

Page 149: ...hown in Fig 135 Fit caps of the wheel nuts Retighten the wheel nuts after driving about 50 km in the above sequence and with the prescribed torque 4 13 3 Snow chains option Fit snow chains on tyre siz...

Page 150: ...er tank cover A and fill up the tank Important Fill with clean tap water only Add a suitable cleaning agent if necessary see page 4 62 In winter Add antifreeze for windscreen washer units to the water...

Page 151: ...g normal battery operation an oxyhydrogen mixture is formed in the battery cells risk of explosion Do not attempt to jump start the vehicle if the battery is frozen or if the acid level is low The bat...

Page 152: ...circuit Always replace light pulbs only with new once with the same version and rating amperage Do not touch the glass piece of the halogen light with your bare fingers The finger print can evaporate...

Page 153: ...adlight plate C downward Front light beam headlight To change the light bulb in the high beam headlight Remove cable plug D Remove sealing cap E Press tension spring F together with your fingers and r...

Page 154: ...bulb G on lamp socket do not touch glass piece and insert it in the headlight Check the locking device which ensures the correct position of the light bulb G in the headlight see figure Fit tension s...

Page 155: ...ndicator To do thos Press in bow clip arrow and pull off plug K at the same time Turn light bulb socket 90 counterclockwise whilst holding on the turn indicator Pull light bulb socket out of the turn...

Page 156: ...indicator M Brake light N Rear light and numberplate light O Rear fog light Q Auxiliary headlight option and working light option To change the light bulbs of the auxiliary headlights and working ligh...

Page 157: ...ewdriver as shown in the figure Change light bulb and fit interior light back in again Rotating bacon To change the light bulb of the rotating beacon Press in the lock arrow on the bottom of the lamp...

Page 158: ...erefore be checked by your authorised Hako workshop before installing the new fuse Only use fuses with the specified load capacity amperage see page 5 8 Only test the engine with the battery connected...

Page 159: ...r If the acid density is below 1 21 kg l Disconnect and recharge battery A Removing the battery To do this proceed as follows Before disconnecting the battery first disconnect the consumers which are...

Page 160: ...rk carefully Wear goggles and protective clothing Do not aim the compressed air at the skin or at other people Do not use compressed air to clean your clothing When using a high pressure cleaner or st...

Page 161: ...terials You can use these also for plastic parts inside the vehicle Do not use paint cleaners or products containing solvents methanol or hydrocarbon Cleaning glass surfaces Use special glass cleaning...

Page 162: ...ng works described in the following at least at daily intervals and yet more often in case of heavy soiling Do not use steam or high pressure cleaning equipment Do not direct water jet on electric or...

Page 163: ...system with tip switch 115 and let water run until clear water comes out of the suction port Lower dirt hopper and close hopper flap Switch on fan and connect water hose to fan fitting see page 4 42...

Page 164: ...in the following table Guarantee and warranty claims will be considered only when all mainte nance intervals were performed by an authorised workshop and registe red Hako Werke GmbH In this context w...

Page 165: ...4500 A D 4800 A B C E 5100 A 5400 A B 5700 A 6000 A B C D F 6300 A 6600 A B 6900 A 7200 A B C E 7500 A D 7800 A B 8100 A 8400 A B C 8700 A 9000 A B D F After opera ting hours Maintenance plan Date Ope...

Page 166: ...DTE 15M Mobil DTE 10 Excel 46 year round 58 l Biodegradable oil on ester basis Panolin HLP SYNTH 46 Plantosyn 3268 ECO Aral Vitamin EHF 46 year round Reduction gearbox and transfer gearbox Hypoid gear...

Page 167: ...y 2 years Antifreeze 6 Every 2 years Control fuel tank drain 1 5 Change fuel filter 15 Every year Change air filter insert e clean air filter housing 21 According to indicating instru ment Breather fi...

Page 168: ...Steering system Service and parking brake Engine oil level Brake fluid Windscreen washer liquid Hydraulic fluid Battery check electrolyte level and charge condition clean and grease battery poles Che...

Page 169: ...necessary Check wheel damage air pressure tread depth Change high pressure hoses of drive system Every 3000 hours or every five years Change hydraulic hoses except high pressure hoses of drive system...

Page 170: ...ront axle and rear axle option 9 23 And after cle aning with high pressure cleaner Hinges joints and fittings e g cab safety strut Sweeping unit 27 49 Dirt hopper 50 52 Work description a Explanation...

Page 171: ...lso refer to the operation and maintenance manual of the engine implement manufacturer b Performance of the work after the first 50 and 300 operating hours by an authorised workshop is required for th...

Page 172: ...4 68 X56b570 fm Maintenance 4 19 Lubrication plan X56077 N13 0754 2 22 25 26 6 1 18 7 23 15 3 21 24 10 8 17 16 19 5 20 4 9 Maintenance...

Page 173: ...X56b570 fm 4 69 Maintenance 32 27 31 28 29 30 31 30 29 28 27 32 34 35 33 34 33 35 33 33...

Page 174: ...4 70 X56b570 fm Maintenance...

Page 175: ...Control Bosch Engine management with electronic diesel control Cooling Water cooling as closed overpressure system with water pump installed on the engine block and separate expansion tank Displaceme...

Page 176: ...red by a pressure relief valve 5 5 Steering Steering is provided by hydrostatic single circuit steering without feedback power steering system with purely hydraulic transmission Both axles have steeri...

Page 177: ...tification 109R 112H 112 110 R 115N Tyre pressure front rear bei 1225 kg 5 5 bar 5 5 bar bei 1288 kg 3 0 bar 3 0 bar bei 1225 kg 5 0 bar 5 0 bar Wheel nuts tightening moment 280 5 Nm 280 5 Nm 280 5 Nm...

Page 178: ...brake via pull cable and cam Diameter Simplex drum brake 180 x 30 mm Cab Seats 2 Driver s seat Suspended seat Air suspension option Passenger s seat Unsprung suspended seat option Heating airconditio...

Page 179: ...r track width 1033 E Wheel base 1900 F Sweeping unit 1197 G Rear overhang with superstructur 643 Front clearance angle 14 Rear clearance angle 34 H Overall height 1995 Height of rotating beacon 2200 K...

Page 180: ...sulation package 111 dB A 99 dB A SO Effective acceleration value for the upper extremities of the body 2 5 m s2 Effective acceleration value for the body 0 5 m s2 Screw dimensions Tightening torques...

Page 181: ...our country The drive steering mode switch over and work hydraulics are each con trolled by an electronic control unit These three control units are intercon nected via a CAN bus according to ISO 1189...

Page 182: ...fog light F10 7 5 A 58 Left parking light F11 7 5 A 58 Right parking light F12 5 A 58 Lighting speedometer operation unit switch light relay front working light F13 15 A X Front working light option...

Page 183: ...heater lambda sensor changeover valve cooling and exhaust gas recircu lation valve F43 15 A 30 Hazard warning system F44 15 A 30 Rotating beacon option F45 10 A 30 Brake lights F46 10 A 30 Interior li...

Page 184: ...auxiliary headlights option K33 3 Switch over relay for direction indicator right K33 2 Switch over relay for direction indicator left K35 8 Relay for low beam K35 5 Switch over relay for high beam K...

Page 185: ...nvironment Never open batteries or damage them Never touch inhale or swallow any material inside batteries Health hazard Never allow batteries to pollute the environment Risk of con taminating the gro...

Page 186: ...hinen Schrubbautomaten Polishers Scrubbers Lustreuses Autolaveuses Au enreinigungs Maschinen Machines for outdoor cleaning Machines pour l entretien des surfaces urbaines Mehrzweck maschinen Multi pur...

Reviews: