background image

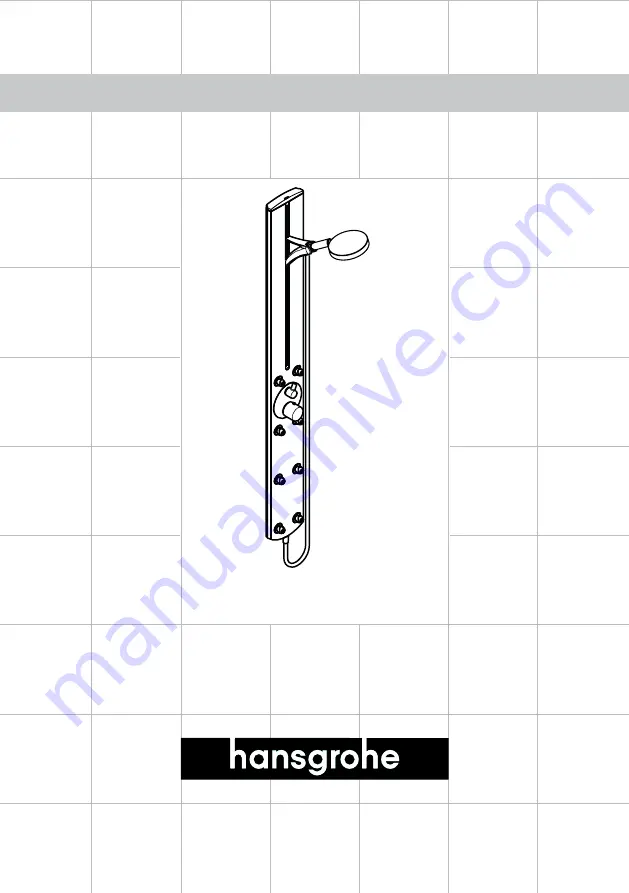
Raindance Showerpanel

27100XX1

Installation Instructions / Warranty 

Summary of Contents for Raindance Showerpane

Page 1: ...Raindance Showerpanel 27100XX1 Installation Instructions Warranty...

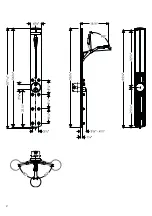
Page 2: ......

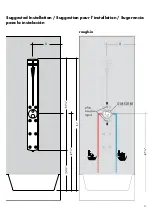
Page 3: ...Suggested Installation Suggestion pour l installation Sugerencia para la instalaci n rough in...

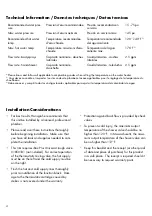
Page 4: ...iques Datos tecnicos Installation Considerations For best results Hansgrohe recommends that this unit be installed by a licensed professional plumber Please read over these instructions thoroughly bef...

Page 5: ...rent la date et l endroit de l achat pour ce produit dans un endroit s r Le re u est requis si vous commandez des pi ces sous garantie Consideraciones para la instalaci n Para obtener mejores resultad...

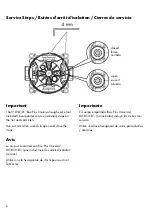
Page 6: ...wrench to open and close the stops Importante El cuerpo empotrado iBox Plus Universal 01850181 no incluidos incluye los cierres de servicio Utilice una llave hexagonal de 4 mm para abrirlas y cerrarl...

Page 7: ...x0 97117000 28406xx0 97326xx0 97327000 97328000 97329000 96446xx0 96451000 96421xx0 38391xx1 23x2 25x2 94073000 25x2 94282000 96525000 96439xx0 95037000 29x2 96435000 96179000 16x2 39x2 47x2 128x3 135...

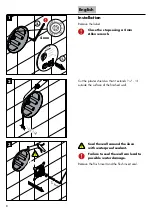
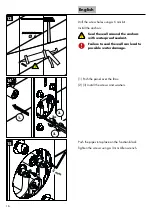
Page 8: ...en wrench Cut the plaster shield so that it extends outside the surface of the finished wall Seal the wall around the i box with waterproof sealant Failure to seal the wall can lead to possible water...

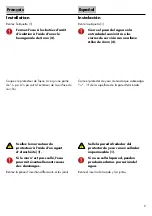
Page 9: ...l l eau pourrait ventuellement causer des dommages Retirez la pi ce d insertion affleurante et les joints Instalaci n Retire la etiqueta 1 Cierre el paso del agua en la entrada del suministro o los ci...

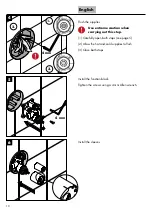
Page 10: ...ion when carrying out this step 1 Carefully open both stops see page 5 2 Allow the hot and cold supplies to flush 3 Close both stops Install the function block Tighten the screws using a 4 mm Allen wr...

Page 11: ...z les deux arr ts Installez le bloc de fonction Serrez les vis l aide d une cl hexagonale de 4 mm Installez les douilles Limpie los suministros Utilice cuidado extremo al llevar a cabo este paso 1 Abr...

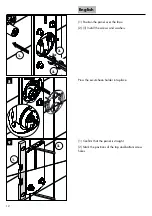
Page 12: ...sition the panel over the iBox 2 3 Install the screws and washers Press the escutcheon holder into place 1 Confirm that the panel is straight 2 Mark the positions of the top and bottom screw holes 7 1...

Page 13: ...ce que le panneau soit bien droit 2 Marquez les positions des trous de vissage sup ri eur et inf rieur 1 Coloque el panel sobre la caja iBox 2 3 Instale los tornillos y las arandelas Presione el sopo...

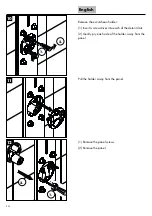
Page 14: ...cutcheon holder 1 Insert a screwdriver into each of the detent slots 2 Gently pry each side of the holder away from the panel 1 Remove the panel screws 2 Remove the panel Pull the holder away from the...

Page 15: ...c t du support pour le sortir doucement du panneau Retirez le support du panneau 1 Retirez les vis du panneau 2 Retirez le panneau Retire el soporte del escudo 1 Inserte un destornillador en cada una...

Page 16: ...around the anchors with waterproof sealant Failure to seal the wall can lead to possible water damage 1 Push the panel over the iBox 2 3 Install the screws and washers Push the pipes into place on the...

Page 17: ...Installez les tuyaux sur le bloc de fonction Serrez les vis l aide d une cl hexagonale de 3 mm Perfore los orificios para tornillos con una broca de 6 mm Instale los pernos de anclaje Selle la pared a...

Page 18: ...18 English Install the escutcheon holder 1 Confirm that the panel is level 2 Install the screws Tighten the screws Install the insert in the top of the panel Tighten the screws 1 2 16 17 18...

Page 19: ...allez les vis Serrez les vis Installez la pi ce d insertion dans la partie sup rieure du panneau Serrez les vis Instale el soporte del escudo 1 Verifique que el panel quede nivelado 2 Instale los torn...

Page 20: ...20 English Open the stops Install the escutcheon Install the handle adapters Tighten the screws using a 3 mm Allen wrench 3 mm 19 20 21...

Page 21: ...es Installez l cusson Installez les adaptateurs de poign e Serrez les vis l aide d une cl hexagonale de 3 mm Abra las llaves de paso Instale el escudo Instale los adaptadores de manija Apriete los tor...

Page 22: ...the thermostatic mixer handle Tighten the screw using a small slot head screwdriver Install the top cover Install the hose washer and handshower hose Insert the screen washer in the other end of the h...

Page 23: ...dans son support R glez la poign e voir page 22 R glez la but e limite de l eau chaude si n cessaire Lubrique los adaptadores de manijas con una capa ligera de grasa blanca Instale la manija del distr...

Page 24: ...s or a sponge If the flow of water reduces over time remove the screen washer Rinse the screen washer with clear water and replace Remove scale deposits from the spray face by soak ing it in a commerc...

Page 25: ...l tel que Lime Away ou CLR Suivez les instructions figurant sur l tiquette du produit Limpiar Elimine los dep sitos calcificados de los canales de rociado frot ndolos con los dedos o una esponja Si el...

Page 26: ...26 English Rinse the handshower with clear water Install the handshower and flush it for at least one minute...

Page 27: ...ol Rincez la douchette l eau claire Installez la douchette et faites la fonctionner pendant au moins une minute Enjuague la ducha de mano con agua limpia Instale la ducha de mano y l vela durante un m...

Page 28: ...28 Set the high temperature limit stop R glez la but e de limite d eau chaude Fije el tope de l mite de alta temperatura Justify the handle R glez la poign e Ajuste el mando 1 2 3 1 2 3...

Page 29: ...29 Adjustment Ajustement Ajuste User Instructions Instructions de service Manejo harder plus difficile m s pasedo easier plus facile m s ligero...

Page 30: ...30 User Instructions Instructions de service Manejo...

Page 31: ...artridge seal or replace diverter cartridge Problema Causa Soluci n Sale poca agua presi n insuficiente comprobar presi n filtro del termoelemento sucio limpiar filtro filtro de la ducha sucio limpiar...

Page 32: ...rop basse La temp rature d eau chaude est trop basse Augmentez la temp rature d eau chaude entre 42 C et 65 C Le r glage de la temp rature n est pas possible L l ment thermostatique est encrass ou ent...

Page 33: ...soaps shampoos and shower foams can also cause damage so rinse with clean water after use The damage of already damaged surfaces will deteriorate under the effect of the cleansers Components with dama...

Page 34: ...es previstos espec ficamente para este campo de aplicaci n No aplicar detergentes que contengan cido clorh drico f rmico o ac tico porque pueden causar da os importantes Detergentes que contienen cido...

Page 35: ...t to Hansgrohe Commercial products and ii for 5 years with respect to Axor products THIS WARRANTY DOES NOT COVER AND HANSGROHE WILL NOT PAY FOR A Conditions malfunctions or damage not resulting from d...

Page 36: ...sequential damages so the above limitation or exclusion may not apply to you This warranty gives you specific legal rights and you may also have other rights that vary from state to state TO THE EXTEN...

Reviews: