background image

HKS18560CNFI

Gebrauchsanleitung

Anleitung/Version:
2301-00706_DE_2021123
Bestell-Nr.: 56230868
Nachdruck, auch auszugs-
weise, nicht gestattet!

Kühlschrank

Summary of Contents for HKS18560CNFI

Page 1: ...HKS18560CNFI Gebrauchsanleitung Anleitung Version 2301 00706_DE_2021123 Bestell Nr 56230868 Nachdruck auch auszugs weise nicht gestattet K hlschrank...

Page 2: ...ich best cken DE 19 Qualit t erhalten DE 20 Pflege und Wartung DE 21 T rdichtungen kontrollieren und reinigen DE 21 Au enw nde reinigen DE 21 Innenbereich reinigen DE 21 R ckseite reinigen DE 22 Innen...

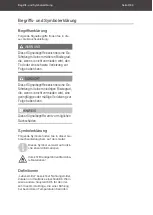
Page 3: ...it einem niedrigen Risikograd die wenn sie nicht vermieden wird eine geringf gige oder m ige Verletzung zur Folge haben kann HINWEIS Dieser Signalbegriff warnt vor m glichen Sachsch den Symbolerkl run...

Page 4: ...cht bestimmungsgem und kann zu Sach sch den oder sogar zu Personensch den f hren Der Hersteller bernimmt keine Haftung f r Sch den die durch nicht be stimmungsgem en Gebrauch entstanden sind Sicherhei...

Page 5: ...ons und Montage arbeiten an das elektrische Netz ange schlossen werden n Niemals das Geh use ffnen n Netzkabel Netzstecker Netzkabel so verlegen dass es nicht zur Stolperfalle wird Netzkabel nicht kni...

Page 6: ...n Mechanische Eingriffe in das K lte system sind nur autorisierten Fach kr ften erlaubt n Den K ltemittelkreislauf nicht besch digen z B durch Aufstechen der K l temittelkan le des Verdampfers mit sc...

Page 7: ...der vom Hersteller empfohlenen Bauart entsprechen n Ger t von offenem Feuer und hei en Fl chen fernhalten Risiken im Umgang mit K hlger ten WARNUNG Brandgefahr Unsachgem er Umgang mit dem Ger t kann...

Page 8: ...r Inbetriebnahme das K hlger t 2 Stunden aufrecht stehen lassen W h renddessen flie t das Schmiermittel in den Kompressor zur ck HINWEIS Gefahr von Sachsch den Unsachgem er Umgang mit dem Ger t kann z...

Page 9: ...das Ger t aus 2 Entfernen Sie alle Verpackungsteile Kunststoffprofile Klebestreifen und Schaumpolster 3 Pr fen Sie ob die Lieferung vollst ndig ist 4 Kontrollieren Sie ob das Ger t Trans portsch den...

Page 10: ...g mit dem Ger t kann zu Verletzungen oder Gesundheits sch den f hren n Den K ltekreislauf nicht besch digen z B durch Aufstechen der K ltemittel kan le des Verdampfers mit scharfen Gegenst nden Abknic...

Page 11: ...lbar neben einem Ofen Herd oder Heiz k rper 3 Wenn am Aufstellungsort eine Fu bo denheizung installiert ist stellen Sie das K hlger t auf eine Isolierplatte aus fes tem Material Sorgen Sie daf r dass...

Page 12: ...Seite DE 12 Inbetriebnahme Mindestabst nde und Raumgr e Raumbedarf nach Ger tema en A 1850 mm B 595 mm C 100 mm D 644 mm E 1057 mm F 75 cm G 100 mm H 135 I 1017 mm ohne T rgriff...

Page 13: ...turen von 16 C bis 38 C be stimmt tropische Zone T Dieses K hlger t ist f r die Verwendung bei Umge bungstemperaturen von 16 C bis 43 C be stimmt Sinkt die Raumtemperatur wesentlich darunter schaltet...

Page 14: ...Trennvorrichtung gem berspannungskategorie III in der Hausinstallation mit mindestens 3 mm Kontaktabstand vorgeschaltet sein ziehen Sie gegebenenfalls eine Fachkraft zurate siehe Kapitel Ser vice n Ne...

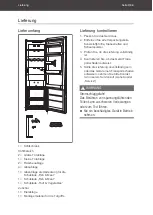
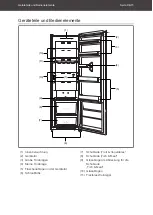
Page 15: ...6 7 8 11 1 9 10 1 10 1 Innenbeleuchtung 2 Ger tet r 3 Gro e T rablagen 4 Kleine T rablage 5 Flaschenablagen in der Ger tet r 6 Schraubf e 7 Schublade Fruit Vegetables 8 Schublade Fish Meat 9 Glasablag...

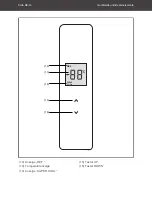
Page 16: ...Seite DE 16 Ger teteile und Bedienelemente 88 SUPER REF C COOL 12 13 14 15 16 12 Anzeige REF 15 Taster UP 13 Temperaturanzeige 16 Taster DOWN 14 Anzeige SUPER COOL...

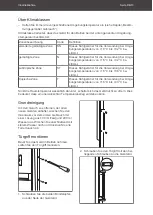
Page 17: ...geschaltet ist lassen Sie die T ren leicht ge ff net damit sich kein Schimmel bil det Temperatur einstellen VORSICHT Gesundheitsgefahr Das Ger t arbeitet eventuell nicht ein wandfrei wenn es ber l nge...

Page 18: ...r DOWN 16 Die Ablagen und Schubladen Die effizienteste Energienutzung f r Ihr Ge r t erzielen Sie wenn Sie die Schubladen Glas und T rablagen wie im Kapitel Ge r teteile und Bedienelemente gezeigt kom...

Page 19: ...h in geeigne ten Beh ltern im K hlschrank so auf bewahren dass es andere Lebensmit tel nicht ber hrt oder auf diese tropft n Wenn das K hl Gefrierger t l ngere Zeit leer steht das Ger t ausschalten ab...

Page 20: ...Sie frisches Obst und Gem se in der Schublade Fruit Vegetables 7 Lagern Sie Frischfleisch Wild Gefl gel Speck Wurst und rohen Fisch in der Schublade Fish Meat 8 Dort ist die Temperatur am niedrigsten...

Page 21: ...T rdichtungen kontrollieren und reinigen Die T rdichtungen m ssen regelm ig kontrolliert werden damit keine warme Luft in das Ger t eindringt 1 Klemmen Sie zur Pr fung ein d nnes St ck Papier an vers...

Page 22: ...ie Schub lade und die T rablagen wieder ein 13 Legen Sie die Lebensmittel zur ck in den K hlbereich 14 Stecken Sie den Netzstecker wieder in die Steckdose und aktivieren Sie das Schnelle K hlen wie im...

Page 23: ...tst ndig ein Ger t k hlt zu stark Temperatur zu niedrig eingestellt H here Einstellung w hlen siehe Kapitel Temperatur einstellen Ger t k hlt nicht ausreichend Temperatur zu hoch ein gestellt Niedrige...

Page 24: ...ieren Sie unseren Service E5 Fehler des Abtauf hlers im K hlraum Trennen Sie das Ger t von der Stromversorgung und kontak tieren Sie unseren Service E6 Kommunikationsfehler Trennen Sie das Ger t von d...

Page 25: ...eh lersuchtabelle beheben l sst Sie weiteres Zubeh r bestellen m chten Die Kontaktdaten Ihrer Produktberatung fin den Sie online auf den Serviceseiten Ihres Versandhauses Hier sind die verschiedenen B...

Page 26: ...n k nnen Verbraucher bis zu drei Altger te einer Ger teart bei einer Sammelstelle eines Vertreibers unentgelt lich abzugeben ohne dass dies an den Er werb eines Neuger ts ankn pft Allerdings darf kein...

Page 27: ...h und Umwelt haben Kleben Sie da her bei lithiumhaltigen Batterien und Akkus vor der Entsorgung die Pole ab um einen u eren Kurzschluss zu vermeiden Batterien und Akkus die nicht fest im Ger t verbaut...

Page 28: ...en Technische Daten Bestellnummer 56230868 Ger tebezeichnung K hlschrank Modellkennung HKS18560CNFI Ger tema e H he Breite Tiefe 1850 mm 595 mm 644 mm Leergewicht 83 kg K ltemittel R600a K ltemittel F...

Page 29: ...HKS18560CNFI User manual Manual version 2301 00706_EN_2021123 Article no 56230868 Reproduction even of ex cerpts is not permitted Refrigerator...

Page 30: ...ng food EN 19 Filling the fridge EN 19 Maintaining quality EN 20 Care and maintenance EN 21 Checking and cleaning the door seals EN 21 Cleaning the exterior EN 21 Cleaning the interior EN 21 Cleaning...

Page 31: ...hazard with a low level of risk which if not avoided could result in minor or moderate injury NOTICE This signal term warns against possible damage to property Explanation of symbols The following sym...

Page 32: ...nal injury The manufac turer accepts no liability for damage caused by improper use Safety notices In this chapter you will find general safety notices that you must always observe for your own protec...

Page 33: ...work n Never open the housing n Mains cord mains plug Take care to prevent the risk of trip ping when laying the mains cord Do not kink or pinch the mains cord or lay it over sharp edges Do not exten...

Page 34: ...ing fins or tubes on a cooling appliance are dam aged prior to the point of proper dis posal n To prevent the formation of a flam mable gas air mixture in the event of a leakage in the refrigerant cir...

Page 35: ...a significant increase of the temperature in the compartments of the appliance n Clean regularly surfaces that can come in contact with food and access ible drainage systems n Store raw meat and fish...

Page 36: ...n Do not pull or lift the appliance by its doors or door handles n Place the appliance only on a level and firm surface that can support the weight of the appliance when it is filled n Do not use shar...

Page 37: ...Checking the delivery 1 Unpack the appliance 2 Remove all parts of the packaging plastic profiles tape and foam padding 3 Check that the delivery is complete 4 Check whether the appliance was dam age...

Page 38: ...Leaking refrigerant is flammable and can lead to eye damage If this hap pens rinse eyes with clear water and call a doctor immediately NOTICE Risk of damage to property Improper handling of the appli...

Page 39: ...e climate category of the appliance see the chapter on In tended use 4 Check the position of the appliance with a spirit level 6 6 5 Level out any unevenness on the ground using both of the front scre...

Page 40: ...Page EN 12 Getting started Space required according to the appliance dimensions A 1850 mm B 595 mm C 100 mm D 644 mm E 1057 mm F 75 cm G 100 mm H 135 I 1017 mm without door handle...

Page 41: ...r use at ambi ent temperatures of 16 to 43 C If the room temperature drops significantly below this the appliance will not switch on as of ten This indicates that an unwelcome increase in temperature...

Page 42: ...hin the house installation with at least 3 mm contact clearance consult a qualified profes sional if necessary see the chapter Service n Do not kink or pinch the supply cord or lay it over sharp edges...

Page 43: ...2 3 4 5 6 7 8 11 1 9 10 1 10 1 Interior light 2 Appliance door 3 Large door shelves 4 Small door shelf 5 Bottle racks in the appliance door 6 Screw feet 7 Fruit Vegetables drawer 8 Fish Meat drawer 9...

Page 44: ...Page EN 16 Appliance parts and control elements 88 SUPER REF C COOL 12 13 14 15 16 12 REF indicator 15 UP button 13 Temperature indicator 16 DOWN button 14 SUPER COOL indicator...

Page 45: ...plug out of the socket If the appliance is switched off leave the doors open slightly to avoid mould formation Setting the temperature CAUTION Health hazard The appliance may not operate properly if e...

Page 46: ...ch the UP button 15 or DOWN button 16 The shelves and drawers You will achieve the most efficient energy utilisation for your appliance if you combine the drawers glass and door shelves as shown in th...

Page 47: ...s left empty for long periods switch off de frost clean dry and leave the door open to prevent mould developing within the appliance Filling the fridge 10 10 11 10 10 10 9 8 7 3 3 4 5 5 Combine the dr...

Page 48: ...ure is lowest Only store strong alcohol standing up right and tightly closed Allow hot food to cool before placing it in the fridge The temperatures within the appli ance and therefore its energy con...

Page 49: ...difficult to pull through at all points 2 If the seal is not uniform everywhere Carefully warm the seal in the affected places with a hair dryer and pull it out slightly with your fingers 3 Only clea...

Page 50: ...on as a temperature of 2 C is reached change the temperature in the interior back to the previous value as described in the chapter on Setting the temperature Cleaning the reverse side Remove dust and...

Page 51: ...mperature has been set too low Select higher setting see the chapter on Set ting the temperature The appliance doesn t cool suffi ciently Temperature has been set too high Select a lower setting see t...

Page 52: ...ns supply and contact our Service Centre E5 Defrost sensor error in the cold store Disconnect the appliance from the mains supply and contact our Service Centre E6 Communication error Disconnect the a...

Page 53: ...shooting table you would like to order further accessor ies You can find the contact details of your product advisor online on the service pages of your mail order company The various sec tions of pro...

Page 54: ...ctrical appliances of the same type to a distributor s collection point for free without having to purchase a new elec trical appliance In this case however the old appliances external dimensions may...

Page 55: ...he terminals of lithium batteries and rechargeable batteries before dispos ing of them to prevent an external short cir cuit Single use and rechargeable batteries that are not built into the device sh...

Page 56: ...specifications Item number 56230868 Name of appliance Refrigerator Model identifier HKS18560CNFI Device measurements Height Width Depth 1850 mm 595 mm 644 mm Unloaded weight 83 kg Refrigerant R600a Fi...

Reviews: