1
Thank you for purchasing Happy Trails products. Our products are proudly hand made in Boise Idaho,
USA. If you have any questions or concerns about the installation of this product, please contact us di-
rectly at 1-800-444-8770 or e-mail installation@happy-trail.com.
Before you begin, place the bike on a hard level
surface where you have room to work. Lay out
the parts included in this kit and compare to the
parts in these instructions. If any parts or hard-
ware are missing, contact us immediately at the
number listed above.
IMPORTANT!!!!
When installing Happy Trails racks, leave all bolt
connections loose until the entire product is in-
stalled. Then go back and tighten all connec-
tions. We recommend the use of thread locking
compound.
Installation
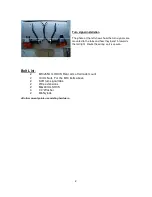
Remove the seat. Mount the rear rack to the two fender bolts under the seat using the original
bolts. Remove the turn signals, being careful to not damage the wires. Install the two turn signal
relocation tabs so that they bend in towards the tail light. Mount them between the tail rack mount-
ing spud and the frame as shown in the photo. Install the turn signals and route the wires along the
tabs.
YAMAHA TW200 TAIL RACK HTP9-3-6
SU Rack
Optional
SU Rack
Optional


