
Harbor Breeze
®
is a registered trademark
of LF, LLC. All Rights Reserved.
®
Questions?
Call our customer service department at 1-800-643-0067, 8 a.m. - 6 p.m.,
EST, Monday - Thursday, 8 a.m. - 5 p.m., EST, Friday.
ITEM #0052319
0429714
UNIVERSAL FAN BLADES
MODEL #40410
40418
ATTACH YOUR RECEIPT HERE
Serial Number ___________________
Purchase Date ___________________
PACKAGE CONTENTS
A
x 5
Blade
SAFETY INFORMATION
Please read and understand this entire manual before attempting to assemble or install the product.
CAUTION:
To ensure balanced fan operation, replace all blades on the fan at the same time. Do not mix and match old
blades with new blades.
PREPARATION
Before beginning assembly of product, make sure all parts are present. Compare parts with package contents list and
hardware contents list. If any part is missing or damaged, do not attempt to assemble the product.
Estimated Assembly Time:
20 minutes
Tools Required for Assembly (not included): Phillips screwdriver
These blades will work on most 42 in. and 52 in., 4 or 5-blade ceiling fans.
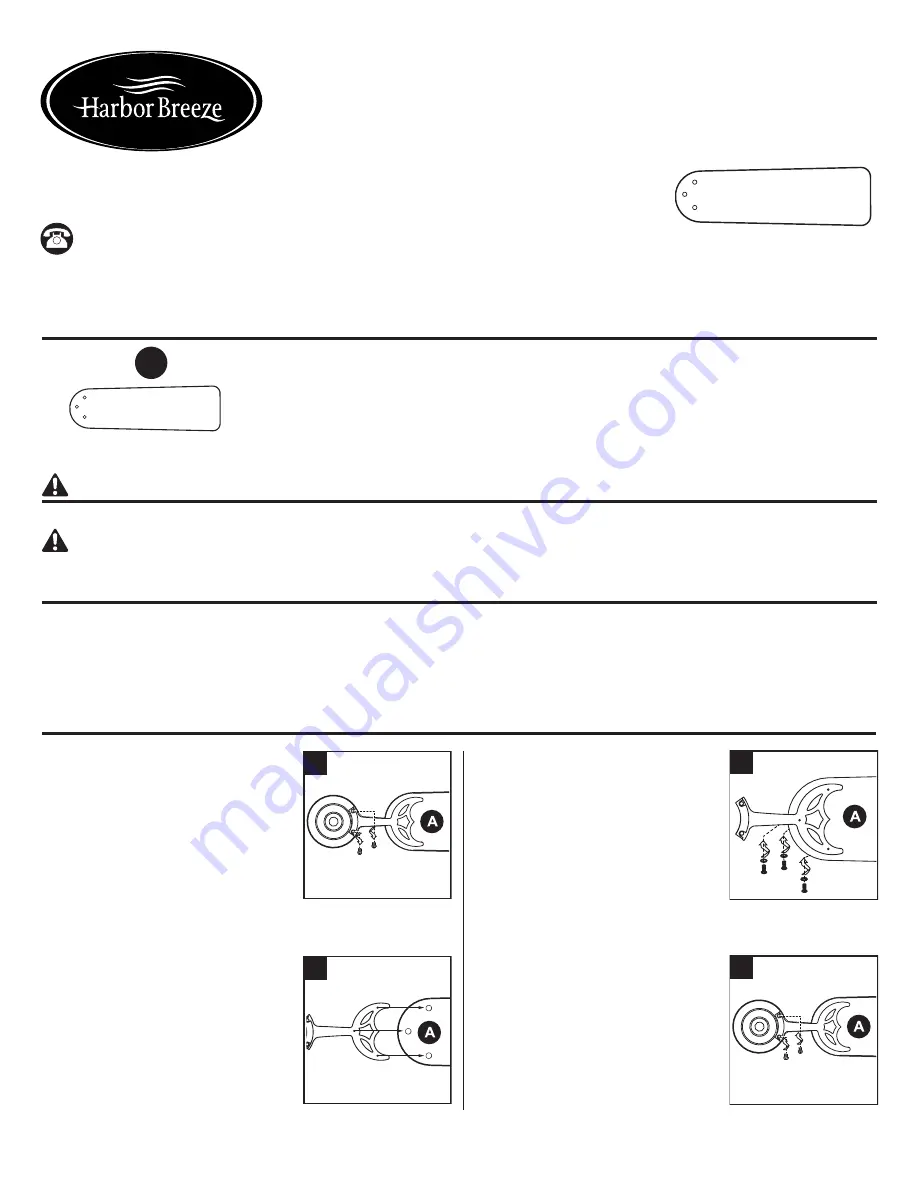
ASSEMBLY INSTRUCTIONS
1. Remove the blade arms from
the underside of the motor on
the existing fan. Remove the old
blades from the blade arms. Save
all screws and washers.
1
Motor
(underside)
Blade
arm
3. Attach blade (A) to an existing blade
arm using the previously-removed
blade screws and washers. Repeat
steps 2 and 3 for each remaining
blade (A) and blade arm. Securely
tighten all screws.
Note:
The ridge side of each blade
should face the ceiling and the
flat side should face the floor. The
fan will
not
operate properly if the
blades are not installed correctly.
3
Blade
arm
2. Align the holes in blades (A) with
the holes in the existing blade
arms.
WARNING:
If the holes in the blade
do not align with the holes in the
existing blade arm, do NOT use
these blades. Any attempt to alter
the blades will cause damage to the
blades and possible personal injury.
2
Blade
arm
4. Re-attach the blade arms to the
motor using the original motor
screws that were removed in
Step 1. Tighten motor screws
securely.
4
Motor
(underside)
Blade
arm
EB1359


