www.hasselblad.com
USER MANUALS
Film magazine HM 16-32 – 3033016 – 2011 – v1
Item no.: 3033016
1/2
FILM MAGAZINE HM 16-32
HM 16-32 Film Magazine
The HM 16-32 film magazine is a sophisticated semi-independent
unit within the modular H-system. It has its own power supply for
individual information storage, LCD panel, illumination, etc.
Much information is transmitted and received between the maga-
zine and the camera body, so ensure the databus connection is kept
clean and not damaged in any way. It is advisable to fit the maga-
zine protective cover when storing a film magazine to protect both
the databus connection and the darkslide.
The features include:
•
Automatic 120/220 compatibility
•
Automatic wind on / wind off
•
Automatic film advance
•
LCD information panel
•
Integral darkslide
•
Customizable data imprinting
•
Illuminated LCD
•
Barcode recognition
•
Count-up or count-down film frame reminder choice
•
Multi shot option
A
B
C
D
E
F
G
H
I
J
K
L
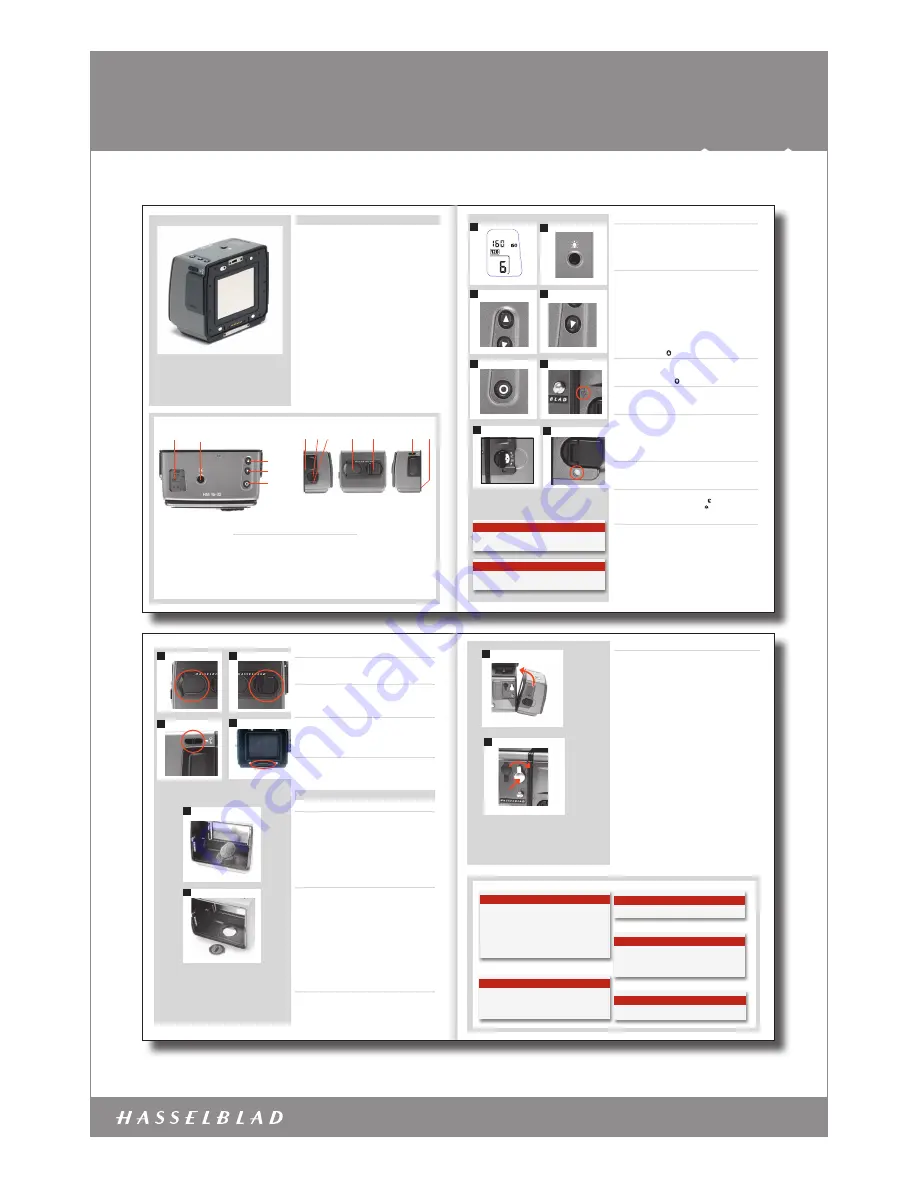
Parts and components
A.
LCD panel
G.
Darkslide key
B.
LCD illumination button
H.
Darkslide indicator
C.
Change up button
I.
Film tab holder
D.
Change down button
J.
Film holder key
E.
Function selector
K.
Magazine settings lock
F.
Film plane index
L.
Databus interface
D
C
B
A
F
E
LCD panel
A
The various functions are accessed by repeatedly pressing the
function selector button (loop menu) and changes made by the
‘change-up’ and ‘change-down’ buttons. Any settings are auto
-
matically saved. At very low temperatures the LCD will require a
few seconds to display new settings.
LCD illumination button
B
The LCD can be illuminated by pressing the display illumination
button, which is accessible when the magazine is not attached to
the camera. The LCD will remain illuminated all the time you keep
the button depressed, up to a maximum of 10 seconds. After 10
seconds has expired, you must release the pressure on the button
and press again to obtain a further 10 second period of illumina
-
tion. Remember that using the illumination function very often
will noticeably shorten the life of the battery in the magazine.
When the magazine is attached to the camera, the button on the
magazine is inaccessible but you can still illuminate the LCD by
pressing the illumination button on the grip instead.
Change up button
C
Can change the settings ‘upwards’. For example, to increase the
film speed setting. Toggle action.
Change down button
D
Can change the settings ‘downwards’. For example, to decrease
the film speed setting. Toggle action.
Function selector
E
Selects the four functions that can be set on the magazine. The
functions are on a menu loop so that repeated pressing of the se-
lector button will successively access all functions in turn. After a
time-out of five seconds of non-activity, the display returns to the
main screen.
Film plane index
F
Provides a measuring point for the actual position of the film plane
in the magazine. Used for calculations in critical applications.
Darkslide key
G
Withdraws and replaces the darkslide. Fold out the key and turn it
counter-clockwise 360° (towards the open
symbol) to withdraw
it and clockwise 360° (towards the closed
symbol) to replace it.
Darkslide indicator
H
Indicates whether the darkslide is in place or withdrawn:
RED
=
stop !
= exposure
CANNOT
be made
(magazine can be removed from camera)
WHITE
=
ok !
=
exposure
CAN
be made
(magazine cannot be removed from camera)
If you attempt to make an exposure when the darkslide is closed,
however, you will receive a warning message in the viewfinder and
grip LCDs – ‘The darkslide is closed’.
N o t e
Changes can only be made when the settings lock switch is in
the unlocked position.
N o t e
The darkslide can only be withdrawn when the magazine is
attached to the camera.
G
H
Film tab holder
I
Holds an ID tab from the film roll pack as a reminder of the type of
film loaded. Don’t forget to change it if you change film type!
Film holder key
J
Secures the film holder in the magazine. Fold out the key and turn
counter-clockwise 90° to remove the film holder and turn clock-
wise 90˚ to lock the film holder in place.
Magazine settings lock
K
All settings can be locked to avoid inadvertent changes. To change
the settings, slide the settings lock (see illus) to the right until it
stops. After the changes have been made, slide the settings lock to
the left (see symbol on magazine) again to secure the new settings.
Databus interface
L
Data interface between magazine and camera. Ensure the contacts
are kept clean and protected from damage. Keep the protective
cover on when the magazine is being stored or transported.
Operation
Battery
The magazine uses a battery to retain information and settings
when unattached from the camera. When attached to the camera
body, the magazine takes its power requirements from the cam-
era batteries. The magazine battery will normally be effective for
1-2 years depending on use (off camera illumination, for example).
When the battery is in a very low condition, (approx. 1 month of
use left), a low-battery symbol appears on the magazine LCD as a
warning. The magazine will continue to function with no battery
power left as long as it remains attached to the camera body. How-
ever, when detached, the settings will not be stored.
Battery replacement
1, 2
Release the film holder by folding out the film holder key and
rotating it 90° in a counter-clockwise direction. Withdraw the
film holder completely. On the bottom plate on the inside of the
film magazine housing you will find a slotted circular battery
cover. Insert a small coin or similar into the slot and rotate the
cover about 20° in a counter-clockwise direction. The cover will
be freed and the battery can be removed. Replace with a fresh
CR2032 / 3V lithium (or equivalent) battery. Observe the polar-
ity and ensure the positive (+) face is uppermost and replace the
cover (ensure the retaining lugs are inserted in the battery com-
partment slots), locking it into place by rotating it in a clockwise
direction until it stops. If you inadvertently insert the battery
incorrectly, the film magazine will not be damaged though it will
not function. Try to avoid touching the surface of the battery with
your bare fingers as sweat residue can decrease the electrical
conductivity of the battery casing and might cause corrosion.
After battery replacement, the magazine’s parameters return to
the default settings (Barcode, 120, Data-on, Count up).
K
I
J
L
2
1
3
4
2
1
Attaching and removing the magazine
3, 4
You cannot remove a magazine from the camera body if the mag-
azine darkslide is not in place, (when the magazine darkslide in-
dicator on the magazine shows white). Neither can you withdraw
the magazine darkslide when the magazine is not attached to the
camera. Both these restrictions therefore prevent accidental film
loss caused by fogging.
Attachment
Position the magazine retention groove onto the magazine sup-
port on the camera body ensuring that they are correctly posi-
tioned. Swing the magazine towards the camera body and firmly
press into place with a click. If there is resistance, the magazine
retaining catch on the camera has probably been inadvertently
released. In that case, push the release button again to reset the
catch.
You can attach and remove the magazine with or without the film
holder in place. If you just want to change to a new film, you can
remove and reload the film holder without having to remove the
whole magazine.
Removal
Ensure that the darkslide indicator on the magazine shows red (sig-
nifying that the darkslide is closed). Firstly push the lever of the
magazine release button to the right (fig. 4/1) and while maintain-
ing that position press the centre of the button firmly inwards to-
wards the camera body (fig. 4/2) to finally release the magazine.
N o t e
You cannot remove a magazine if the darkslide is not closed.
N o t e
Film settings (ISO / film length) are automatic only if the
magazine is set at Barcode automatic. That is, a barcoded
film cannot override a manual film speed setting but a man-
ual setting can override the film speed of a barcoded film.
N o t e
Films without a barcode must have their speed set manu-
ally. A manual setting must also be made if you want to
override the speed setting of a barcoded film.
N o t e
If the film holder is inadvertently removed mid-film, then
exposed frames will naturally be lost due to light fogging.
However, if the film holder is re-inserted, the film will au-
tomatically be advanced by three frames to position fresh
unexposed film. The film counter will also correspondingly
add on three frames to the original number recorded before
the film holder was removed.
N o t e
Ensure you press on the centre of the button, not on the lever.


