
SEN
SAVE
SEN
BAT.
˚C
˚F
LOW
Ft
M
HI
FF3300P
PORTABLE FISH FINDER
SE
T U
P
EN
TE
R
SEN
SAVE
SEN
BAT.
˚C
˚F
LOW
Ft
M
HI
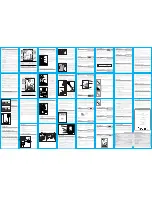
Installing the Batteries
1. Use a screw driver to open
the battery door by turning
the locking screw counter
clockwise until the door
can be removed (Figure 1)
2. Install 4 “AA” batteries. Be
certain to align the batteries
as per the diagram within
the battery compartment.
3. Close the battery door com-
pletely, and turn the locking
screw clockwise until snug
before continuing.
1. Plug the transducer connector
in the display housing (Figure 4).
Be sure the plug pins are
aligned properly to match the
display plug port.
2. Once the connector is plugged
in, slide the fastener housing
flush against the display and
lock it by turning the locking
screws clockwise until tight (be
certain to align the screws prop-
erly to prevent stripping and do
not over tighten).
1. To Remove, turn the locking screw
on the belt clip
until the slot on
the screw is
unlocked (Figure
3) Pull the belt
clip straight off by
grasping the the
belt clip by the
locking screw
(Figure 2).
Installing the Neck/Safety Strap
Fasten the neck/safety strap
to the hook built into the dis-
play housing by using the
included clip. (Figure 5). Use
the strap to hang the fish find-
er from your neck, fasten it to
your body, or any object that
will prevent accidental dam-
age during operation.
Connecting the Transducer Cable
Adjusting the Transducer Float
The transducer float must be
adjusted so that it is between
a minimum of 6 inches away
from the transducer but can be
further (Figure 6).
1. Pull out the rubber stopper.
2. Adjust float so that it is 6 to
10” from the transducer.
3. Replace the rubber stopper.
6”
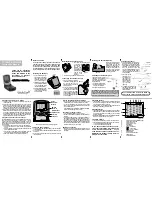
Using the Transducer
1. Toss the transducer and float assem-
bly into the water at your desired fish-
ing location. To toss, place the trans-
ducer and float in your hand, and pitch
underhand.
Do not throw the trans-
ducer by the cable as this will
cause unrepairable damage.
Before
tossing, be certain that the cable is
free from tangles and is not wrapped
around anything.
2. Use a pole to guide
the transducer to
a desirable posi-
tion (Figure 7) or
add floats on the
cable to allow the
cable to float on
top of the water
(Figure 8).
3. To retrieve the transducer and
float simply pull in the cable
being certain to neatly wind up
the excess cable.
Figure 7:
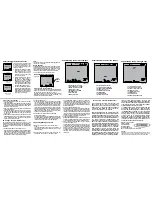
Setup Key
Enter Key
ON/OFF,
Reset, &
Simulator Key
LED Indicator
Setup
Indicators
Window
Refer to Figure 10 to Set the Following Features:
Turning the Power ON/OFF
• To turn the Power ON, PRESS the ON/OFF Key (the LED indi-
cator will light up).
• To turn the Power OFF, PRESS and HOLD the ON/OFF Key for
3 seconds.
• During normal operation the screen can be reset by pressing
the ON/OFF Key
Turning the Simulation Mode ON/OFF
• To turn the simulation mode ON, press and hold the
ON/OFF button for 3 seconds while the screen is OFF.
• To turn the simulation mode off, turn the power off and
back on again as per the instructions in the “Turning the
Power ON/OFF Section.
(The simulation mode will indicate variable depth, bottom
contour, and fish readings on the screen)
Accessing the Feature Setup
• Press and Hold the SETUP Key for 3 seconds.
• The BAT. SAVE indicator will blink in the Setup Indicators
Window.
• Cycle through the features by pressing the SETUP key.
(the indicator will blink for the current feature to be set)
• To activate or deactivate a feature press the ENTER key.
(When a feature is activated, the indicator will appear.
When a feature is deactivated, the indicator will not appear)
• The screen will automatically return to normal operation
after 5 seconds if no keys are pressed.
Battery Save Feature
• Battery Save activated will update the display every 10
seconds, which will greatly increase the battery life of the
fish finder.
Sensitivity Feature
• Low Sensitivity – use this feature to eliminate clutter from
the screen when fishing in muddy water, heavy vegetation,
or water which contain a lot of debris
• High Sensitivity – use this feature to detect small fish, fish in
deep water, or fish hiding near the bottom
Backlight Feature
• Turning the backlight feature ON will keep the screen illumi-
nated all the times. This feature will greatly reduce the bat-
tery life of the fish finder, so it should only be used during
low light conditions.
• When the backlight feature is OFF, the backlight will still illu-
minate for 3 seconds when a key is pressed.
Fish Alarm Feature
• The fish alarm sounds when a group of fish are indicated.
• Two distinctive alarm patterns indicate the size of the fish
• 2 alarm tone bursts indicate small fish.
• 4 alarm tone bursts indicate large fish
A
B C D E F G
H
I
J
K
L
A
Temperature Readout (FF3300PX Only)
B
Battery Save Feature ON
C
Sensitivity set to Hi
D
Sensitivity set to Low
E
Backlight ON
F
Fish Alarm ON
G
( ) – Full Battery
( ) – Low Battery
( ) – Very Low Battery
H
Fish Depth Scale
I
Depth Readout
J
Bottom Contour Indicators
K
Fish Indicators
L
Small Fish Indicators
FF3300P & FF3300PX
Instruction Manual
Thank you for purchasing
the HawkEye
TM
Portable Fish
finder, and welcome to the
innovations of NorCross
Marine Products, Inc.
E
EN
NJJO
OYY YYO
OU
UR
R F
FR
RE
EE
ED
DO
OM
M......
Before You Fish
Get to know the fishing regulations and habits of
the fish that you are targeting
by visiting your local
tackle center, bait shop, library, or website. A little
research can be a valuable lesson, that will allow you
to utilize the features of your fish finder, to make fish-
ing more enjoyable for you, and your fishing buddies.
The FF3300PX’s temperature sensor is located in the trans-
ducer housing. Adjusting the float level will allow you to view
temperature readings at variable depths. Knowing your preys
feeding habits in relation to water temperature will allow you
to fish at the exact depth that is optimal for strikes.
Installing/Removing the Belt Clip
Locked
Unlocked
Figure 1:
Figure 2:
2. To Replace repeat step 1 in the reverse order.
Figure 3:
Figure 4:
Figure 5:
Figure 6:
Figure 8:
Figure 9:
Figure 10:
Figure 11:
Using the Fish Finder for Ice Fishing
1. Clear away snow to expose the ice surface, making sure the
surface is smooth.
2. Place a small amount of liquid water on the ice and set the
transducer on the water allowing the transducer to freeze to
the ice. If there are any air pockets between the transducer
and ice, or the water below the ice, the fish finder will not work
properly and will require you to cut a hole in the ice to use.
3. (a) To remove the transducer from the frozen ice, gently tap the
transducer at the base with your hand. (b) If it will not come
loose, spray a small amount of water on the ice surface around
the transducer repeat steps (a) and (b) until the transducer is
easily removed. Never use a blunt object to strike the trans-
ducer as this will cause damage to the transducer.
Using the Fish finder Thru a Boat Hull?
The FF3300P(PX)’s advanced sonar capabilities allows the trans-
ducer to “shoot thru” the bottom of a boat or canoe. The hull
must be made out of solid fiberglass, or a maximum of 1/8” alu-
minum, and be in direct contact with the water, with no air pock-
ets. The transducer will not work thru wood, plastic, or any com-
posite material.
1. To “Shoot Thru” the hull of a boat, use one of the following:
a) place the transducer in .5 inches of water against the hull
bottom.
b) place the transducer in a plastic bag that is full of water and
place against the hull bottom.
c) coat the face of the transducer with petroleum jelly and
press it against the hull bottom with a twisting motion.
d) refer to our website for more advanced instructions.
If you have questions about the opera-
tion of this unit please visit our website
at www.norcrossmarine.com. If you
need further assistance please call us at
888–NorCross Monday—Friday 8 a.m. to
5:30 p.m. Eastern Time
Do not allow the cable to sink to the bottom as
it may become entangled in debris (Figure 9).