
NICHE INSTALLATION INSTRUCTIONS
LIGHT INSTALLATION INSTRUCTIONS
MASONRY STRUCTURE WITHOUT LINER
WINTERIZING INSTRUCTIONS
DIRECTIVE D’INSTALLATION DE LA NICHE
DIRECTIVE D’INSTALLATION DE LA LUMIÈRE
STRUCTURE DE MACONNERIE SANS TOILE
INSTRUCTIONS D’HIVERNATION
Cut panel using template supplied.
“Except when the fixture is installed in an area of the swimming
pool that is not used for swimming and the lens is adequately
guarded to keep any person from contacting it, the fixture shall
be installed in a wall of the pool, with the top of the lens not less
than 457 mm (18 inches) below the normal water level of the
pool”.
Install niche plus with sealant to rear interior niche hole.
Install conduit adapter to 12 o’clock exterior niche hole.
Install niche from within the pool using (8) 1/2” screws self
tapping or screw/nut combination - fit foam strip supplied
between niche and wall positioning the top conduit opening at
12 o’clock.
- Hand tighten recommended not power drill.
Place 1st niche gasket on the face of the niche, aligning screw
holes in gasket with holes in niche.
Install vinyl liner.
Place 2nd niche gasket on flange, aligning screw holes in gasket
with holes in flange.
Attach on the inside wall of pool, making sure the holes in the
flange are lined up with holes in the niche.
Pierce liner through flange one at a time prior to inserting
screws.
Fasten niche flange and gasket to niche with (16) 1” screws.
- Hand tighten recommended not power drill.
Cut-out liner along inside edge of niche.
“Warning: Potential Shock Hazard. Connect Only to Power
Supply Certified for Use with Submersible Lights”.
Install conduit from 12 o’clock fitting on niche to desired
Transformer position.
Feed wire through back of niche, through conduit to
transformer, leaving enough cable in niche area to allow light to
reach deck area for winterization and maintenance.
Wind excess cable around Lamp Bracket.
Align Lamp Clips with raised area in niche and press into
position.
Qualified professional can now hook up light cable to
transformer.
Warning! Do not attempt to use the light unless it is
submerged beneath the water.
Seal the niche of the projector into the masonry; the front part
should be recessed, so that finishing rendering or tiling can be
applied subsequently.
Proceed with sealing the flexible conduit and cable and install
the lighting unit of the projector in the same way as for the vinyl
light.
Lower pool level below the pool light.
Turn power off at main breaker to light.
Remove light fixture to deck and secure.
Raise light fixture to deck and secure.
Install Winterizing Foam #SPX9400 into niche - press fit foam
into position and ensure light cable is fed through the 12 o’clock
slot.
Continue with winterization of pool.
Couper le panneau d’acier en utilisant le gabarit.
«Sauf si la lumière est installée dans un endroit de la piscine qui
n’est pas utilisé pour nager et que la lentille est adéquatement
surveillée pour assurer aucun contact. La lumière doit être installée
dans le mur de la piscine, assurex-vous que le haut de la lentille
n’est pas à moin de 457mm (18po) en bas du niveau normal de
l’eau de la piscine».
Installer le bouchon de la niche avec du teflon dans le trou interieur
de la niche.
Installer l’adapteur du conduit à 12 heures de l’exterieur du trou de
la niche.
Installer la niche par l’intérieur de la piscine en utilisant soit les 8 vis
auto perçantes ou les 8 vis à boulons. Vous assurer que le joint
d’etanchéité est apposé à l’arrière de la niche et que le conduit soit
positionné à 12 heures.
- Utiliser un tournevis à la main (pas un outil électrique).
Placer le joint d’étanchéité sur la face de la niche en alignant les
trous pour le face plate.
Installer la toile de piscine.
Placer le second joint d’étanchéité sur la face plate et appliquer
celui-ci sur la toile. Visser les 16 vis manuellement.
Utiliser un tourevis à la main (pas un outil électrique).
Couper la toile a l’intérieur du face plate.
«Attention: Seulement brancher à une source de courant certifié
compatible
avec
les
lumières
submersibles.
Risque
délectrocution».
Installer le conduit sur la niche à la position se 12 heures.
Insérer le fils par l’arrière de la niche, en passant par le conduit
jusqu’au transformateur. Laisser suffisamment de câble dans la
niche pour permettre à la lumière d’atteindre le patio pour
l’hivernation et l’entretien,
Enrouler le câble résistant autour de la lumière.
Aligner les ‘clips’ de la lumière avec les parties cochées dans la
niche et serrer en position.
La lumière peux maintenant être connecter au transformateur.
Ceci doit êtra effectuer cetter lumière a moins d’être submergée
siys l’eau.
Attention: Ne pas utiliser cette lumière a moins d’être submergée
sous l’eau
Sceller la niche du projecteur dans le maconage, la partie avant
devrait être en retrait pour pouvoir finir la présentation.
Sceller le conduit et le câble et intaller la lumière du projecteur de
la même facon indiqué pour la lumière du piscine vinyl.
Abaisser le niveau d’eau jusqu’au dessous de la lumière.
Fermer le courant de la lumière au disjoncteur.
Enlever la lumière de la niche.
Enlever la lumière au patio et securer la.
Installer le Styro mousse #SPX9400 d’hivernation dans la niche.
Vous assurez que le câble eat insérer dans le trou à la position de
12 heures.
Continuer avec l’hivernisation de la piscine.
www.haywardcanada.com
SP9120
SP9300
SP9240
Proseries ™
MD
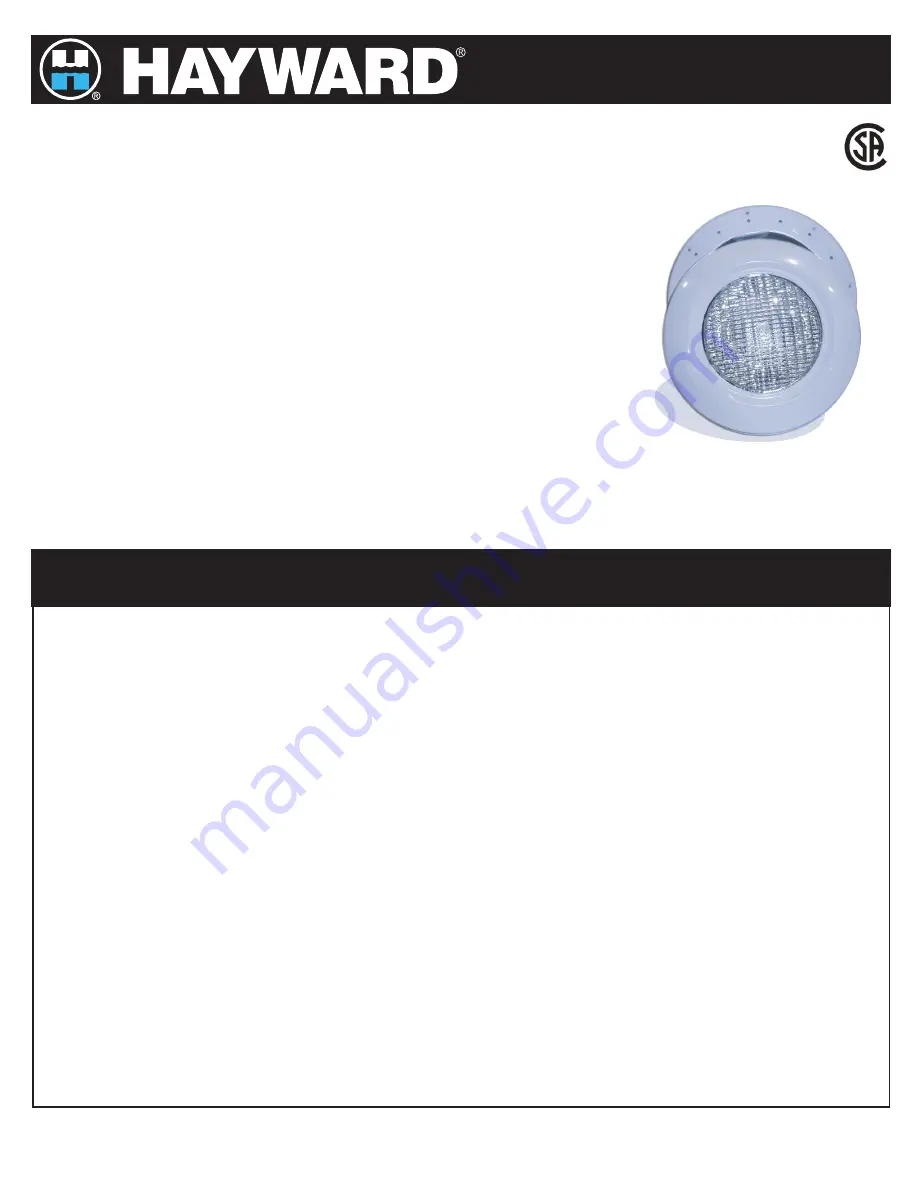
Under Water Lighting Fixtures
Lumières Sous-Marine
FOR SWIMMING POOLS AND SPAS / POUR PISCINES ET SPAS
OWNER’S GUIDE
INSTALLATION AND OPERATING
INSTRUCTIONS
GUIDE DE L’UTILISATEUR
INSTRUCTIONS D’INSTALLATION ET
D’UTILISATION
The underwater lighting fixture you have purchase is CSA Listed under file number LR 35560 and must be
used with an appropriate Hayward CSA Listed fixture housing (niche). Installation of light and niche must be
in accordance with the Canadian Electrical Code.
Point the fixture away from the house or terrace so as not to create excessively bright illumination. The fixture
should not be positioned more than 60 cm under the coping, as measured from the center of the bulb. The
fixture’s niche incorporates two 3/4” outlets. The rear outlet is generally used for masonry swimming pools,
while the vertical outlet is primarily intended for swimming pools built from panels.
Le projecteur que vous venez d’acheter est conforme avec la norme CSA sous le numéro de dossier LR35560 et doit être employé avec la niche Hayward
appropriée. L’installation du projecteur et de la niche doit être en accordance avec le code électrique du Canada.
Détourner le projecteur de la maison ou du patio, pour ne pas avoir le projecteur dirigé vers les occupants. Le projecteur ne devrait pas être positioné plus de 60
cm au dessous du << copying >>, mesurer du centre de l’ampoule. La niche du projecteur comprend deux orifices de 3/4”. La prise arrière est généralement
utilisée pour les piscines de béton, tandis que la prise verticale est principalement utilisée sur les piscines construites de panneaux d’aciers.
IS9000
www.haywardcanada.com
When installing and using this electrical equipment, basic safety precautions should always be followed, including the following. Failure to follow instructions may result in injury.
READ AND FOLLOW ALL INSTRUCTIONS
Warning -
To reduce risk of injury, do not permit children to use this product unless they are closely supervised at all times.
Caution -
This swimming pool / spa light is CSA Listed for permanently installed pools and spas. It is not listed for storable pools or spas. Permanently installed pools are those constructed in
or partially in the ground and all others capable of holding water depth greater than 42 in (1.07cm). Storable pools are those constructed on or above the ground and capable of holding water
to a maximum depth of 42 in. (1.07cm)
This light fixture must be installed by qualified personnel in compliance with the Canadian Electrical code and any applicable codes.
This light fixture must be attached to a CSA certified transformer and connected to a GFI outlet.
Warning!
Do not attempt to use these lights out of the water.
Disconnect Electrical Power before installing, relamping or servicing this equipment.
Hayward Pool Products Canada, Inc. will supply in all complete light kits a transformer sufficient for a 300 watt light (SP9300) or a 240 watt light (SP9240) or two 120 watt lights (SP9120).
Improper installation may result in death or serious injury to bathers or service personnel or others by way of electrical shock. Read and follow instructions below.
Lors de l’installation et de l’emploi d’équipement électrique, des precautions de sécurité de base doivent être suive, ignorer les instructions suivantes peut entrainer des blessures corportelles.
LISEZ ET SUIVEZ LES INSTRUCTIONS SUIVANTES
Attention:
Pour éviter tout risque de blessures corporelles, ne permettre pas aux enfants d’utiliser cet équipment sauf sous la supervision d’un adulte.
Attention:
Ce projecteur et cette niche sont conformes à la norme CSA, pour l’installation dans une piscine ou soa oermanents. Ce n’est pas conforme pour des piscines ou spas démontables.
Des piscines ou spas permanents sont ceux qui sont installés partiellement ou complètement dans le sol et capable de contenir l’eau à une profondeur de plus de 42po (1m07). Des piscines
ou spas démontables sont contrults hors-sol et sont capable de retenir de l’eau à une profonfeur de plus de 42po. (1m07).
Le projecteur doit être installé par une personne qualitiée CSA et protegée par une prise GFI.
Cette lumière doit être branchée à un transformateur certifié CSA at protegée par une prise GFI.
Attention!
ne pas utiliser ces lumières hors de l’eau.
Couper et débrancher le courant avant l’installation, le remplacement de la lampe ou pour toute réparation de cet équipement.
Hayward Pool Products Canada, Inc. fournira dans tout les kits complets, un transformateur suffisant pour lumière de 300 watt (SP9300) ou lumière de 240 watt (SP9240) ou deux lumière de
120 watt (SP9120).
Une mauvaise installation peut causer la mort, blessures corporelles au baigneurs, au personnels d’entrentien ou tout autres personnes par électrocution. Lisez et et suivez les instructions qui
suivent.
IMPORTANT SAFETY INSTRUCTIONS
IMPORTANTE INSTRUCTIONS DE SECURITE
1.
2.
3.
4.
5.
6.
7.
8.
CAUTION: We highly reccommend having a qualified professional install the product. Be sure power supply has been shut off or disconnected. Failure to do so could result in severe personal injury.
ATTENTION: Nous recommandons qu’un électricien qualifié s’occupe de l’installation de ce produit. Soyex certains que le courant est coupé ou déconnecté. Ne pas suivre nos concellies peut découler à de grave
blessures.
1.
2.
3.
4.
5.
6.
7.
8.
SP9120
www.haywardcanada.com
HAYWARD POOL PRODUCTS CANADA, INC.
2880 PLYMOUTH DRIVE, OAKVILLE, ONTARIO L6H 5R4 1-888-238-POOL
LIMITED WARRANTY
To all original purchasers of its products, Hayward Pool Products Canada, Inc., warrants its products free from defects in
materials and workmanship for a period of one year from the date of purchase on inground application only. Products which
fail or become defective during the warranty period, except as a result of freezing, accident, negligence, improper installation,
use, or care, shall be repaired or replaced at our option without charge, within 90 days of the receipt of defective product,
barring unforeseen delays. To obtain warranty replacements or repair, defective product should be returned, transportation
paid to the place of purchase, or to the nearest authorized Hayward service center. For further Hayward dealer or service center
or information, contact Hayward customer service department. No returns may be made directly to the factory without the
express written authorization of Hayward Pool Products Canada, Inc.
Hayward shall not be responsible for cartage, removal and/or reinstallation labour, or any other such costs incurred in
obtaining warranty replacements.
Some provinces do not allow a limitation on how long an implied warranty lasts, or the exclusion or limitation of incidental or
consequential damages, so the above limitation or exclusion may not apply to you.
This warranty gives you specific legal rights, and you may also have other rights which vary from province to province. This
limited warranty is valid and enforceable only in Canada on Hayward products owned and normally operated in Canada.
® Hayward Pool Products Canada, Inc. – Licensee
GARANTIE LIMITÉE
À tous les acheteurs d’origine de ses produits, Produits de Piscines Hayward Canada, Inc. garantit ses produits contre tout
défaut de fabrication ou de matières premières pendant une période d’un an à compter de la date d’achat pour les installations
de piscines creusées. Si un défaut quelconque est constaté à un produit pendant la période de la garantie, à moins qu’un tel
défaut ait été occasionné par le gel, un accident, la négligence ou un vice d’installation, d’utilisation ou d’entretien, le produit
sera réparé ou remplacé gratuitement, au gré de Hayward, dans les 90 jours de la réception du produit défectueux, compte
tenu des retards imprévisibles.
Pour obtenir le remplacement ou la réparation d’un produit defectueux en vertu de la garantie, le retourner en port payé
au lieu d’achat ou au centre d’entretien Hayward autorisé le plus proche. Pour de plus amples renseignements sur les
déspositaires ou centre d’entretien Hayward, communiquer avec la division du service à la clientèle de Hayward. Aucun produit
ne doit être retourné directement à l’usine sans le consentement préalable par écrit de Produits de Piscines Hayward Canada
Inc.
Hayward décline toute responsabilitié à l’égard des frais de transport, d’enlèvement ou de réinstallation et de tous les autres
frais encourus pour obtenir le replacement d’un produit en vertu de la garantie. Certaines provinces interdisent que la durée
d’une garantie implicite soit limitée ou que les dommages indirects ou fortuits soient limités ou exclus de la garantie. Dans de
tels cas, les limites et exclusions susmentionnées ne seraient pas applicables.
Cette garantie vous octroie certains droits juridiques qui peuvent vanier d’une province à l’autre. Cette garantie limitée
est valable et applicable seulement au Canada pour tout système Hayward utilisé normalement au Canada.
® Produits de Piscines Hayward Canada, Inc. –Titulaire de licence.
PRODUITS DE PISCINES HAYWARD® CANADA, INC.
2880 PLYMOUTH DRIVE, OAKVILLE, ONTARIO L6H 5R4 1-888-238-POOL
1
2
3
4
5A
5B
6
7
8
9
10
11
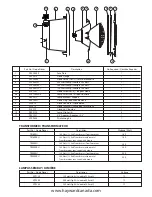
PRXD240P
PRX9513
PRX20008
SPX0502Z1
SPX05024Z1
SPX05012Z1
ECX1901
ECX1900PAK
PRX9472
PRX20021
SP9470
SP9474
EC3219
PRX9120
PRX1927
SPX9400
Face Plate
Niche Flange
Niche Gasket set (2) / Joint d’étanchéité
300 Watt Lamp / Lumière 300 watt
240 Watt Lamp / Lumière 240 watt
120 Watt Lamp / Lumière 120 watt
Niche Screw Set (8) / Bis pour niche
Lamp Screw Pak / Vis pour lumière
Lamp Bracket / Support
Niche Plug / Bouchon de niche
Niche Concrete / Niche béton
Niche Thin Wall / Niche pour mur mince
Gland nut / Boulon
Lamp Clip Set (4)
3/4” Adapter / Adapteur 3/4”
Winterizing Kit
1
1
2
1
1
1
8
1
1
1
1
1
1
4
1
1
Part No. / No de Pièces
Description
No. Required / Qantitée Requises
TR1600U
TR1600RU
TR2400U
TR2400RU
TR3000U
TR3000RU
SP9120
SP9300
SP9240
160 Watt / 12 Volt Transformer / Transformateur
160 Watt / 12 Volt Transformer with remote /
Transformateur avec contrôle à distance
240 Watt / 12 Volt Transformer / Transformateur
240 Watt / 12 Volt Transformer with remote /
Transformateur avec contrôle à distance
300 Watt / 12 Volt Transformer / Transformateur
300 Watt / 12 Volt Transformer with remote /
Transformateur avec contrôle à distance
120 watt light / Lumière 120 watt
300 watt light / Lumière 300 watt
240 watt light / Lumière 240 watt
160
160
240
240
300
300
12
12
12
Wattage / Watt
Voltage
Part No. / No de Pièces
Description
Part No. / No de Pièces
Description
11
9
8
3
9
6 5 B
4
3
2
1
7
10
5 A
www.haywardcanada.com
LAMP ASSEMBLY / LUMIÈRE
TRANSFORMER / TRANSFORMATEUR


