HDPlex 2nd Gen H5 Fanless, Installation Manual
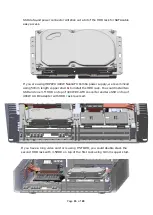
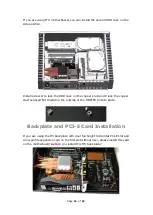
The HDPlex 2nd Gen H5 Fanless is a state-of-the-art product designed with advanced cooling technology for silent and efficient performance. To ensure hassle-free installation, an easy-to-follow Installation Manual is available for download free of charge from our website. Get the most out of your product by accessing the manual at 88.208.23.73:8080.
Share
Download


Reviews:
No comments
Related manuals for 2nd Gen H5 Fanless

MD8000 Series
Brand: Media Links Pages: 98
StorCenter Pro 400e
Brand: Iomega Pages: 16

AL4160-12
Brand: Accuride Pages: 2

CompactDAQ cDAQ-9185
Brand: National Instruments Pages: 140

PXI-1036DC
Brand: National Instruments Pages: 62

ASCENDER 22
Brand: Kelty Pages: 7

Supero SC832
Brand: Supermicro Pages: 34

SecureStack C2 C2RPS-CHAS2
Brand: Enterasys Pages: 34

Hi-low Chassis
Brand: Leckey Pages: 47


