background image


1

No. 


HITACHI 

SERVICE MANUAL 


42HDF52A 


Be sure to read this manual before servicing. To ensure safety from fire, electric shock, injury, harmful 
radiation and materials, various measures are provided in this Plasma Monitor.   
Be sure to read cautionary items described in the manual before servicing.   
These servicing instructions are for use by qualified service personnel only. To reduce the risk of electric 
shock, do not perform any servicing other than that described in the operating instructions unless you are 
qualified to do so. 


1.  Since the Panel Module and the front Filter are made of glass, handling the broken Module and Filter 

carefully and with caution in order not to receive injury. 

2.  Replacement work should be started after the Panel Module and the AC/DC Power supply have 

become sufficiently cool. 

3.  Special care should be taken when working near the display area in order not to damage its surface.
4. The Panel Module should not be touched with bare hands in order to protect its surface from 

blemishes and damage. 

5.  It is recommended that you use clean soft gloves during the replacement work in order to protect not 

only the display area of the Panel Module but also yourself. 


1. Features -------------------------------------------3 

2. Specifications ------------------------------------4 

3. Component Names -----------------------------5 

4. Service points ------------------------------------7 

5. Adjustment ----------------------------------------8 

6. Troubleshooting --------------------------------13 

7. Block diagram ---------------------------------- 26


8. Connection diagram ---------------------------- 29 

9. Wiring diagram ----------------------------------- 30

10. Basic block diagram --------------------------- 31

11. Printed wiring board diagram ---------------- 32

12. Disassembly diagram ------------------------- 39

13. Replacement parts list ------------------------ 41


SPECIFICATIONS AND PARTS ARE SUBJECT TO CHANGE FOR IMPROVEMENT. 

Plasma Television 


Caution 

Contents

Service Warning

Summary of Contents for 42HDF52A

Page 1: ...lacement work should be started after the Panel Module and the AC DC Power supply have become sufficiently cool 3 Special care should be taken when working near the display area in order not to damage its surface 4 The Panel Module should not be touched with bare hands in order to protect its surface from blemishes and damage 5 It is recommended that you use clean soft gloves during the replacemen...

Page 2: ... original conditions in order to prevent electric shock or fire Perform safety check when done Exercise caution while working on the device as the Monitor contains high voltage parts and power supply It is possible to sustain severe injury or death if you accidentally touch the wrong parts You must disconnect the power supply while servicing reassembling or change parts If you touch a live connect...

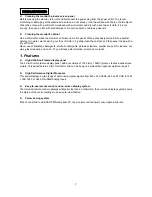
Page 3: ...aline detergents alcoholic detergents abrasive cleaners powder soaps OA cleaners car wax glass cleaners and so on They will cause discoloration scratches or cracks 1 Features z High definition Plasma display panel The 42 inch color plasma display panel with a resolution of 1024 H x 1024 V pixels creates a widescreen picture This panel features a thin form factor and can be hung on a wall with an o...

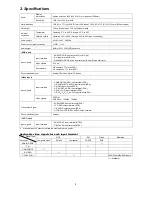
Page 4: ... V composite TTL level 2kΩ Recommended signal Analog 20 modes Digital 18 modes Video input Input terminals COMPOSITE VIDEO input terminal RCA L R COMPOSITE AUDIO input terminal RCA S VIDEO input teminal RCA L R S VIDEO AUDIO input terminal RCA Y PB CB PR CR input terminal RCA L R Y PB CB PR CR AUDIO input terminal RCA Input signals Video signals NTSC M 480i 480p 1080i 60 720p 60 Video output Signa...

Page 5: ... s function can be found on the inside of the control panel cover 1 POWER 4 RIGHT X 7 SELECT 2 CHANNEL S 5 VOL W 2 UP S 5 LEFT W 3 CHANNEL T 6 INPUT 3 DOWN T 6 EXIT Normal Button Action 4 VOL X 7 MENU Button Action when MENU engaged Remote control receiver Power lamp Main power switch The main power switch is located at the back on the right side ...

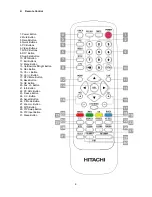
Page 6: ... RTN Button 11 Exit Buttons 12 Menu Button 13 Up Down Left Right Button 14 SEL Button 15 Ch Button 16 Vol Button 17 DTV Menu Button 18 Back Button 19 OK Button 20 Fav ch Button 21 Info Button 22 PC ADJ Button 23 Freeze Button 24 C C Button 25 Aspect Button 26 P Mode Button 27 Zoom Button 28 MTS Button 29 PIP Swap Button 30 PIP Input Button 31 Sleep Button ...

Page 7: ...d solder should be added to existing lead free joints mix in the leaded solder thoroughly after the lead free solder has been completely melted do not apply the soldering iron without solder Servicing soldering iron A soldering iron with a temperature setting capability temperature control function is recommended The melting point of lead free solder is higher than leaded solder Use a soldering ir...

Page 8: ...7 0 01 Netural x 0 285 0 01 y 0 293 0 01 Black White x 0 335 0 01 y 0 343 0 01 Note That a colorimetry meter such as a Minolta CA 200 is required to measure the actual screen color temperature Video Picture Mode Natural Brightness 0 100 Contrast 0 100 Color 0 100 Tint 0 100 Sharpness 0 31 Color Temperature Cool 1 Press MENU button on remote control to display the PDP OSD menu Reset Video Color Tem...

Page 9: ......

Page 10: ......

Page 11: ......

Page 12: ......

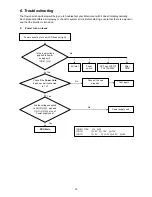
Page 13: ...or is turned on z Power turn on issue Is the input voltage applied to Power supply unit CN61 Power cannot be turn on LED does not light No Yes AC inlet Check if the Power Cord has been well connected to TV Connect the wire properly No Yes PBC Main Are the voltages applied to CN10 pins and CN11 pins of Power supply unit Yes Power switch AC Fuse 5HTP10 TL 510A 250V Filter PWB CN61 110V L W CN10 5V 1...

Page 14: ...es of the speakers terminals have been well connected to the PCB Main and speakers Are the voltages applied to CN2 of the power supply unit Are the signals applied to P23 of the PBC Main Are there signals on the speaker terminals Yes Yes Yes Speakers PCB Main or PCB I O No No PCB Audio PCB Speaker Connector CN2 15 5 16V GND P23 NC L GND R ...

Page 15: ...voltages of CN10 CN11 on the power supply unit CN10 5V 12V CN11 5V 3 3V st 5V Is it the power saving mode Green Is voltage applied to CN11 st 5v PCB Main No Yes Input signal cables or PCB Main Are the voltages applied to CN64 of the power supply unit correct Yes Panel module Yes No Power supply unit No Power supply unit ...

Page 16: ... are placed correctly Put new batteries to the remote control No Yes Take off the back cover Check if the wire of PCB IR has been well connected to the PCB Main No Change the PCB IR then check if it works Test again Connect the wire properly Yes Change PCB Main then connect all wires properly Replace the Remote Controller Yes No ...

Page 17: ...as been well connected to the PCB Key Pad and PCB Main Key pad doesn t work No Yes Change PCB Key Pad and connect all wires properly Check if it works Yes No Change the PCB Main Test again Connect the wire properly Change PCB Speaker connectoer and connect all wires properly Check if it works No Yes ...

Page 18: ...he PDP No PC signal Yes No Check if the signal frequency is higher than 1024x768 Adjust the signal frequency No Yes Test again Take off the back cover Connect the D Sub or DVI cables properly Change the PCB Main Check if PC source is working on other display Check PC by PC Service Provider Yes No ...

Page 19: ...done Execute the Channel Search function No Yes Check if the Assembly PCB Video has been well connected No Yes Change the NTSC Tuner Board and check if it works Test again Connect the Assembly PCB Video properly Connect the TV cable properly No Change the PCB Main Yes Make sure the OSD TV source option is correct Cable Air No Select to the correct option Yes ...

Page 20: ...onnector Be sure have done the channel scan Connect it firmly Connect it firmly Is the signal received Problem has been resolved Problem has been resolved Make auto scan Is the signal received Change the tuner module Is the signal received Problem has been resolved Yes No No Yes No Yes No Yes No No Yes Yes Cannot receive any digital channel ...

Page 21: ...work Problem has been resolved Is it in MUTE mode Press MUTE or VOL so that audio work Be sure this channel was been locked Change the tuner module Yes No Yes No No Yes Yes Problem has been resolved Problem has been resolved No No Yes Scan this channel by using Manual Scan Is the audio work Yes No No audio service ...

Page 22: ...onnect the signal wire properly Check if the PCB I O has been well connected to the PCB Main Connect the PCB I O properly No Yes Take off the back cover Check if Wire Ass y 31P has been well connected to PCB Main No Yes Connect Wire Ass y 31P properly to the PCB Main Change the PCB I O then check the signal No Change PCB Main board Yes Test again ...

Page 23: ...has been well connected to the PDP Connect RS 232 Cable properly No Test again Yes Take off the back cover Check if all wires have been well connected to the PCB RS232 PCB Main No Connect the wires properly Yes Change the PCB RS232 and see if it works Yes No Change the PCB Main ...

Page 24: ...voltage D020 k J051 Q003 Q004 R005 ect Q200 Q201 Q202 D210 ect Q301 Q302 Q303 D310 ect NO POWER See NO PICTURE SOUND IC101 R005 D151 D101 etc OK NG NG NG NG NG OK OK OK OK NG Over 130V Under 130V NG SEE NO POWER NO Vs Va Vcc FUSE Vcc check voltage D020 k J051 NO PICTURE SOUND See NO PICTURE PC201 PC202 D210 etc OK NG OK Over 130V Under 130V IC001 D601 D604 RL001 PC001 PC003 IC002 etc ...

Page 25: ... PICTURE Va no uprise Vs down after up D351 Open connector CN64 OK NG NG OK OK NG impedance check Va LINE Vs no uprise Va down after up Q303 PC301 PC302 D310 etc Q501 D510 Q500 PC501 PC502 etc PDP module Va NG impedance check Vs LINE D551 D550 Open connector CN64 OK NG PDP module Vs NG ...

Page 26: ...26 7 Block Diagram z Plasma Television ...

Page 27: ...27 z ATSC Module ...

Page 28: ...28 z Power Module ...

Page 29: ...29 8 Connection Diagram ...

Page 30: ... 5097651912 TS06667 5 P9003A Wire Ass y W4 4P E057404011 TE02305 15 P7002A This wire is included in PCB Key pad assembly G Audio Power Board PWB 0905 5097651913 TS06666 6 P211 Wire Ass y W5 5P E057405008 TE02298 16 P215 Wire Ass y E057401009 TE02753 H Audio Board PWB 0807 5097639914 TS06668 7 P814 Wire Ass y W3 3P E057403016 TE02755 I ATSC Connector Board PWB 0833 5097642804 TS05977 8 P813 Wire As...

Page 31: ...31 10 Basic Block Diagram ...

Page 32: ...32 11 Printed Wiring Board Diagram z Main Board Top Side ...

Page 33: ...33 z Main Board Bottom Side ...

Page 34: ...34 z I O Board Top Side z RS 232 Board Top Side Audio Board Top Side ...

Page 35: ...35 z Audio Transfer Board Top Side L Bottom Side R ...

Page 36: ...36 z Power EMI Board Top Side L Bottom Side R z ATSC Connector Board Top Side L Bottom Side R ...

Page 37: ...37 z Speaker Connector Board Top Side L Bottom Side R z Key Pad Top Side L Bottom Side R z IR Board Top Side L Bottom Side R ...

Page 38: ...38 z Power Board ...

Page 39: ...39 12 Disassembly Diagram z Mechanical ...

Page 40: ...40 z Packing ...

Page 41: ...46522200 TJ03541 5 M14 Washer E646522300 TJ03551 4 M15 NON WOVEN FABRICS E642025810 TE03541 2 M16 GASKET 585X10X1 E642025339 TJ03951 2 M17 GASKET 963X10X1 E642025309 TJ03952 2 M18 GASKET 624X5X1 E642025316 TJ03953 2 M19 GASKET 1025X5X1 E642025315 TJ03954 2 M20 GASKET E642025349 TJ03575 1 M21 Special Screw E640223000 TJ03772 2 M22 Wire Saddle E640104007 TJ05181 2 M23 Wire Saddle E642583500 TJ05182 ...

Page 42: ... Label E030409339 TJ03605 1 M38 Grip Joint I534100356 TJ04071 4 M39 Clip PE Bag I533251157 TJ03606 1 M40 EPE Bag back I534100156 TE02351 1 M41 EPE Bag front I534100256 TE02352 1 M42 EPS Bottom BM I524100456 TJ05311 2 ...

Page 43: ...20 TE04002 1 Y002 WARRANTY CARD E030230010 TE02282 1 Y003 QUICK SETUP GUIDE E030039023 TE04012 1 Y007 WARRANTY CARD CANADA E030230012 TE02286 1 GL01 SCREEN FILTER 42 5771900152 KS06492 1 H001 TUNER MODULE 5052110027 TE03601 1 J001 QUICK TIE 5071000531 TJ03631 10 UA01 ATSC MODULE 5053911077 TS06001 1 UA02 POWER MODULE 6693006618 TS06011 1 P201 WIRE ASSEMBLY W2 2P E057402005 TE02291 1 P203 WIRE ASSE...

Page 44: ...S Y ABUS L A3 FPF29R ABL0030 5053911113 TS06289 1 d PWB ASS Y ABUS R A3 FPF29R ABR0031 5053911114 TS06291 1 e PWB ASS Y X BUS A3 FPF29R XBU0026 5053911115 TS06292 1 f PWB ASS Y LOGIC A3 FPF29R LGC0057 5053911116 TS06293 1 g CABLE LOGIC ABUSL A3 FPF29R CBL001401 5000100119 TE02577 1 h CABLE LOGIC XSUS A3 FPF29R CBL001411 5000100120 TE02578 1 i CABLE LOGIC YSUS A3 FPF29R CBL001412 5000100121 TE02579...

Reviews: