background image

Summary of Contents for DSS SYSTEM

Page 1: ...H ITAC H I DIGITAL AI ELUTE SYSTEM ...

Page 2: ...El is a registered trademark of El Entertainment Television Inc Other product corporate names program titles network names and logns may be the property of other companies and are used within this manual and related DSS recdver software only for explanation to the owner s benefit without intent to infringe This product is the subject of one or more U S or foreign patents pending Disclaimer Every e...

Page 3: ...ealer or local power company For DSS products intended to operate from battery power or other sources refer to the operating instsuciions 6 Overloading_Do not overload wall oudcts or extension cords as this can result in a risk of fire or electric shock Overloaded ac outlets ex l_a_on cords flayed power cords damaged or cracked wire insulation and broken plugs are dangerous They may result in a sh...

Page 4: ...or dmfits as contact with them might be fatal 16 Cleaning_Unplug this DSS product fi om the wall outlet before clemm_ Do not use Iiquid cleaners or aerosol cleaners Use a clamp cloth for deanmg 17 Object and Liquid Entry Never push objects of any kind into this DSS product through openings as they may touch dangerous voltages or short out parts that could result in a fire or electric shock Never s...

Page 5: ...easures Reorientor relocate the receiving antenna Increasethe separationbetween the equipment and thereceivez Connect the equipment into an oudet on a circuit different from that to whinh the receiver is connected the telephonenumber daisunit is connected to the mager equivalence number REN The number can be found on a label located on the bottom of the equipment the UniversalSer_ce Order Code USO...

Page 6: ...HE HITACHI BRAND DSS RECEIVER 13 Now It is Time for You to Take Control 13 Front Panel vs Remote Control Keys 13 Basic Navigation 13 POINTING YOUR HITACHI SATELLITE ANTENNA 15 One Spot 22 300 Miles in Space and You ll Find It 15 Determine Where to Point Your Satellite Dish 15 The DISH POINTING MENU 15 The ZIP CODE and LATITUDE LONGITUDE Screens 16 ALIGNMENT RESULT Screen 16 Connecting the Satellit...

Page 7: ...in Menu 39 Preferences 39 Dish Pointing 40 Default Audio 40 System Test 40 Assistance 41 New Access Card 41 VCR Setup 41 QuickTune Setup 42 PREFERENCES ON YOUR HITACHI RECEIVER 43 Customize Your Hitachi Menus to Appear the Way You Want 43 Done 43 On Screen Guide Width 43 1V2Hrs or 2 l lrs 43 Channel Sort Option 44 Number or Name 44 Multi Color Guide 45 Yes or No _ 45 Picture Size 45 4 3 or 16 9 45...

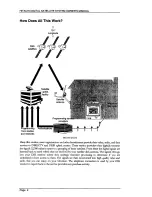
Page 8: ...may seem like magic but it isn t It is amazing though What You Should Do First Your Hitachi digital satellite system is both a compficated technical mirade and an easy to operate source of entertainment You should complete the following steps to achieve the greatest performance from your system Read the included guides and manuals to familiarize yourself with the system Install your DSS receiver I...

Page 9: ... then digitally transmit the signals 22 300 miles in space to a grouping of three satellites From there the digital signals are beamed back to earth where they are received by your satellite dish antenna The signals then go into your DSS receiver where they undergo extensive processing to determine if you are authorized to have access to them The signals are then reconverted into high quality vide...

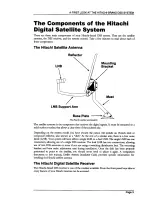
Page 10: ...composite reflector also known as a dish At the end of a tubular arm there is a low noise block LNB Your system vail have either a single LNB or a dual LNB The single LNB has one connection allowing use of a single DSS receiver The dual LNB has two connections allowing use of two DSS receivers or more if you are using a switching distribution box The mountLng bracket and b_ise make adjustment easy...

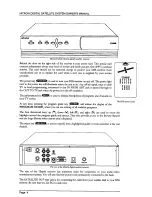
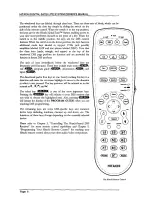
Page 11: ...The information key _ is used to display descriptions of programs and channels on your TV screen At any time pressing the progmrn guide key _ _ will initiate the display of the PROGRAM GUIDE where you can see a listing of aUavailable programs r A CnRD The DSS Access Card The four directional keys up A down V left _ and right are used to move the highlight around the program guide and menus They al...

Page 12: ...stem for proper placement of the transmitter end of the VCR control cable The standard RJ 11 modular PHONE JACK is for connecting your DSS receiver to your phone line This phone connection is necessary to access certain program offemags from your service providers Any calls generated by the DSS receiver are toll free The telephone line connection should not normally interfere with your telepbone o...

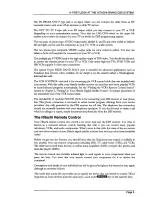
Page 13: ...de main menu II__RIB _ exit _ _ program guide l_l_ information 1 _ and input The directional pad is four keys in one Gently rocking this key in a direction will cause the on screen highlight to move in the direction in which it was pressed The key positions will be referred to in this manual as _ A and V The select key l_ _ is one of the most important keys Pressing the _ key will indicate to your...

Page 14: ...ged Please save all packing materials until the installation of your system is complete in case anything needs to be returned You now need to decide where you want to place your DSS receiver Avoid installing the receiver in a location where the power cord or cables could be inadvertently disconnected Obviously choose a place near your TV The location should also be well ventilated Do not set elect...

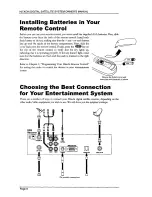
Page 15: ...mote control to verify that the key lights up indicating that it is operating properly_ If the key doesn t fight make sure that the batteries are fresh and that each is inserted in the fight direction Refer to Chapter 9 Programming Your Hitachi Remote Control for setting the codes to control the devices in your entertainment system Remove the battery cover and insert four AAA batteries as shown Ch...

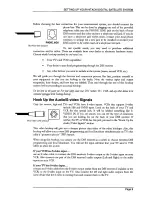
Page 16: ...R and any otherdedces to be connected unplugged whik hookingthem up The S video cable and jack Hook Up the Audio S video Signals Only the newest high end TVs and VCRs have S video inputs VCRs that support S video include Hi8 and SVHS types Look on the back of your TV and VCR for this special jack It will be labeled something like S VIDEO IN If you are unsure you can see the type of connector that ...

Page 17: ...r VCR offers to select the source If your VCR has a video input use an audio video cable to connect one of the DSS receiver s video output to the video input on your VCK Also connect one pair of the DSS receiver s audio outputs Left and Right to the audio inputs on your VCtL If your TV has a video input connect an audio video cable from the video output either from the DSS receiver if available or...

Page 18: ...ter as described earlier If you have a stereo system you may be able to achieve big speaker sound See the Hook Up to a Stereo System section for the necessary connections If your hookup is complete move on to the Finishing Up section Hook Up to a Stereo System To achieve high quality sound from your DSS receiver through a stereo system simply connect one of the AUDIO outputs Left and Right to an a...

Page 19: ...y move the remote control to the right repeatedly pressing the remote control s power key on and off Once your VCR responds to your pressing the remote control power key note the position This should be the location of your VCR s remote control sensor Scanning for the remote control sensor Once the sensor positi6n has been determined attach the emitter to the area with a piece of tape This is temp...

Page 20: ... DSS receiver The remote control has many more keys to provide shortcuts or access to extended features of the DSS receiver Most of the remote control keys can also be used to control other components in your entertainment system For this reason you must remember to press the _ key putting the remote control in DSS mode when you want to control your DSS receiver When the remote control keys are pr...

Page 21: ...re three keys on your remote control that you will likely use frequently They are _ _i and _llD After you have established favorite channel lists as described in Chapter 6 Your Hitachi Receiver s Main Menu you will want to cycle through these lists quickly and easily This is accomplished by pressing the _ key Each press will advance to the next fist which contains channels After stepping through t...

Page 22: ...he SetupMenu button _ to display the SETUP MENU A or V to move the highlight over the Dish Poinifngbutton _ to display the DISH POINTING MENU Determine Where to Point Your Satellite Dish The DISH POINTING MENU When you press _ you will be whisked into the menu that assists you with dish pc rating and signal strength utilities Since you may have never used the Hitachi brand DSS system before we ll ...

Page 23: ...king your head no You should take a moment to write down the elevation and azimuth numbers ELEVATION AZIMUTH The values displayed are fairly accurate however some fine tuning may be necessary Use these values when choosing a mounfng location for your satellite dish remembering that you will need an unobstructed view in that direction The ALIGNMENT RESULT screen Before proceeding your DSS antenna s...

Page 24: ...lculated earlier Finish adjusting the elevation by tightly tightening the bolts when the indicator is afigned with the correct tick mark Make sure that the dish doesn t slip out of position while you are tightening the bolts Next we ll adjust the azimuth For this part of the procedure a compass such as the one included in the Hitachi Do It Yourself DSS Installalion Ki_ will make it possible to poi...

Page 25: ...d It shows the quality of the signal that you are receiving Because you have not adjusted the pointing of your satellite dish you probably have a signal strength of 0 To let you know that it is looking you should hear a short beep every few seconds Even though a signal strength of 50 _ give you the same high quality picture and sound as a reading of 90 you should maximize your signal as much as po...

Page 26: ... have acquired a signal or until you have rotated flae antenna approximately 15 degrees from the starting point If you acquire a signal go to step 6 otherwise go to step 2 2 If no signalis detected return to the starting point and begin rotating the antenna to the eft in the same wayas you did in step 1 If you acquire a signal go to step 6 otherwise go to step 3 If you axe unable to acquire the sa...

Page 27: ...dd the Golf Channel three new sports networks and over 18 out of maxket regional sports networks showing exciung collegiate action Real sports fans may choose from several season ticket options including the NFL Sunday Ticket NBA League Pass NHL Center Ice MLB Extra Innings ESPN ABC Sports college football and ESPN Full Court college basketball Direct Ticket PPV is like having a video store fight ...

Page 28: ...m the next available channel in the direction that you selected The second way assumes that you know the number of the channd you want For example to go to the Direct Ticket movie previews simply press _N _M_ Or to watch the USSB preview channel press _ _ You can enter the three digit channd number for any channd you wish The Channel Banner This is a good time to explain the banner that you see at...

Page 29: ... the key has been programmed your DSS receiver vail change to the associated channd Otheawise if the selected QT key has not been programmed the QUICKTUNE SETUP screen will appear From the QUICKTUNE SETUP screen you can program the key to any available channel See Chapter 7 Your Hitachi Receiver s Setup Menu for information on changing the charred number associated with each of the QuickTune keys ...

Page 30: ... next Continue pressing A or V until you see something you like then press IN AIF I_ You will tune to that channel The Browse Banner Pressing the key will move the highlight to the channd tag The tag will become the associated network logo when available You may find this useful if the logo is easier to identify than the call sign If you wait a few seconds or press the _ key while the Browse Banne...

Page 31: ...ta services may include interactive television video games computer services etc To choose the highlighted data press _ The PROGRAM GUIDE Probably the most powerful feature of your Hitachi digital satellite receiver is the PROGRAM GUIDE From the PROGRAM GUIDE you can see a page of seven channel listings at a time filter the guide to include only programs in the categories of interest to you and ev...

Page 32: ...x channels at a time You can press _ on a currently airing program to tune to it If the program is not airing until later pressing dk q al V_ will take you to the INFORMATION screen The INFORMATION screen is described later in this chapter in the section called Getting Program Information When the highlight is in the grid you can use the _ and keys to move left and right If you move the highlight ...

Page 33: ...ide These list D pe guides do not represent channels and time but rather a list of possible options These guide types are very rare Class One more way that you can filter your guide is through the Classesdrop down menu From this menu you can select classifications such as PPV Subscriptn Schedukd etc By combining each of these filter options you can quickly narrow down 200 channels to those that me...

Page 34: ...eduk when selected will initiate a drop down menu offering up to three choices To View To Tape and Don t Scheduk To View if selected will mark the program to be automatically tuned when it airs This way you won t miss an important program At the right time the receiver will even turn on if it was turned off and tune to the appropriate channel Programs that are scheduled to be automatically ttmed t...

Page 35: ...ed as part of the button and it may not always be 2 99 After highlighting this button and pressing 4_ HD a confirmation will appear Use this opportunity if you wish to change your mind If you are not authorized to make the purchase directly from your DSS receiver you will need to contact the service provider of the event for assistance Purchase confirmation Buy Options While this burton is similar...

Page 36: ...splayed provides a simple way to display a concise list of other presentauon times of the program of interest You may use this button to find a viewing time that may be more convenient to meet your schedule The Times button will only apply to PPV programs and events The OTHER TIMES screen You will be renamed to the INFORMATION screen with the displayed information updated to reflect your selection...

Page 37: ...HITACHI DSSRECEIVER OWNER S GUIDE Page30 ...

Page 38: ...related functions We ll explain each section and button and the resulting screen one at a time Activities The area at the top contains primary Activities you might need to perform Two of the four available buttons in this area can be performed quickly with the key and the _ key The Activities portion of the MAIN MENU Program Guide As you have probably guessed the Program Guide button takes you fro...

Page 39: ...ish to set or edit press or The entire row changes color to indicate that it is the one being changed and the highlight advances to the Chan column The 16 EVENT TIMER screen You can enter the desired charred number using the mmaber keys on the remote control or using the A and V _ and _0 or QuickTune keys The Alph_Tune feature can also be used If you don t know the charred number use the to advanc...

Page 40: ...mation upcoming special events offers and other pr0modonal programming The MESSAGES Screen When new messages are received a New Mail indicator appears at the top of all menu screens This indicator will remain on the menus until you have read the new message When you highlight the Messagebutton the advisory message at the bottom of the screen indicates if there axe any messages to read If there are...

Page 41: ... a small lock symbol appears within the Spending button on the MAIN MENU indicating that the passcode will be needed to access the SPENDING LIMIT screen Ratings Program ratings indicate the suitability of a program s content for a given audience For families with younger children a lower rating limit may be desirable Other families may choose to allow viewing of more sophisticated pro_ The RATINGS...

Page 42: ...pears at the top of the screen This may be of some guidance Remember that when using a Family list and the DSS receiver is locked only channels included in the Family list can be viewed This means that if you are currently set to the Fav A B C or A Channels list you vail step through the channds included on the current list however to actually view or hear the program the selected channel must be ...

Page 43: ...e provider highlight the questioned event and press I_I_U F_ Additional information that the representative may ask for is provided in the advisory message area at the bottom of the screen Upcoming The UPCOMING PURCHASES screen displays PPV events that you have purchased but not yet viewed Events that were ordered by calling the service provider will not appear on this list You can see displayed t...

Page 44: ...EM screen is displayed The Lock screen Use the A and V keys or the remote control number keys to enter a four digit passcode of your choosing If you enter the code using the number keys you will not see the numbers appear on the screen After entering a four eliot passeode highlight and select OK to proceed Otherwise choose Cancelto abort the locking process If you continue locking you _ be asked t...

Page 45: ...for assistance LOCK OVERRIDE Unlock screen There are times that you may wish to access a program or channel which exceeds the spending limit rating limit or family approved channels while your DSS receiver is locked You can do this without unlocldng your DSS receiver When you press 41_m_D when prompted the LOCK OVERRIDE screen _ be displayed It looks and navigates just like the SYSTEM UNLOCK scree...

Page 46: ...ch button on the SETUP MENU and describe the options available on each resulting screen Main Menu The Main Menu button returns you back to the MAIN MENU once you are finished accessing all of the desired SETUP MENU options Preferences The Preferences button takes you to the PREFERENCES screen The PREFERENCES screen is where you find a variety of items that enable you to customize the appearance of...

Page 47: ... While English is the default language you may choose an alternate language If a program is available in the language that you choose the program will be heard in that language Otherwise the language that you will hear will be the primary language in which the program is being broadcast The DEFA UL T AUDIO screen System Test Anyume you experience a problem with your system you can run the SYSTEM T...

Page 48: ...erruption could cause both the old and the new card to become invalid When the process has completed your new access card w4al be usable while the old card will no longer be valid The NEW ACCESS CARD screen VCR Setup The VCR SETUP screen The VCR SETUP screen is used to set your Hitachi digital satellite receiver to control your VCR To determine the code necessary first choose CodeLaokup You can pa...

Page 49: ...by the associated button displaying QT EMlYlY Once highlighted the channel can be changed in one of three ways enter the channel using the number keys use fi0 and _0 or use the AlphaTune feature see Chapter 5 Watching DSS Programs On the Hitachi Receiver for AlphaTtme instructions After setting the QuickTune keys you can either select Done or press the _ key to return to viewing DSS programming Th...

Page 50: ...er or not you axe using a wide screen TV whether or not you wish to use the V chip like parental controls and the unit ID for multiple receiver environments Let s look at each of these areas one at a One Done Once you have set the options on the PREFERENCES screen to those you desire highlight the Done button and press I _j _t_ This will return you to the SETUP MENU On Screen Guide Width On Screen...

Page 51: ...tically by channel call sign Number or Name The Channel Sort Option portion of the PREFERENCES screen By default Channd Sort Option is set to Number This lists charmds in the program guide in numerical order You may find that semng this option to Name may help you familiarize yoursdf with what channel number each channel call sign corresponds to This is because when set to Name channels are in alp...

Page 52: ...ze should be set to 4 3 for most televisions which is the default This indicates that you are using a standard format television screen However if you have a wide screen television you may want to change this setmag to the 16 9 optioo While setting this option to the wrong format _ not harm your TV in any way it may cause undesirable appearances for programs broadcast in what is known as 16 9 rati...

Page 53: ...receivers the remote control signals can be independently detected and processed screen The Receiver ID portion of the PREFERENCES DSS I or DSS 2 By default it is set to DSS 1 If you do not have multiple Hitachi brand or HNS brand DSS receivers located in the same area or controlled by an RF remote control leaving the setting to DSS 1 should be fine If however you have more than one DSS receiver t...

Page 54: ...rol during this process The remote control will send out the power command for DSS TV cable CBL and audio components AMP The Play command will be sent for disc players DISC and VCRs While holding down the device key that you are programming press the power key and simultaneously release both keys The light assodated with the device you are programming should be flashing rapidly If it isn t repeat ...

Page 55: ...ntry mode Simply use the remote control keypad to enter the four digit code You _ see the lights on the remote light in a circle to indicate that the code was accepted The remote willremember the code until you reprogram it Test if the entered code matches your device by pressing the _ key for DSS TV CBL_ or AMP or the play key for VCR or DISC If the device works you re all sefl Otherwise repeat t...

Page 56: ... 6657 Also see Cand e 6624 6663 6629 6691 6607 6610 6613 6620 6624 and Nikko 6606 6612 6643 6606 6608 6612 6613 6616 6620 6626 6646 6649 6656 6659 6661 6663 6669 6673 6696 6610 6617 6618 6630 6686 6608 6610 6637 6641 Also see Daewoo Funai and Nikko 6626 AlSO see Sears Sanyo and Rsher 6666 6613 6624 6629 6631 6656 6610 Also see MGN 6606 6672 6626 6624 Also see Panaso_i_ 8692 6610 6636 6641 6649 666...

Page 57: ...vice mode For instance while in DSS mode pressing Volume controls your TWs volume not DSS volume This is because the remote control knows that there is no volume control on the DSS receiver Advanced feature keys i e _ _IiD etc are not supported for devices other than your DSS receiver and Hitachi devices For other devices only the primary keys i e O and _0 _ etc will fianctlon For Sony brand devic...

Page 58: ...l try pressing the appropriate device key to put your remote in the proper mode Then try controlling that device Also make sure that the batteries in the remote control axe good Q My Hitachi digital satellite receiver does not respond when I press keys What s wrong A Most likely if the front panel keys work but the remote control doesn t work try pressing the _ key before trying to control the Hit...

Page 59: ... roof mounted attic mounted or rabbit ears or cable TV Codnect this signal to the IN FROM ANTENNA on the back of your DSS receiver Use the _ key to switch between DSS prograrma m_ and local programming provided on the OUT TO TV connector Q If I have questions about my Hitachi brand DSS system or need to have it serviced who should I call A Always cal your dealer first They are most familiar with y...

Page 60: ...ntal control 45 FAVORITE LISTS screen 35 G Guides 26 H Hookup overview 8 phone jack 9 rear jacks 4 RF 10 satellite 16 stereo system 11 S video 9 VCR Control 12 video 10 I Icons 21 Information from the guide 26 from the Information screen 27 from video 22 Information Banner 22 INFORMATION screen 27 Buy 28 Buy Options 28 Cancel Purchase 28 Cancel Schedule 28 Done 27 Schedule 27 Times 29 View 27 L LA...

Page 61: ...3 rear jacks 4 Remote control 13 50 batteries 8 codes 48 overview 5 programming 47 s Satellite antenna components 3 Fine tuning 19 pointing 15 17 Schedule Cancel 28 To Tape 27 To View 27 28 Service providers 2 20 SETUP MENU 37 39 Assistance 41 Default Audio 40 Dish Pointing 40 New Access Card 41 Preferences 39 QuickTune Setup 42 System Test 40 VCR Setup 41 SIGNAL STRENGTH screen 18 SPENDING LIMIT ...

Page 62: ...Notes ...

Page 63: ...Revision A Part 1022510 0001 This documentwas printedinthe U S A on recycledpaper ...

Reviews: