


Instruction Manual
(English)
DZ-BD7HE/DZ-BD70E
DZ-BD7HE (UK)/DZ-BD70E (UK)
DZ-BD70E/DZ-BD70E (UK)
(BD Camcorder)
DZ-BD7HE/DZ-BD7HE (UK)
(Hybrid BD Camcorder)
Dubbing on BD/DVD
(DZ-BD7HE)
Introduction
HDD/BD/DVD/Cards
Battery Pack
Various Recording
Techniques
Editing
Viewing on the
Other Devices
Connecting to
your PC
Additional
Information
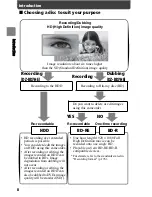
Let’s Get Started
Recording — Viewing— Dubbing
Thank you for purchasing this Hitachi Camcorder.
Please read this Instruction Manual to understand its proper use.
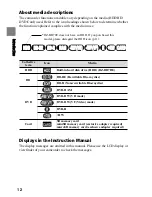
Regarding the differences between the DZ-BD7HE/DZ-BD7HE (UK) and the DZ-BD70E/
DZ-BD70E (UK), please first refer to "How to Read this Instruction Manual" (p.11).
Also, “(UK)” of the DZ-BD7HE (UK)/DZ-BD70E (UK) is omitted in this manual unless
otherwise description of difference is needed.
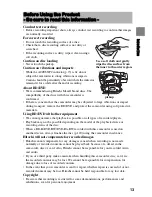
Before opening the CD-ROM included with this product, please read p.184.
After reading the Instruction Manual, store it safely.
The Instruction Manual contains an illustration of the DZ-BD70E/DZ-BD70E (UK) on the cover
page only.


