
View
Top
Side
View
CAUTION: CAREFULLY READ INSTRUCTIONS AND PROCEDURES FOR SAFE OPERATION
Assembly Instructions for Lighted Tree
Unpacking, Assembly and Shaping
Do not discard carton!
Use for Tree Storage.
Disassembly and Storage
CAUTION: MAKE SURE ALL LIGHT WIRES & HANDS ARE CLEAR OF BRANCH HINGES
1)
Before you start to assemble your tree, choose a location near a wall outlet.
3)
Insert the bottom tree section into the stand body. Allow the branches to fall into place or gently pull them out and down.
5)
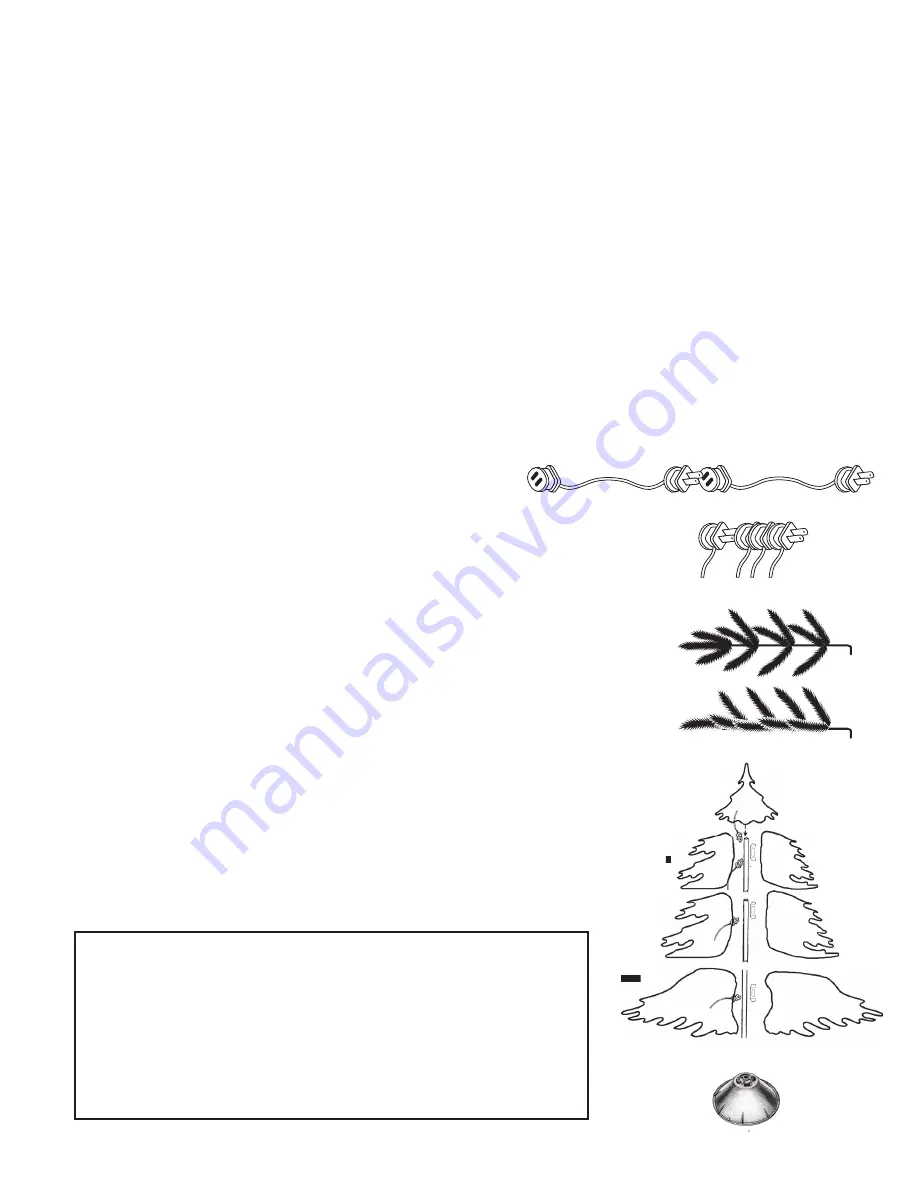
Place the tree top into the middle tree section pole. Allow the branches to fall into place or gently pull them out and down.
4)
Insert the tapered end of middle tree section pole into the bottom tree section pole. Allow the branches to fall into place or gently pull them out
and down.
6)
Connect each section’s light set securely to each other and plug into wall outlet.
7)
Your entire tree should now be lit. If some bulbs do not light, search for any broken, loose, or missing bulbs.
8)
Keep tree plugged in while shaping your tree. Should a light flicker while doing this, check for the bulb that
may have caused the trouble.
1)
Unplug cord(s) from wall outlet.
MODEL
L40D
7-13 084 -121125
2)
Unplug the tree sections from the cord(s). Keep stacks plugged together.
3)
Gently lift off each tree section from top to bottom. Remove the stand from the bottom section.
4)
Carefully place the tree sections back in the storage carton and tape it shut. Store carton in a
cool, dry place where the temperature does not exceed 100 degrees Fahrenheit.
If your tree includes an attached extension cord, drop it through the
bottom of the tree. Plug each section’s light set into the extension cord
and plug it into the wall outlet.
If your tree has no extension cord, connect the light sets together and plug into the wall
outlet. You have the option to connect the strands end to end (Fig. 6a), or stack the plugs
into one central connection (Fig. 6b).
2)
Carefully remove contents from the carton. Contents will include:
1. Tree Top: Section A • 2. Middle Tree: Section B & C • 3. Bottom Tree: Section D • 4. Tree Stand • 5. Extra Bulbs/ Fuses
6a.
6b.
After shaping the whole tree following the previous steps, step back and take an overall look at the
tree. Shift branches to fill any gaps. Slightly up sweep all branch tips for a uniform look. Your tree is
now ready to decorate and enjoy.
10)
Begin to shape the branches working from the bottom to the top. Start with tips farthest from the pole,
one to the right, one to the left, and one at the center of the main stem.
9)
PARTS AVAILABLE
Sección A
Sección B
Sección C
Sección D
Warranty and Support for Christmas Trees
This tree comes with a two year limited warranty for the tree and a two
year limited warranty for the lights (if applicable). To register and find out
more, go to genfoam.com and select the warranty link.
For any questions, comments, problems, or missing parts, do not return
to place of purchase. Please call General Foam Plastics at 1-855-277-0085
and ask for the Product Service Department between the hours of
8:00 AM and 5:00 PM, Monday - Friday, Eastern Standard time, or visit our
website at genfoam.com.


