

Hardware List
Part List
20 05149 0001
IMPORTANT
Home Styles Customer Service: www.homestyles-furniture.com,
servicedesk@homestyles-furniture.com,
888-680-7460, 877-831-0319
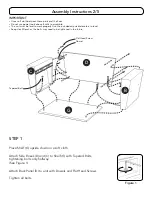
Carefully remove all the parts from the carton and
place them individually on a soft cloth to prevent
scratches or other damage.
Carefully and strictly follow these assembly instructions
to ensure a completed product as designed.
Do not use power tools above 8 volts to assemble.
File Cabinet
Tool(s) required for assembly: Phillips screwdriver, Level
Hex Wrench
1 pc.
Dowel
6 pcs. (+1 extra)
M6x28
Tapered Bolt
8 pcs. (+1 extra)
M6x16
Head Cap Bolt
4 pcs. (+1 extra)
Spring Washer
4 pcs. (+1 extra)
Flat Washer
4 pcs. (+1 extra)
Small Hex Wrench
1 pc.
H.
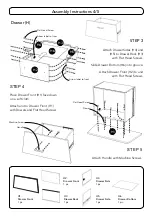
Drawer
1 pc.
C.
Side Box
1 pc.
E.
Side Frame
1 pc.
F.
Side Frame
1 pc.
Refer to later page(s) of these
instructions for rawer assembly.
d
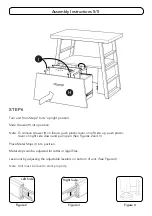
Handle
1 pc.
M4x32
Machine Screw
2 pcs.
M3x25
Flat Head Screw
28 pcs. (+1 extra)
A.
Top
1 pc.
B.
Side Box
1 pc.
D.
Back Panel
1 pc.
G.
Shelf
1 pc.
I.
Metal Strip
2 pcs.


