background image

www.hp.com/go/briosupport

Setting Up

Getting Started

Fixing Problems

Adding Components ...

Brio

Guide

Business PCs

HP

Brio BA210

Summary of Contents for Brio BA210

Page 1: ...www hp com go briosupport Setting Up Getting Started Fixing Problems Adding Components Brio Guide Business PCs HP Brio BA210 ...

Page 2: ......

Page 3: ...rting Your Brio 10 Setting Up Windows 10 Stopping Your Brio 10 Your PC s Desktop 11 HP Brio Center Your Desktop Assistant 12 Using Your Software 16 Finding Information on the Web 16 If You Have a Problem What to Do First 18 My Brio Doesn t Start Properly 19 My Brio Isn t Working Properly 21 What Kind of Problem Is It 22 Hardware Problems 23 Software Problems 31 ...

Page 4: ...g and Replacing Brio Hardware Important Before You Start 48 Inside the Computer 48 Removing the Cover and Front Panel 49 Replacing the System Board 52 Cables and Connectors in Your PC 53 Replacing a Processor 54 Replacing the Floppy Drive 55 Replacing the Hard Drive 56 Installing an Expansion Bay Drive 58 Installing a Memory Module 61 Installing an Expansion Card 62 Replacing the Power Supply Unit...

Page 5: ...PC s BIOS 70 Technical Characteristics 71 Regulatory Warranty and Support Regulatory Information 74 Recycling your PC 76 HP Hardware Warranty 77 HP Software Product Limited Warranty 85 International Warranty 87 HP Year 2000 Warranty 87 HP Customer Care Center Phone Numbers 88 Other Services 89 ...

Page 6: ...batteries either to the shop from which you bought them or to the dealer from whom you purchased your PC or to HP so that they can either be recycled or disposed of in the correct way Returned used batteries will be accepted free of charge Do not attempt to connect this product to the phone line during a lightning storm Never install telephone jacks in wet locations unless the telephone line has b...

Page 7: ...e Systems Incorporated Microsoft MS DOS Windows and Windows NT are U S registered trademarks Hewlett Packard France Business Desktop Division 38053 Grenoble Cedex 9 France 2000 Hewlett Packard Company Important Ergonomic Information Improper and prolonged use of keyboards and input devices are among those tasks associated with repetitive strain injury RSI to soft tissues in the hands and arms If y...

Page 8: ... Center Your Desktop Assistant on page 12 for more information HP Brio Internet Center available in some countries only for a range of Web based information and services For more information refer to Get Connected with the HP Brio Internet Center on page 13 Information on the HP Brio Support Web Site Refer to the Manuals section of the HP Brio support web site www hp com go briosupport for a wide ...

Page 9: ...1 Status Setting Up Your Brio This chapter describes how to set up your HP Brio PC Unpacking the PC and Monitor page 2 Connecting Devices to Your PC page 3 Comfort and Safety Checklist page 5 ...

Page 10: ...nd the monitor from their boxes When you have finished unpacking the boxes you will find the items shown here Your monitor or keyboard may be different from the ones shown here Monitor Monitor cable Power cord Brio Guide this manual Mouse Keyboard Brio Assist CD ROMs two HP Brio PC ...

Page 11: ...up the PC connect devices and power cords to the rear of the PC as shown below The connectors are color coded for easy matching Match the colors The connectors are shaped to go in one way only Connecting a Mouse Keyboard Power Cords and a Monitor Mouse green Keyboard purple Monitor blue To connect a monitor to your Brio refer to the manual that came with the monitor Power Connector check the volta...

Page 12: ...u find a comfortable listening level When you are able to hear comfortably and clearly without distortion leave the volume in that position One 15 pin Midi Joystick Connector yellow 25 pin Parallel Connector burgundy To connect a printer to your Brio refer to the manual that came with the printer Two USB Connectors black USB is supported by Windows 98 Windows 2000 One 9 pin Serial Connector turquo...

Page 13: ...provide a comfortable sitting position including features such as a height and tilt adjustment feature curved seat edge a stable base for example five legs and castors adjustable back support a freely rotating swivel fully adjustable padded arm rests Monitor Place your monitor so that the top of the screen is at or slightly below eye level up to 15 degrees Work Surface Arrangement Make sure that a...

Page 14: ...r arms and elbows are relaxed and loose with your upper arms perpendicular to the floor or tilted downward not more than 15 degrees Keep your forearms and hands approximately parallel with the floor with elbows bent between 70 and 115 degrees Keep your elbows close to your sides less than 20 degrees away from your body Hands Wrists Forearms Try to keep your hands wrists and forearms in a relaxed n...

Page 15: ...writing filing and moving around in your work environment helps you maintain a relaxed posture Occasionally stretch the muscles in your hands arms shoulders neck and back You should stretch at least as often as you take brief task breaks at least once every hour Discomfort may be alleviated by using alternative ergonomic designs and accessories such as ergonomically personalized chairs palm rests ...

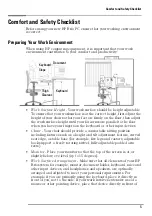
Page 16: ...Comfort and Safety Checklist 8 ...

Page 17: ... Brio PC and how to use the online HP Brio Center preinstalled on your PC Starting Your Brio page 10 Setting Up Windows page 10 Stopping Your Brio page 10 Your PC s Desktop page 11 HP Brio Center Your Desktop Assistant page 12 Using Your Software page 16 Finding Information on the Web page 16 ...

Page 18: ...s time you will be asked to carry out various tasks such as selecting the regional settings to be used on your PC 3 After the initialization routine has finished click on OK and the Brio will restart Stopping Your Brio To stop the PC exit all applications and then use your operatingsystem s Shut Down command in the Start menu for Windows NT 4 0 Windows 98 and Windows 2000 If you want to force your...

Page 19: ...in the HP Brio Center or by referring to the Windows documentation supplied with your computer Start button Use this to start programs open documents find help and change your PC s settings Taskbar button This shows you which applications are running Click on these buttons to open a program window My Computer Use this to see which files and folders are accessible on your PC or network Desktop Use ...

Page 20: ...or any questions you might have You can access the HP Brio Center by double clicking on the HP Brio Center shortcut on your PC s Desktop or selecting HP Brio Center in the Start menu Using Your HP Brio PC Learn how to use your PC Fix a Problem Learn how to fix problems with your HP Brio PC HP Brio Internet Center Acess a suite of Internet based services for small businesses ...

Page 21: ... double clicking on the Brio Internet Center shortcut on your Desktop or selecting HP Brio Internet Center in the Start menu Get business information Access the HP and Internet partners small business Web site some regions only Put Your Business Online Create a Web site for your business and sell online Start Online Collaboration Access office resources from wherever you are HP Special Offer Find ...

Page 22: ...ur Learn how to make the most of your PC s operating system Getting Started Get tips on using your mouse keyboard modem and DVD drive if available Information Roadmap Where to find information on your HP Brio PC Frequently Asked Questions Provides answers to frequently asked questions Optimizing Performance Tips on getting the best performance out of your PC Know Your Configuration Provides inform...

Page 23: ...h your PC Try this before any other troubleshooting Troubleshoot your PC Tips on solving problems with your PC Covers topics such as problems with Windows your DVD drive and modem if available Diagnose your Hardware Information on how to use DiagTools to check your PC s hardware for problems Get the Latest Updates Access the Brio support Web site for the latest updates to preloaded software and dr...

Page 24: ...used to launch the program The file name will end in exe 3 In the File menu select Create Shortcut then click on the newly created file and drag it onto the PC s desktop For more details on customizing Windows refer to Windows online help accessible from the Start menu Refer to your program s documentation or online help for information about its use Finding Information on the Web Once you have se...

Page 25: ... My Brio Isn t Working Properly page 21 What Kind of Problem Is It page 22 Hardware Problems page 23 Software Problems page 31 My PC Has an Audio Sound Problem page 33 Software Problems page 31 Frequently Asked Questions page 41 Need More Help page 41 HP Hardware Diagnostics DiagTools page 42 Brio Assist CD ROMs page 43 Support and Information Services page 45 ...

Page 26: ...ard DVD drive CD RW or modem I still haven t solved my problem and need to do some troubleshooting Does it seem to be a basic problem with Windows or with your modem DVD or CD RW drive Yes Refer to your online HP Brio Center Fix a Problem for information on troubleshooting your PC your DVD drive CD RW or modem No For more detailed help refer to the troubleshooting sections starting on page 19 Stil...

Page 27: ...Contact your authorized support provider The power supply is working properly 1 When you power on the PC check that the light on the On Off button comes on and that you hear the power supply fan 2 If nothing happens contact your authorized support provider The original power supply unit may have to be replaced I II If f f f t t t th h h he e e e p p p pr r r ro o o ob b b blllle e e em m m m p p p...

Page 28: ...s F10 to exit the Setup program saving changes I II If f f f t t t th h h he e e e p p p pr r r ro o o ob b b blllle e e em m m m p p p pe e e er r r rs s s siiiis s s st t t ts s s s c c c con on on ont t t ta a a ac c c ct t t t y y y yo o o ou u u ur r r r a a a au u u ut t t tho ho ho hor r r riiiiz z z ze e e ed d d d s s s su u u up p p pp p p po o o ort rt rt rt p p p pr r r ro o o ov v v v...

Page 29: ...ask button 3 Restart the program to see if it is working normally 4 If it does not work normally restart the PC and try again There is not a hardware problem 1 Run DiagTools refer to page 42 2 If the problem persists try removing any added memory or expansion cards You have installed enough memory in your PC It is recommended that you install at least 64MB of RAM to run Windows 2000 or NT 4 0 on y...

Page 30: ...m your PC wait for a few seconds and then plug it in again Your PC will restart automatically The PC responds to you pressing the power button 1 Save all data and exit all programs if you can 2 Press the power button and keep it pressed for 5 seconds The PC will turn off Is the Problem to Do with Hardware or Something Else Have you checked that How The problem is related to hardware or to some oth...

Page 31: ... the correct connector on the back of the Brio Color coding is used for easy matching The keyboard is clean and no keys are stuck down Check all keys are at the same height and none are stuck The keyboard itself is not defective Either replace the keyboard by a known working unit or try the keyboard with another Brio The keyboard settings are not causing a problem Select Settings Control Panel Key...

Page 32: ... then the screen goes blank Have you checked that How The monitor settings in your Brio are compatible with your monitor Windows NT Restart the Brio and enter VGA mode when prompted during start up Windows 98 Windows 2000 Restart the Brio The Brio opening screen is displayed For Windows 98 when you hear a beep press F8 and then start the Brio in safe mode For Windows 2000 when prompted press F8 an...

Page 33: ...way Run ScanDisk and Disk Defragmenter to see if they detect a problem with the hard disk drive To access these utilities select Programs Accessories System Tools from the Start menu You have not disabled the option to boot your PC from the hard drive in the B B B Bo o o oo o o ot t t t menu of the Setup program Enter the Setup program by pressing F2 at startup then go to the Boot menu The hard di...

Page 34: ...ssing F2 at startup then Go to the Advanced menu Make sure you have enabled Floppy Disk Controller Go to the Main menu You should see 1 44 M 3 5 in in the Legacy Diskette A field The hardware is working properly Run DiagTools to see if it detects a problem with the floppy drive refer to page 42 Advanced Troubleshooting The drive s power and data cables are correctly connected Check that the drive ...

Page 35: ...boot from the CD ROM drive you should place CD ROM before HDD in the Setup Boot Device Priority submenu The hardware is working properly Run DiagTools to see if it detects a problem with the drive refer to page 42 Onboard PCI IDE Enable is selected in the Setup program Enter the Setup program by pressing F2 at startup then go to the Advanced menu Make sure you have selected both in the Onboard PCI...

Page 36: ...00 Windows 98 Display settings of 800 x 600 pixels High Color 16 bit You are using the latest drivers These can be downloaded from the HP Brio support Web site at www hp com go briosupport For more information on using and troubleshooting DVD refer to the PC s online Brio Center The CD ROM or DVD Drive Doesn t Open 1 If you have difficulty removing a disc from the CD ROM or DVD drive during a powe...

Page 37: ...e e ef f f fa a a au u u ullllt t t t is selected and that the printer is set to work online If the printer is on your network you can set it up by browsing for it in Network Neighborhood clicking on the printer s icon then clicking on Install in the File menu Print out a test page to test the printer The parallel port is configured correctly in the PC s Setup program 1 Switch the PC OFF then ON 2...

Page 38: ... bent pins and poor connection External devices Check any connections to external devices for bent pins or poor connection If it is an external device that it is switched on Press the device s power button if there is one and check that the power cable is correctly connected The Modem Doesn t Work Have you checked that How The problem is not described in the Fix a Problem section of the HP Brio Ce...

Page 39: ...been unplugged for too long Change the date and time by selecting Settings Control Panel Date Time from the Start menu or use the Setup program see page 66 If necessary install a new battery see page 64 You Get the Message Some necessary system files are corrupted Have you checked that How You didn t delete any system files Reinstall the operating system or return the PC to its original factory co...

Page 40: ...ft com windows euro asp The font you are using supports the Euro symbol If the symbol is supported by a particular font you will see it in the Character Map accessible by selecting Programs Accessories Charmap in the Windows Start menu Windows 98 or Programs Accessories Programs System Tools Character Map Windows 2000 Your keyboard has a Euro symbol If not you can configure the keyboard Select Set...

Page 41: ...CD ROM drive is correctly set Turn up the volume dial on the front of the drive If you are using headphones or speakers they are correctly connected the operating system volume controls are correctly set Refer to page 4 for information on connecting speakers and headphones Double click on the speaker icon on the taskbar then set the required volume with the volume slider The audio cable for the CD...

Page 42: ...ata compression can reduce the space required The A law and m law hardware compression used by the audio interface enables the sampling of sound at a resolution of 16 bits but it generates the same quantity of data as an 8 bit sample No Output From 8 or 16 Bit Digitized Sounds Have you checked that How You do not have an interrupt conflict or that you have not selected the wrong DMA channel Use yo...

Page 43: ...er cord 2 Remove the PC s cover refer to page 49 3 Check the memory modules are correctly installed of the correct type and in the correct sockets refer to page 61 4 Close the PC reconnect the power cord and check that the PC boots starts The PC s memory modules are working 1 Disconnect the power cord 2 Remove the PC s cover refer to page 49 3 Replacethememorymodulesbyknownworking memory modules f...

Page 44: ...board The keyboard is working 1 Switch off the PC 2 Replace the keyboard by a known working unit 3 Switch on the PC and check it works Run DiagTools Refer to page 42 The keyboard port is working 1 Disconnect the keyboard from the PC 2 Attach the keyboard to another PC of the same model 3 If the keyboard works you may need a new system board Contact your authorized support provider You are using th...

Page 45: ...connect the power cord 2 Remove the PC s cover refer to page 49 3 Check the floppy drive s power and data cables are correctly connected refer to page 53 and page 55 4 Close the PC then switch it on and check it works The drive cable is working 1 Disconnect the power cord 2 Remove the PC s cover refer to page 49 3 Replace the floppy drive cable by a known working cable from the same model of PC if...

Page 46: ...he hard disk DVD or CD ROM drive is working To test your hard drive run DiagTools from the Brio Assist CD ROM Drivers Utilities To test your DVD or CD ROM drive run DiagTools from the Utility Partition on your hard drive Refer to page 42 You are using the latest BIOS for your PC Download the latest BIOS and instructions for its installation from HP s Web at www hp com go briosupport Advanced Troub...

Page 47: ... in the PC s Setup program the recommended method if you have access to this option Refer to page 68 Clear your PC s CMOS manually Refer to page 69 Advanced Troubleshooting Power is correctly connected to the system board 1 Disconnect the power cord 2 Remove the PC s cover refer to page 49 3 Check the power connector is correctly attached to the system board 4 Close the PC reconnect the power cord...

Page 48: ... You are using the latest BIOS for your PC Download the latest BIOS and instructions for its installation from HP s Web at www hp com go briosupport I II If f f f t t t th h h he e e e p p p pr r r ro o o ob b b blllle e e em m m m p p p pe e e er r r rs s s siiiis s s st t t ts s s s c c c con on on ont t t ta a a ac c c ct t t t y y y yo o o ou u u ur r r r a a a au u u ut t t tho ho ho hor r r ...

Page 49: ...the software manufacturer for help or information on known compatibility problems Can I use USB hardware devices with the operating system preloaded on my PC Yes USB is supported by both Windows 98 and Windows 2000 How can I find out what hardware and BIOS version are used in my PC Restart the PC and press ESC during the Power On Self Test POST The BIOS version will be displayed at the top of the ...

Page 50: ... PC and see whether it is functioning correctly diagnose hardware related problems provide precise information to support personnel so that they can solve your problems quickly and efficiently How Do I Run DiagTools You can run DiagTools from The Utility Partition on your PC s hard drive To run diagnostics from the hard drive restart the PC and press F10 when the message Press F10 to start hardwar...

Page 51: ...ssist CD ROM System Recovery in your PC an HTML page is displayed containing detailed instructions about how to use the Brio Assist CD ROMs Note If the PC does not boot from the Brio Assist CD System Recovery you must change the order of devices from which your PC tries to start up To do so restart your PC and press F2 when prompted to enter the HP Setup program Change the Boot Device Priority in ...

Page 52: ...d restart the PC 3 Reinstall drivers for any devices that were not part of your PC s original configuration 4 Restore all data files and software applications that were not part of your PC s original configuration If you received any software CDs with your PC in addition to the Brio Assist CD ROMs you must also reinstall these applications Manually Reinstalling Drivers 1 Insert the Brio Assist CD ...

Page 53: ...n a brief description of the problem Frequency How often has the problem occurred Run OK How long has the PC been running normally Recent changes to the PC Have there been any recent changes made to the PC Any DiagTools errors Run DiagTools Refer to page 42 Hardware Which BIOS version is used The BIOS version is displayed on the Summary Screen accessed by pressing Esc during start up Any BIOS para...

Page 54: ...Support and Information Services 46 ...

Page 55: ... Important Before You Start page 48 Inside the Computer page 48 Removing the Cover and Front Panel page 49 Replacing the System Board page 52 Cables and Connectors in Your PC page 53 Replacing a Processor page 54 Replacing the Floppy Drive page 55 Replacing the Hard Drive page 56 Installing an Expansion Bay Drive page 58 Installing a Memory Module page 61 Installing an Expansion Card page 62 Repla...

Page 56: ...an damage electronic components Turn all equipment OFF Don t let your clothes touch the accessory To equalize the static electricity rest the accessory bag on top of the PC while you are removing the accessory from the bag Handle the accessory as little as possible and with care Inside the Computer Floppy drive Hard drive Power supply Up to Three PCI Expansion Card Slots Some slots may come with p...

Page 57: ...d and all external cables 1 Place the PC on a flat surface and stand behind it 2 Disconnect all cables from the rear of the PC 3 Loosen the three screws at the rear of the PC with a cross headed Philips screwdriver 4 Slide the cover back by about 1cm 0 3 inches 5 Pulling the bottom edges of the cover apart slightly lift it up and off the PC ...

Page 58: ...cm 0 3 inches between the cover and the front of the PC 3 Make sure that the protruding metal tab at the rear of the PC chassis fits through the slit on the top right of the cover 4 When you are sure that the bottom sides of the cover fit correctly into the guide rails slide the cover towards the front of the PC 5 Tighten the three screws on the back of the computer ...

Page 59: ...us panel connector connected from the rear of the front panel 4 Lay the front panel on a flat surface beside the PC To Replace the Front Panel 1 Reconnect the status panel connector to the rear of the panel taking care to connect it the right way round 2 Insert the two plastic clips on one side of the panel then snap the panel into place Note If the PC does not start properly or will not start at ...

Page 60: ...o the appropriate section for instructions on removing the individual components 6 Install any components removed from the old system board in the new board Refer to the appropriate section for instructions on installing the individual components 7 Replace the system board in the PC ensuring that it is properly in place and attach the six screws 8 Reconnect the following connectors and cables stat...

Page 61: ... power cables These are connected to the system board and internal devices as shown below You must also connect the power connector status panel connector and CD audio connector if a CD ROM is fitted to the system board Power connector CD ROM DVD Tape or Zip drive Hard drive Floppy drive CD audio connector Status panel connector Processor fan connector ...

Page 62: ...and remove the heatsink fan unit This requires you to release it first on one side then on another 5 Raise the lever to the side of the socket to release the old processor then lift it out 6 Install the new processor in the socket with its corner markers facing the corner markers on the socket then lower the lever to lock it in place 7 Fit the new heatsink fan unit and fasten its retention clip fi...

Page 63: ...fully the position of these screws 5 Slide the floppy drive tray out through the PC s front panel 6 Slide the new drive into the floppy drive bay making sure that the connectors on the rear of the drive are at the back of the bay 7 Replace the two screws 8 Replace the floppy drive connectors 9 Replace the front panel Refer to page 51 10 Replace the cover Refer to page 50 Note If the PC does not st...

Page 64: ...cables 1 Switch off the PC and remove the PC s cover Refer to page 49 2 Remove the hard drive s data and power cables 3 Remove the single screw that holds the hard drive in place Caution Take care when handling the hard drive A one quarter inch drop can damage it 4 Slide the drive tray sideways until it is released from its mountings Holding the drive tray firmly so as not to drop it pull the tray...

Page 65: ... 7 Replace the four screws 8 Fix the hard drive tray in place on its mountings taking care not to damage the status panel cables 9 Reconnect the power and data cables Refer to Cables and Connectors in Your PC on page 53 if you are unsure of which cables to use 10 Replace the tray fixing screw 11 Replace the PC s cover Refer to page 51 ...

Page 66: ...o make any adjustment to the laser unit Refer to the label on the CD ROM for power requirements and wavelength This product is a class 1 laser product 1 Switch off the PC and remove the PC s cover Refer to page 49 2 Remove the PC s front panel taking care to disconnect the status panel cable Refer to page 51 3 Disconnect the cables from the rear of the drive 4 Remove the two retaining screws notin...

Page 67: ...he status panel cable Refer to page 51 3 Remove the plastic masking plate from the front panel by prising the retaining tabs open by hand 4 If the bay has a metal blanking plate tear it off or break it off by hand or with a screwdriver 5 Slide the drive in from the front of the PC aligning it with the drive in place in the shelf above 6 Align the drive with the drive in the shelf above Tighten the...

Page 68: ...pairing Your e Vectra If this is the only device fit the end CD connector marked CD Master 8 Check that the jumpers on the drive are set to CS cable select mode 9 Replace the front panel Refer to page 51 10 Replace the cover Refer to page 50 ...

Page 69: ...ccess the system board 4 Either remove the module you want to replace or locate an empty memory module socket 5 Make sure that the socket s clips are open 6 Align the grooves on the bottom of the module with the corresponding marks on the socket and push it firmly into place The clips close automatically 7 Replace the cover Refer topage 51 Position of memory modules ...

Page 70: ...he PC s cover Refer to page 49 3 Locate the slot you want to use If fitting a card in an empty slot break off the slot cover facing the slot you want to use If replacing a card in an expansion slot undo the screw holding the card in place and lift it out 4 Aligning the new card carefully press it firmly into the socket and tighten the retaining screw 5 Replace the PC s cover Refer topage 51 ...

Page 71: ...inside 1 Switch off the PC 2 Remove the PC s cover Refer to page 49 3 Remove the three screws from the rear of the PC 4 Disconnect all power cables from installed drives and from the system board 5 Lift the power supply unit out of the PC 6 Place the new power supply unit inside the computer and tighten the three screws on the rear of the PC 7 Reconnect all the power cables to the drives and the s...

Page 72: ...urn used batteries to the shop from which you bought them or to the dealer from which you purchased your PC or to HP so that they can either be recycled or disposed of in an environmentally sound way Returned used batteries will be accepted free of charge 1 Switch off the PC 2 Remove the PC s cover Refer to page 49 3 Lay the PC on its side to gain access to the system board 4 Remove the old batter...

Page 73: ...l information on your PC For more detailed information refer to the PC s datasheet in the library on HP s web site www hp com desktops HP Setup Program page 66 Clearing Your PC s CMOS BIOS Settings page 68 Your PC s BIOS page 70 Technical Characteristics page 71 ...

Page 74: ...your configuration including processor speed the amount of installed RAM installed drives time and date Advanced for setting Advanced Features Security for setting a password to restrict access to your computer It is possible to set a Supervisor or a User password The Supervisor can change all settings and the User can only change the date and time Setting a password will by preventing access to t...

Page 75: ...disk Exit for leaving the Setup program Setting System Defaults The Setup program changes system behavior by modifying the power on initialization parameters Setting incorrect values may cause system boot failure If this occurs press the F9 key while you are in the Setup program to load the Setup program s default values or select Load default values in the Exit menu of the Setup program This shou...

Page 76: ... expansion card or other device when you are having problems booting the PC You can clear CMOS settings by using your PC s BIOS Setup program by opening your PC and clearing CMOS manually Clearing CMOS Using the Setup Program If you are able to gain access to your PC s Setup program use the following simple method to clear CMOS settings 1 Restart your PC and press F2 when the message Press F2 to e...

Page 77: ...r PC and clearing CMOS manually recommended if you cannot solve the problem by using Setup 1 Remove the PC s cover Refer to page 49 2 Move the Clear CMOS jumper to the Clear CMOS position shown above If you want to clear passwords only move the Clear Password jumper to the Clear Password position 3 Replace the cover and reconnect the power cord 4 Switch on the PC 5 Shut down the PC and replace the...

Page 78: ...e link between the software running on your PC and your PC s hardware The BIOS is stored in a chip on the system board A PC s BIOS is specific to that PC Updating Your PC s BIOS Many problems with your PC can be solved by updating flashing the PC s BIOS Updating flashing your BIOS is a simple procedure that involves booting your PC from a floppy disk containing the new BIOS The latest BIOS for you...

Page 79: ...ipped For more information refer to the product s data sheet at HP s web site www hp com desktops When the computer is turned off with the power button on the front panel the power consumption falls below 3W but it is not zero The special on off method used by these computers considerably extends the lifetime of the power supply To reach zero power consumption in off mode either unplug the power o...

Page 80: ...Technical Characteristics 72 ...

Page 81: ...your HP Brio PC and how to contact support Regulatory Information page 74 Recycling your PC page 76 HP Hardware Warranty page 77 HP Software Product Limited Warranty page 85 International Warranty page 87 HP Year 2000 Warranty page 87 HP Customer Care Center Phone Numbers page 88 Other Services page 89 ...

Page 82: ...IEC 555 2 1982 A1 1985 EN60555 2 1987 IEC 1000 3 3 1994 EN61000 3 3 1995 FCC Title 47 CFR Part 15 Class B 2 1 The product was tested in a typical configuration with Hewlett Packard Personal Computer Systems 2 This Device complies with Part 15 of the FCC Rules Operation is subject to the following two conditions 1 this device may not cause harmful interference and 2 this device must accept any inte...

Page 83: ...SA use a UL listed type SVT detachable power cord For your safety never remove the PC s cover without first removing the power cord and any connection to a telecommunication network Always replace the cover before switching on again Si le cordon secteur n est pas livré avec votre ordinateur utiliser un cordon secteur en accord avec votre code electrique national USA utiliser un cordon secteur UL l...

Page 84: ...ervice Connection to Party Line Service is subject to state tariffs When programming and or making test calls to emergency numbers Remain on the line and briefly explain to the dispatcher the reason for the call Perform such activities in the off peak hours such as early morning or late evenings The Telephone Consumer Protection Act of 1991 makes it unlawful for any person to use a computer or oth...

Page 85: ...ce upon prompt return of the product to your HP Authorized Support Provider or other HP designate Unless otherwise stated or agreed upon in writing with HP all hardware components must be returned for refund with the entire central processor unit The central processor unit CPU keyboard mouse and Hewlett Packard accessories inside the system unit at the time of delivery such as video adapters mass ...

Page 86: ...ranty period Exclusions Warranty does not apply to defects resulting from a improper or inadequate maintenance or calibration b software interfacing parts or supplies not supplied by HP c unauthorized repair maintenance modification or misuse d operation outside of the published operating specifications for the product e improper site preparation or maintenance f virus infection or g such other ex...

Page 87: ...le in your country Consult your local HP Sales and Service Office or HP Authorized Support Provider for Warranty Entitlements available in your country Warranty Entitlement Descriptions 5 Year Limited Hardware Warranty 5 Year Free Parts Exchange Service Free parts exchange service for the central processor unit keyboard and mouse provided by an HP Sales and Service Center or an HP Authorized Suppo...

Page 88: ... provided by an HP Sales and Service Center or an HP Authorized Support Provider during the three year product warranty period F F F Fo o o or r r r H H H HP P P P K K K Ka a a ay y y ya a a ak k k k P P P PC C C C W W W Wo o o or r r rk k k ks s s st t t ta a a at t t ti i i io o o on n n ns s s s Free parts exchange service for the product keyboard and mouse provided by an HP Sales and Service C...

Page 89: ... Options If HP receives notice of a defect in your HP hardware product during the hardware product s warranty period HP or its designate may at its option and depending on warranty entitlement 1 Repair the parts which prove to be defective OR 2 Replace the parts which prove to be defective OR 3 Provide you the end user customer with the appropriate part s required for repair In this event HP may P...

Page 90: ...uiring support in order to determine warranty entitlement Note Before dispatching an HP Service Representative or replacement part HP will attempt to resolve your support issue via the telephone HP Lifeline Telephone Support a fee based service is available for telephone assistance not covered by the warranty of your hardware product or for assistance for your hardware product outside of the warra...

Page 91: ...ibit routine travel service is provided on a negotiated basis at extra charge Response time for on site service in an HP Service Travel Area is normally next business day excluding HP holidays for HP Travel Zones 1 3 generally 100 miles or 160 Km from the HP office Response time is second business day for Zones 4 and 5 200 miles 320 Km third business day for Zone 6 300 miles 480 Km and negotiated ...

Page 92: ...turning your product for repair service is recommended You are required to return the complete product in an acceptable and repairable condition Return for Repair service is limited to the repair of hardware failures only Returned product failures caused by non HP products whether internal or external to the system processor unit are subject to standard per incident repair charges If a hardware fa...

Page 93: ...ied upon which this product is recorded to be free from defects in materials and workmanship under normal use for a period of NINETY 90 DAYS from the date of delivery In the event the media proves to be defective during the warranty period Customer s remedy shall be to return the media to HP for replacement Should HP be unable to replace the media within a reasonable amount of time Customer s alte...

Page 94: ...lar purpose is limited to the 90 day duration of this written warranty Some states or provinces do not allow limitations on how long an implied warranty lasts so the above limitation or exclusion may not apply to you This warranty gives specific legal rights and you may also have other rights which vary from state to state or province to province Limitation of Liability and Remedies THE REMEDIES P...

Page 95: ...ng and sequencing from into and between the twentieth and twenty first centuries and the years 1999 and 2000 including leap year calculations when used in accordance with the product documentation provided by HP including any instructions for installing patches or upgrades provided that all other products e g hardware software firmware used in combination with such HP Product s properly exchange d...

Page 96: ...0 999 0700 outside Seoul only Europe Middle East Africa Malaysia 60 3 295 2566 Austria 43 0711 420 10 80 Penang 1 300 88 00 28 Belgium Dutch 32 02 626 88 06 French 32 02 626 88 07 New Zealand 64 9 356 6640 Denmark 45 39 29 40 99 Philippines 63 2 867 3551 English International 44 0171 512 52 02 Singapore 65 272 5300 Finland 358 0203 472 88 Taiwan 886 2 2717 0055 France 33 01 43 62 34 34 Thailand 66...

Page 97: ...ss No charge Anytime HP BBS WWW CompuServe America Online Technical Phone Support Basic assistance for system setup configuration start up and hardware diagnosis First year 3 years for hardware failure diagnosis Business hours No charge At time of delivery HP Lifeline Phone Support Basic assistance for system setup configuration and start up After first year Business hours Per call fee no time lim...

Page 98: ...Other Services 90 ...

Page 99: ...CMOS 68 CMOS 68 configuring your PC 70 connecting keyboard 3 monitor 3 mouse 3 power cords 3 to the Internet 13 connectors in the PC 53 cover removing 49 replacing 50 51 D DiagTools features 42 running 42 drivers reinstalling 43 DVD installing 58 recommended configuration 28 E ergonomic information v errors at startup 35 expansion cards installing 62 F Fix a Problem 15 floppy drive replacing 55 H ...

Page 100: ... 23 36 modem 30 monitor 24 PC doesn t start 19 20 printer 29 software 31 what to do first 18 processor replacing 54 R replacing battery 64 CD ROM 58 floppy drive 55 hard drive 56 power supply 63 processor 54 system board 52 S software problems 31 starting the PC 10 support 73 system board replacing 52 T troubleshooting HP Brio Center 15 what to do first 18 your PC 15 U updating BIOS 70 using CD RW...

Page 101: ......

Page 102: ...e e e er r r r Y Y Y Yo o o ou u u ur r r r p p p pr r r ro o o odu du du duc c c ct t t t w w w will ill ill ill n n n no o o ot t t t b b b be e e e ac ac ac acc c c ce e e ep p p pt t t te e e ed d d d f f f fo o o or r r r r r r re e e ep p p pa a a ai i i ir r r r un un un unl l l le e e es s s ss s s s y y y yo o o ou u u u f f f fi i i ir r r rs s s st t t t c c c co o o on n n nt t t tac a...

Reviews: