background image

Copyright © Huawei Technologies Co., Ltd. 2011. All 
rights reserved. 


Trademarks and Permissions


, and 

  are trademarks or 

registered trademarks of Huawei Technologies Co., Ltd. 
Other trademarks, product, service and company names mentioned 
are the property of their respective owners. 
 

NO WARRANTY


THE CONTENTS OF THIS MANUAL ARE PROVIDED “AS IS”. EXCEPT 
AS REQUIRED BY APPLICABLE LAWS, NO WARRANTIES OF ANY 
KIND, EITHER EXPRESS OR IMPLIED, INCLUDING BUT NOT LIMITED 
TO, THE IMPLIED WARRANTIES OF MERCHANTABILITY AND FITNESS 
FOR A PARTICULAR PURPOSE, ARE MADE IN RELATION TO THE 
ACCURACY, RELIABILITY OR CONTENTS OF THIS MANUAL. 
TO THE MAXIMUM EXTENT PERMITTED BY APPLICABLE LAW, IN NO 
CASE SHALL HUAWEI TECHNOLOGIES CO., LTD BE LIABLE FOR ANY 
SPECIAL, INCIDENTAL, INDIRECT, OR CONSEQUENTIAL DAMAGES, 
OR LOST PROFITS, BUSINESS, REVENUE, DATA, GOODWILL OR 
ANTICIPATED SAVINGS. 


Summary of Contents for G6620

Page 1: ...DED AS IS EXCEPT AS REQUIRED BY APPLICABLE LAWS NO WARRANTIES OF ANY KIND EITHER EXPRESS OR IMPLIED INCLUDING BUT NOT LIMITED TO THE IMPLIED WARRANTIES OF MERCHANTABILITY AND FITNESS FOR A PARTICULAR PURPOSE ARE MADE IN RELATION TO THE ACCURACY RELIABILITY OR CONTENTS OF THIS MANUAL TO THE MAXIMUM EXTENT PERMITTED BY APPLICABLE LAW IN NO CASE SHALL HUAWEI TECHNOLOGIES CO LTD BE LIABLE FOR ANY SPEC...

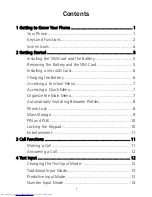
Page 2: ...SD Card 6 Charging the Battery 6 Accessing a Function Menu 7 Accessing a Quick Menu 7 Organize the Main Menu 7 Automatically Switching Between Profiles 8 Phone Lock 8 Mass Storage 9 PIN and PUK 10 Locking the Keypad 10 Entertainment 11 3 Call Functions 11 Making a Call 11 Answering a Call 12 4 Text Input 12 Changing the Text Input Mode 12 Traditional Input Mode 13 Predictive Input Mode 13 Number I...

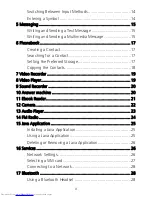
Page 3: ...ed Storage 17 Copying the Contacts 18 7 Video Recorder 19 8 Video Player 19 9 Sound Recorder 20 10 Answer machine 20 11 Ebook Reader 21 12 Camera 22 13 Audio Player 23 14 FM Radio 24 15 Java Application 25 Installing a Java Application 25 Using a Java Application 25 Deleting or Removing a Java Application 26 16 Services 26 Network Settings 26 Selecting a SIM card 27 Connecting to a Network 28 17 B...

Page 4: ...iii Transferring Data 29 18 STK 29 19 Chat Functions 30 20 Warnings and Precautions 30 ...

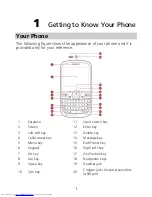
Page 5: ...your reference 1 Earpiece 11 Input switch key 2 Screen 12 Enter key 3 Left soft key 13 Delete key 4 Call Answer key 14 Message key 5 Menu key 15 End Power key 6 Keypad 16 Right soft key 7 Alt key 17 Ok Confirm key 8 A a key 18 Navigation keys 9 Space key 19 Headset jack 10 Sym key 20 Charger jack Universal serial bus USB port ...

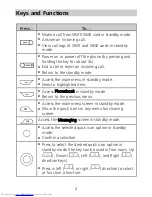
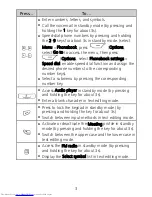
Page 6: ...nu in standby mode Select a highlighted item Access Phonebook in standby mode Return to the previous menu Access the main menu screen in standby mode Show the quick icons in any menu functioning screen Access the Messaging screen in standby mode Access the selected quick icon option in standby mode Confirm a selection Press to select the desired quick icon option in standby mode the key can be use...

Page 7: ...r keys Select a submenu by pressing the corresponding number key Access Audio player in standby mode by pressing and holding the key for about 3s Enter a blank character in text editing mode Press to lock the keypad in standby mode by pressing and holding the key for about 3s Switch between input methods in text editing mode Activate or deactivate the Meeting profile in standby mode by pressing an...

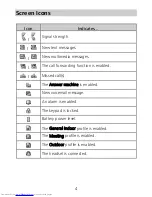
Page 8: ...he call forwarding function is enabled Missed call s The Answer machine is enabled New voicemail message An alarm is enabled The keypad is locked Battery power level The General Indoor profile is enabled The Meeting profile is enabled The Outdoor profile is enabled The headset is connected ...

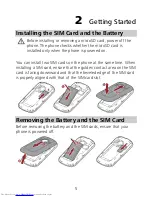
Page 9: ...e phone is powered on You can install two SIM cards on the phone at the same time When installing a SIM card ensure that the golden contact area on the SIM card is facing downward and that the beveled edge of the SIM card is properly aligned with that of the SIM card slot Removing the Battery and the SIM Card Before removing the battery and the SIM cards ensure that your phone is powered off ...

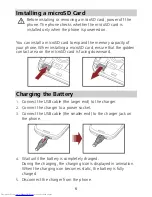
Page 10: ...card ensure that the golden contact area on the microSD card is facing downward Charging the Battery 1 Connect the USB cable the larger end to the charger 2 Connect the charger to a power socket 3 Connect the USB cable the smaller end to the charger jack on the phone 4 Wait until the battery is completely charged During the charging the charging icon is displayed in animation When the charging ico...

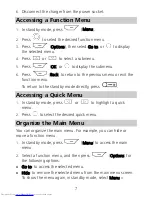
Page 11: ...ion menu To return to the standby mode directly press Accessing a Quick Menu 1 In standby mode press or to highlight a quick menu 2 Press to select the desired quick menu Organize the Main Menu You can organize the main menu For example you can hide or move a function menu 1 In standby mode press Menu to access the main menu 2 Select a function menu and then press Options for the following options...

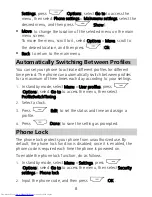
Page 12: ...es for a maximum of three times each day according to your settings 1 In standby mode select Menu User profiles press Options select Go to to access the menu then select ProfileSwitchTiming 2 Select a clock 3 Press Edit to set the status and time and assign a profile 4 Press Done to save the setting as prompted Phone Lock The phone lock protects your phone from unauthorized use By default the phon...

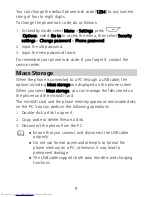
Page 13: ...ted to a PC through a USB cable the options including Mass storage are displayed on the phone screen When you select Mass storage you can manage the files stored on the phone and the microSD card The microSD card and the phone memory appear as removable disks on the PC You can perform the following operations 1 Double click a disk to open it 2 Copy paste or delete files on a disk 3 Disconnect the ...

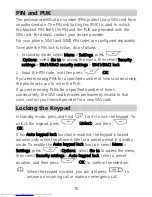
Page 14: ... of times consecutively the phone asks you to enter the PUK If you enter wrong PUKs for a specified number of times consecutively the SIM card becomes permanently invalid In that case contact your service provider for a new SIM card Locking the Keypad In standby mode press and hold for 3s to lock the keypad To unlock the keypad press Unlock and then OK If the Auto keypad lock function is enabled t...

Page 15: ...nd play radio programs Ebook reader to read the e books stored on the phone or the microSD card Games to provide games and fun Java to run Java applications Facebook to send and receive instant messages 3 Call Functions Making a Call 1 In standby mode enter a phone number To make an international call press to enter the plus sign and then enter the country or region code area code and phone number...

Page 16: ... Answer to answer the call Press to reject the call Press Silent to silence the phone Then press Reject to reject the call or press Options and then select Answer to answer the call If the Any key answer function is enabled you can press any key except and to answer an incoming call 4 Text Input Changing the Text Input Mode The icon of the current text input mode is displayed in the upper left cor...

Page 17: ...a space In any text input mode press to add a new paragraph Traditional Input Mode In traditional input mode you can press the key labeled with the desired letter to enter the letter on the key Predictive Input Mode In predictive input mode you can enter a word as follows 1 Press each key once to enter the letters according to the spelling sequence of the desired word The phone displays the candid...

Page 18: ...guage is English Entering a Symbol To enter a symbol with the QWERTY keypad in any input mode you can do as follows Using to enter a symbol In text editing mode do as follows To enter only a symbol press once and then the key labeled with the desired symbol To enter multiple symbols press twice and then the keys labeled with the desired symbols Using to enter a symbol To enter a desired symbol in ...

Page 19: ...acts from the phonebook 5 Highlight a recipient and then press to directly send the message or press Options for the following options Send to send the message to the recipient Save to save the message to Drafts and exit the message editing screen Writing and Sending a Multimedia Message 1 Select Menu Messaging press Options select Go to to access the menu then select Write message or press in sta...

Page 20: ...dd from Phonebook to add the desired contacts from the phonebook 6 Highlight a recipient and then press to directly send the message or press Options for the sending options as follows Send to send the message Change to Cc to copy the message to the recipient Change to Bcc to blind copy the message to the recipient Save to Drafts to save the message to Drafts You can contact your service provider ...

Page 21: ...ct 1 Select Menu Phonebook press Options select Go to to access the menu 2 Enter several letters of the name until the desired contact appears or press or to scroll to the desired contact Setting the Preferred Storage You can set the storage location where the new contacts are stored 1 Select Menu Phonebook press Options select Go to to access the menu 2 Press Options and then select Phonebook set...

Page 22: ...py 4 Select a final location by selecting To phone To SIM1 To SIM2 or To file as required 5 Press OK to copy the contact to the desired location Copying Multiple Contacts 1 Select Menu Phonebook press Options select Go to to access the menu 2 Press Options and then select Phonebook settings Copy contacts 3 Press or to scroll to the desired operation such as SIM1 to phone or Phone to SIM1 4 Press O...

Page 23: ...n or to zoom out Press to stop recording and save the video clip as prompted 8 Video Player The video player can play downloaded or recorded video clips that are saved in the Videos folder in File manager of Phone or Memory card To play a video clip do as follows 1 Select Menu Video player press Options select Go to to access the menu 2 Press and to select a video clip 3 Press Options and then sel...

Page 24: ...o record an audio clip do as follows 1 Select Menu Sound recorder press Options select Go to to access the menu 2 Press Options and then select New record to record an audio clip During the recording press Pause Cont or to pause or continue 3 Press Stop to stop recording the audio clip and then save the recorded clip as prompted 10 Answer machine When the answer machine is enabled a caller will be...

Page 25: ...her phone Set up a call between the other phone and your phone press the hot key that has been set on your phone after an alert tone is heard and then input the password following the interactive voice response IVR The phone displays a message on the standby screen if there is a new voicemail message You can also manually access the voicemail messages by selecting Menu Answer machine press Options...

Page 26: ...ored in a folder other than Ebook the phone automatically moves the ebook to Ebook so that you can find it easily in your next reading 12 Camera The phone is provided with a built in 1 3 mega pixel complementary metal oxide semiconductor CMOS camera which supports the photographing functions 1 Select Menu Camera press Options select Go to to launch the camera 2 On the screen for taking a picture d...

Page 27: ...dset to enjoy the enhanced music effect The music files are loaded from My music on the phone or on the microSD card 1 In standby mode select Menu Audio player press Options select Go to to access the menu or press and hold for 3s 2 Press to start playing music When the music is being played you can do as follows Press and to adjust the volume Press and to switch between songs Press the button on ...

Page 28: ...n do as follows Press to stop or continue the playing Press or to adjust the volume Press or to adjust the frequency at a precision of 0 1 MHz Press and hold or then release the key to switch to the adjacent channel Press to search and save channels Press the number key to switch to the corresponding channel based on the settings in Channel list Press the button on the headset cable to switch betw...

Page 29: ...ervice GPRS connection is proper Installing a Java Application To install a Java applications on your phone do as follows 1 Store the Java installation files in jar or jad format to Phone or Memory card 2 Select a Java installation file press Options and then select Install to start the installation 3 Press Yes to confirm the certification information 4 Select a location to install the Java applic...

Page 30: ...ion information When the deleting is successful the message Deleted is displayed 16 Services You can access Wireless Application Protocol WAP sites and use WAP based services on your phone To access WAP sites on your phone you need to subscribe to the corresponding service from your service provider and set the relevant parameters on your phone For details about the services and charges contact yo...

Page 31: ...e menu then select Internet service Settings Profiles 2 Select SM1 or SIM2 3 Select Add new and then press 4 Set the Internet parameters based on the information obtained from your service provider 5 Press Done to save the settings 6 Select your service provider press Options and then select Activate If the profile supported by your service provider already exists select the profile press Options ...

Page 32: ...s Options and then select Done to access the address 17 Bluetooth Through Bluetooth you can exchange data with other Bluetooth devices and use a Bluetooth headset You can enable the Bluetooth function by performing Bluetooth settings Using a Bluetooth Headset No Bluetooth headset is delivered in the product package If a Bluetooth headset is required you can buy one by yourself 1 Select Menu Blueto...

Page 33: ...th function 2 Select My device Search new device to search for available Bluetooth devices 3 Pair the phone with the desired device When a Bluetooth device is connected with the phone for the first time you need to enter a pairing password for verification 4 After pairing exchange data between the phone and the Bluetooth device 18 STK The SIM Tool Kit STK function is available only if it is provid...

Page 34: ... card has been inserted 20 Warnings and Precautions This section contains important information pertaining to the operating instructions of your device It also contains information about how to use the device safely Read this information carefully before using your device Electronic Device Power off your device if using the device is prohibited Do not use the device when using the device causes da...

Page 35: ...quipment in fuel depots storage and distribution areas and chemical plants In addition adhere to restrictions in areas where blasting operations are in progress Before using the device watch out for areas that have potentially explosive atmospheres that are often but not always clearly marked Such locations include areas below the deck on boats chemical transfer or storage facilities and areas whe...

Page 36: ...cuit The device complies with the RF specifications when the device is used near your ear or at a distance of 1 5 cm from your body Ensure that the device accessories such as a device case and a device holster are not composed of metal components Keep your device 1 5 cm away from your body to meet the requirement earlier mentioned On a stormy day with thunder do not use your device when it is bein...

Page 37: ...lidate any approval or warranty applicable to the device result in the non operation of the device and cause danger Battery and Charger Unplug the charger from the electrical plug and the device when not in use The battery can be charged and discharged hundreds of times before it eventually wears out When the standby time and the talk time are shorter than the normal time replace the battery Use t...

Page 38: ...y is incorrectly replaced Recycle or dispose of used batteries according to the local regulations or reference instruction supplied with your device Cleaning and Maintenance The device battery and charger are not water resistant Keep them dry Protect the device battery and charger from water or vapor Do not touch the device or the charger with a wet hand Otherwise it may lead to a short circuit a ...

Page 39: ...gency Call You can use your device for emergency calls in the service area The connection however cannot be guaranteed in all conditions You should not rely solely on the device for essential communications Certification Information SAR This device meets guidelines for exposure to radio waves Your device is a low power radio transmitter and receiver As recommended by international guidelines the d...

Page 40: ...nst harmful interference in a residential installation This equipment generates uses and can radiate radio frequency energy and if not installed and used in accordance with the instructions may cause harmful interference to radio communications However there is no guarantee that interference will not occur in a particular installation If this equipment does cause harmful interference to radio or t...

Page 41: ...ing of the device or batteries contact your local city office the household waste disposal service or the retail store where you purchased this device The disposal of this device is subject to the Waste from Electrical and Electronic Equipment WEEE directive of the European Union The reason for separating WEEE and batteries from other waste is to minimize the potential environmental impacts on hum...

Page 42: ...s that this device is in compliance with the essential requirements and other relevant provisions of Directive 1999 5 EC For the declaration of conformity visit the Web site www huaweidevice com certification Notice Observe the national local regulations in the location where the device is to be used This device may be restricted for use in some or all member states of the European Union EU Versio...

Reviews: