background image

LR-5RG

LINE LASER RECEIVER

English

1~12

Deutsch

13~25

Français

26~38

Italiano

39~50

Español

51~62

P

усский

63~75

support@huepar.com

V4

日本語

76~85

Summary of Contents for LR-5RG

Page 1: ...LR 5RG LINE LASER RECEIVER English 1 12 Deutsch 13 25 Français 26 38 Italiano 39 50 Español 51 62 Pусский 63 75 support huepar com V4 日本語 76 85 ...

Page 2: ......

Page 3: ...s Warranty Please turn on the Pulse Mode of the laser level when using with the receiver The receiver can ONLY be used in Pulse Mode Huepar receiver can only be compatible with Huepar laser levels that feature PULSE MODE function Please pay attention to whether the laser level can be used with the Huepar receiver when purchasing If you have any questions please contact us by support huepar com CON...

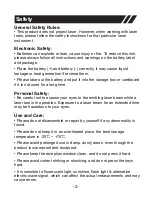
Page 4: ...ong time Personal Safety Be careful not to expose your eyes to the emitting laser beam while a laser tool is in operation Exposure to a laser beam for an extended time may be hazardous to your eyes Use and Care Please do not disassemble or repair by yourself if any abnormality is found Please do not keep it in an overheated place the best storage temperature is 25 70 Please avoid prolonged use in ...

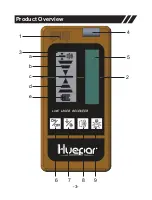
Page 5: ... 3 Product Overview 1 2 3 4 5 a b c d e 6 7 8 9 LINE LASER RECEIVEER ...

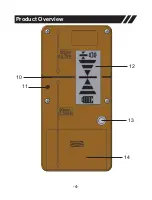
Page 6: ... 4 Product Overview 10 11 12 13 14 ...

Page 7: ... Indicator move upward e Power Indicator 4 Bubble Vial 5 Laser Reception Window 6 Power ON OFF Button 7 Accuracy Button Fine Medium 8 Volume Button Loud Soft Mute 9 Illumination ON OFF Button 10 Rear Center Mark 11 Alignment Hole 12 Rear LCD Display Screen 13 Thread Mount 14 Battery Compartment 15 Clamp 16 Tightening Knob on the Clamp 17 Adjusting Knob on the Clamp ...

Page 8: ...11 and tighten the tightening knob 16 Set Up Loosen the adjusting knob 17 and fix the clamp onto a measuring rod pole or similar object Tighten the adjusting knob 17 to secure the clamp Switch on the pulse mode of the laser level When locating the laser beam loosen the clamp to allow for up down positioning When the laser beam is found tighten the adjusting knob 17 again to secure the object ...

Page 9: ...ode Power OFF Press again to turn the receiver OFF Note When no laser beam reaches the laser reception window 5 for 10 minutes the receiver will automatically switch off in order to save the battery MEDIUM adjustment FINE adjustment Note MEDIUM accuracy setting should be selected only when a stable laser beam cannot be obtained due to slight vibrations at or near the work site If the point to be me...

Page 10: ...e the receiver down to match the center indicator c because it indicates that the laser line is above the center mark Move the receiver as indicated on the LED to align with the laser beam If the Lower Indicator lights up move the receiver up to match the center indicator c because it indicates that the laser line is below the center mark If the center Indicator lights up it indicates that the las...

Page 11: ...d securely tighten the clamp to ensure the receiver remains stable on the rod When marking take care to align the tool exactly vertical for horizontal laser beam or horizontal for vertical laser beam as otherwise the marks are offset with respect to the laser beam Be sure to refer to the back of the receiver for the measurement of the compensation value the distance from the top of the receiver to ...

Page 12: ...gh 2mm 0 08in Low 3mm 0 12in May differ due to the working range and laser power Up to 50m 165ft 5 5 10K Hz Up to 20 hours 10 to 50 25 to 70 Specifications Storage Temperature Range 10 mins 2 x AA battery IP55 waterproof dustproof and shockproof Note Position the receiver at least 17ft 5m away from the laser level The working distance and detection accuracy will be affected by the operating environme...

Page 13: ...distributor s This Warranty does not cover Faults caused by accidental damage The product has suffered unreasonable wear and tear Failure to use according to manufacturers instructions Defects caused by maintenance or renovation without our authorization Calibration and maintenance are not included in the warranty Note We are not liable for any direct or indirect loss caused by the failure of this ...

Page 14: ...ut it can be up to 24 months if you register as a member through the product registration Please scan the QR code to activate your priority If you encounter any question or confusion about the product please feel free to contact us support huepar com ...

Page 15: ...ifikationen Garantie Bitte schalten Sie den Impulsmodus der Laserebene ein wenn Sie den Laserdetektor verwenden Der Laserdetektor kann NUR im Impulsmodus verwendet werden Der Huepar Laserdetektor kann nur mit Huepar Kreuzlinienlaser kompatibel sein die über die Funktion IMPULSMODUS verfügen Bitte achten Sie beim Kauf darauf ob das Kreuzlinienlaser mit dem Huepar Laserdetektor verwendet werden kann ...

Page 16: ...s Gerät längere Zeit nicht benutzt sollte die Batterie herausgenommen und das Gerät in die Aufbewahrungsbox oder den Karton gelegt werden Persönliche Sicherheit Achten Sie darauf die direkte Bestrahlung des Laserstrahls mit den Augen zu vermeiden während ein Lasergerät in Betrieb ist Eine längere Bestrahlung mit einem Laserstrahl kann gefährlich für Ihre Augen sein Gebrauch und Pflege Versuchen Sie...

Page 17: ...r Erschütterungen und drücken Sie die Tasten nicht zu stark Es ist empfindlich gegenüber Leuchtstofflampe Sonnenschein Blitzlicht und alternativen elektrischen Wellensignalen die die tatsächlichen Messungen beeinflussen und Fehler verursachen können ...

Page 18: ... 16 Produktbeschreibung 1 2 3 4 5 a b c d e 6 7 8 9 LINE LASER RECEIVEER ...

Page 19: ... 17 Produktbeschreibung 10 11 12 13 14 ...

Page 20: ...re Anzeige Nach oben bewegen e Stromanzeige 4 Libelle 5 Laser Empfangsfenster 6 EIN AUS Taste 7 Genauigkeitstaste Fein Mittel 8 Lautstärketaste laut leise Mute 9 Beleuchtung EIN AUS Taste 10 Mittellinie auf der Rückseite 11 Ausrichtungsbohrung 12 LCD Bildschirm auf der Rückseite 13 Gewindemontage 14 Batteriefach 15 Klemmhalter 16 Befestigungsknopf an dem Klemmhalter 17 Einstellknopf an dem Klemmha...

Page 21: ...16 anziehen Einrichtung Lösen Sie den Einstellknopf 17 und befestigen Sie den Klemmhalter an einem Messstab einer Stange oder einem ähnlichen Zielpunkt Ziehen Sie den Einstellknopf 17 fest um den Klemmhalter zu befestigen Schalten Sie den Impulsmodus des Lasergeräts ein Wenn Sie den Laserstrahl lokalisieren lösen Sie die Klemme um die Positionierung nach oben unten zu ermöglichen Wenn der Laserstr...

Page 22: ...ene ein wenn Sie mit einem Laserdetektor arbeiten möchten Der Laserdetektor kann NUR unter dem Impulsmodus verwendet werden Ausschalten nochmals drücken um den Laserdetektor auszuschalten Hinweis Wenn 10 Minuten lang kein Laserstrahl das Laserempfangsfenster 5 erreicht schaltet sich der Laserdetektor automatisch ab um die Batterie zu schonen MITTEL Einstellung FEIN Einstellung Hinweis Die Genauigk...

Page 23: ...aus dass der Laserstrahl seitlich durch das Laserempfangsfenster 5 durchlaufen kann Mithilfe der Libelle können Sie eine waagerechte Ebene mit dem Laserdetektor zu halten Achten Sie darauf dass das Laserempfangsfenster 5 in Richtung des Laserstrahls zeigt Richtungsanzeiger Wenn die obere Anzeige aufleuchtet das bedeutet dass der Laserstrahl höher als die Mittellinie ist dann bewegen Sie den Laserde...

Page 24: ...osition am Rand der Klemmhalter Markierung Hinweis Wenn Sie den Laserstrahl mit einem Messstab suchen lösen Sie den Einstellknopf 17 leicht um den Laserdetektor leichter nach oben oder unten zu bewegen Wenn der Laserstrahl richtig gefunden wurde ziehen Sie die Klemme fest um sicherzustellen dass der Laserdetektor weiterhin stabil auf dem Stab montiert Achten Sie beim Markieren darauf dass das Werk...

Page 25: ...ann aufgrund des Arbeitsbereichs und der Laserleistung abweichen Bis zu 50m 165 Fuß 5 5 10K Hz Bis zu 20 Stunden 10 to 50 25 to 70 Spezifikationen Lagertemperaturbereich 10 Minuten 2 x AA Batterien IP55 wasserdicht staubdicht und stoßfest Hinweis Stellen Sie den Laserdetektor mindestens 5 m 17 Fuß von der Laserebene entfernt auf Der Arbeitsabstand und die Erkennungsgenauigkeit werden durch die Betr...

Page 26: ... defekte Produkt kostenlos oder nach unserem Ermessen Diese Garantie gilt nicht für Defekte durch zufällige Beschädigung Mängel am Produkt aufgrund von ungewöhnlichem Verschleiß Bei Nichtbeachtung der Anweisung des Herstellers Mängel die durch Wartung oder Umbau ohne unsere Genehmigung entstanden sind Kalibrierung und Wartung sind von der Garantie nicht umfasst Hinweis Wir haften nicht für direkte...

Page 27: ...ngere Garantie genießen wenn Sie sich durch die Produktregistrierung als Mitglied registrieren Bitte scannen Sie den QR Code ein um Ihre Priorität zu genießen Sollten Sie Fragen oder Unklarheiten bezüglich des Produkts haben können Sie sich gerne an uns wenden support huepar com ...

Page 28: ...ntie Veuillez activer le mode d impulsion du niveau laser lors de l utilisation avec le détecteur Le détecteur peut être utilisé UNIQUEMENT en mode impulsion Le détecteur Huepar ne peut être compatible qu avec les niveaux laser Huepar dotés de la fonction PULSE MODE Veuillez faire attention à savoir si le niveau laser peut être utilisé avec le détecteur Huepar lors de l achat Si vous avez des ques...

Page 29: ...t la mettre dans la boîte de rangement ou le carton si elle n est pas utilisée pendant une longue période Sécurité personnelle Veillez à ne pas exposer vos yeux au faisceau lasérique émetteur pendant qu un outil laser est en fonctionnement Une exposition prolongée à un faisceau lasérique peut être dangereuse pour vos yeux Utilisation et entretien Veuillez ne pas démonter ni réparer vous même si un...

Page 30: ... 28 Il est sensible à la lumière fluorescente au soleil à la lumière flash et aux signaux d ondes électriques alternatifs qui peuvent affecter les mesures réelles et provoquer des erreurs ...

Page 31: ... 29 Présentation du produit 1 2 3 4 5 a b c d e 6 7 8 9 LINE LASER RECEIVEER ...

Page 32: ... 30 Présentation du produit 10 11 12 13 14 ...

Page 33: ...érieur monter e Voyant d alimentation 4 Flacon à bulles 5 Fenêtre de réception laser 6 Bouton marche arrêt 7 Bouton de précision fin moyen 8 Bouton de volume fort doux muet 9 Bouton d éclairage ON OFF 10 Marque centrale arrière 11 Trou d alignement 12 Écran d affichage LCD arrière 13 Montage sur filetage 14 Compartiment à piles 15 Pince 16 Bouton de serrage sur la pince 17 Bouton de réglage sur la pin...

Page 34: ... le bouton de serrage 16 Installation Desserrez le bouton de réglage 17 et fixez la pince sur une tige de mesure un poteau ou un objet similaire Serrez le bouton de réglage 17 pour fixer la pince Activez le mode d impulsion du niveau laser Lors de la localisation du faisceau lasérique desserrez la pince pour permettre un positionnement haut bas Lorsque le faisceau lasérique est détecté resserrez le ...

Page 35: ...détecteur peut être utilisé UNIQUEMENT en mode impulsion Arrêt appuyez à nouveau pour éteindre le détecteur Remarque Quand aucun faisceau lasérique n atteint la fenêtre de réception laser 5 pendant 10 minutes le détecteur s éteint automatiquement afin d économiser la batterie Réglage MOYEN Réglage précis Remarque Le réglage de précision MOYEN ne doit être sélectionné que lorsqu un faisceau lasériqu...

Page 36: ...ser latéralement à travers la fenêtre de réception laser 5 Utilisez le flacon à bulles pour maintenir un plan horizontal avec le détecteur Assurez vous que la fenêtre de réception laser 5 fait face à la direction du faisceau lasérique Indicateurs de direction Si l indicateur supérieur s allume déplacez le détecteur vers le bas pour qu il corresponde à l indicateur central c car cela indique que la ...

Page 37: ... sur le bord de la pince Marquage Remarque Lorsque vous recherchez le faisceau laser à l aide d une tige de mesure desserrez légèrement le bouton de réglage 17 pour déplacer le détecteur vers le haut ou vers le bas plus facilement Lorsque le faisceau lasérique a été trouvé en sécurité serrez la pince pour que le détecteur reste stable sur la tige Lors du marquage veillez à aligner l outil exacteme...

Page 38: ... Faible 3 mm 0 12 pouces Peut différer en raison de la plage de travail et de la puissance du laser Jusqu à 50 m 165 pieds 5 5 10K Hz Jusqu à 20 heures 10 to 50 25 to 70 Spécifications Plage de température de stockage 10 mins 2 x AA batterie Ip55 étanche antipoussière et antichoc Remarque Positionnez le détecteur à au moins 5 m 17 ft du niveau laser La distance de travail et la précision de détectio...

Page 39: ... autorisés Cette garantie ne comprend pas Défauts causés par des dommages accidentels Le produit a subi une usure excessive L utilisation sans les instructions du fabricant Défauts causés par l entretien ou la rénovation sans notre autorisation L étalonnage et l entretien ne sont pas inclus dans la garantie Remarque Nous ne sommes pas responsables de toute perte directe ou indirecte causée par la ...

Page 40: ... être prorogé jusqu à 24 mois si vous vous inscrivez en tant que membre via l enregistrement du produit Veuillez scanner le code QR pour activer votre priorité Si vous rencontrez des questions ou des confusions sur le produit n hésitez pas à nous contacter support huepar com ...

Page 41: ...i attivare la Modalità di Impulso della livella laser quando è utilizzata con il rilevatore Il rilevatore può essere utilizzato SOLO nella Modalità di Impulso Il Huepar rilevatore può essere compatibile solo con le Huepar livelle laser che dispongono della funzione Modalità di Impulso Si prega di prestare attenzione a se la livella laser può essere utilizzata con il Huepar rilevatore quando si acq...

Page 42: ...a o cartone per conservazione se non è utilizzata per un lungo periodo Sicurezza Personale Quando uno strumento laser è in funzione fare attenzione a non esporre gli occhi al raggio laser che emette L esposizione a un raggio laser per lungo tempo potrebbe essere pericolosa per gli occhi Uso e Cura Non smontare o riparare da solo in qualsiasi caso di anormalità Non tenerlo in un luogo surriscaldato...

Page 43: ... 41 Descrizione di Prodotto 1 2 3 4 5 a b c d e 6 7 8 9 LINE LASER RECEIVEER ...

Page 44: ... 42 Descrizione di Prodotto 10 11 12 13 14 ...

Page 45: ... spostare verso l alto e Indicatore di Energia 4 Fiala a Bolla 5 Finestra di Ricezione Laser 6 Pulsante ON OFF 7 Pulsante di Precisione Normale Alta 8 Pulsante di Volume Alto Basso Muto 9 Pulsante ON OFF di Illuminazione 10 Segno Centrale Posteriore 11 Foro di Allineamento 12 Schermata LCD Posteriore 13 Attacco Filettato 14 Vano Batteria 15 Morsetto 16 Pomello da Stringere sul Morsetto 17 Pomello ...

Page 46: ...re il pomello 16 Come Installare Allentare il pomello da regolare 17 e fissare il morsetto su un asta un palo o un oggetto simile di misurazione Stringere il pomello da regolare 17 per fissare il morsetto Attivare la modalità di impulso della livella laser Quando si localizza il raggio laser allentare il morsetto per consentire il posizionamento su giù Quando il raggio laser è rilevato stringere di ...

Page 47: ...r quando è utilizzata con il rilevatore Il rilevatore può essere utilizzato SOLO nella Modalità di Impulso Spegnere Premere di nuovo per spegnere il rilevatore Nota Se nessun raggio laser raggiunge la finestra di ricezione laser 5 per 10 minuti il rilevatore si spegne automaticamente per risparmiare la batteria Cambiare a ALTA Cambiare a NORMALE Note L impostazione di precisione ALTA deve essere se...

Page 48: ... che il raggio laser possa scorrere lateralmente attraverso la finestra di ricezione laser 5 Utilizzare la fiala a bolla per mantenere un piano livellato con il rilevatore Assicurarsi che la finestra di ricezione laser 5 sia rivolta verso la direzione del raggio laser Indicatori di Direzione Se l Indicatore Superiore si illumina spostare il rilevatore verso il basso in modo che corrisponda all indica...

Page 49: ... Segno Note Quando si cerca il raggio laser utilizzando un asta di misurazione allentare leggermente il pomello da regolare 17 per spostare il rilevatore su o giù più facilmente Quando il raggio laser è trovato in modo sicuro stringere il morsetto per assicurarsi che il rilevatore rimanga stabile sull asta Quando si fa un segno fare attenzione ad allineare lo strumento esattamente in verticale per...

Page 50: ...rmale 3 mm 0 12 pollice Potrebbe differire a causa del limite di funzione e della potenza del laser Fino a 50 m 165 piedi 5 5 10K Hz Fino a 20 ore 10 a 50 25 a 70 Specifiche Limite di Temperatura per Conservazione 10 minuti 2 x Batteria AA IP55 impermeabile antipolvere e antiurto Note Posizionare il rilevatore ad almeno 5 m 17 piedi di distanza dalla livella laser La distanza di funzione e la precis...

Page 51: ...o distributore autorizzato Questa Garanzia non include Guasti causati da danni accidentali Il prodotto ha subito un irragionevole usura Uso senza osservanza delle istruzioni del produttore Difetti causati da manutenzione o ristrutturazione senza la nostra autorizzazione La calibrazione e la cura non sono coperte dalla Garanzia Note Nella misura consentita dalla legge non saremo responsabili per qu...

Page 52: ...essere fino a 24 mesi se ti registri come membro attraverso la registrazione del prodotto Si prega di scansionare questo codice QR per attivare la priorità In caso di qualsiasi domanda o confusione sul prodotto non esitare a contattarci support huepar com ...

Page 53: ...pecificaciones Garantía Active el Modo de Pulso del nivel láser cuando use el receptor El receptor SOLO se puede usar en modo de pulso El receptor Huepar solo puede ser compatible con los niveles de láser Huepar que cuentan con la función de Modo de Pulso Por favor preste atención a si el nivel láser se puede usar con el receptor Huepar al comprar Si tiene alguna pregunta contáctenos a través de su...

Page 54: ...ho tiempo Seguridad Personal Tenga cuidado de no exponer sus ojos al rayo láser emisor mientras una herramienta láser está en funcionamiento La exposición a un rayo láser durante un tiempo prolongado puede ser peligroso para sus ojos Uso y Cuidado Si se encuentra alguna anomalía no la desmonte ni la repare usted mismo No lo guarde en un lugar sobrecalentado la mejor temperatura de almacenamiento e...

Page 55: ... 53 Descripción del Producto 1 2 3 4 5 a b c d e 6 7 8 9 LINE LASER RECEIVEER ...

Page 56: ... 54 Descripción del Producto 10 11 12 13 14 ...

Page 57: ...Indicador de Encendido 4 Vial de Burbuja 5 Ventana de Recepción Láser 6 Botón de Encendido Apagado 7 Botón de Precisión Fino Medio 8 Botón de Volumen Alto Suave Silencio 9 Botón de ENCENDIDO APAGADO de iluminación 10 Marca Central Trasera 11 Agujero de Alineación 12 Pantalla LCD Trasera 13 Montaje de Rosca 14 Compartimento de la Batería 15 Abrazadera 16 Perilla de Apriete de la Abrazadera 17 Peril...

Page 58: ...te la perilla de ajuste 16 Configuración Afloje la perilla de ajuste 17 y fije la abrazadera en una varilla de medición poste u objeto similar Apriete la perilla de ajuste 17 para asegurar la abrazadera Active el modo de pulso del nivel láser Al ubicar el rayo láser afloje la abrazadera para permitir el posicionamiento arriba abajo Cuando encuentre el rayo láser vuelva a apretar la perilla de ajuste 1...

Page 59: ...el láser cuando lo use con el receptor El receptor SOLO se puede usar en modo de pulso APAGADO Presione nuevamente para APAGAR el receptor Nota Cuando ningún rayo láser alcanza la ventana de recepción del láser 5 durante 10 minutos el receptor se apagará automáticamente para ahorrar batería Ajuste MEDIO Ajuste FINO Nota La configuración de precisión MEDIA debe seleccionarse solo cuando no se puede ...

Page 60: ...r pueda correr lateralmente a través de la ventana de recepción del láser 5 Use el vial de burbujas para mantener un plano nivelado con el receptor Asegúrese de que la ventana de recepción del láser 5 esté orientada en la dirección del rayo láser Indicadores de Dirección Si el indicador superior se ilumina mueva el receptor hacia abajo para que coincida con el indicador central c porque indica que...

Page 61: ...usque el rayo láser utilizando una vara de medir afloje ligeramente la perilla de ajuste 17 para mover el receptor hacia arriba o hacia abajo con mayor facilidad Después de asegurarse de que se encuentre el rayo láser apriete la abrazadera para asegurarse de que el receptor se mantenga estable en la varilla Al marcar tenga cuidado de alinear el receptor con precisión en la dirección vertical para r...

Page 62: ... pulgadas Bajo 3mm 0 12 pulgadas Puede diferir debido al rango de trabajo y la potencia del láser Hasta 50 m 165 pies 5 5 10K Hz Hasta 20 horas 10 a 50 25 a 70 Especificaciones Rango de Temperatura de Almacenamiento 10 minutos 2 x Batería AA IP55 impermeable a prueba de polvo y a prueba de golpes Nota Coloque el receptor al menos a 5 m 17 pies del nivel del láser La distancia de trabajo y la precis...

Page 63: ...a a nuestros distribuidores autorizados Esta garantía no cubre Fallos causados por daños accidentales El producto ha sufrido un desgaste irrazonable No se utiliza según las instrucciones del fabricante Defectos causados por mantenimiento o renovación sin nuestra autorización La calibración y el mantenimiento no están incluidos en la garantía Nota No somos responsables de ninguna pérdida directa o ...

Page 64: ...12 meses pero puede ser de hasta 24 meses si se registra como miembro a través del registro del producto Escanee el código QR para activar su prioridad Si tiene alguna pregunta o confusión sobre el producto no dude en contactarnos support huepar com ...

Page 65: ...чите режим работы с приемником Pulse Mode Импульсный режим на Вашем лазерном уровне Приемник будет работать ТОЛЬКО в таком режиме Приемник Huepar может быть использован только с лазерными уровнями Huepar которые поддерживают функцию Работа с приемником PULSE MODE Перед покупкой лазерного уровня убедитесь в наличии данной функции Если у Вас имеются какие либо вопросы пожалуйста свяжитесь с нами по ...

Page 66: ...ятным последствиям Извлекайте батарейки из прибора и храните отдельно в специальном контейнере если не планируете пользоваться прибором длительное время Личная безопасность Будьте осторожны и не направляйте луч лазера в глаза Продолжительное воздействие лазерного луча может стать причиной травмирования глаз Использование и уход Не разбирайте и не ремонтируйте инструмент самостоятельно Температура ...

Page 67: ... 65 Прибор чувствителен к флуоресцентному свету солнечному свету вспышке и альтернативному электрическому сигналу который может повлиять на фактические измерения и вызвать ошибки ...

Page 68: ...LINE LASER RECEIVEER 66 Обзор продукции 1 2 3 4 5 a b c d e 6 7 8 9 ...

Page 69: ... 67 Обзор продукции 10 11 12 13 14 ...

Page 70: ...икатор питания 4 пузырьковый уровень 5 окно сенсора приёмника 6 кнопка включения выключения 7 кнопка выбора точности максимальная средняя 8 кнопка громкости громко тихо без звука 9 включение выключение подсветки 10 задняя центровая метка 11 точка центровки с креплением 12 задний LCD дисплей 13 резьба крепления 14 отсек для батареек 15 крепление к рейке 16 ручка крепления к приемнику 17 ручка регул...

Page 71: ...овки 11 и затяните ручку крепления 16 Установка Разведите зажимной механизм 17 и прикрепите держатель на измерительную линейку штангу или похожий предмет Зафиксируйте крепление регулировочной ручкой 17 Включите импульсный режим работы с приёмником Pulse mode на лазерном уровне При поиске лазерного луча ослабьте крепление для свободного движения вверх вниз Когда лазерный луч пойман надежно затяните...

Page 72: ...ать между режимами максимальный и средний Операция Внимание Пожалуйста включите режим работы с приемником Pulse Mode Импульсный режим на Вашем лазерном инвелиром Приемник будет работать ТОЛЬКО в таком режиме Выключение нажмите кнопку еще раз чтобы выключить приемник Примечание если лазерный луч не попадает в окно приемника в течении 10 минут устройство автоматически отключится для экономии батарее...

Page 73: ...рного луча Примечание Минимально рекомендуемое расстояние от лазерного уровня 5 метров 17 футов При включенном приемнике расположите приемник так чтобы лазерный луч мог попасть в окно приема лазера 5 Выровняйте приемник так чтобы лазерный луч мог проходить в боковом направлении через окно приема лазера 5 параллельно средним отметкам на приемнике Используйте пузырьковый уровень приемника чтобы выро...

Page 74: ...одимость перемещать приемник вверх Непрерывный звуковой сигнал указывает на совпадение лазерного луча с центровой отметкой Когда лазерный луч пойман и центрирован отметьте положение по краю крепления зажима Разметка Примечание При использовании измерительной линейки слегка ослабьте зажим крепления 17 так Вы сможете перемещать приемник вверх вниз Когда луч будет пойман затяните зажим крепления наде...

Page 75: ... Низкая 3mm 0 12дюйма Может отличаться из за рабочей дистанции и мощности лазера До 50 м 165 фт 5 5 10 КГц До 20 часов 10 до 50 25 до 70 Характеристики Диапазон температуры хранения 10 минут 2 x AA батарейки Ip55 защита от влаги пыли и падений Внимание Минимально рекомендуемое расстояние от лазерного прибора 5 метров 17 футов Рабочая дистанция и точность определения луча могут зависеть от условий ...

Page 76: ...стрибьютору ам Гарантия не распространяется на Неисправности вызванные случайным повреждением Продукт имеет необоснованную степень износа Неиспользование в соответствии с инструкциями производителя Дефекты вызванные обслуживанием или ремонтом без нашего разрешения Калибровка и обслуживание не включены в гарантию Примечание Мы не несем ответственности за любые прямые или косвенные убытки вызванные ...

Page 77: ... месяцев если вы зарегистрируетесь в качестве клиента через форму регистрации продукта Пожалуйста отсканируйте QR код чтобы активировать продленную гарантию Если у вас возникнут какие либо вопросы или сомнения относительно продукта пожалуйста свяжитесь с нами support huepar com ...

Page 78: ...ご注意 本機はHueparレーザー墨出し器専用の受光器です 他社の物には対応できないので ご注意ください モデル9011G 9211Gのレーザー墨出し器は受光器 が対応できないので ご注意ください 受光器と合わせて使用する前は 墨出し器のパルスモード 受光器モード を起動してください パルスモードを起動しないと 受光器は反応できないです 墨出し器のパルスモードの起動方法は 当該取扱説明書をご参照ください 各部の名称 ...

Page 79: ... 77 ...

Page 80: ... 78 LINE LASER RECEIVEER ...

Page 81: ... 79 ...

Page 82: ... 80 ...

Page 83: ... 81 ...

Page 84: ... 82 ...

Page 85: ... 83 LINE LASER RECEIVEER Clamp ...

Page 86: ... 84 ...

Page 87: ... 85 support huepar com ...

Page 88: ...Facebook Huepartools Made in China E mail support huepar com www huepar com Changzhou Levelsure Optoelectronics Technology Co Ltd ...

Reviews: