background image

Owner’s Manual

Preschool Scooter

PLEASE READ AND FULLY UNDERSTAND THIS MANUAL 

BEFORE OPERATION.

SAVE THIS MANUAL FOR FUTURE REFERENCE.

THIS MANUAL CONTAINS IMPORTANT SAFETY, ASSEMBLY, 

OPERATION AND MAINTENANCE INFORMATION.

Date Code Label

Here

H 2F-1R Scooter EN 010515 

m0095

Copyright Huffy Corporation 2015

Summary of Contents for m0095

Page 1: ...LLY UNDERSTAND THIS MANUAL BEFORE OPERATION SAVE THIS MANUAL FOR FUTURE REFERENCE THIS MANUAL CONTAINS IMPORTANT SAFETY ASSEMBLY OPERATION AND MAINTENANCE INFORMATION Date Code Label Here H 2F 1R Scooter EN 010515 m0095 Copyright Huffy Corporation 2015 ...

Page 2: ... persons 3 years Maximum weight is 60 lbs 27kgs Do not allow a child to ride without an approved helmet with the chinstrap securely fastened Ensure the child always wears safety equipment such as helmet knee pads elbow pads and shoes Do not allow a child to ride wearing anything that obstructs visibility or hearing Do not allow a child to ride the product at dusk at night or at times of limited vi...

Page 3: ...lied are secure to the product and do not interfere with operation of the unit Use with caution since skill is required to avoid falls or collisions causing injury to the user or third parties Protective equipment should be worn Not to be use in traffic If you have any questions regarding the operation of this product please refer to this owners manual or contact customer service Scooter Safety In...

Page 4: ...4 10 11 12 28 13 18 20 19 14 15 16 17 21 6 9 3 4 2 1 8 7 24 23 22 27 25 26 5 8 Components Parts View ...

Page 5: ... 24 Screws x2 4 Captive Screw Set 25 Washers x2 5 Locking Cap Lower 26 Nuts x2 6 Steering Axle 27 Handlebar Pad 7 Retaining Collar 28 Cap x2 8 Captive Screw Set 9 Deck Assembly 10 Axle 11 Front Wheel x2 12 Washer x2 13 Cap Nut x2 14 Rear Wheel 15 Axle 16 Axle Cap x2 17 Fender Brake 18 Screw 19 Fender Bracket 20 Screw 21 Screws 8 Parts List ...

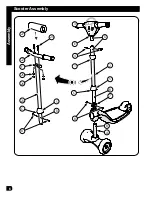
Page 6: ...Assembly 6 7 B B 5 8 8 A B C C 5 2 24 1 23 22 27 25 F 26 4 E 3 D Scooter Assembly ...

Page 7: ...e sure the Lights and Sounds unit holes line up with the Steering tube holes D 11 Install Screw Set 4 through Steering Tube 2 and tighten securely 12 Slide upper Locking Cap 1 UP so that tabs lock Cap into position E Handlebar Installation if equipped 1 Place Handlebar 22 in Handlebar Tube Bracket F as shown 2 Install Screws 24 through Handlebar and Bracket 3 Install Washers 25 and Nuts 26 onto Sc...

Page 8: ...ble batteries are only to be charged under adult supervision This unit produces flashing lights and light patterns Although rare it is possible for children to be susceptible to photosensitive seizures when exposed to certain flashing lights or light patterns It is important that parents monitor their children while playing with this unit To reduce exposure to such potential play in a well lit are...

Page 9: ... Push and Hold Button B for 1 second After the Light Sequence shows repeat using the corresponding buttons Game Mode 3 Follow The Leader Push and Hold Button A for 1 second When a light shows press the corresponding button Reset Unit If ANY Button is pushed continuously for more than 10 seconds a BEEP will play for 1 0 second and the unit will reset If there are problems with operation ensure the ...

Page 10: ...r should be checked periodically for any loose broken or worn parts Tighten any parts that are loose and replace any worn or broken parts immediately Periodic cleaning will prolong the useful life of this scooter Do not store outside or expose Lights and Sounds unit if equipped to water ...

Page 11: ...his product is designed for recreational use only This Limited Warranty does not cover normal wear and tear normal maintenance items or any damage failure or loss that is caused by improper assembly maintenance adjustment storage or use This Limited Warranty is void if the product is ever used for stunt riding jumping acrobatics or similar activity ridden by more than one person at a time or the w...

Page 12: ...and your chin A proper fitting helmet should be comfortable and not rock forward back ward or side to side Always read the user manual that comes with your helmet to make sure it is fitted and attached properly to the wearer s head according to the fitting instructions described in the user manual Check www Huffybikes com contact for the current contact information WARNING ALWAYS WEAR YOUR HELMET ...

Reviews: