background image

1

Section Title

587ci and 597ci Combo

Operations Manual

587ci and 597ci Combo

Operations Manual

531696-1_A

Summary of Contents for 587ci Combo

Page 1: ...1 Section Title 587ci and 597ci Combo Operations Manual 587ci and 597ci Combo Operations Manual 531696 1_A ...

Page 2: ...ects WARNING Disassembly and repair of this electronic unit should only be performed by authorized service personnel Any modification of the serial number or attempt to repair the original equipment or accessories by unauthorized individuals will void the warranty WARNING This product contains chemicals known to the State of California to cause cancer and or reproductive harm ENVIRONMENTAL COMPLIA...

Page 3: ...nmentally sound disposal of those products however these requirement do vary within European Union member states For more information about where you should dispose of your waste equipment for recycling and recovery and or your European Union member state requirements please contact your dealer or distributor from which your product was purchased ROHS STATEMENT Product designed and intended as a f...

Page 4: ...16 Sonar Zoom View 17 Big Digits View 18 Bird s Eye View 19 Chart View 20 Chart Sonar Combo View 22 View Orientation 23 Viewing Cartography 23 Introduction to Navigation 26 Waypoints Routes and Tracks 27 Save Edit or Delete a Waypoint 28 Navigate to a Waypoint or Position 30 Add a Waypoint Target or Trolling Grid 31 Save Edit or Delete a Route 33 Save or Clear a Current Track 34 Edit Delete or Hid...

Page 5: ...K Key 40 GOTO Key 40 ZOOM Key 40 EXIT Key 41 Multi Media Card MMC SD Slot 42 Adding Maps to Your Fishfinder 42 Exporting Navigation Data 43 Powering On the Unit 44 The Menu System 45 Start Up Options Menu 46 Normal Operation 47 Simulator 47 System Status 49 Self Test 49 Accessory Test 50 GPS Diagnostic View 51 X Press Menu 52 Table of Contents ...

Page 6: ...aypoint 63 Cursor To Waypoint Chart or Combo View only 64 Save Current Track 64 Clear Current Track 65 Save Current Route only when Navigating 65 Skip Next Waypoint only when Navigating 66 Cancel Navigation only when Navigating 66 Remove Target only if Target is Active 67 Remove Grid only if Grid is Active 67 Sonar Window Combo View only 67 Waypoint Name Most recently created waypoint 68 Alarms Me...

Page 7: ...1 Max Depth Advanced 81 Water Type Advanced 82 Navigation Menu Tab 83 Current Track 84 Saved Tracks 84 Waypoints 86 Routes 88 Chart Orientation 89 Chart Detail Level 90 Map Borders 91 Lat Lon Grid 91 Spot Soundings 92 Shaded Depth 92 Chart Select 92 North Reference 93 Waypoint Decluttering Advanced 93 Grid Rotation 94 Trackpoint Interval 94 Track Min Distance Advanced 95 Table of Contents ...

Page 8: ...ts Speed 102 User Mode 102 Language International only 102 Triplog Reset 103 Restore Defaults 103 Select Readouts Advanced Sonar View only 104 Depth Offset Advanced 105 Temp Offset Advanced with Temp Speed only 106 Speed Calibration Advanced with Temp Speed only 106 Local Time Zone Advanced 107 Daylight Saving Time Advanced 107 Position Format Advanced 108 Time Format Advanced International only 1...

Page 9: ... To obtain a list of authorized International Distributors please visit our website at www humminbird com or contact our Customer Resource Center at 1 800 633 1468 to locate the distributor nearest you NOTE Entries in this Table of Contents which list with Temp Speed only require the purchase of separate accessories You can visit our website at www humminbird com to order these accessories online ...

Page 10: ......

Page 11: ...n size and composition of an object Sonar is very fast A sound wave can travel from the surface to a depth of 240 ft 70 m and back again in less than 1 4 of a second It is unlikely that your boat can outrun this sonar signal SONAR is an acronym for SOund and NAvigation Ranging Sonar utilizes precision sound pulses or pings which are emitted into the water in a teardrop shaped beam The sound pulses...

Page 12: ...balance between depth performance and resolution Low frequencies 83 kHz are typically used to achieve greater depth capability The power output is the amount of energy generated by the sonar transmitter It is commonly measured using two methods Root Mean Square RMS measures power output over the entire transmit cycle Peak to Peak measures power output at the highest points The benefits of increase...

Page 13: ...ition using a narrow 20 beam yet can still indicate fish found in the wide 60 beam when the Fish ID feature is turned on DualBeam is ideal for a wide range of conditions from shallow to very deep water in both fresh and salt water Depth capability is affected by such factors as boat speed wave action bottom hardness water conditions and transducer installation How Sonar Works ...

Page 14: ...rea Augmentation System EGNOS the European Geostationary Navigation Overlay Service and MSAS the MTSAT Satellite Augmentation System satellites if they are available in your area GPS uses a constellation of 24 satellites that continually send radio signals to the earth Your present position is determined by receiving signals from up to 16 satellites and measuring the distance from the satellites A...

Page 15: ...a You can insert optional purchase cards in the MMC SD slot on your control head to access additional detailed maps See Multi Media Card MMC SD Slot for more information NOTE Your 500 Series supports Navionics Gold HotMaps and HotMaps Premium Your 500 Series does not support Navionics Classic Charts or Platinum Cartography Your unit also comes with a built in UniMap with a more detailed map of Nor...

Page 16: ... Receiver Second Sonar Return when the sonar signal bouncesbetweenthebottomandthesurfaceofthe water and back again Use the appearance of the second return to determine bottom hardness Hard bottomswillshowastrongsecondreturn whilesoft bottomswillshowaveryweakoneornoneatall Speed if a Temp Speed accessory or GPS Receiver is attached the Fishfinder can display the speed of the boat and can keep a Tri...

Page 17: ...display at the same depth Bait Ball Fish the Fishfinder displays fish as arches and or fish icons and can be set to alarm when a fish of a certain size is detected When a target is detected a Fish ID symbol appears on the display with the depth displayed above it The size of the symbol indicates the intensity of the sonar return The unit will clearly show schools of Bait Fish as clouds of differen...

Page 18: ...trol head and plotted on the display represents something that was detected by a sonar return at a particular time As both the boat and the targets fish may be moving the returns are only showing a particular segment of time when objects were detected not exactly where those objects are in relation to other objects shown on the display The returned sonar echoes are displayed on the screen As a new...

Page 19: ...nar Menu Tab RTS Window The Narrow RTS Window indicates the sonar intensity through the use of colors Red indicates a strong return and blue indicates a weak return The depth of the sonar return is indicated by the vertical placementofthereturnonthe display depth scale The Wide RTS Window indicates the sonar intensity through the use of a bar graph The length of the plotted return indicates whethe...

Page 20: ...ttom of the screen in the cursor information box Instant Image Update You can change a variety of sonar menu settings such as Sensitivity or Upper Range and the adjustments will be shown instantly on the screen When combined with the Freeze frame feature you can adjust and see the effects of many different sonar settings quickly and easily The RTS Window continues to update in Freeze Frame Pressin...

Page 21: ...d sediment or flat rock appears as a thinner line across the display A Soft Bottom such as mud or sand appears as a thicker line across the display Rocky Bottoms have a broken random appearance The sonar returns from the bottom structure and fish can be represented as either WhiteLine or Structure ID See Sonar Menu Tab Bottom View for details on how to set the bottom view Bottom Contour Profile wi...

Page 22: ...k returns in blue and strong returns in red WhiteLine highlights the strongest sonar returns in white resulting in a distinctive outline This has the benefit of clearly defining the bottom on the display What s On the Sonar Display ...

Page 23: ... cycles through the available views in reverse order When you first power up the control head Sonar View will be the default view You can display and hide any view to suit your fishing preferences NOTE When you change any menu settings that affect the sonar the view will update immediately You don t have to exit the menu to apply the change to the screen Sonar View Accessory Test View Chart View G...

Page 24: ...her or not you are navigating The digital readouts on the Sonar View can be customized See Setup Menu Tab Select Readouts for more information 1 Press the MENU key twice to access the tabbed Main Menu then press the RIGHT Cursor key until the Setup tab is selected 2 Press the DOWN key to highlight Select Readouts and press the RIGHT Cursor key to access the Select Readouts submenu NOTE If the Sele...

Page 25: ...g pages Navigation views Bird s Eye View Chart View Chart Sonar Combo View Sonar views Sonar View Sonar Zoom View Big Digits View Self Test View see Start Up Options Menu Accessory Test View see Start Up Options Menu GPS Diagnostic View see Start Up Options Menu Views ...

Page 26: ...based on the Select Readouts settings or the optional purchase accessories attached see Setup Menu Tab Select Readouts Freeze Frame Use the 4 WAY Cursor Control key to freeze the display and move the cursor over a sonar return The depth of the sonar return will be displayed at the bottom of the screen in the cursor information box NOTE If the Depth number is flashing it means that the unit is havi...

Page 27: ...utomatically The Full Range View is displayed on the right side of the screen The Full Range View includes the Zoom Preview Box which shows where the zoomed view is in relation to the full range view The Upper and Lower Depth Range numbers indicate the high and low range of the water which is being viewed Digital depth is displayed in the upper left hand corner The digital readouts in the Sonar Zo...

Page 28: ...e system The Triplog shows distance traveled average speed and time elapsed since the Triplog was last reset The digital readouts in the Big Digits View cannot be customized Big Digits View Depth Temperature Speed Timer shows the time elapsed since Triplog was last reset Distance is the distance traveled since the Triplog was last reset Voltage displays the battery voltage Average Speed shows the ...

Page 29: ...turn the eye point so that you can look off to the sides or even behind the boat Pressing the RIGHT or LEFT arrow keys on the 4 WAY Cursor Control key turns the eye point right or left while pressing the UP arrow key moves the eye point forward and pressing the DOWN arrow key moves the eye point backward Pressing the EXIT key moves the eye point back to its original position behind and above the b...

Page 30: ...racks waypoints and the current route when navigating are overlaid on the chart Use the 4 WAY Cursor Control key to shift pan the chart to another area Press the ZOOM keys to zoom in and out Press the INFO key to get information on the chart objects near the cursor Chart View without Active Cursor shown with Optional Purchase Navionics Cartography Depth Map Scale Speed of Boat Water Surface Temper...

Page 31: ...or shown with Optional Purchase Navionics Cartography Cartography Active Cursor Latitude and Longitude Position of Cursor Bearing of Boat with Respect to True North Depth Map Scale Distance to the Cursor and Bearing to Cursor Views ...

Page 32: ... side of the screen The width of the sonar window can be changed by pressing the MENU key once and using the 4 WAY Cursor Control key to select Sonar Window from the Sonar X Press Menu Combo View Depth Map Scale Water Surface Temperature Sonar Window Cartography Speed of Boat Bearing of Boat with Respect to True North Views ...

Page 33: ...tion it takes on a boat shape pointed in the direction of motion always Up in the Course Up orientation V Vi ie ew wi in ng g C Ca ar rt to og gr ra ap ph hy y In the Chart or Combo Views there are several cartography related functions that you can access using various keys Panning Use the 4 WAY Cursor Control key to move the chart around on the display in the direction of the key being pressed Wh...

Page 34: ... size waypoint name and icon will be displayed You can also press the ZOOM key until you can see the individual waypoints on the screen Chart Info Use the INFO key to get detailed information about the chart If the cursor is active you will see information about the chart objects located near the cursor If the cursor is not active the Chart Info submenu will appear Use the 4 WAY Cursor Control key...

Page 35: ...display indicate the distance and bearing to the tide station from your present position Nearest Current Station Current information for the nearest current station to your present position will be displayed This includes the position of the station and the current changes for today Two graphs are also presented that show the time direction and flow speed of the current changes for the 24 hour tim...

Page 36: ... mark waypoints at areas of interest and to navigate to those waypoints via a savable route A route represents the shortest intended distance between waypoints You can also view and save tracks which represent the actual path of the boat Introduction to Navigation ...

Page 37: ... a Decluttered Waypoint at full size use the 4 WAY Cursor Control key to move the cursor onto a decluttered waypoint icon When the cursor snaps onto the icon the full size waypoint name and icon will be displayed You can also press the ZOOM key until you can see the individual waypoints on the screen Waypoints Routes and Tracks Decluttered Waypoints XTE Cross Track Error Distance of Boat from Rout...

Page 38: ...ave your current position as a waypoint On any view press the MARK key to save the current position of the boat as a waypoint Save the cursor position as a waypoint On the Chart or Combo View use the 4 WAY Cursor Control key to move the cursor to the position you want to save as a waypoint Then press the MARK key to save the position as a waypoint Save a position from the sonar history On any Sona...

Page 39: ...ted waypoint first Distance shows the closest waypoint first Delete a waypoint From the Waypoints submenu select Delete and press the RIGHT Cursor key to display the saved waypoints list Select the waypoint you want to delete then press the RIGHT Cursor key You will be asked to confirm deletion before the waypoint is permanently deleted Program or Edit the waypoint fields Use the 4 WAY Cursor Cont...

Page 40: ...ons you can add more waypoints to create a longer multi segment route NOTE When two or more waypoints overlap or are displayed close together on a chart view the screen will automatically declutter waypoint names will shorten and the waypoint icons will change into small blue icons To view a Decluttered Waypoint at full size use the 4 WAY Cursor Control key to move the cursor onto a decluttered wa...

Page 41: ...ill be prompted to save the current route when you cancel navigation Add a Waypoint Target or Trolling Grid Add or Remove a Waypoint Target The target shows various distance ranges in circular format from the waypoint you choose From the Waypoints submenu select Target and press the RIGHT Cursor key to display the saved waypoints list Select the waypoint you want to target A target consisting of c...

Page 42: ...grid can be rotated to any heading by adjusting the Grid Rotation setting on the Navigation Main Menu To remove the trolling grid choose Remove Grid from the Navigation X Press Menu NOTE Only one waypoint can have either a target or a grid applied to it at one time If you apply a target or a grid to a new waypoint the original waypoint will lose its target or grid NOTE The spacing of the rings on ...

Page 43: ... Route list and press the RIGHT Cursor key to access the Waypoint In Route submenu From this submenu you can move the waypoint up or down in the route order or delete it from the list Delete a saved route From the Routes submenu select Delete and press the RIGHT Cursor key Select the route you want to delete and press the RIGHT Cursor key You will be asked to confirm your choice by pressing the RI...

Page 44: ...lear the current track From the Navigation X Press Menu select Clear Current Track and press the RIGHT Cursor key The track will be removed from the display and permanently deleted Edit Delete or Hide Saved Tracks Display the Saved Tracks Submenu From any view press the MENU key twice to display the Main Menu then press the RIGHT Cursor key to select the Navigation tab Select Saved Tracks and pres...

Page 45: ... be asked to confirm deletion before the track is permanently deleted Hide or display a saved track From the Saved Tracks submenu select Visibility and press the RIGHT Cursor key to display the saved tracks list Select the track you want to hide or display and press the RIGHT or LEFT Cursor keys to select Hidden or Visible Press the EXIT key to return to the Saved Tracks submenu Introduction to Na...

Page 46: ... see on the display Refer to the following illustration and see Key Functions for more information Screen MENU key 1 7 MARK key 8 INFO key EXIT key 2 9 GOTO key 10 3 4 5 6 7 8 9 10 1 POWER LIGHT key 11 MMC SD Card slot cover 12 VIEW key ZOOM key 3 5 4 WAY Cursor Control key LEFT RIGHT UP or DOWN Cursor keys 6 ZOOM key 4 2 11 12 Using Your 500 Series Control Head ...

Page 47: ...any seconds there are until shutdown occurs To ensure that shutdown occurs properly and any menu settings will be saved your Fishfinder should always be turned off using the POWER LIGHT key Adjust the Backlight or the Display Background Color Press the POWER LIGHT key to access the Light and Background submenu Use the 4 WAY Cursor Control key to select Light or Background and then use the LEFT or ...

Page 48: ... access the X Press Menu The X Press Menu provides a shortcut to the most frequently used settings and the options on the X Press Menu correspond with the current view or navigation mode Press the UP or DOWN Cursor keys to highlight your X Press Menu choice then press the RIGHT or LEFT Cursor keys to change the setting The X Press Menu will collapse temporarily and the screen will update if it is ...

Page 49: ...d saved immediately no further action is required Freeze Frame In Sonar View press any arrow on the 4 WAY Cursor Control key to freeze the display and move the active cursor to a location on the screen A cursor dialog box will display to show the depth of the location you choose Active Cursor Press any arrow on the 4 WAY Cursor Control key and the active cursor will appear on the screen In any Cha...

Page 50: ...the boat location GOTO Key The GOTO key has multiple functions depending on the situation If the Cursor is active press the GOTO key while in any view to create a waypoint and start navigation towards that waypoint If the Cursor is not active press the GOTO key to display the saved waypoints list and then highlight a waypoint Press the RIGHT Cursor key to begin navigation ZOOM Key The ZOOM key has...

Page 51: ...it the menu mode and return to the view If a menu is active press the EXIT key to return to the previous level in the menu system From any view press the EXIT key to cycle through the available views in reverse order If Freeze Frame is active press the EXIT key to return to a scrolling display If the Cursor is active press the EXIT key to remove the cursor from the display Key Functions ...

Page 52: ...age the cover To remove an MMC SD card 1 Remove the MMC SD slot cover 2 Press the MMC SD card into the slot and then release The card will eject from the slot A Ad dd di in ng g M Ma ap ps s t to o Y Yo ou ur r F Fi is sh hf fi in nd de er r Your 500 Series Fishfinder includes a built in UniMap You can also purchase MMC SD cards with additional chart information for a particular location When you ...

Page 53: ...ighlight Export All Nav Data 4 Press the RIGHT Cursor key to export all navigation data The Confirm dialog box will appear To confirm export press the RIGHT Cursor key once more To cancel export press the LEFT Cursor key NOTE If no MMC card is installed an error message will be displayed Insert the MMC card and try again NOTE The MMC SD cards and MMC SD Card Reader require separate purchases The M...

Page 54: ... the water with the transducer connected Select the Simulator to learn how to use your Fishfinder before taking your boat on the water Select System Status to view system connections and conduct a unit self test If a functioning transducer is connected Normal operation will be selected automatically at power up and your Fishfinder can be used on the water If a transducer is not connected and you w...

Page 55: ...rmal Simulator and System Status X Press Menu The X Press Menu provides a shortcut to the most frequently used settings and the options on the X Press Menu correspond with the current view Main Menu The Main Menu is a standard set of menu settings which are organized under the following tabbed headings Alarms Sonar Navigation Setup and Views NOTE The X Press Menu s and the Main Menu options can al...

Page 56: ...tor to learn how to use your Fishfinder before taking your boat on the water Select System Status to view system connections and conduct a unit self test See the following pages for more information about each of these options If a functioning transducer is connected Normal operation will be selected automatically at power up and your Fishfinder can be used on the water If a transducer is not conn...

Page 57: ...es on the water operation Selecting Simulator from the Start Up Options Menu allows you to pre configure your Fishfinder for on the water operation Any menu changes you make will be saved for later use We recommend going through this manual while using the Simulator since all of the menus function and affect the display in the same way as they would in Normal operation NOTE To get the full benefit...

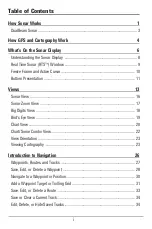
Page 58: ...48 Simulator Start Up Options Menu ...

Page 59: ...ess the VIEW key to display the following options Self Test Accessory Test GPS Diagnostic View Exit System Status by powering your Fishfinder off Self Test displays results from the internal diagnostic self test including unit serial number Printed Circuit Board PCB serial number software revision total hours of operation and the input voltage Self Test Screen Start Up Options Menu ...

Page 60: ...t lists the accessories connected to the system NOTE The speed accessory will be detected only if the paddlewheel has moved since your Fishfinder was powered up System Status Accessory Test Screen Start Up Options Menu ...

Page 61: ...ew also reports the current position local time and date and other numeric information The current GPS Fix Type is reported as No Fix 2D Fix 3D Fix or Enhanced An Enhanced fix has been augmented using information from WAAS EGNOS or MSAS A 3D or Enhanced Fix is required for navigation HDOP the Horizontal Dilution of Precision is a GPS system parameter which depends on the current satellite configur...

Page 62: ...GHT or LEFT Cursor keys to change the menu setting NOTE The X Press Menu will collapse temporarily and the screen will update if it is affected by your menu setting change which allows you to see the effects of your change immediately 3 Reactivate the X Press Menu by pressing the UP or DOWN Cursor keys Total Screen Update When you change any menu settings that affect the current view the view will...

Page 63: ...ys to highlight a menu tab 3 Press the DOWN or UP Cursor keys to select a specific menu option under that tab 4 Press the RIGHT or LEFT Cursor keys again to change a menu setting A down arrow at the bottom of a menu means that you can scroll to additional menu options using the DOWN Cursor key A right or left arrow on a menu option means that you can use the RIGHT or LEFT Cursor keys to make chang...

Page 64: ...also jump to the beginning or end of the tab rotation by repeatedly pressing the RIGHT or LEFT Cursor keys If there is a down arrow at the bottom of a menu tab press the DOWN Cursor key to scroll to additional menu options If there is a right or left arrow on a menu option press the RIGHT or LEFT Cursor keys to make setting changes or see more information If you press the MENU key or EXIT key to l...

Page 65: ...Advanced To change the User Mode setting 1 Press the MENU key twice to access the Main Menu 2 Press the RIGHT Cursor key until the Setup tab is selected 3 Press the DOWN Cursor key to highlight User Mode on the Setup main menu 4 Press the LEFT or RIGHT Cursor keys to change the User Mode setting Normal Advanced Default Normal NOTE Any changes made while in Advanced Mode will remain in effect after...

Page 66: ...56 Sonar Tab Normal Mode Sonar Tab Advanced Mode Main Menu ...
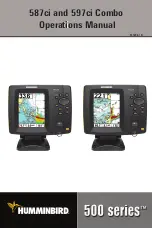
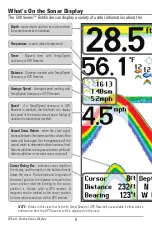
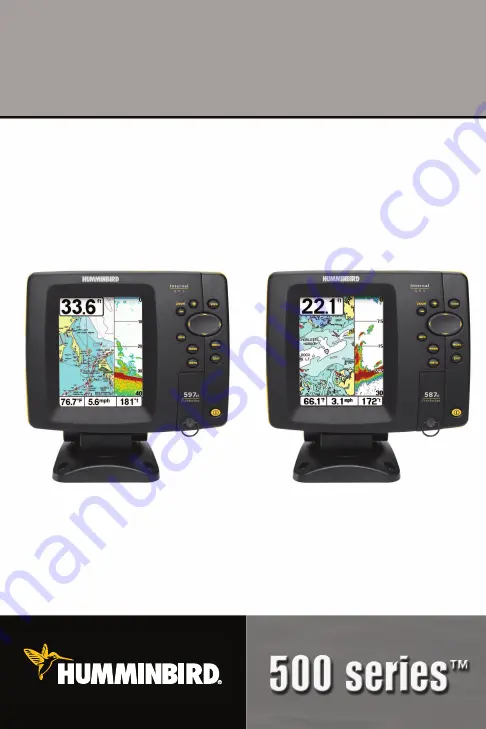
Page 67: ...t frequently used settings Press the MENU key once while in any of the Sonar Views to access the Sonar X Press Menu NOTE Menu options can be expanded or simplified by setting the Fishfinder User Mode to Advanced or Normal See Main Menu User Mode for details Sonar X Press Menu Sonar X Press Menu ...

Page 68: ...ased sensitivity shows weaker returns that may be of interest Decreasing the sensitivity eliminates the clutter from the display that is sometimes present in murky or muddy water If Sensitivity is adjusted too low the display may not show many sonar returns that could be fish To adjust the Sensitivity 1 Highlight Sensitivity on the Sonar X Press Menu 2 Press the RIGHT or LEFT Cursor keys to increa...

Page 69: ...ange 1 Make sure the User Mode is set to Advanced then highlight Upper Range on the Sonar X Press Menu NOTE See Main Menu User Mode to change the User Mode to Advanced 2 Press the RIGHT or LEFT Cursor keys to increase or decrease the Upper Range setting 0 to 990 feet or 0 to 327 meters International Models only Default 0 For example if you are only interested in the area between 20 and 50 feet dee...

Page 70: ...structure NOTE A minimum distance of 10 feet will be maintained between the Upper and Lower Range regardless of the manual settings entered To adjust the Lower Range 1 Highlight Lower Range on the Sonar X Press Menu 2 Press the RIGHT or LEFT Cursor keys to increase or decrease the Lower Range setting AUTO 10 to 1000 feet 3 to 330 meters International Models only Default AUTO For example if you are...

Page 71: ...rsonal preference To adjust the Chart Speed 1 Highlight Chart Speed on the Sonar X Press Menu 2 Press the RIGHT or LEFT Cursor keys to increase or decrease the Chart Speed setting 1 9 Ultra where 1 Slow 9 Fast Ultra Fastest Default 5 Cancel Navigation only when Navigating Cancel Navigation discards the current route and exits Navigation Mode This menu option will only appear when you are currently...

Page 72: ...hile in the Bird s Eye Chart or Combo View to access the Navigation X Press Menu NOTE Menu options will vary depending on system settings such as whether you are currently navigating NOTE Menu options can be expanded or simplified by setting the User Mode to Advanced or Normal See Main Menu User Mode for details Navigation X Press Menu Navigation X Press Menu ...

Page 73: ...3 Press the RIGHT Cursor key to view the Waypoints submenu NOTE See Navigation Menu Tab for more Waypoints information The Waypoint Submenu contains the following menu options Edit allows you to edit the Name Position Latitude and Longitude and select the Icon that will be used to represent the waypoint in the Chart and Combo Views Delete allows you to delete a waypoint from the saved waypoints li...

Page 74: ...nt then press the RIGHT Cursor key to select the destination waypoint Save Current Track Save Current Track allows you to save the current track being displayed After the current track is saved a new current track is started NOTE Save Current Track appears on the Navigation X Press Menu after navigation is stopped To Save Current Track 1 Highlight Save Current Track on the Navigation X Press Menu ...

Page 75: ...e more To cancel clearing the current track press the LEFT Cursor key Save Current Route only when Navigating Save Current Route allows you to save the current route being displayed This menu option will only appear when you are currently navigating a route To Save Current Route 1 Highlight Save Current Route on the Navigation X Press Menu 2 Press the RIGHT Cursor key to initiate saving the curren...

Page 76: ...key once more To cancel skipping the next waypoint press the LEFT Cursor key Cancel Navigation only when Navigating Cancel Navigation discards the current route and exits Navigation Mode This menu option will only appear when you are currently navigating a route This will not delete a previously saved route To Cancel Navigation 1 Highlight Cancel Navigation on the Navigation X Press Menu 2 Press t...

Page 77: ...splay This menu option will only appear when a grid has already been applied to a waypoint NOTE See Introduction to Navigation Add a Waypoint Target or Trolling Grid for more information To Remove a Grid 1 Highlight Remove Grid on the Navigation X Press Menu 2 Press the RIGHT Cursor key to remove the grid Sonar Window Combo View only Sonar Window sets the size of the Sonar Window in the Combo View...

Page 78: ...the Waypoints submenu NOTE See Navigation Menu Tab for more Waypoints information The Waypoint Submenu contains the following menu options Edit allows you to edit the Name Position Latitude and Longitude and select the Icon that will be used to represent the waypoint in the Chart and Combo Views Delete allows you to delete a waypoint from the saved waypoints list Go To allows you to select a waypo...

Page 79: ...n an alarm is triggered you can silence it by pressing any key The alarm will be silenced and will not be triggered again until a new instance of the alarm condition is detected NOTE Menu options can be expanded or simplified by setting the User Mode to Advanced or Normal See Main Menu User Mode for details Alarms Menu Alarms Menu Tab ...

Page 80: ...sh ID Alarm Fish ID Alarm sounds when the Fishfinder detects fish that correspond to the alarm setting Fish ID Alarm will only sound if Fish ID is on To change the Fish ID Alarm setting 1 Highlight Fish ID Alarm on the Alarms main menu 2 Press the LEFT or RIGHT Cursor keys to change the Fish ID Alarm setting Off All Large Medium Large Default Off Large Large Medium All Off For example if you ve se...

Page 81: ...ishfinder reaches the Temp Alarm setting which is either set in degrees Fahrenheit or Celsius International Models only To change the Temp Alarm setting 1 Highlight Temp Alarm on the Alarms main menu 2 Press the LEFT or RIGHT Cursor keys to change the Temp Alarm setting Off 33 120 Fahrenheit 0 50 Celsius Default Off For example if the Temp Alarm is set to 58 degrees Fahrenheit and the water temper...

Page 82: ... Arrival Alarm Arrival Alarm sounds when the boat has either exceeded the distance to the destination waypoint or has entered the Arrival Alarm Circle based on the menu setting when navigating Arrival Alarm allows you to set how close the boat must be to the destination waypoint before the Arrival Alarm will sound To change the Arrival Alarm setting 1 Highlight Arrival Alarm on the Alarms main men...

Page 83: ...tside of that perimeter the Drift Alarm will sound To change the Drift Alarm setting 1 Highlight Drift Alarm on the Alarms main menu 2 Press the LEFT or RIGHT Cursor keys to change the Drift Alarm setting Off 25 to 3000 feet 10 to 1000 meters International Models only Default Off Drift Alarm Perimeter Drift Alarm Circle Alarms Menu Tab ...

Page 84: ...duced as you adjust the Alarm Tone so that you can select the tone that you can hear best To change the Alarm Tone setting 1 Highlight Alarm Tone on the Alarms main menu 2 Press the LEFT or RIGHT Cursor keys to change the Alarm Tone setting High Medium Low Default Medium Alarms Menu Tab ...

Page 85: ...e to access the Main Menu and then press the RIGHT Cursor key to select the Sonar tab NOTE Menu options can be expanded or simplified by setting the User Mode to Advanced or Normal See Main Menu User Mode for details Sonar Menu Sonar Menu Tab ...

Page 86: ...s turned off the Fishfinder shows only the raw sonar returns on the display These returns will often result in arches forming on the display indicating potential targets Due to the transducer beam angle the distance to a fish decreases as the fish moves into the beam and then increases as it moves out again creating a Fish Arch when this distance change is shown on the display Boat speed chart spe...

Page 87: ...o change the Fish ID Sensitivity setting 1 Highlight Fish ID Sensitivity on the Sonar main menu 2 Press the LEFT or RIGHT Cursor keys to change the Fish ID Sensitivity setting Low 1 High 10 Default 5 Real Time Sonar RTS Window RTS Window sets the RTS Window to either Wide or Narrow or turns it off in the Sonar View The RTS Window always updates at the fastest rate possible and only displays return...

Page 88: ...What s on the Sonar Display Bottom Presentation for more information To adjust the Bottom View 1 Highlight Bottom View on the Sonar main menu 2 Press the LEFT or RIGHT Cursor keys to change the Bottom View setting Structure ID WhiteLine Default Structure ID Zoom Width Zoom Width adjusts the width of the Zoom window on the Sonar Zoom View To change the Zoom Width Setting 1 Highlight Zoom Width on t...

Page 89: ...can turn Depth Lines On or Off The Depth Lines menu option is available when User Mode is set to Advanced see Main Menu User Mode To change the Depth Lines setting 1 Make sure the User Mode is set to Advanced then highlight Depth Lines on the Sonar main menu 2 Press the LEFT or RIGHT Cursor keys to turn the Depth Lines setting On or Off Off On Default Off Depth Lines Depth Lines Sonar Menu Tab ...

Page 90: ...d The Surface Clutter menu option is available when User Mode is set to Advanced see Main Menu User Mode To change the Surface Clutter setting 1 Make sure the User Mode is set to Advanced then highlight Surface Clutter on the Sonar main menu 2 Press the LEFT or RIGHT Cursor keys to change the Surface Clutter setting Low 1 to High 10 Default 5 Surface Clutter Surface Clutter Sonar Menu Tab ...

Page 91: ... change the Noise Filter setting Off Low Medium High1 High2 High3 Default Low Max Depth Advanced Max Depth controls the maximum depth of operation When Max Depth is set to Auto the Fishfinder will acquire bottom readings as needed within the capacity of the unit When Max Depth is set to match your fishing maximum depth your Fishfinder will not attempt to acquire sonar data below that depth so more...

Page 92: ...e on the Sonar main menu 2 Press the LEFT or RIGHT Cursor keys to change the Water Type setting Fresh Salt shallow Salt deep Default Fresh NOTE Make sure that the Water Type is set accurately especially in salt water as this affects the accuracy of deep water depth readings In salt water what would be considered a large fish might be 2 to 10 times bigger than a large fish in fresh water depending ...

Page 93: ...y to select the Navigation tab NOTE Menu options will vary depending on system settings such as whether you are currently navigating NOTE Menu options can be expanded or simplified by setting the User Mode to Advanced or Normal See Main Menu User Mode for details Navigation Menu Tab Navigation Menu Tab ...

Page 94: ...the color of the line Saved Tracks Saved Tracks allows you view the Saved Tracks submenu To view the Saved Tracks Submenu 1 Highlight Saved Tracks on the Navigation main menu 2 Press the RIGHT Cursor key to view the Saved Tracks submenu The Saved Tracks Submenu contains the following menu options Edit allows you to select a saved track and change its Name Visibility Style and Color Select Edit and...

Page 95: ... UP or DOWN Cursor keys to choose a color or shade NOTE You can exit these fields with the LEFT or RIGHT Cursor keys or by pressing the EXIT key Select Save to confirm your changes Delete allows you to delete a track from the saved tracks list Select Delete and press the RIGHT Cursor key to display the saved tracks list Select the track you want to delete and press the RIGHT Cursor key To delete t...

Page 96: ...vailable as well as digits 0 9 and some punctuation characters Latitude Longitude Press the LEFT or RIGHT Cursor keys to move between latitude or longitude fields and press the UP or DOWN Cursor keys to change the coordinates of each field Icon Select the Icon field and use the Up or Down Cursor keys to scroll through a variety of icons to assign to your waypoint NOTE You can exit these fields by ...

Page 97: ...se a waypoint from the list Press the Right Cursor key again to initiate navigation Target allows you to apply a target to a waypoint selected from the saved waypoints list Select Target and press the Right Cursor key to view the saved waypoints list Use the UP or DOWN Cursor keys to choose a waypoint from the list Press the Right Cursor key to apply a target to the waypoint you choose Grid allows...

Page 98: ...unctuation characters Waypoints Press the UP or DOWN Cursor keys to highlight saved waypoints and press the RIGHT Cursor key to add them to the In Route list In Route Highlight a waypoint in the In Route list and press the RIGHT Cursor key to access the Waypoint In Route submenu From this submenu you can move the waypoint up or down in the route order or delete it from the list NOTE You can exit t...

Page 99: ... the UP or DOWN Cursor keys to choose a route and press the RIGHT Cursor key to select it Navigation will begin immediately Info provides information about the route you choose from the saved routes list including the distance and bearing from each waypoint to the next Select Info and press the RIGHT Cursor key to display the saved routes list Use the UP or DOWN Cursor keys to choose a route and p...

Page 100: ... areas underwater wrecks tides and currents in addition to the Basic and Navigation information All shows roads buildings railways and other notations in addition to the Basic Navigation and Underwater information To change the Chart Detail Level setting 1 Highlight Chart Detail Level on the Navigation main menu 2 Press the LEFT or RIGHT Cursor keys to change the Chart Detail Level setting Basic N...

Page 101: ...e LEFT or RIGHT Cursor keys to change the Map Borders setting Hidden MMC SD Only All Visible Default MMC SD Only Lat Lon Grid Lat Lon Grid allows you to display or hide a grid showing latitude and longitude lines To change the Lat Lon Grid setting 1 Highlight Lat Lon Grid on the Navigation main menu 2 Press the LEFT or RIGHT Cursor keys to change the Lat Lon Grid setting Hidden Visible Default Hid...

Page 102: ...he depth used for shading on the chart views To change the Shaded Depth setting 1 Highlight Shaded Depth on the Navigation main menu 2 Press the LEFT or RIGHT Cursor keys to change the Shaded Depth setting Off 1 to 180 Feet or 1 to 60 Meters International Units only Default 15 ft 5 m Chart Select Chart Select allows you to choose which chart to use if you have built in charts or a map card If you ...

Page 103: ...er feature On or Off When two or more waypoints overlap or are displayed close together on a Chart view the screen will automatically declutter waypoint names will shorten and the waypoint icons will change into small blue icons The Waypoint Decluttering menu option is available when User Mode is set to Advanced see Main Menu User Mode To change the Waypoint Decluttering setting 1 Make sure the Us...

Page 104: ...elect the time period between trackpoints The current track can only contain up to 20 000 trackpoints so longer time periods cause the track to extend back further in time but will be less detailed NOTE Trackpoint Interval works in conjunction with Track Min Distance Both conditions must be met before a trackpoint is added to the current track To change the Trackpoint Interval setting 1 Highlight ...

Page 105: ... LEFT or RIGHT Cursor keys to change the Track Min Distance setting 1 to 300 feet or 1 to 100 meters International Units only Default 16 ft 5 m NOTE During slow travel or drift setting both Trackpoint Interval and Track Min Distance to small values will allow you to increase the track resolution Map Datum Advanced Map Datum allows you to change the map coordinate system used by the Fishfinder to m...

Page 106: ...ou want start the simulation NOTE The cursor must be active in order for this procedure to work 2 Make sure the User Mode is set to Advanced then highlight Set Simulation Position on the Navigation main menu 3 Press the RIGHT Cursor key to change the Simulation Position setting The Confirm dialog box will appear To confirm the setting press the RIGHT Cursor key once more To cancel the setting pres...

Page 107: ...hlight Set Map Offset on the Navigation main menu 3 Press the RIGHT Cursor key to set the Map Offset The Confirm dialog box will appear To confirm the setting press the RIGHT Cursor key once more To cancel the setting press the LEFT Cursor key NOTE If the cursor was not active before you began this procedure an error message will appear Exit the menu set the cursor then try again Course Projection...

Page 108: ...t Export All Nav Data Export All Nav Data allows you to export all saved Tracks Waypoints and Routes to an MMC SD card To Export All Navigation Data 1 Make sure that an optional purchase MMC SD card is installed in the slot then highlight Export All Nav Data on the Navigation main menu 2 Press the RIGHT Cursor key to export all navigation data The Confirm dialog box will appear To confirm export p...

Page 109: ... menu option should be used with caution To Delete All Navigation Data 1 Make sure the User Mode is set to Advanced then highlight Delete All Nav Data on the Navigation main menu 2 Press the RIGHT Cursor key to delete all navigation data The Confirm dialog box will appear To delete all navigation data press the RIGHT Cursor key once more To cancel deleting all navigation data press the LEFT Cursor...

Page 110: ...s the RIGHT Cursor key until the Setup tab is selected NOTE Menu options will vary depending on which accessories are attached to the unit NOTE Menu options can be expanded or simplified by setting the User Mode to Advanced or Normal See Main Menu User Mode for details Setup Menu Tab Setup Menu Tab ...

Page 111: ...in menu 2 Press the LEFT or RIGHT Cursor keys to change the Units Temp setting Celsius Fahrenheit Default Celsius Units Distance Units Distance selects the units of measure for all distance related readouts and will appear in the menu if a Temp Speed Accessory is connected and the paddlewheel has moved at least once or if the GPS Receiver is connected To change the Units Distance setting 1 Highlig...

Page 112: ...ystem to Normal or Advanced When set to Normal default setting the basic set of menu options are shown in the menu system When set to Advanced additional menu options are added to the menu system See Main Menu User Mode for details To change the User Mode setting 1 Highlight User Mode on the Setup main menu 2 Press the LEFT or RIGHT Cursor keys to change the User Mode setting Normal Advanced Defau...

Page 113: ...ighlight Reset Triplog on the Setup main menu 2 Press the RIGHT Cursor key to initiate Triplog Reset 3 The Confirm dialog box will appear To reset the Triplog press the RIGHT Cursor key once more To cancel Reset Triplog press the LEFT Cursor key Restore Defaults Restore Defaults resets ALL menu settings to their factory defaults Use this menu choice with caution To Restore Defaults 1 Highlight Res...

Page 114: ...ceiver or Temp Speed Each data window can be empty or contain one of the following information categories Course Time Date Navigation Triplog Position Voltage Speed Temperature To change Select Readouts 1 Make sure the User Mode is set to Advanced then highlight Select Readouts on the Setup main menu 2 Press the RIGHT Cursor key to access the Select Readouts submenu 3 Press the UP or DOWN Cursor k...

Page 115: ...is available when the User Mode is set to Advanced see Main Menu User Mode To change the Depth Offset setting 1 Make sure the User Mode is set to Advanced then highlight Depth Offset on the Setup main menu 2 Press the LEFT or RIGHT Cursor keys to change the Depth Offset setting 10 0 to 10 0 feet or 3 to 3 meters International Models only Default 0 NOTE The availability of the digital readout infor...

Page 116: ...Press the LEFT or RIGHT Cursor keys to change the Temp Offset setting 10 0 to 10 0 degrees Default 0 Speed Calibration Advanced with Temp Speed only Speed Calibration will adjust the speed readout by the percentage entered and will appear in the menu if a Temp Speed Accessory is connected and the paddlewheel has moved at least once and when the User Mode is set to Advanced see Main Menu User Mode ...

Page 117: ... Standard Time Daylight Saving Time Advanced Daylight Saving Time adjusts the time display to account for local Daylight Saving Time when Time Date is selected as a Digital Readout on the Sonar View see Setup Menu Tab Select Readouts Selecting On adds one hour to the time display adjusted for your local time zone Selecting Off leaves the time display as adjusted for your local time zone This menu ...

Page 118: ... Default dd mm mmm Time Format Advanced International only Time Format changes the time format used by the unit This menu option is available when the User Mode is set to Advanced see Main Menu User Mode International Models only Time Format selects a 12 hour or 24 hour format for the time of day displayed when Time Date is selected as a Digital Readout on the Sonar View see Setup Menu Tab Select ...

Page 119: ...r keys to change the Date Format mm dd yy dd mm yy or yy mm dd Default mm dd yy NMEA Output Advanced NMEA Output turns the NMEA output on or off This menu option is available when the User Mode is set to Advanced see Main Menu User Mode NMEA Output should be turned On if you connect the NMEA Output wires of the GPS Receiver cable to another NMEA compatible device such as an autopilot NMEA 0183 is ...

Page 120: ... sure the User Mode is set to Advanced then highlight NMEA Output on the Setup main menu 2 Press the LEFT or RIGHT Cursor keys to change the NMEA Output to On or Off Off On Default Off Sonar Sonar deactivates Sonar and removes the Sonar Views from the view rotation To turn Sonar on or off 1 Highlight Sonar on the Setup main menu 2 Press the LEFT or RIGHT Cursor keys to change the Sonar to On or Of...

Page 121: ...le in the view rotation The view will be removed from the view rotation if it is set to Hidden and will be displayed in the view rotation if it is set to Visible NOTE See Views for more information To Hide or Show a view 1 Press the UP or DOWN Cursor keys to select a View from the Views main menu 2 Press the LEFT or RIGHT Cursor keys to change the status of the view from Hidden to Visible or vice ...

Page 122: ...osion from the battery terminals or wiring or actually replacing the battery if necessary Fishfinder Defaults to Simulator with a Transducer Attached A connected and functioning transducer will cause the newly started Fishfinder to go into Normal operating mode automatically If when you power up the Fishfinder it goes into Simulator mode automatically even though a transducer is already connected ...

Page 123: ... air and water flowing around the transducer cavitation may be interfering with the interpretation of sonar data See your Installation Guide for suggestions on adjusting the transducer position Electrical noise from the boat s engine may be interfering with sonar reception See Finding the Cause of Noise for more information Sonar readings may be affected if the transducer is not positioned correct...

Page 124: ...s To determine whether the boat s engine is the source of the noise increase the RPMs while the boat is in neutral and stationary to see if the noise increases proportionately if noise appears when you rev the engine the problem could be the spark plugs alternator or tachometer wiring Replace the spark plugs with resistor plugs install an alternator filter or route the control head power and trans...

Page 125: ...peed and temperature readouts as well as a valuable Triplog function NOTE If an external Temperature Speed TS W or Temperature TG W accessory is connected AND a transducer with temperature built in is connected at the same time the TS W or TG W accessory will override the temperature built into the transducer Be sure to check out our web site www humminbird com for additional new and exciting acce...

Page 126: ...2 Inches 63 5 mm Power Requirement 10 20 VDC LCD Matrix 587ci 320 V x 240 H 597ci 640 V x 480 H Transducer XNT 9 20 T Transducer Cable Length 20 ft 6 m NOTE Humminbird verifies maximum stated depth in saltwater conditions but actual depth performance may vary due to transducer installation water type thermal layers bottom composition and slope NOTE Product specifications and features are subject t...

Page 127: ...en speed input is available the Big Digits View also shows the TripLog See TripLog Bottom Black Bottom Black is a Humminbird feature that fills in the area of the display below the bottom contour Bottom Black is preferred by some anglers because of its high contrast and easy readability even though it can obscure bottom hardness information Bottom Contour Bottom Contour is the profile of the botto...

Page 128: ... close to the bottom that fall within the dead zone will probably not be visible in the sonar beam Precision sonar beams such as the Humminbird 20 beam have a smaller dead zone than wider sonar beams Decibel A Decibel is the measurement for sound pressure level or intensity of the sonar return See dB Down Point dB Down Point The dB Down Point is the standard decibel level at which the sonar cone a...

Page 129: ...etected in the wider beam are shown as hollow symbols Fish Symbol A Fish Symbol is the graphic that is displayed on the screen when Fish ID determines that a sonar return is likely to be a fish See Fish ID Freeze Frame Freeze Frame is a Humminbird feature that pauses the sonar scrolling so that the image on screen can be studied with greater detail See Instant Image Update Frequency Frequency is a...

Page 130: ...aximum Depth Menu is a Humminbird feature that optimizes performance based on the maximum operational depth set by the user Many Humminbird units can operate across a very broad depth range up to 2500 feet which causes the unit to look up to that full depth under some circumstances Due to the speed of sound in water this can result in less responsiveness because the unit has to wait for a longer p...

Page 131: ...oat speed and the Chart Speed setting A greater number of horizontal pixels show more sonar history that the boat has passed through On many models Humminbird provides the most vertical pixels to provide a better display resolution See Chart Speed and Pixels Power Output Power output is the amount of sound energy emitted into the water by the sonar transmitter Power output is measured using either...

Page 132: ... results in a more detailed instantaneous view of what is under the boat The Real Time Sonar window is a vertical band at the right side of the display that shows the instantaneous sonar return from the transducer at a particular instant The RTS Window menu option permits the user to adjust the window to show the full sonar signal return or just a narrower band that indicates intensity using grays...

Page 133: ...o the angler including bait fish game fish thermoclines weed beds subtle structure and more Sonar Update Rate Sonar Update Rate is the number of times per second that the transmitter receiver sends and receives sonar signals A very fast sonar update rate collects more information and provides a more detailed image of the bottom fish and structure Many Humminbird units operate at up to 40 times per...

Page 134: ...ze two very close objects as two distinct targets i e two fish hanging very close or a fish hanging very close to structure Humminbird fishfinders provide a very good 2 1 2 inches of target separation in shallower than 100 feet of depth Target separation decreases as depth increases due to the need for longer Pulse Width to achieve greater depth See Pulse Width Thermoclines Thermoclines are water ...

Page 135: ...r signals and work in conjunction with the transducer Humminbird transmitters have an extremely fast cycling design that can send signals up to 60 times per second as well as produce the varying levels of power output needed for different depths and conditions Additionally the transmitter has the capability to create very precise sonar pulses needed for a high degree of target separation Humminbir...

Page 136: ... MENU key Items that appear on the X Press Menu are related to the current view and present the most logical options for that view Sonar View X Press menus will differ from Chart View X Press menus etc X Press menus are one of the principal reasons that Humminbird products are easier to use Zoom Zoom is a feature that focuses in on a smaller area of the bottom to provide enhanced resolution With e...

Page 137: ...n be provided by GPS Bearing BRG Bearing is the direction to a destination waypoint measured in degrees from North i e 321 where 000 is North 090 East 180 is South 270 is West Chartplotter Chartplotter describes a navigation device that shows Present Position on a Map along with Tracks Waypoints and Routes All Chartplotters are also considered Trackplotters All Humminbird GPS Combo units are Chart...

Page 138: ...S factors which include satellite position in the sky signal strength and others factors Fix Type Fix Type indicates whether the GPS receiver is providing 2D fix or 3D fix A 2D fix requires only three satellites and provides only latitude and longitude A 3D fix requires four or more satellites and provides latitude longitude and altitude GPS GPS is an acronym for Global Positioning System GPS prov...

Page 139: ...an appropriate card reader MMC is the same format that many digital cameras use See SD North Magnetic North is the principle reference point of the compass i e North is 000 Magnetic North relies on the earth s magnetic field to align a metal pointer generally towards True North However due to local variations in the earth s magnetic field around the globe the difference between True North and Magn...

Page 140: ...rs 95 of the time Currently SA is inactive and the consumer can enjoy the greater precision GPS provides however the DoD reserves the right to activate SA at any time Speed Over Ground SOG Speed Over Ground is the measurement of the boat s progress across a given distance and is the speed measurement provided by GPS An alternate Speed Through Water is provided by a speed paddlewheel and is the mea...

Page 141: ...ent and complete coverage of that area Trolling Grid resolution be changed by zooming in or out on the chart The Trolling Grid can also be rotated on the display to orient it for optimal boat course for wave and wind conditions UTC UTC is an acronym for Universal Time Constant UTC is the standard time used in navigation and is the local time in Greenwich England UTC is equivalent to Greenwich Mean...

Page 142: ...d assign a symbol to the saved location Depth Date and Time of Day when the waypoint was created is also saved Waypoint Target Waypoint Target is a Humminbird feature that displays a precise bull s eye around a selected waypoint This bull s eye is used to easily monitor boat position relative to a waypoint and is useful for fishing over submerged structure With Waypoint Targets a quick look at the...

Page 143: ...ways By Telephone Monday Friday 8 00 a m to 4 30 p m Central Standard Time 1 800 633 1468 By e mail typically we respond to your e mail within three business days cservice johnsonoutdoors com For direct shipping our address is Humminbird Service Department 678 Humminbird Lane Eufaula AL 36027 USA ...

Reviews: