Humminbird DUAL BEAM 250DX, Operation Manual
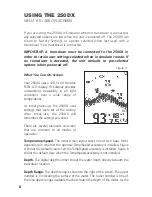
The Humminbird DUAL BEAM 250DX Operation Manual is a comprehensive guide that allows you to maximize the benefits of your fish finder. Easily download this user-friendly manual for free from our website, ensuring you have all the necessary instructions and information to enhance your fishing experience with this exceptional product.
Share
Download


Reviews:
No comments