
Summary of Contents for ID Sixty
Page 1: ......
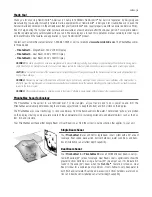
The Humminbird ID Sixty is a top-of-the-line fish finder designed for effortless operation and accurate results. Ensure you get the most out of your device by downloading the free Operation Manual from 88.208.23.73:8080. This comprehensive manual provides step-by-step instructions for optimal performance and successful fishing expeditions.
Page 1: ......