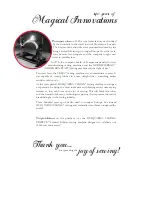
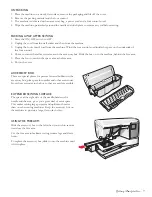
background image

140TH ANNIVERSARY LIMITED EDITION SEWING MACHINE

WING MACHINE

User’s Guide

Summary of Contents for Tribute 140C

Page 1: ...140TH ANNIVERSARY LIMITED EDITION SEWING MACHINE WING MACHINE User s Guide ...

Page 2: ...from the accumulation of lint dust and loose cloth Keep Àngers away from all moving parts Special care is required around the sewing machine needle Always use the proper needle plate The wrong plate can cause the needle to break Do not use bent needles Do not pull or push fabric while stitching It may deÁect the needle causing it to break Wear safety glasses Switch the sewing machine off 0 when ma...

Page 3: ...g stitches in a neat straight line something earlier models could not do As the years passed HUSQVARNA VIKING sewing machines developed a reputation for being the most innovative and offering sewers time saving features so they can focus on the joy of sewing This still holds true today and the brand holds many technological patents that represent innovative breakthroughs in the sewing industry Thr...

Page 4: ...18 Clear 18 Stitch Selection Buttons 18 Navigator Arrow Buttons 18 Stitch Menu 18 Font Menu 18 Shift to upper case lower case or numbers 18 Save to My Stitches 18 Program Mode 18 SET Menu 19 Mirror Side to Side 19 Exclusive SEWING ADVISOR 19 Sewing Mode 20 Selecting a Stitch 21 Selecting a Font 21 Programming 22 24 SET Menu 25 Presser Foot Pressure 25 Pivot Height 25 Sensor Foot Auto 25 FIX Auto 2...

Page 5: ...bulbs 10 Sensor One Step Buttonhole Foot socket 11 Needle threader 12 Presser foot 13 Stitch plate 14 Bobbin cover 15 Free arm 16 Drop feed teeth switch 17 Needle bar with needle clamp screw 18 Presser bar 19 Presser foot ankle 20 Stitch panel 21 Spool pin 22 Spool caps 23 Auxiliary spool pin 24 Bobbin spindle Bobbin stop 25 Thread cutter for bobbin thread 26 Handwheel 27 GraphicDisplay 28 Touch P...

Page 6: ... the hem edge Zipper Foot E This foot can be snapped on either to the right or to the left of the needle making it easy to sew close to both sides of the zipper teeth Move needle position to right or left to sew closer to zipper teeth or for covering large cording Non Stick Glide Foot H This foot with a non stick coating underneath is used when sewing foam vinyl plastic or leather to minimize the ...

Page 7: ... box Slide the box on to the machine behind the free arm 5 Place the foot control in the space above the free arm 6 Put on the cover ACCESSORY BOX There are special places for presser feet and bobbins in the accessory box plus space for needles and other accessories Store the accessories in the box so they are easily accessible EXTENDED SEWING SURFACE The space at the right side of the needle betw...

Page 8: ...erside of foot control 1 Connect the foot control cord to the front socket on the bottom right side of the machine 2 Connect the power cord to the rear socket on the bottom right side of the machine 3 Press the ON OFF switch to ON to turn on power and light For the USA and Canada This sewing machine has a polarized plug one blade wider than the other To reduce the risk of electric shock this plug ...

Page 9: ...30 705H The needle package included with your machine contains needles of the most frequently used sizes for sewing on woven and stretch fabrics Universal needle A Universal needles have a slightly rounded point and come in a variety of sizes For general sewing in a variety of fabric types and weights Stretch needle B Stretch needles have a special scarf to eliminate skipped stitches when there is...

Page 10: ...st the spool There should be no space between spool cap and thread spool Two extra spool caps one small and one large are also included as accessories for your machine The small spool cap can be used for small thread spools The second large spool cap can be used when winding a bobbin from a second spool of thread or when sewing with a twin needle Vertical Position Lift the spool pin up and all the...

Page 11: ...ion Bring the thread over and behind the pre tension thread guide A and under the thread guide B Spool pin in vertical position Instead of bringing the thread into the pre tension guide A bring it directly under the thread guide B 3 Bring the thread down between the thread tension discs C 4 Continue threading in the direction indicated by the arrows Bring the thread from the right into the slot on...

Page 12: ...e needle Pull the thread loop out behind the needle 5 Place the thread under the presser foot Note The needle threader is designed to be used for size 70 120 needles You cannot use the needle threader for size 60 needles or smaller the wing needle twin needle triple needle or when the Sensor One Step Buttonhole Foot is on There are also some other optional accessories that require manual threading...

Page 13: ...s thread should lie between the right thread tension discs A and outside the needle thread guide B Thread the right needle manually Note Only use symmetrical twin needles C Do not use this type of twin needle D since it may damage your sewing machine WINDING THE BOBBIN WITH THE MACHINE THREADED Make sure that the presser foot is up and the needle is in the highest position Note Do not use a plasti...

Page 14: ...BIN USING THE AUXILIARY SPOOL PIN 1 Place an empty bobbin on the bobbin spindle on the top of the machine The bobbin only Àts on one way with the logo facing up Use only original HUSQVARNA VIKING bobbins 2 Fold out the auxiliary spool pin Place a large spool holder and a felt pad under the spool 3 Bring the thread over and behind the pre tension thread guide A and down around the thread tension di...

Page 15: ...cs and or techniques To set the tension turn the numbered tension dial The higher the number the tighter the tension Normally top thread tension is set to around 4 When sewing buttonholes and decorative stitches set thread tension to around 3 When topstitching with a heavy thread in thick fabric increase the tension to 7 9 Make a few tests on a scrap piece of the fabric you are going to sew and ch...

Page 16: ...ckness of the fabric and raises the presser foot to just the right height to Áoat over the fabric for pivoting Go to the SET Menu to turn off this function see page 25 STARTING TO SEW The buttons at the bottom of the Touch Panel are the Exclusive SEWING ADVISOR buttons that will help you to get the best stitch and settings when you are sewing Press the button for the type and weight of fabric you ...

Page 17: ...hread and stops automatically when one stitch unit or stitch program has been completed The LED next to the button is lit when STOP is activated STOP is cancelled once you have used the function Press the button again if you wish to activate it once more STOP is also used to repeat the same size darning bartack and Automatic Tapering stitch with the same size TIP If you want to repeat the STOP fun...

Page 18: ...u This button is also used to activate tapering for Decorative Tapering Stitches 12 Stitch Selection Buttons By pressing any of the 0 to 9 buttons you select the stitch illustrated on that button immediately By pressing two digits in quick succession you will be able to select a stitch from 10 and up from the selected stitch menu If the stitch number does not exist in the selected stitch menu you ...

Page 19: ...edle position is changed from left to right If the button is pressed in Sew Out Mode for stitch programs the whole stitch program is mirrored The change is visible on the GraphicDisplay 21 Exclusive SEWING ADVISOR The Exclusive SEWING ADVISOR feature sets the best stitch stitch length stitch width sewing speed and Sensor Foot Pressure for the selected fabric and sewing technique The stitch is show...

Page 20: ...se icon is shown to indicate that you need to press the reverse button when the buttonhole columns or the darning stitch are sewn to the desired length 11 Stitch density is shown instead of stitch length when a buttonhole bartack or darning stitch is selected or when a satin stitch is selected and the Alternate View button is pressed Reduce or increase the stitch density by pressing the Stitch Len...

Page 21: ...ction buttons once you select the stitch illustrated on that button immediately regardless of the selected stitch menu By pressing two digits in quick succession you will be able to select a stitch from 10 and up from the selected stitch menu If the stitch number does not exist in the selected menu you will hear a beep and the Àrst entered digit will be selected as a stitch The selected stitch men...

Page 22: ...titch and it will appear to the right of the last entered stitch Note Two numbers are displayed above the stitch program on the left side of the GraphicDisplay The Àrst number is the position of the selected stitch in the program The second number put in brackets is the total number of stitches in the program The number above the stitch program on the right side of the GraphicDisplay is the number...

Page 23: ... program Note If autoÀx is activated on your machine you do not need to add a FIX in the beginning of the program Join Two Stitch Programs Into One You can add a previously saved program to a new one in Programming Mode Press the Stitch Menu button select My Stitches and the program you wish to add Press OK and the program will be inserted in Programming Mode to the right of the cursor Adjust a Si...

Page 24: ...m Programming or Sewing Mode This will open the My Stitches Menu Select an empty memory by pressing the up down arrow buttons ConÀrm your selection by pressing the OK button If the selected memory is not empty a pop up message will appear asking if you wish to overwrite the previously saved stitch program with the new one Select Yes or No with the arrow buttons and press the OK button Press the My...

Page 25: ...by pressing the left right arrow buttons Sensor Foot Auto Press the OK button to turn on or off the automatic pivot function for lifting the presser foot for example when stopping with the needle down The setting will go back to default when the machine is turned off FIX Auto Press the OK button to turn on or off the automatic FIX function in the beginning of each stitch The setting will go back t...

Page 26: ...ffect the selected stitch If another stitch is selected or the same stitch is selected again the value is reset to the default value Audible Alarm Turns on or off all alarm sounds of the machine Default setting is on This setting is saved even if the machine is turned off Contrast Adjust the contrast of the GraphicDisplay by using the left right arrow buttons The value can be set between 20 to 20 ...

Page 27: ...turn on your machine Press the OK button or tap the foot control to close the pop up message Stitch Width Limited for Twin Needle This message is shown when the machine is set for twin needle and you try to adjust the stitch width to wider than possible with the twin needle Close the pop up message by pressing the OK button Machine Set for Straight Stitch This message is shown when the stitch widt...

Page 28: ...ite areas and close the pop up message by pressing the OK button Sensor One Step Buttonhole Presser Foot connected The Sensor One Step Buttonhole Foot can only be used for the buttonhole stitches recommended for the foot If the Sensor One Step Buttonhole Foot is connected and you select a stitch that is not possible to sew with the foot this message will appear when you start to sew Remove the foo...

Page 29: ...Stitches If you try to add more than 40 stitches or letters in the same program this message is shown Close the pop up message by pressing the OK button Note If you add a FIX or STOP to the program these will each use one memory space in the program The Combination of Commands is Incorrect If you are programming stitches or letters and try to insert the commands STOP or FIX into a stitch program i...

Page 30: ...xclusive SEWING ADVISOR feature automatically sets a long stitch length so the threads are easy to remove or to pull for gathering BLIND HEM creates an invisible hem on garments Is not recommended for light weight fabric or for leather vinyl HEM selects the best visible or top stitch hem for your fabric type and weight BUTTONHOLE the Exclusive SEWING ADVISOR feature selects and sets the best butto...

Page 31: ... 8 15 mm seam guide 1 2 Stretch Stitch Fabric Stretch light cut in two Select Stretch light fabric and Seam technique The Exclusive SEWING ADVISOR feature selects the Stretch Stitch Use Presser Foot A and size 75 stretch needle as recommended Line up the fabric edge with the 3 8 10 mm seam guide OVERCAST The three step zigzag is up to 1 4 6mm wide and suitable for all types of fabrics Use this sti...

Page 32: ...wo Select Stretch heavy fabric and Seam Overcast technique The Exclusive SEWING ADVISOR feature selects the Overlock Stitch Use Presser Foot B and size 90 stretch needle as recommended 1 10 Double Overlock Stitch Fabric Woven heavy cut in two Select Woven heavy fabric and Seam Overcast technique The Exclusive SEWING ADVISOR feature selects the Double Overlock Stitch Use Presser Foot B and size 80 ...

Page 33: ...on under the presser foot 2 Start sewing above the hole and over it 3 Once over the hole press the Reverse button Continue sewing The machine sews back and forth across the hole 14 times and then stops 4 To repeat the stitch with the same size press the STOP button Reposition your fabric then step on the foot control to sew again The stitch will now repeat the same size darning square The machine ...

Page 34: ...he stitch width as needed to barely catch the fold Note The blind hem technique is not recommended for light weight fabric or leather vinyl If you select the blind hem and light woven light stretch or leather and vinyl you will hear a beep and the technique will be unselected Woven medium heavy fabric Stretch medium heavy fabric 1 16 Stretch Blind Hem Stitch 1 17 Woven Blind Hem Stitch Fabric Stre...

Page 35: ...over the thick seam Stop sewing again just in front of the seam with the needle in the fabric Remove the multipurpose tool and re insert it under the presser foot from the front Sew a few stitches until the whole presser foot has passed the seam and is resting on the multipurpose tool Stop sewing once again The needle is in the fabric and the presser foot lifts Remove the multipurpose tool Continu...

Page 36: ... the up and down arrow buttons to set the button size on the GraphicDisplay The size can be set between 0 50 mm 5 Place the fabric and stabilizer under the Sensor One Step Buttonhole Foot The measurement wheel can be raised by lifting it which makes it easier to place the fabric under the presser foot Use the markings on the left toe of the Sensor One Step Buttonhole Foot to position the garment e...

Page 37: ...e 4 Sew to the starting mark and press the Reverse button to sew the second bartack Keep the foot control depressed until the buttonhole is Ànished The machine will stop automatically when the buttonhole is complete 1 0 1 23 28 Buttonhole Stitches Fabric All types of fabric Select The fabric you are using and the Buttonhole technique The Exclusive SEWING ADVISOR feature selects a buttonhole suitab...

Page 38: ...oat button decrease or increase the stitch width until the swing of the needle sews in the holes of the button 3 Set the number of stitches to sew on the button by pressing the up and down arrow buttons Six to eight stitches is normal 4 Press the foot control The sewing machine will sew the number of stitches set on the display and then tie off and stop 5 Raise feed teeth when button sewing is com...

Page 39: ...ht side so it stays in place see Àg 1 3 Select straight stitch and move the needle position to the left Snap on the Zipper Foot E so the needle is on the left side of the foot Place fabric under the foot right side up with the zipper foot on the right side of the zipper 4 Begin stitching across the bottom turn the fabric and stitch the right side of the zipper to the top see Àg 2 5 To avoid fabric...

Page 40: ...s the up and down movement of the needle with the help of the spring and the arm on the presser foot The feed teeth must be lowered and the fabric is moved manually Tip Use the optional Open Toe Free Motion Spring foot 1 1 Free Motion Stippling Fabric Woven medium with batting underneath Select Woven medium on The Exclusive SEWING ADVISOR Straight Stitch 1 FreeM Floating in the Machine SET menu To...

Page 41: ...st or lint built up Press the ON OFF switch to OFF Clean the Bobbin Area Remove the presser foot and slide off the bobbin cover Lower the feed teeth Place the screwdriver under the stitchplate as shown on the picture and gently turn the screwdriver to pop off the stitch plate Clean the feed teeth with the brush Cleaning Under the Bobbin Area After sewing several projects or any time you notice an ...

Page 42: ...p and bobbin threads Use recommended presser foot Turn machine off and on to reset Consult your Authorized HUSQVARNA VIKING dealer for service Needle Breaks Use care not to pull fabric when sewing Insert needle size and type as recommended on the GraphicDisplay Insert needle correctly as described in the User s Guide Poor Tension Select correct type and weight of fabric in the Exclusive SEWING ADV...

Page 43: ... the function buttons do not respond to touch turn the machine off and then on again If the problem persists contact your authorized HUSQVARNA VIKING dealer HAVE YOUR SEWING MACHINE SERVICED REGULARLY BYYOUR AUTHORIZED HUSQVARNAVIKING DEALER If you have followed this trouble shooting information and still have sewing problems take the sewing machine to your authorized HUSQVARNA VIKING dealer If th...

Page 44: ...Stretch Seam Overcast Stitch B Seam and overcast in one step along the edge or trim later For medium and medium heavy stretch fabrics 9 Automatic Button Sewing No presser foot For sewing on buttons Set the number of stitches on the GraphicDisplay 10 Double Overlock Stitch B Seam and overcast in one step along the edge or trim later For heavy stretch and heavy woven fabrics 11 Overlock Stitch B Sea...

Page 45: ... Buttonhole Sensor One Step Buttonh Foot C With reinforced bartacks 28 Leather Straight Stitch Buttonhole A B For leather and suede 29 Eyelet B For belts laces etc 30 Satin stitch narrow B For appliqués sewing on laces and trims For light and medium fabrics 31 Satin stitch medium B For appliqués sewing on laces and trims For light and medium fabrics 32 Satin stitch wide B For appliqués sewing on l...

Page 46: ...es Menu 2 Quilt Stitches Menu 3 Satin and Heirloom Stitches Menu 4 Decorative Stitches Stitches 0 9 are the same in all four stitch menus Cyrillic and Hiragana Russian and Japanese alphabets See the fonts on the GraphicDisplay of your sewing machine Alphabets ...

Page 47: ...d underneath the sewing machine VIKING KEEPING THE WORLD SEWING Design FREJA NORDSTJERNAN NORTHERN STAR TRIBUTE EXCLUSIVE SENSOR SYSTEM and SEWING ADVISOR are trademarks of KSIN Luxembourg II S ar l HUSQVARNA and the crowned H mark are trademarks of Husqvarna AB All trademarks are used under license by VSM Group AB Please note that on disposal this product must be safely recycled in accordance wit...

Page 48: ...www husqvarnaviking com 413 32 36 26B English Inhouse 2011 KSIN Luxembourg II S ar l All rights reserved Printed in Sweden on environmental friendly paper ...

Reviews: