HUSQVARNA AUTOMOWER
®
305/308
www.automower.com
1
2
3
4
5
6
7
20 cm
5 cm
30 cm
8
9
10
11
12
13
14
15
16
QUICK GUIDE
GUÍA RÁPIDA
GUIDE RAPIDE
KURZANLEITUNG
115 59 36-38
AUTOMOWER
®
is a trademark owned by Husqvarna AB. Copyright © 2013 HUSQVARNA. All rights reserved.
AUTOMOWER
®
es una marca registrada de Husqvarna AB. Copyright © 2013 HUSQVARNA. Todos los derechos reservados.
AUTOMOWER
®
est une marque déposée appartenant à Husqvarna AB. Copyright © 2013 HUSQVARNA. Tous droits réservés
AUTOMOWER
®
ist eine Marke von Husqvarna AB. Copyright © 2013 HUSQVARNA. Alle Rechte vorbehalten.
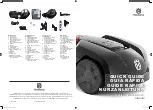
What is what?
1. Main switch
2. STOP button
3. Charging strip
4. LED for function check
of the boundary and
guide wires
5. Cutting height indication
6. Display
7. Keypad
8. Charging station
9. Transformer
10. Low voltage cable
11. Wire for boundary and
guide
12. Couplers
13. Staples
14. Connectors
15. Measurement gauge
16. Screws for securing the
charging station
Componentes de
Automower
®
?
1. Interruptor principal
2. Botón de PARADA
3. Tira de carga
4. LED para comprobar el
funcionamiento de los
cables delimitador y de
guía
5. Indicación de la altura de
corte
6. Pantalla
7. Teclado
8. Estación de carga
9. Transformador
10. Cable de tensión baja
11. Cable delimitador y cable
guía
12. Acopladores
13. Grapas
14. Conectores
15. Galga
16. Clavos para afianzar la
estación de carga
Quels sont les
composants ?
1. Interrupteur principal
2. Bouton STOP
3. Contacts de charge
4. LED de fonctionnement
du câble périphérique et
du câble guide
5. Indication de la hauteur
de coupe
6. Écran
7. Clavier
8. Station de charge
9. Transformateur
10. Câble basse tension
11. Câble périphérique et
guide
12. Coupleurs
13. Cavaliers
14. Raccords
15. Règle
16. Vis pour fixation de la
station de charge
Was ist was?
1. Hauptschalter
2. STOP-Taste
3. Ladekontakte
4. LED für Funktionsprüfung
des Begrenzungskabels
und Suchkabels
5. Schnitthöhenanzeige
6. Display
7. Tastatur
8. Ladestation
9. Transformator
10. Niederspannungskabel
11. Begrenzungs- und
Suchkabel
12. Verbinder
13. Haken
14. Verbinder
15. Lineal
16. Schrauben zum
Befestigen der
Ladestation
QG,1155936-,305-308,2014.indd 1
2013-11-08 17.41


