background image

Riot Control

F L I G H T   C O N T R O L L E R

USER MANUAL

Summary of Contents for Riot Control

Page 1: ...Riot Control F L I G H T C O N T R O L L E R USER MANUAL...

Page 2: ...2 RIOT CONTROL USER MANUAL Hypetrain Electronics Riot Control FC User Manual Version 2 Published January 2019 Written By Drew Camden Andr Elb Illustrations by Sebastian Selbach Andre Elb...

Page 3: ...ated wires grouped together to eliminate unnecessary board crossing The Riot Control FC has 3 UARTs available for peripherals like serial receivers VTX telemetry and more The Riot Control FC also has...

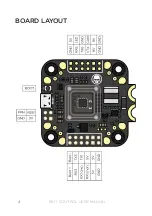
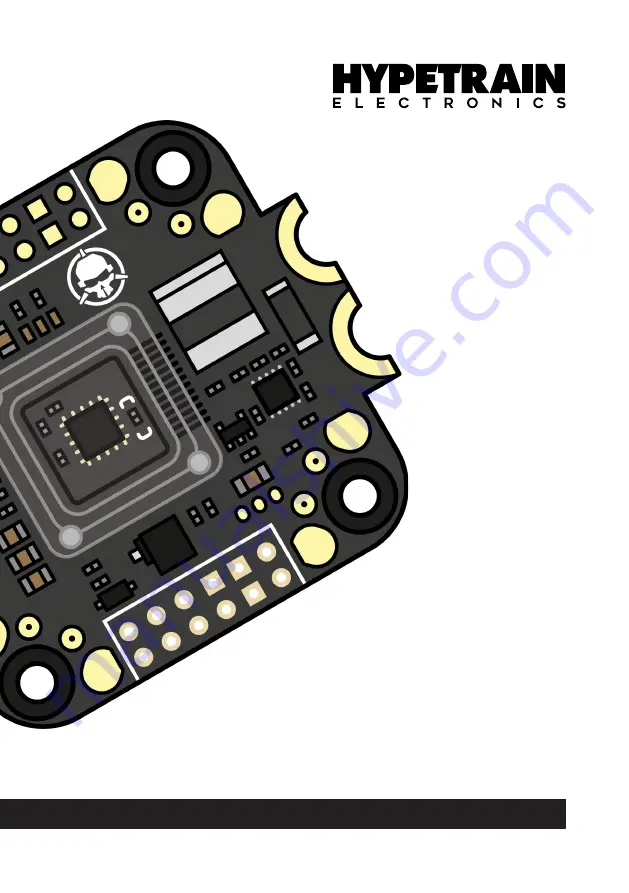
Page 4: ...4 RIOT CONTROL USER MANUAL BOARD LAYOUT...

Page 5: ...Video Transmitter 1 5A max 3 3V 3 3 Volt Output for some Spektrum Receivers such as SPM 4648 VTX Video Signal OUT to VTX CAM Video Signal IN from FPV Camera LED Signal to LED Strip Buzz Hookup for Buz...

Page 6: ...he connection is very straightforward At each corner connect the positive wire of your ESC thick red wire to the large pad labeled V Connect the thicker ground wire of your ESC thick black wire to the...

Page 7: ...rly for your flight board and 4 in 1 board Currently there is no standard wiring order so the order of the pins and wires may vary between the Riot Control FC and the 4 in 1 ESC board of your choice L...

Page 8: ...sfer data between the flight controller itself and external devices such as a radio receiver Each UART port has a receiver RX for input and transmitter TX for output If the flight controller is accept...

Page 9: ...his is because FrSky receivers send an inverted signal For the flight controller to understand it properly it must run through an inverter The Riot Control FC has a built in inverter which can be eith...

Page 10: ...ming from your receiver to the RX1 inv pad on the Riot Control FC Bridge pads B and SBUS as instructed on page 9 to enable signal inversion for UART1 required for S Bus If you want to use FrSky Teleme...

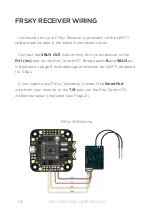
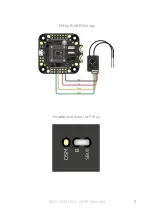
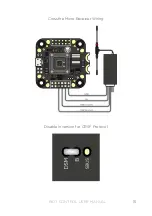
Page 11: ...11 RIOT CONTROL USER MANUAL FrSky R XSR Wiring Enable Inversion for FrSky...

Page 12: ...via the UART 1 solder pads located in the bottom connection rows Connect the DSM signal wire from the receiver to the RX1 nor pad on the Riot Control FC Bridge pads B and DSM as instructed on page 9 t...

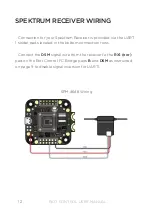
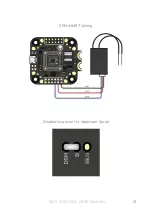
Page 13: ...13 RIOT CONTROL USER MANUAL SPM 4649T Wiring Disable Inversion for Spektrum Serial...

Page 14: ...SF Protocol so that CH1 is CRSF TX and CH2 is CRSF RX Consult your TBS Crossfire Manual for instructions on how to do this Connect the CRSF TX CH1 wire from the Crossfire Receiver to the RX1 nor pad o...

Page 15: ...15 RIOT CONTROL USER MANUAL Crossfire Micro Receiver Wiring Disable Inversion for CRSF Protocol...

Page 16: ...CAM and VTX pads on the Riot Control FC A 9V regulator is built into the Riot Control FC to provide power for your FPV components FPV CAMERA Connect the FPV camera to the 9V GND and CAM pads on the Ri...

Page 17: ...ra The red wire is the voltage input and the black wire is the ground WARNING Do not power the Video Transmitter without an antenna connected Doing so may cause damage to the VTX If your Video Transmi...

Page 18: ...ansmitter and camera support direct LiPo Voltage input you may want to bypass the 9V voltage regulator built into the Riot Control FC To do this connect the VTX and Camera as shown Direct LiPo Input W...

Page 19: ...may not support the current draw from large quantities of LED s If you plan to use a large quantity of LED s we suggest using a separate 5v regulator instead The Riot Control FC comes with a Buzzer T...

Page 20: ...t the Riot Control FC with a Micro USB Cable Run the Betaflight Configurator Application on your computer Go to Firmware Flasher section Select OMNIBUSF4 from the Target dropdown list Select the lates...

Page 21: ...tions that can be set in the configurator according to personal preference However these suggested settings should offer a good starting point for the majority of pilots ENABLING SOFTSERIAL FOR FRSKY...

Page 22: ...n for UART 3 UART 6 will be used for your Video Transmitter Settings or RunCam Split which is not covered in this manual Select the correct VTX Protocol from the Peripherals dropdown for UART 6 SOFTSE...

Page 23: ...to ON Set Barometer to OFF Set Magnetometer to OFF In the Receiver Section Set Receiver Mode to Serial based Receiver If you are using a FrSky Receiver set the Serial Receiver Provider to SBUS If you...

Page 24: ...sing SmartPort CRSF or other telemetry output Otherwise set to OFF Set AIRMODE to ON Set OSD to ON Set ANTI_GRAVITY to ON Set DYNAMIC FILTER to ON In the ESC Motor Features Section Set ESC Motor Proto...

Page 25: ...r Settings Section Set Gyro Notch Filters to OFF Press SAVE before moving to the next tab In the Arming Section Set Maximum ARM Angle degrees to 180 This will allow you to arm the drone regardless of...

Page 26: ...adio so that Throttle UP input moves the Throttle T bar to the right Yaw RIGHT input moves the Yaw R bar to the right Pitch UP input moves the Pitch E bar to the right Roll RIGHT input moves the Roll...

Page 27: ...We highly recommend switch arming rather than using a stick pattern to arm the drone This is a safer and more reliable way to arm and disarm start and stop the motors of the drone as needed or in case...

Page 28: ...Hypetrain FPV www hypetrainfpv com...

Reviews: