Quick Start Guide
i3-TRNG-CAMS-
Ax48DC-QSG
.indd
Rev.
160826
1.3MP Door Count Covert IP Camera
Ax48DC2/Ax48DC3
SAFETY
When installing your Ax48DC camera be sure to avoid:
• excessive heat, such as direct sunlight or heating appliances
• contaminants such as dust and smoke
• strong magnetic fields and areas with mechanical vibrations
• moisture and humidity
• fluorescent lamps or objects that reflect light and unstable light sources
• temperatures below -30° C (-22° F) and above 60° C (140° F)
.
POWER SUPPLY
• Input voltage must comply with the SELV (Safety Extra Low Voltage) and the Limited
Power Source with 12 VDC according to the IEC60950-1 standard.
• Ax48DC camera series does not support direct PoE power. Use a PoE splitter to
connect the camera to the PoE switch.
CLEANING
• For maximum optical clarity, the camera lens must remain clean. Use a soft, dry cloth
to remove finger prints or dust from the dome cover.
• Use a blower to remove dust from the lens.
• Do not use volatile solvents such as alcohol, benzene, or thinners, as they may
damage the surface finishes.
SERVICING
• To avoid electrical shock and to preserve the product warranty, DO NOT disassemble
the camera. Refer servicing to qualified personnel only.
• To reduce the risk of fire or electric shock, do not expose the product to rain or
moisture.
• If the system needs to be modified or repaired, contact a certified i3 International
Dealer/Installer. When serviced by unauthorized technician, the system warranty will
be voided. Should you have any problems or questions regarding our products, contact
your local i3 International Dealer/Installer.
UNPACKING
1
ALAR
M
RS23
2
RXD TXD GND IN1 1B 1A
LAN(PoE)
DC 12V
RESET
SD
VIN1
AUDIO
OUT
AUDIO
IN
2 3 4
5 6
7
8
9
11
10
13
14
15
18
12
17
16
19
Please read this guide carefully before you install the camera. Keep this guide
for future reference
Thank you for purchasing an i3 Ax48DC-series Door Count Covert IP Camera.
Ax48DC comes in two models:
• Ax48DC2 (2.1mm lens, suitable for low ceiling installations 8-10 meters AFF) and
• Ax48DC3 (2.8mm lens, suitable for high ceiling installations 10-14 meters AFF).
Camera’s default IP address is
192.168.1.64
Camera’s default Subnet mask address is
255.255.255.0
Default camera User Name:
i3admin
and default Password:
i3admin
1
2
3
4
5
6
7
8
9
1.
Ax48DC, Main Unit w/ attached
mounting plate
2.
Wall Mounting Bracket
3.
Round-head screw (Tapping Type) x3
4.
Plastic anchor x3
5.
Adhesive strip
6.
Camera with RJ12 cable
7.
Dome cover (Optional)
8.
PoE Gigabit Splitter
9.
PoE Gigabit Splitter Power Cable
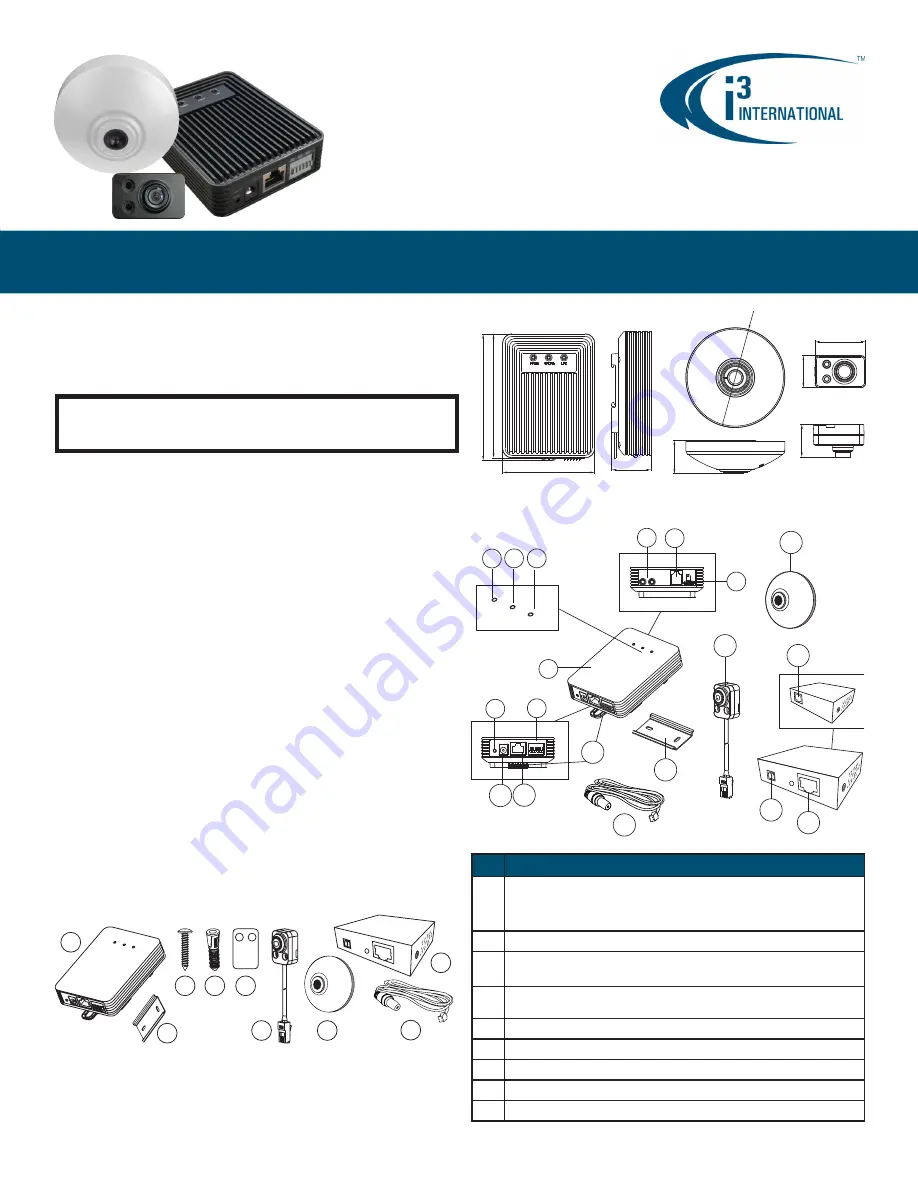
No. Description
1
Camera’s Main Unit w/ with attached mounting plate. If your camera comes
with mounting plate not attached to the main unit, use a small Phillips
screwdriver to secure the plate to the main unit with four small black screws
(provided).
2
Power Indicator LED. Solid Red = Power ON, Unlit = Power OFF
3
Status Indicator LED. Solid Green = Camera operating correctly.
Unlit = Camera is not operating normally.
4
Link Indicator LED. Flashing Amber = Network connection is operating cor-
rectly. Unlit = No network connection.
5
Audio Interface
6
RJ12 Port. Connect the camera cable to this port.
7
Micro SD Card Slot (64GB max)
8
RESET Button.
9
RS-232 & Alarm Interface
CAMERA PARTS AND DEFINITIONS
CAMERA DIMENSIONS
107.57 mm (4 ¼”)
105.06 mm (4.14”)
78 mm (3”)
33.5 mm (1.32”)
95 mm (3 ¾”)
48.68 mm (1
15
/
16
”)
30.68 mm (1.2”)
31.53 mm (1¼”)
31.53 mm (1¼”)


