background image

RS/6000


Enterprise


Server


Model


M80

Eserver


pSeries


660


Model


6M1

Service


Guide


SA38-0571-01


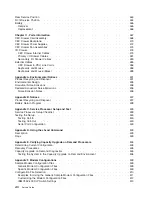
Summary of Contents for RS/6000 Enterprise Server M80

Page 1: ...RS 6000 Enterprise Server Model M80 Eserver pSeries 660 Model 6M1 Service Guide SA38 0571 01...

Page 2: ...s to Information Development Department H6DS 905 6C006 11501 Burnet Road Austin Texas 78758 3493 To send comments electronically use this commercial internet address aix6kpub austin ibm com Any inform...

Page 3: ...12 Primary I O Drawer Front View With Cover On 13 Secondary I O Drawer Front View With Cover On 14 Primary I O Drawer Rear View 15 Primary I O Drawer Front View with Covers Removed 16 Secondary I O Dr...

Page 4: ...ice Processor and Electronic Service Agent Features 69 Service Processor 69 Electronic Service Agent 70 Chapter 3 Maintenance Analysis Procedures MAPs 71 Entry MAP 71 Quick Entry MAP 72 Quick Entry MA...

Page 5: ...rade on Demand Feature 353 Enabling the Capacity Upgrade on Demand Feature 354 Enabling Additional Capacity Upgrade on Demand Processors 356 Determining Processor Configuration 356 Adding Processor Ca...

Page 6: ...l Home 394 Console Mirroring 395 System Configuration 395 Service Processor Error Log 396 LCD Progress Indicator Log 397 Service Processor Operational Phases 398 Pre Standby Phase 398 Standby Phase 39...

Page 7: ...EC Backplane 440 Removal 440 Replacement 442 I O Drawer Backplane Assembly 442 Removal 442 Replacement 444 I O Drawer RIO Bus Adapter 445 Removal 445 Replacement 446 I O Drawer Power Distribution Boar...

Page 8: ...cling and Disposal 497 Battery Return Program 498 Appendix C Service Processor Setup and Test 499 Service Processor Setup Checklist 499 Testing the Setup 500 Testing Call In 500 Testing Call Out 500 S...

Page 9: ...fg 517 Sample File modem_m1 cfg 520 Sample File modem_z cfg 522 Sample File modem_z0 cfg 525 Sample File modem_f cfg 528 Sample File modem_f0 cfg 530 Sample File modem_f1 cfg 532 Appendix G Rack Drawe...

Page 10: ...x Service Guide...

Page 11: ...install this unit in a rack where the air flow is compromised Any side front or back of the unit used for air flow through the unit must not be in indirect contact with the rack v Ensure that a hazard...

Page 12: ...signal cables are connected If possible disconnect all power cables from the existing system before you add a device Use one hand when possible to connect or disconnect signal cables to prevent a poss...

Page 13: ...ification numbers and approval information CAUTION All IBM laser modules are designed so that there is never any human access to laser radiation above a class 1 level during normal operation user main...

Page 14: ...xiv Service Guide...

Page 15: ...ges or component failures must verify the accuracy of operations performed and data saved or transmitted by the system at or near the time of the outage or failure In addition users must establish pro...

Page 16: ...xvi Service Guide...

Page 17: ...terprise Server Model M80 Eserver pSeries 660 Model 6M1 User s Guide order number SA38 0565 contains information on how to use the system use diagnostics use service aids and verify system operations...

Page 18: ...v RS 6000 Other company product and service names may be trademarks or service marks of others xviii Service Guide...

Page 19: ...complex CEC drawer and the optional DASD and I O devices are in 5 EIA unit I O drawers The basic system consists of one CEC drawer and one I O drawer in the same rack You can expand the system by add...

Page 20: ...e The Capacity Upgrade on Demand feature is available for this system when a minimum of four processors running at 750 MHz are installed The Capacity Upgrade on Demand feature is not available on syst...

Page 21: ...can be used on these ports Heartbeat type devices or cables must be installed on serial port 3 or serial port 4 The PCI bus speeds are as follows v Up to 33 MHz for the four 32 bit slots at 5 V v Up t...

Page 22: ...Data Flow 4 Service Guide...

Page 23: ...O drawer system power control network SPCN When power is applied the power LEDs on the primary I O drawer go from blinking to on continuously and the power LED on the CEC drawer and secondary I O draw...

Page 24: ...erial port to another from S1 to S2 cannot be detected by the firmware so it does not constitute a configuration change You can also initiate a system console selection sequence from the SMS menus Pow...

Page 25: ...d POST indicator displays you must use the numeric number keys to enter input 1 Key The numeric 1 key when pressed during POST starts the System Management Services SMS interface 5 Key The numeric 5 k...

Page 26: ...fter the word keyboard displays and before the last word speaker displays during startup After you press the 8 key the remaining POST indicators display until initialization completes When initializat...

Page 27: ...ther expansion of the system is required The following figure shows the system units R R R CEC Drawer 8 EIA Units CEC Drawer 8 EIA Units Primary I O Drawer 5 EIA Units Primary I O Drawer 5 EIA Units S...

Page 28: ...CEC Drawer Front View With Bezel Removed 3 2 1 1 Power On Off LED 2 Fan 2 3 Fan 1 10 Service Guide...

Page 29: ...CEC Drawer Rear View 1 2 3 4 5 6 7 8 1 RIO connector A0 2 RIO connector B0 3 RIO connector B1 4 RIO connector A1 5 V S COMM 6 JTAG 7 Power supply 1 8 Power supply 2 Chapter 1 Reference Information 11...

Page 30: ...CEC Card Cage Rear of CEC drawer viewed from top cover removed 12 Service Guide...

Page 31: ...Primary I O Drawer Front View With Cover On 1 2 3 R 1 CD ROM 2 Operator panel 3 Tape drive optional Chapter 1 Reference Information 13...

Page 32: ...Secondary I O Drawer Front View With Cover On 1 2 3 1 Optional media bay 2 Operator panel 3 Optional media bay 14 Service Guide...

Page 33: ...4 Mouse connector 5 Serial port 1 6 Serial port 2 7 J11 SPCN 1 connector 8 J14 SPCN 3 connector reserved 9 V S Comm 10 JTAG connector 11 Parallel port 12 Keyboard connector 13 Serial port 3 14 Serial...

Page 34: ...O Drawer Front View with Covers Removed 1 4 5 6 7 2 3 R 1 Bay A Diskette 2 Bay B CD ROM 3 Bay C Operator panel 4 Bay D Tape drive optional 5 Power Supply 2 6 Power Supply LEDs 7 Power Supply 1 16 Serv...

Page 35: ...RIO 0 connector 3 SCSI connector 4 J11 SPCN 1 connector 5 J14 SPCN 3 connector 6 J16 SPCN 2 connector 7 J15 SPCN 4 connector 8 14 Hot plug LED one for each adapter I O Drawer Backplane PCI Slot Locati...

Page 36: ...4 5 6 Rear 1 Regulator M01 2 Memory Riser 1 M02 3 Processor 2 M04 4 Memory Riser 2 M05 5 RIO Adapter M06 6 Processor 1 M03 Note In order for the system to boot the first processor card slot M03 must b...

Page 37: ...ry DIMMs on Riser Card 1 n denotes DIMM number U1 1 P1 M1 1 x4 Memory Quad A Odd DIMMs 1 9 17 25 U1 1 P1 M1 1 x8 Memory Octal A DIMMs 1 2 9 10 17 18 25 26 U1 1 P1 M1 1 x32 All Memory DIMMs on Riser Ca...

Page 38: ...P1 M2 5 x4 Memory Quad C Odd DIMMs 5 13 21 29 U1 1 P1 M2 5 x8 Memory Octal C DIMMs 5 6 13 14 21 22 29 30 U1 1 P1 M2 6 x4 Memory Quad C Even DIMMs 6 14 22 30 U1 1 P1 M2 7 x4 Memory Quad D Odd DIMMs 7...

Page 39: ...etent of the switch After you press the switch the service processor resets and then shuts down the system Secondary I O Drawer Operator Panel 1 2 1 Power Present LED 2 Disturbance or System Attention...

Page 40: ...a devices installed at the factory are set using jumpers on the drives when the drives are installed Primary I O Drawer SCSI IDs 1 2 R 1 CD ROM SCSI ID 1 2 Optional Tape Drive SCSI ID 0 Note The SCSI...

Page 41: ...tems can also be used Riser Card Memory Placement Rules The rules for one way processor memory are as follows v Memory octals must contain DIMM modules of equal memory size v You must have at least on...

Page 42: ...ocessor logic reside I O Drawer Addressing I O drawer addressing refers to the drawer number that is displayed in the operator panel on secondary I O drawers This address is the drawer s location in t...

Page 43: ...ed power on initiated System power connected not turned on power supply detected fault System power connected not turned on power supply detected fault On slow blinking green on for two seconds off fo...

Page 44: ...may also be displayed right justified in the second line of the display When 8 character codes are displayed they are in the form 10n1xxxx where n is the drawer number 3 8 character checkpoint There...

Page 45: ...ed Because of a Shutdown Drawer State Power LED Drawer Operator Panel Display Standby Blinking slowly OK is displayed System power ON Blinking quickly On solid OK 9xxx checkpoints ending with E1FF Rec...

Page 46: ...he format for the location code is a string of alphanumeric characters separated by a dash slash pound sign or period character The base location is all of the information preceding the slash or pound...

Page 47: ...n code for a failing part may also be specified If the location code includes a blank space followed by a lowercase x followed by a number this is an error code with multiple FRU callouts This error c...

Page 48: ...cards are identified only with AB CD The possible values for CD depend on the adapter card For pluggable PCI adapters cards CD is the device s devfunc number PCI device number times 8 plus the functio...

Page 49: ...ation Code E0 58 AIX and Physical Location Code Reference Tables The following tables contain location codes that are used to identify functional units in the RS 6000 Enterprise Server Model M80 and E...

Page 50: ...ions on page 19 Memory Quad A Even on Riser Card 1 U1 1 P1 M1 2 x4 00 00 Refer to Memory Riser Card and Memory DIMM Locations on page 19 Memory Quad B Odd on Riser Card 1 U1 1 P1 M1 3 x4 00 00 Refer t...

Page 51: ...00 00 CEC Connector M5 Memory DIMMs 1 32 on riser card 2 U1 1 P1 M2 1 to U1 1 P1 M2 32 00 00 Refer to Memory Riser Card and Memory DIMM Locations on page 19 Memory Quad A Odd on Riser Card 2 U1 1 P1 M...

Page 52: ...r Card 2 U1 1 P1 M2 6 x4 00 00 Refer to Memory Riser Card and Memory DIMM Locations on page 19 Memory Quad D Odd on Riser Card 2 U1 1 P1 M2 7 x4 00 00 Refer to Memory Riser Card and Memory DIMM Locati...

Page 53: ...rd 2 Processor 2 U1 1 P1 C2 00 05 Connector M04 in CEC Drawer 4W Card 2 Processor 3 U1 1 P1 C2 00 06 Connector M04 in CEC Drawer 4W Card 2 Processor 4 U1 1 P1 C2 00 07 Connector M04 in CEC Drawer 4W C...

Page 54: ...1 P1 I4 10 5E PCI slot 4 content card U0 1 P1 I4 1A 08 through 1A 0F or 1B xx or 1C xx PCI to PCI bridge 2 U0 1 P1 20 58 20 5A 20 5B 20 5C 20 5E PCI slot 5 U0 1 P1 I5 20 58 PCI slot 5 content card U0...

Page 55: ...ller 2 U0 1 P1 00 FFF7F0A000 ISA Bus U0 1 P1 10 80 Service Processor U0 1 P1 JTAG Connector U0 1 P1 Q4 NVRAM U0 1 P1 Service Processor ISA Bridge U0 1 P1 Real Time Clock RTC U0 1 P1 Timer U0 1 P1 Inte...

Page 56: ...Power Connector 1 U0 1 X1 V1 PDB Power Connector 2 U0 1 X1 V2 Fan Controller Card U0 1 X2 Power Supply 1 w Fan 5 U0 1 V1 PDB connector J2 Power Supply 2 w Fan 6 U0 1 V2 PDB connector J1 Fan 1 U0 1 F1...

Page 57: ...through 64 0F or 65 xx or 66 xx PCI slot 7 5V U0 2 P1 I7 60 5B PCI slot 7 content card U0 2 P1 I7 67 08 through 67 0F or 68 xx or 69 xx PCI slot 8 U0 2 P1 I8 60 5C PCI slot 8 content card U0 2 P1 I8 6...

Page 58: ...3 Power Supply 1 w Fan 5 U0 2 V1 PDB connector J2 Power Supply 2 w Fan 6 U0 2 V2 PDB connector J1 Fan 1 U0 2 F1 Fan connector P3 on power supply 1 Fan 2 U0 2 F2 Fan connector P3 on power supply 1 Fan...

Page 59: ...slot 7 5V U0 3 P1 I7 A0 5B PCI slot 7 content card A0 3 P1 I7 A7 08 through A7 0F or A8 xx or A9 xx PCI slot 8 A0 3 P1 I8 A0 5C PCI slot 8 content card U0 3 P1 I8 AA 08 through AA 0F or AB xx or AC xx...

Page 60: ...ly 1 w Fan 5 U0 3 V1 PDB connector J2 Power Supply 2 w Fan 6 U0 3 V2 PDB connector J1 Fan 1 U0 3 F1 Fan connector P3 on power supply 1 Fan 2 U0 3 F2 Fan connector P3 on power supply 1 Fan 3 U0 3 F3 Fa...

Page 61: ...0 4 P1 I6 E4 08 through E4 0F or E5 xx or E6 xx PCI slot 7 5V U0 4 P1 I7 E0 5B PCI slot 7 content card A0 4 P1 I7 E7 08 through E7 0F or E8 xx or E9 xx PCI slot 8 A0 4 P1 I8 E0 5C PCI slot 8 content c...

Page 62: ...er connector 2 U0 4 X1 V2 Fan controller card U0 4 X2 Power supply 1 w Fan 5 U0 4 V1 PDB connector J2 Power supply 2 w Fan 6 U0 4 V2 PDB connector J1 Fan 1 U0 4 F1 Fan connector P3 on power supply 1 F...

Page 63: ...Logical Connection SCSI Backplane Bank C or D When connected to PCI adapter in slot U0 x P1 ly x drawer number y PCI slot number z connector U0 x P1 ly Zz Bb AB CD 00 15 0 Where AB CD identifies the...

Page 64: ...nnecting JTAG and V S COMM Cables Use the following figure to connect the JTAG and V S COMM cables CEC Drawer Attached to One I O Drawer V S COMM CEC Drawer Primary I O Drawer V S COMM JTAG JTAG Conne...

Page 65: ...er in the loop which allows the firmware to initialize the system The following figures provide cabling examples for all valid cabling configurations Match your configuration to the correct figure and...

Page 66: ...CEC Drawer Attached to Two I O Drawers Type B A0 A1 R1 R0 CEC Drawer Primary I O Drawer B0 B1 R1 R0 Secondary I O Drawer 48 Service Guide...

Page 67: ...CEC Drawer Attached to Three I O Drawers A0 A1 CEC Drawer Secondary I O Drawer Secondary I O Drawer Primary I O Drawer R1 R0 R1 R0 R1 R0 B0 B1 Chapter 1 Reference Information 49...

Page 68: ...CEC Drawer Attached to Four I O Drawers A0 B1 R1 R0 CEC Drawer Secondary I O Drawer Secondary I O Drawer R1 R0 Primary I O Drawer R1 R0 B0 A1 Secondary I O Drawer R1 R0 50 Service Guide...

Page 69: ...bling configurations Match your configuration to the correct figure and connect your SPCN cables as shown CEC Drawer Attached to One I O Drawer V S COMM CEC Drawer Primary I O Drawer V S COMM Note The...

Page 70: ...CEC Drawer Attached to Two I O Drawers V S COMM CEC Drawer Primary I O Drawer V S COMM J15 Secondary I O Drawer J16 J15 J16 Note The V S COMM cable incorporates SPCN wiring 52 Service Guide...

Page 71: ...to Three I O Drawers CEC Drawer Primary I O Drawer V S COMM V S COMM Secondary I O Drawer J15 J16 J15 J16 Secondary I O Drawer J15 J16 Note The V S COMM cable incorporates SPCN wiring Chapter 1 Refer...

Page 72: ...our I O Drawers CEC Drawer Primary I O Drawer V S COMM V S COMM Secondary I O Drawer J15 J16 J15 J16 Secondary I O Drawer J15 J16 Secondary I O Drawer J15 J16 Note The V S COMM cable incorporates SPCN...

Page 73: ...ow system cable connections CEC Drawer Cable System Board JTAG V S COMM Power Supply 2 Power Supply 1 LED Board Fan 2 Fan 1 P 1 P 3 J 3 J 12 12 V 3 3 V G J 10 J 11 P 13 S 14 S 16 S 17 S 18 S 15 J 15 J...

Page 74: ...Supply 1 3 3 V 3 3 V Ground Grd 5 V 5 V Fan 1 Fan 2 Fan 5 CD ROM DASD 2 DASD 1 Term Term Optional Media Diskette Diskette Base SPCN Base SPCN JTAG I P SCSI V S COMM B u l k h e a d Power Supply 2 or...

Page 75: ...nel Op Panel Power Supply 1 3 3 V 3 3 V Ground Grd 5 V 5 V Fan 1 Fan 2 Fan 5 Term Optional Media Optional Media Base SPCN SCSI Base SPCN I P Power Supply 2 or Cooling Unit Fan 3 Fan 4 Fan 6 Fan 9 J4 J...

Page 76: ...DC Power Cable Routings Power Distribution Panel A1 PS2 B4 B1 A4 CEC PS1 Primary I O Drawer PS2 PS1 58 Service Guide...

Page 77: ...mum altitude 0 39 0 6 200 to 240 50 or 60 M80 1265 Btu hr 6M1 772 Btu hr M80 1877 Btu hr 6M1 1378 Btu hr M80 370 watts 6M1 226 watts M80 550 watts 6M1 406 watts 0 95 34 amps 2135 m 7000 ft Temperature...

Page 78: ...ower off on cycle 7014 Series Model T00 Rack The mechanical packaging cooling power supply and environmental requirements for the rack are shown in the following table Dimensions Height Width Depth in...

Page 79: ...ive With tape drive Wet Bulb Requirements Without tape drive With tape drive Operating 8 to 80 20 to 80 27 C 80 F 23 C 73 F Non Operating 8 to 80 20 to 80 27 C 80 F 27 C 80 F Noise Emissions1 2 LWAd L...

Page 80: ...5 mm 36 in 915 mm 36 in 915 mm 36 in Front Caster Location Front cover thickness 58 mm 2 4 in Rear cover thickness 20 mm 0 8 in Side cover thickness 2x 10 mm 0 4 in 4 8 121 3 1 80 Cable opening 310 mm...

Page 81: ...t the operator position if any for a production series of machines 3 LpA m is the mean value of the space averaged A weighted sound pressure emission levels at the one meter positions for a production...

Page 82: ...of 15 feet in length and a tandem blade grounding type attachment plug rated at 15 A 250 V v Appliance couplers complying with International Electrotechnical Commission IEC Standard 320 Sheet C13 Powe...

Page 83: ...e to determine if it is steady 4 Set the power switch of the system unit to Off 5 Remove the covers 6 Check for alterations or attachments If there are any check for obvious safety hazards such as bro...

Page 84: ...66 Service Guide...

Page 85: ...r all isolation and error recovery procedures The MAPs are consistent with existing procedures and methods The system uses a set of integrated procedures mentioned earlier to which the MAPS are the pr...

Page 86: ...operator panel Exxx Exxx checkpoints indicate that a system processor is in control and is initializing the system resources Control is being passed to AIX when E105 normal mode boot or E15B service...

Page 87: ...rovide a flexible solution to automated system maintenance Service Processor The service processor runs on its own power boundary and continually monitors hardware attributes the AIX operating system...

Page 88: ...rvice center without user intervention The service center receives the machine type serial number host name SRN and a problem description The service center analyzes the problem report and if warrante...

Page 89: ...p Also check to ensure that any client or server that addresses this system is updated Symptom Starting Point You have a problem that does not prevent the system from booting and all I O drawer operat...

Page 90: ...tic Information for Multiple Bus Systems Symptom Action Service Actions You have parts to exchange or a corrective action to perform 1 Go to Chapter 10 Removal and Replacement Procedures on page 413 2...

Page 91: ...r on page 83 There is an 8 Digit Error Code You have an 8 digit error code in the form 10n1 xxxx and n is greater than the number of I O drawers in the system The failing drawer is drawer n Look for t...

Page 92: ...into unique drawer numbers The system stops with an 8 digit error code displayed when booting Record the error code Go to Checkpoint and Error Code Index on page 161 Error Indication in Secondary I O...

Page 93: ...tor panel is on and there is no SRN displayed Go to MAP 1520 Power on page 83 888 sequence in Operator Panel Display A flashing 888 is displayed in the primary I O drawer operator panel display Go to...

Page 94: ...ed to a controller adapter than are actually attached A device may be set to use the same SCSI bus ID as the control adapter Note the ID being used by the controller adapter this can be checked and or...

Page 95: ...cable problem Go to the RS 6000 and Eserver pSeries Adapters Devices and Cable Information for Multiple Bus Systems All other problems Go to MAP 1020 Problem Determination on page 78 Chapter 3 Mainte...

Page 96: ...NTENANCE POLICIES service aid You can use the same service aid to restore the settings at the end of your service action Just in case the service processor settings were not saved by the user if you d...

Page 97: ...he other conditions to occur The diagnostic operating instructions are displayed Go to MAP 0020 Problem Determination Procedure in the RS 6000 and Eserver pSeries Diagnostic Information for Multiple B...

Page 98: ...rvices menu is displayed Go to Step 1020 4 on page 82 All other symptoms If you were directed here from the Entry MAP go to MAP 1540 Minimum Configuration on page 110 Otherwise find the symptom in the...

Page 99: ...code M0KBD003 then go to Step 1020 3 ASCII terminal keyboard Go to the documentation for this type of ASCII terminal and continue problem determination Step 1020 3 Perform the following 1 Find the ei...

Page 100: ...menus appear check the error log for any errors a Choose Error Log b If an error is logged check the time stamp c If the error was logged during the current boot attempt record it d Look up the error...

Page 101: ...at the power cables for those devices are unplugged before the signal cables are connected If possible disconnect all power cables from the existing system before you add a device Use one hand when po...

Page 102: ...CEC drawer does not become powered on Go to Map 1522 Cannot Power On the CEC Drawer on page 92 The secondary I O drawer does not become powered on no power present LED Go to Map 1523 Cannot Power On...

Page 103: ...ation in the I O Drawer and Power Supply LED Status on page 25 to answer the following question Is the power supply LED blinking quickly NO Check the SPCN cabling Check internal drawer cabling from po...

Page 104: ...ce the following one at a time v Primary I O drawer BACKPLANE v Power distribution board This ends the procedure Go to MAP 0410 Repair Checkout in the RS 6000 and Eserver pSeries Diagnostic Informatio...

Page 105: ...Go to MAP 0410 Repair Checkout in the RS 6000 and Eserver pSeries Diagnostic Information for Multiple Bus Systems YES Go to Step 1521 11 Step 1521 11 Note Read the danger and caution notices under Saf...

Page 106: ...the primary I O drawer to the appropriate power distribution unit Is the power distribution unit power LED on NO Go to Step 1521 18 on page 90 YES Go to Step 1521 15 Step 1521 15 Note Read the danger...

Page 107: ...r cabling from power distribution card to primary I O backplane See Primary I O Drawer Cables on page 481 Replace the following in the primary I O drawer one at a time disconnecting the ac power cable...

Page 108: ...ion notices under Safety Notices on page xi before continuing with this procedure Perform the following 1 Disconnect the mainline ac power cable from the power distribution unit that supplies power to...

Page 109: ...er outlet Is the ac voltage from 200 V ac to 240 V ac NO Inform the customer that the ac voltage at the power outlet is not correct This ends the procedure Go to MAP 0410 Repair Checkout in the RS 600...

Page 110: ...ep 1522 3 YES Replace the power supply with the flashing LED This ends the procedure Go to MAP 0410 Repair Checkout in the RS 6000 and Eserver pSeries Diagnostic Information for Multiple Bus Systems S...

Page 111: ...under Safety Notices on page xi before continuing with this procedure Perform the following 1 Disconnect the dc power cable from each power supply of the CEC drawer 2 Use a multimeter to measure the a...

Page 112: ...age 97 YES Go to Step 1522 11 Step 1522 11 Note Read the danger and caution notices under Safety Notices on page xi before continuing with this procedure Perform the following 1 Disconnect the ac powe...

Page 113: ...Diagnostic Information for Multiple Bus Systems YES Go to Step 1522 13 Step 1522 13 Disconnect the ac power cable dc power cable for a dc powered system to each power supply of the CEC drawer and rem...

Page 114: ...s Systems YES Go to Step 1522 15 Step 1522 15 Have all cards in this step been reinserted NO Go to Step 1522 14 YES The symptom has changed Call your next level of support for assistance This ends the...

Page 115: ...it end of the mainline ac power cable Is the ac voltage from 200 V ac to 240 V ac NO Go to Step 1522 20 YES Replace the power distribution unit This ends the procedure Go to MAP 0410 Repair Checkout i...

Page 116: ...2 YES This ends the procedure Go to MAP 0410 Repair Checkout in the RS 6000 and Eserver pSeries Diagnostic Information for Multiple Bus Systems Step 1523 2 Look at the power supply LED s at the front...

Page 117: ...the RS 6000 and Eserver pSeries Diagnostic Information for Multiple Bus Systems Step 1523 5 Is there a power supply with a flashing LED NO Go to Step 1523 7 on page 100 YES Go to Step 1523 6 Step 1523...

Page 118: ...r Multiple Bus Systems YES Go to Step 1523 8 Step 1523 8 Is this machine connected to dc power NO Go to Step 1523 12 on page 101 YES Go to Step 1523 9 Step 1523 9 Are all circuit breakers reset at the...

Page 119: ...ndary I O drawer 2 Use a multimeter to measure the dc voltage at the drawer end of each dc power cable Is the dc voltage from 40 V ac to 60 V ac NO There is no power to the drawer Refer to the rack do...

Page 120: ...tep 1523 15 Note Read the danger and caution notices under Safety Notices on page xi before continuing with this procedure Perform the following 1 Disconnect the ac power cable s from the power distri...

Page 121: ...ibution card to secondary I O backplane See Secondary I O Drawer Cables on page 483 Replace the following in the secondary I O drawer one at a time disconnecting the ac power cable dc power cable for...

Page 122: ...n notices under Safety Notices on page xi before continuing with this procedure Perform the following 1 Disconnect the mainline ac power cable from the power distribution unit that supplies power to t...

Page 123: ...r outlet Is the ac voltage from 200 V ac to 240 V ac NO Inform the customer that the ac voltage at the power outlet is not correct This ends the procedure Go to MAP 0410 Repair Checkout in the RS 6000...

Page 124: ...ry riser 1 at M02 c CEC processor at M03 d CEC processor at M04 if present e CEC memory riser 2 at M05 if present f CEC RIO adapter at M06 4 Reconnect the ac power cables dc power cables in a dc power...

Page 125: ...ion for Multiple Bus Systems Step 1524 4 1 Turn off the power 2 Reinstall CEC power supply 2 that was removed in Step 1524 2 on page 106 3 Reconnect the ac power cable dc power cable in a dc powered s...

Page 126: ...agnostic Information for Multiple Bus Systems YES Go to Step 1524 6 Step 1524 6 1 Turn off the power 2 Reinstall CEC fan 1 that was removed in Step 1524 5 3 Remove CEC fan 2 Disregard a CEC fan error...

Page 127: ...rawer 5 Turn on the power Is the error code 1011 1C0x displayed NO Go to Step 1524 8 YES The last card you installed is defective Replace the last card you installed This ends the procedure Go to MAP...

Page 128: ...ers to the device mnemonics words memory keyboard network scsi and speaker that appear on the system console during the power on self test POST 5 The service processor may have recorded one or more sy...

Page 129: ...displayed NO Go to Step 1540 3 YES Go to Step 1540 12 on page 117 Step 1540 3 The system is unable to boot standalone diagnostics Check the service processor error log and the primary I O drawer opera...

Page 130: ...minimum configuration First Four Characters of the Error Code Last Four Characters of the Error Code 406x 0009 00A1 00A3 00A6 00A7 450x 460x 4B2x 245B 245C 245D 24A5 24A6 25B3 25B4 267D 2733 27AA 27A...

Page 131: ...of the CEC drawer back to an I O drawer disconnect the I O drawer end RIO port 1 note location of the RIO cable and reconnect it to the primary I O drawer RIO port 0 6 With only one RIO cable connect...

Page 132: ...Go to Step 1540 8 on page 115 YES Go to Step 1540 6 Step 1540 6 1 Turn off the power 2 Disconnect the ac power cables dc power cables in a dc powered system from the CEC drawer 3 Reinsert the followin...

Page 133: ...re failing leave the new memory DIMMs installed Return the machine to the original configuration Go to MAP 0410 Repair Checkout in the RS 6000 and Eserver pSeries Diagnostic Information for Multiple B...

Page 134: ...pSeries Diagnostic Information for Multiple Bus Systems Step 1540 11 Attention Contact your second level of support before performing this action 1 Turn off the power 2 Disconnect the ac power cables...

Page 135: ...om NO Go to substep 6 of Step 1540 9 on page 115 YES Go to Entry MAP on page 71 Use the new symptom 6 Record any devices missing from the list of all adapters and devices Continue with this MAP When y...

Page 136: ...the CEC drawer connector position shown in Chapter 1 Follow the JTAG cable back to the primary I O drawer Examine SPCN cable connections at J15 and J16 These cables if any go to secondary I O drawers...

Page 137: ...ort 1 note location of the RIO cable and reconnect it to the primary I O drawer RIO port 0 6 Verify that primary I O drawer RIO port 0 is connected to the CEC drawer RIO port 0 7 Turn on the power to...

Page 138: ...avoid removing power from drawers that are used by other systems when you are instructed to unplug power from an I O drawer remove only the power distribution unit PDU side of the single ac cables co...

Page 139: ...ed to the I O drawer in question 4 If a display adapter with keyboard and mouse connected to the primary I O drawer is being used as the console locate a stand alone serial terminal possibly a 3151 an...

Page 140: ...Turn on the power to boot standalone diagnostics from CD 6 If the TTY screen displays Enter 0 to select this console press the 0 key on the TTY terminal s keyboard 7 If the Please define the System C...

Page 141: ...isted NO Go to Step 1540 19 on page 122 YES Go to Step 1540 23 on page 124 Step 1540 22 1 If it is not already off turn off the power 2 Remove all adapters from slots 10 11 12 13 and 14 that are not a...

Page 142: ...000 and Eserver pSeries Diagnostic Information for Multiple Bus Systems if necessary 6 Check that all attached devices and adapters are listed Did the Please define the System Console screen display a...

Page 143: ...devices and adapters refer to the RS 6000 and Eserver pSeries Diagnostic Information for Multiple Bus Systems if necessary 3 Check that all attached devices and adapters are listed Did the Please def...

Page 144: ...all attached devices and adapters refer to the RS 6000 and Eserver pSeries Diagnostic Information for Multiple Bus Systems if necessary 9 Check that all attached devices and adapters are listed Did t...

Page 145: ...Diagnostic Information for Multiple Bus Systems Step 1540 27 If the Please define the System Console screen does display and all attached devices and adapters are listed the problem is with a remaini...

Page 146: ...st to list all attached devices and adapters refer to the RS 6000 and Eserver pSeries Diagnostic Information for Multiple Bus Systems if necessary 4 Check that all attached devices and adapters are li...

Page 147: ...ower to boot standalone diagnostics from CD 6 If the TTY screen displays Enter 0 to select this console press the 0 key on the TTY terminal s keyboard 7 If the Please define the System Console screen...

Page 148: ...and adapters listed NO Go to Step 1540 32 on page 129 YES Go to Step 1540 36 on page 131 Step 1540 35 1 If it is not already off turn off the power 2 Remove all adapters from slots 10 11 12 13 and 14...

Page 149: ...tems if necessary 6 Check that all attached devices and adapters are listed Did the Please define the System Console screen display and are all attached devices and adapters listed NO Go to Step 1540...

Page 150: ...agnostic Information for Multiple Bus Systems if necessary 9 Check that all attached devices and adapters are listed Did the Please define the System Console screen display and are all attached device...

Page 151: ...O port 1 Reconnect this RIO cable end to RIO port 0 6 Verify that primary I O drawer RIO port 0 is connected to the CEC drawer RIO port 0 7 Turn the power on to boot standalone diagnostics from CD 8 I...

Page 152: ...that all attached devices and adapters are listed Did the Please define the System Console screen display and are all attached devices and adapters listed NO Replace the next part in the list and ret...

Page 153: ...sole keyboard v Phase 2 Hardware Initialization by the Service Processor Phase 2 starts when system power up is initiated by pressing the power on button on the primary I O drawer operator panel 9xxx...

Page 154: ...or each phase Note The following table lists the major checkpoints only Phase Checkpoints on Operator Panel Time in phase minutes Major contributors to time in phase Phase 1 8xxx OK Approx 1 Phase 2 9...

Page 155: ...in the range of 8xxx through EFFF not listed in the checkpoint tables v A four digit code is in the checkpoint tables but does not contain a repair action or FRU listing v All of the FRUs listed in th...

Page 156: ...ote 1 on page 142 8012 Initialize hardware interrupts See note 1 on page 142 8014 Allocate and initialize area in DRAM See note 1 on page 142 8016 Initialize debugger and build VPD See note 1 on page...

Page 157: ...zation See note 1 on page 142 9034 I2C initialization See note 1 on page 142 9035 ISA initialization See note 1 on page 142 9036 Mailbox initialization See note 1 on page 142 9037 SLLA initialization...

Page 158: ...IST See note 1 on page 142 9109 LBIST See note 1 on page 142 910A Configure and initialize processors See note 1 on page 142 910B Configure main storage system memory See note 1 on page 142 910C Initi...

Page 159: ...2 94B2 Wire test L2 cache status refcode See note 2 on page 142 94BB Wire test status SRC refcode See note 2 on page 142 9501 Main storage initialization See note 2 on page 142 9502 Main storage L3 ca...

Page 160: ...f not or the update does not fix the problem change the primary I O backplane d If this procedure does not fix the problem call service support 2 If the system fails to progress after this checkpoint...

Page 161: ...b If the hang repeats check with service support to see if there is a firmware update that fixes the problem c If there is not or the update does not fix the problem replace the following FRUs one at...

Page 162: ...second line of the operator panel use that location code as the primary FRU 2 If no location code is present or if replacing the primary FRU indicated in the location code did not fix the problem then...

Page 163: ...on page 137 E130 Build device tree See the note on page Note on page 137 E134 Create memory node See the note on page Note on page 137 E137 Create openprom node See the note on page Note on page 137...

Page 164: ...tion listed for checkpoint E151 E153 End adapter FCODE probe evaluate See Note on page 137 E154 Create PCI bridge node Follow the repair action listed for checkpoint E151 E155 Probing PCI bridge secon...

Page 165: ...k v Is the intended boot device correctly specified in the boot list v Are the IP parameters correct v Verify the network connection network could be down v Have network administrator verify the serve...

Page 166: ...ror code 28030xxx in Firmware POST Error Codes on page 194 E1AD See description of checkpoint E1DE See Note on page 137 E1B0 Create lpt node See Note on page 137 E1B1 Create serial node See Note on pa...

Page 167: ...ting the console with an ASCII terminal suspect the ASCII terminal Use the problem determination procedures for the terminal Replace the primary I O backplane if these procedures do not reveal a probl...

Page 168: ...mptom All display problems E1F5 Build boot device list Entering SMS Multiboot See MultiBoot on page 408 for more information If Multiboot was not enabled through SMS see Note on page 137 E1F6 Determin...

Page 169: ...likely to have caused the error follow these steps 1 Check the progress codes from last boot in the service processor s Information menu Look for the last location code that was displayed before the...

Page 170: ...blem persists See Note on page 137 E442 Validate NVRAM partitions 1 Verify that the system firmware levels are at the current release levels Update as necessary 2 Replace primary I O backplane if prob...

Page 171: ...the PCI bus is Y PCI bus 1 0 2 1 3 2 4 3 See AIX and Physical Location Code Tables in Chapter 1 for location codes Using the information above go to MAP 1540 Minimum Configuration on page 110 E600 SS...

Page 172: ...F SSA PCI adapter open firmware about to exit with stack corruption Replace the adapter See Determining Location Code on page 160 for location code information related to this error E700 Create system...

Page 173: ...s CD ROM is available Step 1 Restart the system and access the firmware SMS Main Menu Select Multiboot 1 If the intended boot device is correctly specified in the boot list a Remove all removable medi...

Page 174: ...CD ROM drive is attached to d Try to boot the standalone diagnostics again e If you are still unable to load standalone diagnostics go to Step 4 f If standalone diagnostics load one of the disconnect...

Page 175: ...s load replace the graphics adapter 1 Replace the CD ROM drive 2 Replace the SCSI cable 3 If the CD ROM drive is attached to a SCSI adapter rather than the integrated SCSI on the system board replace...

Page 176: ...158 Service Guide...

Page 177: ...t swap Four Character Checkpoints Four character progress codes and checkpoints in the form 8xxx 9xxx Axxx Bxxx and Exxx are listed in Firmware Checkpoints on page 144 If you have a four character cod...

Page 178: ...drawer address will have been resolved and the original error log entry can be ignored Isolating the I O Drawer Failure The primary I O drawer is drawer number 1 although it is not displayed on the op...

Page 179: ...ons call out memory DIMMs or cards containing memory DIMMs go to Memory Related Error Codes on page 163 For all other error codes go to Confirming Initial Error Code on page 162 3 Go to Service Proces...

Page 180: ...rocessor may have recorded one or more symptoms in its error log If the system has attempted to boot since an error terminated normal operation there may be specific fault information in the service p...

Page 181: ...y DIMM is 1 2 or 3 but not 0 or 4 this is a suspect DIMM Record its location See System Information Menu on page 372 for more information on the error status of the DIMMs 2 If only one DIMM was record...

Page 182: ...f power good signal from power supply 1 Primary I O backplane Location U0 1 P1 2 Primary I O power supply Locations U0 1 V1 U0 1 V2 0000 1113 While power on failure of power good signal from power sup...

Page 183: ...ted Information message 1011 00EF Room emergency power off detected Information message 1011 1510 Power supply 1 power source failure 1 Check input power to power supply 1 Location U0 1 V1 2 Primary I...

Page 184: ...1011 1612 CEC regulator 1 non power fault Regulator card Location U1 1 P1 V1 1011 1613 CEC regulator 1 domain fault Regulator card Location U1 1 P1 V1 1011 1621 CEC regulator 2 fault Regulator card L...

Page 185: ...ion U0 1 P1 1011 1922 Power supply 2 non power fault 1 CEC drawer power supply 2 Location U1 1 V2 2 Primary I O backplane Location U0 1 P1 1011 1923 Power supply 2 domain fault 1 CEC drawer power supp...

Page 186: ...ocation U0 1 V1 2 If power supply U0 1 V2 present no cooling unit use the power supply you removed from U0 1 V1 to replace U0 1 V2 3 Primary I O backplane Location U0 1 P1 1011 1B07 Load fault on 2 5V...

Page 187: ...wer power distribution board Location U0 1 X1 6 Primary I O backplane Location U0 1 P1 1011 2604 Power domain fault in CEC and primary I O drawers See error codes 1011 2602 and 1011 2603 1011 2610 Mis...

Page 188: ...er fault 1 Fan controller card Location U0 1 X2 2 Primary I O backplane Location U0 1 P1 3 I O drawer power distribution board Location U0 1 X1 1011 3117 System power cooling control fault I O backpla...

Page 189: ...wer supply 1 Location U0 1 V1 1011 7660 Slow I O drawer fan 6 in I O drawer power supply 2 1 I O drawer power supply 2 Location U0 1 V2 2 Primary fan controller Location U0 1 X2 3 I O drawer power dis...

Page 190: ...mismatch Ignore all location codes Go to MAP 1540 and run CEC minimum configuration 1011 8404 PU 2 mismatch 1 Processor card Location U1 1 P1 C2 2 Primary I O backplane Location U0 1 P1 1011 8409 Proc...

Page 191: ...rocessor 2 VPD Processor card Location U1 1 P1 C2 1011 8430 V S COMM cable not connected properly Check cabling 1011 8431 Frame ID error 1 Check cabling 2 From the main service processor menu select t...

Page 192: ...on table 1 Check SPCN cabling 2 Reset system and reboot 3 Primary I O backplane Location U0 1 P1 1011 9101 SPCN failed to respond to service processor in time Primary I O backplane Location U0 1 P1 10...

Page 193: ...O backplane Location U0 2 P1 1021 1516 Swapped power supply and cooling unit or power supply 1 missing 1 Verify correct installation of power supply and cooling unit Location U0 2 V1 2 Primary I O pow...

Page 194: ...present no cooling unit use the power supply you removed from U0 2 V1 to replace U0 2 V2 3 Secondary I O backplane Location U0 2 P1 1021 1B04 Load fault on 12V 1 I O drawer power supply Location U0 2...

Page 195: ...tion U0 2 X1 4 Secondary I O backplane Location U0 2 P1 1021 2612 SPCN problem Secondary I O backplane Location U0 2 P1 1021 3100 I2C controller fault Secondary I O backplane Location U0 2 P1 1021 310...

Page 196: ...cation U0 2 F1 1021 7620 Slow I O drawer fan 2 1 Fan 2 Location U0 2 F2 2 Primary fan controller Location U0 2 X2 3 I O drawer power distribution board Location U0 2 X1 1021 7621 Missing I O drawer fa...

Page 197: ...oblem 1 Check for system firmware update 2 Call second level of support 1021 840A VPD 5 stuck high Secondary I O backplane Location U0 2 P1 1021 840B VPD 5 stuck low Secondary I O backplane Location U...

Page 198: ...y I O backplane Location U0 2 P1 1021 9043 Download failure 1 Check for system firmware update 2 Call second level of support 1021 9046 QDS packet sequence error 1 Check for system firmware update 2 C...

Page 199: ...ocation U0 3 V1 2 Secondary I O backplane Location U0 3 P1 1031 1514 Power supply 1 cooling fault 1 I O drawer power supply 1 Location U0 3 V1 2 Secondary I O backplane Location U0 3 P1 1031 1516 Swap...

Page 200: ...oling unit use the power supply you removed from U0 3 V1 to replace U0 3 V2 3 Secondary I O backplane Location U0 3 P1 1031 1B03 Load fault on 3 3 1 I O drawer power supply Location U0 3 V1 2 If power...

Page 201: ...awer power domain fault 1 Check input power to power supplies Locations U0 3 V1 U0 3 V2 2 I O drawer power supplies Locations U0 3 V1 U0 3 V2 3 I O Drawer Power Distribution Board Location U0 3 X1 4 S...

Page 202: ...low I O drawer fan 1 1 Fan 1 Locaton U0 3 F1 2 Fan controller card Locaton U0 3 X2 3 I O drawer power distribution board Location U0 3 X1 1031 7611 Missing I O drawer fan 1 Fan 1 Location U0 3 F1 1031...

Page 203: ...n U0 3 X1 1031 7691 Missing I O drawer fan 9 in cooling unit Fan 9 cooling unit Location U0 3 F9 1031 8400 VPD configuration problem 1 Check for system firmware update 2 Call second level of support 1...

Page 204: ...Secondary I O drawer is present but off Information only 1031 902D Secondary I O drawer not present Information only 1031 9038 I O drawer node fault Secondary I O backplane Location U0 3 P1 1031 9039...

Page 205: ...I O backplane Locaton U0 4 P1 1041 1511 Power supply 1 fault 1 I O drawer power supply 1 Locaton U0 4 V1 2 Secondary I O backplane Locaton U0 4 P1 1041 1512 Power supply 1 non power fault 1 I O drawer...

Page 206: ...er supply Location U0 4 V1 2 If power supply U0 4 V2 is present no cooling unit use the power supply you removed from U0 4 V1 to replace U0 4 V2 3 Secondary I O backplane Location U0 4 P1 1041 1B02 Lo...

Page 207: ...ved from U0 4 V1 to replace U0 4 V2 3 Secondary I O backplane Location U0 4 P1 1041 2600 Pgood fault Secondary I O backplane Location U0 4 P1 1041 2601 Pgood fault Secondary I O backplane Location U0...

Page 208: ...118 System power control network fault Secondary I O backplane Location U0 4 P1 1041 311C Thermal sensor fault 1 Secondary I O operator panel Location U0 4 L1 2 Secondary I O backplane Location U0 4 P...

Page 209: ...drawer fan 6 in I O drawer power supply 2 I O drawer power supply 2 Location U0 4 V2 1041 7690 Slow I O drawer fan 9 in cooling unit 1 Fan 9 cooling unit Locaton U0 4 F9 2 Fan controller card Locaton...

Page 210: ...ddress 1 Check SPCN cabling 2 Secondary I O Backplane Location U0 2 P1 1041 9014 Invalid address mode Update system firmware Location U0 1 P1 Y1 Note Allow up to 30 minutes for this update to take eff...

Page 211: ...ane Location U0 4 P1 1041 9109 Download failure Secondary I O backplane Location U0 4 P1 1041 9113 Firmware image corrupted Secondary I O backplane Location U0 4 P1 1041 9114 Firmware image corrupted...

Page 212: ...replaced by hot swap Table 6 Firmware Error Codes Error Code Description Action Possible Failing FRU 2011 00xy I O drawer Power Supply failure 1 Replace power supply y in I O drawer x If y _ then the...

Page 213: ...CEC drawer according to the following table y Nearest RIO Port 1 0 2 1 3 2 4 3 v z B indicates a missing return line from the I O drawer to the CEC drawer v z C indicates a missing link between two I...

Page 214: ...e password 20E0 0004 Battery drained or needs replacement 1 Replace battery Location U0 1 P1 V3 2 Replace Primary I O drawer backplane Location U0 1 P1 20E0 0009 Invalid password entered system locked...

Page 215: ...found This can happen for two reasons either your installed operating system does not support storing the values or some event occurred that caused the system to lose non volatile storage information...

Page 216: ...that drawer 20FB 0030 Failure to read I O drawer SPCN address Uninitialized failed to read SPCN address 1 Check RIO cable connections 2 Check for system firmware update 3 Replace RIO card assembly 4 R...

Page 217: ...pdate 3 Replace corresponding I O backplane location code indicates which drawer 4 Replace primary I O drawer backplane if not already replaced Location U0 1 P1 20FC 0021 Failed to retrieve power pack...

Page 218: ...e may have been a bad connection Go to MAP 0410 Repair Checkout in the RS 6000 and Eserver pSeries Diagnostic Information for Multiple Bus Systems 2100 0004 Cannot determine SCSI bus mode Before eplac...

Page 219: ...the SCSI device 21A0 0004 Send diagnostic failed devofl cmd Refer to the notes in error code 21A000xxx Replace the SCSI device 21E0 0xxx SCSI tape Refer to 21A00xxx for a description and repair action...

Page 220: ...the system may need to be reconfigured If the error is persistent replace primary I O drawer backplane Location U0 1 P1 25A8 0000 Initialization failed device test failed Refer to Action under error c...

Page 221: ...1 The problem can be caused by a SCSI adapter whose SCSI bus ID has been changed from the default setting no longer appearing in the system This can be caused either by removing a SCSI adapter or a pr...

Page 222: ...MM as follows 00 Unrecognized Unsupported memory DIMM 28 512 MB memory DIMM 38 128 MB memory DIMM 58 32 MB memory DIMM 68 256 MB memory DIMM 78 1 GB memory DIMM Notes 1 Refer to System Memory on page...

Page 223: ...b Replace the entire octal that contains the memory DIMM c Replace the memory riser card 3 If more than one DIMM was recorded in step one and the DIMMs reside in more than one octal a Replace the mem...

Page 224: ...cs on adapter Replace if indicated 4 Replace adapter 5 Check for system firmware updates Apply if update available 6 Replace I O drawer backplane See notes on Chapter 5 Error Code to FRU Index on page...

Page 225: ...error code 28030001 2803 0003 RTC not updating not correctable 1 Replace primary I O drawer backplane Location U0 1 P1 2803 0004 RTC operating mode parameters eg data mode changed 1 Set time and date...

Page 226: ...r Then reboot the system 2 If the processor is failing POST then replace the processor card at the location specified in the error log See Determining Location Code on page 160 for location code infor...

Page 227: ...ce tests detected AIX or system firmware fault 1 Check for AIX updates 2 Check for system firmware updates Location U0 1 P1 Y1 4066 00A2 Scan interface basic assurance tests detected service processor...

Page 228: ...tion U1 1 P1 M1 17 4066 0206 Scan interface basic assurance tests detected memory DIMM fault Memory DIMM 18 riser 1 Location U1 1 P1 M1 18 4066 0207 Scan interface basic assurance tests detected memor...

Page 229: ...cted memory DIMM fault Memory DIMM 22 riser 1 Location U1 1 P1 M1 22 4066 0227 Scan interface basic assurance tests detected memory DIMM fault Memory DIMM 29 riser 1 Location U1 1 P1 M1 29 4066 0228 S...

Page 230: ...t Memory DIMM 1 riser 2 Location U1 1 P1 M2 1 4066 0502 Scan interface basic assurance tests detected memory DIMM fault Memory DIMM 2 riser 2 Location U1 1 P1 M2 2 4066 0503 Scan interface basic assur...

Page 231: ...cted memory DIMM fault Memory DIMM 6 riser 2 Location U1 1 P1 M2 6 4066 0523 Scan interface basic assurance tests detected memory DIMM fault Memory DIMM 13 riser 2 Location U1 1 P1 M2 13 4066 0524 Sca...

Page 232: ...mory failure on riser card 2 that cannot be automatically isolated go to MAP 1540 Minimum Configuration on page 110 and run CEC drawer minimum configuration for further isolation 4066 0600 Scan interf...

Page 233: ...1 Q1 2 RIO bus adapter Location U0 1 P1 1 4066 3282 Scan interface basic assurance tests detected primary RIO port 1 fault 1 Check RIO cable Location U0 1 P1 1 Q2 2 RIO bus adapter Location U0 1 P1 1...

Page 234: ...0B0 6xx bus processor runtime diagnostics detected bus controller lock unlock failure RIO bus adapter Location U0 1 P1 1 4067 00B1 6xx bus processor runtime diagnostics detected bus controller failure...

Page 235: ...ted memory DIMM fault Memory DIMM 19 riser 1 Location U1 1 P1 M1 19 4067 0216 6xx bus processor runtime diagnostics detected memory DIMM fault Memory DIMM 20 riser 1 Location U1 1 P1 M1 20 4067 0217 6...

Page 236: ...067 0236 6xx bus processor runtime diagnostics detected memory DIMM fault Memory DIMM 24 riser 1 Location U1 1 P1 M1 24 4067 0237 6xx bus processor runtime diagnostics detected memory DIMM fault Memor...

Page 237: ...cs detected memory DIMM fault Memory DIMM 3 riser 2 Location U1 1 P1 M2 3 4067 0512 6xx bus processor runtime diagnostics detected memory DIMM fault Memory DIMM 4 riser 2 Location U1 1 P1 M2 4 4067 05...

Page 238: ...ics detected memory DIMM fault Memory DIMM 8 riser 2 Location U1 1 P1 M2 8 4067 0533 6xx bus processor runtime diagnostics detected memory DIMM fault Memory DIMM 15 riser 2 Location U1 1 P1 M2 15 4067...

Page 239: ...4067 3124 6xx bus processor runtime diagnostics detected RIO cable on port 3 fault 1 RIO cable on port 3 Location U1 1 P1 1 Q4 2 CEC RIO bus adapter Location U1 1 P1 1 4067 3140 6xx bus processor runt...

Page 240: ...or AIX updates 2 Check for system firmware updates Location U0 1 P1 Y1 4068 00A2 Other bus processor runtime diagnostics detected service processor firmware processor runtime diagnostics fault Check f...

Page 241: ...17 4068 0206 Other bus processor runtime diagnostics detected memory DIMM fault Memory DIMM 18 riser 1 Location U1 1 P1 M1 18 4068 0207 Other bus processor runtime diagnostics detected memory DIMM fau...

Page 242: ...tics detected memory DIMM fault Memory DIMM 22 riser 1 Location U1 1 P1 M1 22 4068 0227 Other bus processor runtime diagnostics detected memory DIMM fault Memory DIMM 29 riser 1 Location U1 1 P1 M1 29...

Page 243: ...riser 2 Location U1 1 P1 M2 1 4068 0502 Other bus processor runtime diagnostics detected memory DIMM fault Memory DIMM 2 riser 2 Location U1 1 P1 M2 2 4068 0503 Other bus processor runtime diagnostic...

Page 244: ...tics detected memory DIMM fault Memory DIMM 6 riser 2 Location U1 1 P1 M2 6 4068 0523 Other bus processor runtime diagnostics detected memory DIMM fault Memory DIMM 13 riser 2 Location U1 1 P1 M2 13 4...

Page 245: ...re on riser card 2 that cannot be automatically isolated go to MAP 1540 Minimum Configuration on page 110 and run CEC drawer minimum configuration for further isolation 4068 0600 Other bus processor r...

Page 246: ...1 Q1 2 RIO bus adapter Location U0 1 P1 1 4068 3282 Other bus processor runtime diagnostics detected primary RIO port 1 fault 1 Check RIO cable Location U0 1 P1 1 Q2 2 RIO bus adapter Location U0 1 P1...

Page 247: ...ailure RIO bus adapter Location U0 1 P1 1 4069 00B3 Memory test detected clock fault 1 Clock card Location U1 1 P1 1 1 2 CEC RIO bus adapter Location U1 1 P1 1 4069 00B7 Memory test detected insuffici...

Page 248: ...0217 Memory test detected memory DIMM fault Memory DIMM 27 riser 1 Location U1 1 P1 M1 27 4069 0218 Memory test detected memory DIMM fault Memory DIMM 28 riser 1 Location U1 1 P1 M1 28 4069 021D Memo...

Page 249: ...31 4069 0238 Memory test detected memory DIMM fault Memory DIMM 32 riser 1 Location U1 1 P1 M1 32 4069 023D Memory test detected memory DIMM group fault Memory octal D riser 1 Location U1 1 P1 M1 7 x...

Page 250: ...4 4069 0513 Memory test detected memory DIMM fault Memory DIMM 11 riser 2 Location U1 1 P1 M2 11 4069 0514 Memory test detected memory DIMM fault Memory DIMM 12 riser 2 Location U1 1 P1 M2 12 4069 051...

Page 251: ...t detected memory DIMM fault Memory DIMM 16 riser 2 Location U1 1 P1 M2 16 4069 0535 Memory test detected memory DIMM fault Memory DIMM 23 riser 2 Location U1 1 P1 M2 23 4069 0536 Memory test detected...

Page 252: ...pter Location U1 1 P1 1 4069 3140 Memory test detected RIO hub 0 fault CEC RIO bus adapter Location U1 1 P1 1 4069 3141 Memory test detected RIO hub 1 fault CEC RIO bus adapter Location U1 1 P1 1 4069...

Page 253: ...cessor runtime diagnostics fault Check for system firmware updates Location U0 1 P1 Y1 406A 00A3 Self test detected memory plugging fault All pluggable memory 406A 00A4 Self test detected application...

Page 254: ...U1 1 P1 M1 18 406A 0207 Self test detected memory DIMM fault Memory DIMM 25 riser 1 Location U1 1 P1 M1 25 406A 0208 Self test detected memory DIMM fault Memory DIMM 26 riser 1 Location U1 1 P1 M1 26...

Page 255: ...test detected memory DIMM fault Memory DIMM 30 riser 1 Location U1 1 P1 M1 30 406A 022D Self test detected memory DIMM group fault Memory octal C riser 1 Locations U1 1 P1 M1 5 x8 406A 022E Self test...

Page 256: ...f test detected memory DIMM fault Memory DIMM 9 riser 2 Location U1 1 P1 M2 9 406A 0504 Self test detected memory DIMM fault Memory DIMM 10 riser 2 Location U1 1 P1 M2 10 406A 0505 Self test detected...

Page 257: ...lf test detected memory DIMM fault Memory DIMM 14 riser 2 Location U1 1 P1 M2 14 406A 0525 Self test detected memory DIMM fault Memory DIMM 21 riser 2 Location U1 1 P1 M2 21 406A 0526 Self test detect...

Page 258: ...ed CEC RIO bus adapter CEC RIO bus adapter Location U1 1 P1 1 406A 0601 Self test detected clock card fault CEC clock card Location U1 1 P1 1 1 406A 3101 Self test detected RIO port 0 fault CEC RIO bu...

Page 259: ...0 1 RIO bus adapter Location U0 1 P1 1 2 Primary I O drawer backplane Location U0 1 P1 406A 3285 Self test detected PCI controller PHB1 1 RIO bus adapter Location U0 1 P1 1 2 Primary I O drawer backpl...

Page 260: ...by the service processor firmware on the CEC was completed correctly but a problem occurred when the firmware tried to communicate outside the CEC Suspect a problem with the RIO interface either cabl...

Page 261: ...y DIMM group pair A fault Memory quad B odd riser 1 Location U1 1 P1 M1 3 x4 406B 021F Wire test detected memory DIMM group fault Memory quad B even riser 1 Location U1 1 P1 M1 4 x4 406B 0221 Wire tes...

Page 262: ...1 P1 M1 7 x4 406B 023F Wire test detected memory DIMM group fault Memory quad D even riser 1 Location U1 1 P1 M1 8 x4 406B 02FF Wire test detected memory on riser fault All memory on riser 1 Location...

Page 263: ...0516 Wire test detected memory DIMM fault Memory DIMM 20 riser 2 Location U1 1 P1 M2 20 406B 0517 Wire test detected memory DIMM fault Memory DIMM 27 riser 2 Location U1 1 P1 M2 27 406B 0518 Wire test...

Page 264: ...24 406B 0537 Wire test detected memory DIMM fault Memory DIMM 31 riser 2 Location U1 1 P1 M2 31 406B 0538 Wire test detected memory DIMM fault Memory DIMM 32 riser 2 Location U1 1 P1 M2 32 406B 053D...

Page 265: ...1 P1 1 406B 3200 Wire test detected primary I O drawer fault Go to MAP 1540 Minimum Configuration on page 110 406B 3201 Wire test detected primary I O drawer backplane fault Primary I O drawer backpla...

Page 266: ...y installed 2 If more than one DIMM is called out go to the service processor Memory Configuration Deconfiguration Menu to verify memory DIMMs state See Memory Configuration Deconfiguration Menu on pa...

Page 267: ...IPL MOPS detected memory DIMM fault Memory DIMM 4 riser 1 Location U1 1 P1 M1 4 406C 0213 IPL MOPS detected memory DIMM fault Memory DIMM 11 riser 1 Location U1 1 P1 M1 11 406C 0214 IPL MOPS detected...

Page 268: ...P1 M1 8 406C 0233 IPL MOPS detected memory DIMM fault Memory DIMM 15 riser 1 Location U1 1 P1 M1 15 406C 0234 IPL MOPS detected memory DIMM fault Memory DIMM 16 riser 1 Location U1 1 P1 M1 16 406C 023...

Page 269: ...roup fault Memory octal A riser 2 Location U1 1 P1 M2 1 x8 406C 050E IPL MOPS detected memory DIMM group pair A fault Memory quad A odd riser 2 Location U1 1 P1 M2 1 x4 406C 050F IPL MOPS detected mem...

Page 270: ...detected memory DIMM group pair A fault Memory quad C odd riser 2 Location U1 1 P1 M2 5 x4 406C 052F IPL MOPS detected memory DIMM group fault Memory quad C even riser 2 Location U1 1 P1 M2 6 x4 406C...

Page 271: ...ocation U1 1 P1 1 406C 3122 IPL MOPS detected RIO cable on port 1 fault 1 RIO cable on port 1 Location U1 1 P1 1 Q2 2 CEC RIO bus adapter Location U1 1 P1 1 406C 3123 IPL MOPS detected RIO cable on po...

Page 272: ...e processor firmware fault Update system firmware Location U0 1 P1 Y1 406D 00A1 Attention handler detected AIX or system firmware fault 1 Check for AIX updates 2 Check for system firmware updates Loca...

Page 273: ...mory DIMM 10 riser 1 Location U1 1 P1 M1 10 406D 0205 Attention handler detected memory DIMM fault Memory DIMM 17 riser 1 Location U1 1 P1 M1 17 406D 0206 Attention handler detected memory DIMM fault...

Page 274: ...tention handler detected memory DIMM fault Memory DIMM 21 riser 1 Location U1 1 P1 M1 21 406D 0226 Attention handler detected memory DIMM fault Memory DIMM 22 riser 1 Location U1 1 P1 M1 22 406D 0227...

Page 275: ...memory riser card fault Memory riser card 2 Location U1 1 P1 M1 406D 0501 Attention handler detected memory DIMM fault Memory DIMM 1 riser 2 Location U1 1 P1 M2 1 406D 0502 Attention handler detected...

Page 276: ...ttention handler detected memory DIMM fault Memory DIMM 5 riser 2 Location U1 1 P1 M2 5 406D 0522 Attention handler detected memory DIMM fault Memory DIMM 6 riser 2 Location U1 1 P1 M2 6 406D 0523 Att...

Page 277: ...handler detected memory on riser fault Memory failure on riser card 2 that cannot be automatically isolated go to MAP 1540 Minimum Configuration on page 110 and run CEC drawer minimum configuration fo...

Page 278: ...ion handler detected primary RIO port 1 fault 1 Check RIO cable Location U0 1 P1 1 Q2 2 RIO bus adapter Location U0 1 P1 1 406D 3283 Attention handler detected primary RIO ports fault RIO bus adapter...

Page 279: ...control routines detected bus controller failure RIO bus adapter Location U0 1 P1 1 406E 00B3 Scan control routines detected clock fault 1 Clock card Location U1 1 P1 1 1 2 CEC RIO bus adapter Locatio...

Page 280: ...rol routines detected memory DIMM fault Memory DIMM 20 riser 1 Location U1 1 P1 M1 20 406E 0217 Scan control routines detected memory DIMM fault Memory DIMM 27 riser 1 Location U1 1 P1 M1 27 406E 0218...

Page 281: ...6E 0237 Scan control routines detected memory DIMM fault Memory DIMM 31 riser 1 Location U1 1 P1 M1 31 406E 0238 Scan control routines detected memory DIMM fault Memory DIMM 32 riser 1 Location U1 1 P...

Page 282: ...an control routines detected memory DIMM fault Memory DIMM 4 riser 2 Location U1 1 P1 M2 4 406E 0513 Scan control routines detected memory DIMM fault Memory DIMM 11 riser 2 Location U1 1 P1 M2 11 406E...

Page 283: ...tected memory DIMM fault Memory DIMM 15 riser 2 Location U1 1 P1 M2 15 406E 0534 Scan control routines detected memory DIMM fault Memory DIMM 16 riser 2 Location U1 1 P1 M2 16 406E 0535 Scan control r...

Page 284: ...l routines detected RIO cable on port 3 fault 1 RIO cable on port 3 Location U1 1 P1 1 Q4 2 CEC RIO bus adapter Location U1 1 P1 1 406E 3140 Scan control routines detected RIO hub 0 fault CEC RIO bus...

Page 285: ...eck for system firmware updates Location U0 1 P1 Y1 406F 00A2 Error code generation logging detected service processor firmware processor runtime diagnostics fault Check for system firmware updates Lo...

Page 286: ...7 riser 1 Location U1 1 P1 M1 17 406F 0206 Error code generation logging detected memory DIMM fault Memory DIMM 18 riser 1 Location U1 1 P1 M1 18 406F 0207 Error code generation logging detected memor...

Page 287: ...detected memory DIMM fault Memory DIMM 22 riser 1 Location U1 1 P1 M1 22 406F 0227 Error code generation logging detected memory DIMM fault Memory DIMM 29 riser 1 Location U1 1 P1 M1 29 406F 0228 Erro...

Page 288: ...DIMM fault Memory DIMM 1 riser 2 Location U1 1 P1 M2 1 406F 0502 Error code generation logging detected memory DIMM fault Memory DIMM 2 riser 2 Location U1 1 P1 M2 2 406F 0503 Error code generation l...

Page 289: ...detected memory DIMM fault Memory DIMM 6 riser 2 Location U1 1 P1 M2 6 406F 0523 Error code generation logging detected memory DIMM fault Memory DIMM 13 riser 2 Location U1 1 P1 M2 13 406F 0524 Error...

Page 290: ...mory failure on riser card 2 that cannot be automatically isolated go to MAP 1540 Minimum Configuration on page 110 and run CEC drawer minimum configuration for further isolation 406F 0600 Error code...

Page 291: ...U0 1 P1 1 Q1 2 RIO bus adapter Location U0 1 P1 1 406F 3282 Error code generation logging detected primary RIO port 1 fault 1 Check RIO cable Location U0 1 P1 1 Q2 2 RIO bus adapter Location U0 1 P1 1...

Page 292: ...ts detected 2W 750 MHz processor fault Processor card Locations U1 1 P1 C1 U1 1 P1 C2 4506 25DA Memory system and scan interface basic assurance tests detected 500 MHz clock fault 500 MHz clock Locati...

Page 293: ...ce tests detected 256 MB DIMM fault Memory DIMM Locations U1 1 P1 M1 n U1 1 P1 M2 n 4506 300D Memory system and scan interface basic assurance tests detected 512 MB stacked DIMM fault Memory DIMM Loca...

Page 294: ...Menu on page 373 for more information Replace the card that has the bad processors Locations U1 1 P1 C1 U1 1 P1 C2 4507 248B Memory system and 6xx bus processor runtime diagnostics detected primary I...

Page 295: ...1 4507 267D Memory system and 6xx bus processor runtime diagnostics detected an 8W 750 MHz regulator fault 8W regulator card Location U1 1 P1 V1 4507 2687 Memory system and 6xx bus processor runtime...

Page 296: ...tics detected 512 MB stacked DIMM fault Memory DIMM Locations U1 1 P1 M1 n U1 1 P1 M2 n 4507 300E Memory system and 6xx bus processor runtime diagnostics detected 512 MB unstacked DIMM fault Memory DI...

Page 297: ...1 Memory system and other bus processor runtime diagnostics detected 750 MHz clock fault 540 MHz clock Location U1 1 P1 1 1 4508 25B3 Memory system and other bus processor runtime diagnostics detected...

Page 298: ...ion Menu on page 374 for more information 2 Memory riser card Locations U1 1 P1 M1 U1 1 P1 M2 4508 300A Memory system and other bus processor runtime diagnostics detected 32 MB DIMM fault Memory DIMM...

Page 299: ...ry test detected 2W 500 MHz processor fault Processor card Locations U1 1 P1 C1 U1 1 P1 C2 4509 24A6 Memory system and memory test detected 4W 500 MHz processor fault Processor card Locations U1 1 P1...

Page 300: ...fault 1 Go to the service processor Memory Configuration Deconfiguration Menu to verify memory DIMMs state See Memory Configuration Deconfiguration Menu on page 374 for more information 2 Memory rise...

Page 301: ...fault Processor card Locations U1 1 P1 C1 U1 1 P1 C2 450A 24A6 Memory system and self test detected 4W 500 MHz processor fault Processor card Locations U1 1 P1 C1 U1 1 P1 C2 450A 25AB Memory system a...

Page 302: ...fault 1 Go to the service processor Memory Configuration Deconfiguration Menu to verify memory DIMMs state See Memory Configuration Deconfiguration Menu on page 374 for more information 2 Memory rise...

Page 303: ...Processor card Locations U1 1 P1 C1 U1 1 P1 C2 450B 24A6 Memory system and wire test detected 4W 500 MHz processor fault Processor card Locations U1 1 P1 C1 U1 1 P1 C2 450B 25AB Memory system and wir...

Page 304: ...ard fault 1 Go to the service processor Memory Configuration Deconfiguration Menu to verify memory DIMMs state See Memory Configuration Deconfiguration Menu on page 374 for more information 2 Memory r...

Page 305: ...fault Processor card Locations U1 1 P1 C1 U1 1 P1 C2 450C 24A6 Memory system and IPL MOPS detected 4W 500 MHz processor fault Processor card Locations U1 1 P1 C1 U1 1 P1 C2 450C 25AB Memory system an...

Page 306: ...fault 1 Go to the service processor Memory Configuration Deconfiguration Menu to verify memory DIMMs state See Memory Configuration Deconfiguration Menu on page 374 for more information 2 Memory rise...

Page 307: ...cations U1 1 P1 C1 U1 1 P1 C2 450D 24A6 Memory system and attention handler detected 4W 500 MHz processor fault Processor card Locations U1 1 P1 C1 U1 1 P1 C2 450D 25AB Memory system and attention han...

Page 308: ...fault 1 Go to the service processor Memory Configuration Deconfiguration Menu to verify memory DIMMs state See Memory Configuration Deconfiguration Menu on page 374 for more information 2 Memory rise...

Page 309: ...d Locations U1 1 P1 C1 U1 1 P1 C2 450E 25AB Memory system and scan control routines detected 400 MHz clock fault 400 MHz clock Location U1 1 P1 1 1 450E 25AD Memory system and scan control routines de...

Page 310: ...nfiguration Menu on page 374 for more information 2 Memory riser card Locations U1 1 P1 M1 U1 1 P1 M2 450E 300A Memory system and scan control routines detected 32 MB DIMM fault Memory DIMM Locations...

Page 311: ...sor fault Processor card Locations U1 1 P1 C1 U1 1 P1 C2 450F 25AB Memory system and error code detected 400 MHz clock fault 400 MHz clock Location U1 1 P1 1 1 450F 25AD Memory system and error code d...

Page 312: ...ration Deconfiguration Menu on page 374 for more information 2 Memory riser card Locations U1 1 P1 M1 U1 1 P1 M2 450F 300A Memory system and error code detected 32 MB DIMM fault Memory DIMM Locations...

Page 313: ...d 4W 500 MHz processor fault Processor card Locations U1 1 P1 C1 U1 1 P1 C2 4606 25AB Other bus PRD detected 400 MHz clock fault 400 MHz clock Location U1 1 P1 1 1 4606 25AD Other bus PRD detected 540...

Page 314: ...Memory Configuration Deconfiguration Menu on page 374 for more information 2 Memory riser card Locations U1 1 P1 M1 U1 1 P1 M2 4606 300A Other bus PRD detected 32 MB DIMM fault Memory DIMM Locations...

Page 315: ...sor fault Go to the service processor Processor Configuration Deconfiguration Menu to check the states of the processors See Processor Configuration Deconfiguration Menu on page 373 for more informati...

Page 316: ...system and 6xx bus processor runtime diagnostics detected an 8W 750 MHz regulator fault 8W regulator card Location U1 1 P1 V1 4607 2687 I O system and 6xx bus processor runtime diagnostics detected r...

Page 317: ...n 4607 301F I O system and 6xx bus processor runtime diagnostics detected 128 MB DIMM fault Memory DIMM Locations U1 1 P1 M1 n U1 1 P1 M2 n 4607 303A I O system and 6xx bus processor runtime diagnost...

Page 318: ...1 P1 C1 U1 1 P1 C2 4608 25DA I O system and other bus processor runtime diagnostics detected 500 MHz clock fault 500 MHz clock Location U1 1 P1 1 1 4608 267D I O system and other bus processor runtime...

Page 319: ...sor runtime diagnostics detected 512 MB stacked DIMM fault Memory DIMM Locations U1 1 P1 M1 n U1 1 P1 M2 n 4608 300E I O system and other bus processor runtime diagnostics detected 512 MB unstacked DI...

Page 320: ...ssor card Locations U1 1 P1 C1 U1 1 P1 C2 4609 25B4 I O system and memory test detected 2W 750 MHz processor fault Processor card Locations U1 1 P1 C1 U1 1 P1 C2 4609 25DA I O system and memory test d...

Page 321: ...n 4609 300D I O system and memory test detected 512 MB stacked DIMM fault Memory DIMM Locations U1 1 P1 M1 n U1 1 P1 M2 n 4609 300E I O system and memory test detected 512 MB unstacked DIMM fault Memo...

Page 322: ...cessor card Locations U1 1 P1 C1 U1 1 P1 C2 460A 25B4 I O system and self test detected 2W 750 MHz processor fault Processor card Locations U1 1 P1 C1 U1 1 P1 C2 460A 25DA I O system and self test det...

Page 323: ...M2 n 460A 300D I O system and self test detected 512 MB stacked DIMM fault Memory DIMM Locations U1 1 P1 M1 n U1 1 P1 M2 n 460A 300E I O system and self test detected 512 MB unstacked DIMM fault Memor...

Page 324: ...cessor card Locations U1 1 P1 C1 U1 1 P1 C2 460B 25B4 I O system and wire test detected 2W 750 MHz processor fault Processor card Locations U1 1 P1 C1 U1 1 P1 C2 460B 25DA I O system and wire test det...

Page 325: ...M2 n 460B 300D I O system and wire test detected 512 MB stacked DIMM fault Memory DIMM Locations U1 1 P1 M1 n U1 1 P1 M2 n 460B 300E I O system and wire test detected 512 MB unstacked DIMM fault Memor...

Page 326: ...cessor card Locations U1 1 P1 C1 U1 1 P1 C2 460C 25B4 I O system and IPL MOPS detected 2W 750 MHz processor fault Processor card Locations U1 1 P1 C1 U1 1 P1 C2 460C 25DA I O system and IPL MOPS detec...

Page 327: ...n 460C 300D I O system and IPL MOPS detected 512 MB stacked DIMM fault Memory DIMM Locations U1 1 P1 M1 n U1 1 P1 M2 n 460C 300E I O system and IPL MOPS detected 512 MB unstacked DIMM fault Memory DIM...

Page 328: ...or card Locations U1 1 P1 C1 U1 1 P1 C2 460D 25B4 I O system and attention handler detected 2W 750 MHz processor fault Processor card Locations U1 1 P1 C1 U1 1 P1 C2 460D 25DA I O system and attention...

Page 329: ...system and attention handler detected 512 MB stacked DIMM fault Memory DIMM Locations U1 1 P1 M1 n U1 1 P1 M2 n 460D 300E I O system and attention handler detected 512 MB unstacked DIMM fault Memory...

Page 330: ...utines detected 4W 750 MHz processor fault Processor card Locations U1 1 P1 C1 U1 1 P1 C2 460E 25B4 I O system and scan control routines detected 2W 750 MHz processor fault Processor card Locations U1...

Page 331: ...ocations U1 1 P1 M1 n U1 1 P1 M2 n 460E 300D I O system and scan control routines detected 512 MB stacked DIMM fault Memory DIMM Locations U1 1 P1 M1 n U1 1 P1 M2 n 460E 300E I O system and scan contr...

Page 332: ...ng detected 4W 750 MHz processor fault Processor card Locations U1 1 P1 C1 U1 1 P1 C2 460F 25B4 I O system and error code generation logging detected 2W 750 MHz processor fault Processor card Location...

Page 333: ...1 M1 n U1 1 P1 M2 n 460F 300D I O system and error code generation logging detected 512 MB stacked DIMM fault Memory DIMM Locations U1 1 P1 M1 n U1 1 P1 M2 n 460F 300E I O system and error code genera...

Page 334: ...etected 750 MHz clock fault 750 MHz clock Location U1 1 P1 1 1 4B26 25B3 Processor system and scan interface basic assurance tests detected 4W 750 MHz processor fault Go to MAP 1540 Minimum Configurat...

Page 335: ...ests detected 32 MB DIMM fault Memory DIMM Locations U1 1 P1 M1 n U1 1 P1 M2 n 4B26 300B Processor system and scan interface basic assurance tests detected 128 MB DIMM fault Memory DIMM Locations U1 1...

Page 336: ...processor runtime diagnostics detected 4W 4M processor fault Go to the service processor Processor Configuration Deconfiguration Menu to check the states of the processors See Processor Configuration...

Page 337: ...267D Processor system and 6xx bus processor runtime diagnostics detected an 8W 750 MHz regulator fault 8W regulator card Location U1 1 P1 V1 4B27 2687 Processor system and 6xx bus processor runtime di...

Page 338: ...ssor runtime diagnostics detected 512 MB stacked DIMM fault Memory DIMM Locations U1 1 P1 M1 n U1 1 P1 M2 n 4B27 300E Processor system and 6xx bus processor runtime diagnostics detected 512 MB unstack...

Page 339: ...rocessor system and other bus processor runtime diagnostics detected 750 MHz clock fault 750 MHz clock Location U1 1 P1 1 1 4B28 25B3 Processor system and other bus processor runtime diagnostics detec...

Page 340: ...Menu on page 374 for more information 2 Memory riser card Locations U1 1 P1 M1 U1 1 P1 M2 4B28 300A Processor system and other bus processor runtime diagnostics detected 32 MB DIMM fault Memory DIMM...

Page 341: ...540 Minimum Configuration on page 110 4B29 25AB Processor system and memory test detected 400 MHz clock fault 400 MHz clock Location U1 1 P1 1 1 4B29 25AD Processor system and memory test detected 540...

Page 342: ...lt Memory DIMM Locations U1 1 P1 M1 n U1 1 P1 M2 n 4B29 300B Processor system and memory test detected 128 MB DIMM fault Memory DIMM Locations U1 1 P1 M1 n U1 1 P1 M2 n 4B29 300C Processor system and...

Page 343: ...Hz clock Location U1 1 P1 1 1 4B2A 25B3 Processor system and self test detected 4W 750 MHz processor fault Go to MAP 1540 Minimum Configuration on page 110 4B2A 25B4 Processor system and self test det...

Page 344: ...acked DIMM fault Memory DIMM Locations U1 1 P1 M1 n U1 1 P1 M2 n 4B2A 300E Processor system and self test detected 512 MB unstacked DIMM fault Memory DIMM Locations U1 1 P1 M1 n U1 1 P1 M2 n 4B2A 301F...

Page 345: ...on page 110 4B2B 25DA Processor system and wire test detected 500 MHz clock fault 500 MHz clock Location U1 1 P1 1 1 4B2B 267D Processor system and wire test detected an 8W 750 MHz regulator fault 8W...

Page 346: ...sor system and wire test detected 128 MB DIMM fault Memory DIMM Locations U1 1 P1 M1 n U1 1 P1 M2 n 4B2B 303A Processor system and wire test detected 1 GB DIMM fault Memory DIMM Locations U1 1 P1 M1 n...

Page 347: ...Location U1 1 P1 1 4B2C 271A Processor system and IPL MOPS detected primary I O planar fault Primary I O planar Location U0 1 P1 4B2C 271D Processor system and IPL MOPS detected secondary I O planar f...

Page 348: ...s U1 1 V1 U1 1 V2 4B2C 51AC Processor system and IPL MOPS detected 595W ac power supply fault 595W ac power supply Locations U0 1 V1 U0 1 V2 4B2C 51AD Processor system and IPL MOPS detected 595W dc po...

Page 349: ...apter Location U1 1 P1 1 4B2D 27AA Processor system and IPL MOPS detected a 2W 4W regulator fault 2W 4W regulator card Location U1 1 P1 V1 4B2D 27AB Processor system and IPL MOPS detected an 8W regula...

Page 350: ...AP 1540 Minimum Configuration on page 110 4B2E 245C Processor system and scan control routines detected 2W 2M processor fault Go to MAP 1540 Minimum Configuration on page 110 4B2E 245D Processor syste...

Page 351: ...ed CEC backplane fault CEC backplane Location U1 1 P1 4B2E 281D Processor system and scan control routines detected Model 6M1 CEC backplane fault CEC backplane Location U1 1 P1 4B2E 285D Processor sys...

Page 352: ...ected 4W 4M processor fault Go to MAP 1540 Minimum Configuration on page 110 4B2F 248B Processor system and error code detected primary I O drawer operator panel fault Operator Panel Location U0 1 L1...

Page 353: ...power distribution board Location U0 1 X1 4B2F 288A Processor system and error code detected memory riser card fault 1 Go to the service processor Memory Configuration Deconfiguration Menu to verify m...

Page 354: ...U1 1 V1 U1 1 V2 4B2F 51AC Processor system and error code detected 595W ac power supply fault 595W ac power supply Locations U0 1 V1 U0 1 V2 4B2F 51AD Processor system and error code detected 595W dc...

Page 355: ...mware update recovery mode entered Information message A1FD 0001 Service processor flash recovery Insert Diskette 1 A1FD 0002 Service processor flash recovery Insert Diskette 2 A1FD 0003 Service proce...

Page 356: ...processor firmware fault 1 Update system firmware Location U0 1 P1 Y1 2 Primary drawer I O backplane Location U0 1 P1 B006 1406 Service processor program error 1 Update system firmware Location U0 1...

Page 357: ...B10F 1401 Service processor failure Primary I O drawer backplane Location U0 1 P1 B10F 1670 Service processor flash update failure 1 Retry flash update 2 Primary I O drawer backplane Location U0 1 P1...

Page 358: ...ary I O drawer backplane Location U0 1 P1 B1xx 4601 CPU subsystem problem No isolation possible contact next level of support B1xx 4602 RIO bus fault 1 Check reseat RIO cables 2 RIO bus adapter Locati...

Page 359: ...ocation codes Go to MAP 1540 and run CEC minimum configuration B1xx 4646 General VPD fault Ignore all location codes Go to MAP 1540 and run CEC minimum configuration B1xx 4647 The machine type and mod...

Page 360: ...4672 Critical temperature fault in secondary I O drawer 1 Check ambient temperature 2 Check air supply to fans 3 Check fans for proper installation and operation 4 Check for any unsupported cards tha...

Page 361: ...rating system crash Use the other error as the starting point for your service action 2 The other possibility is that the operating system was not found during a prior boot attempt To determine if thi...

Page 362: ...t checkpoint before any 8 digit error code Use this checkpoint and go to Checkpoint and Error Code Index on page 161 and follow the instructions 4 If the problem is not solved call the second level of...

Page 363: ...re update 2 Primary I O drawer backplane Location U0 1 P1 B1xx 469C Firmware to I O interface problem 1 Check for system firmware update 2 Primary I O drawer backplane Location U0 1 P1 B1xx 469E Possi...

Page 364: ...ror log and find the error log entry containing B1xx 8FF0 Examine the first two bytes of word 13 of the detailed entry v If the system is running do the following Examine the AIX error log entry conta...

Page 365: ...de is generated by the customer performing Problem Determination in the RS 6000 Enterprise Server Model M80 Eserver pSeries 660 Model 6M1 User s Guide Type 101 keyboard M0KB D002 The system did not re...

Page 366: ...page 83 M0SC SI00 Unable to load diagnostics This error code is generated by the customer performing Problem Determination in the RS 6000 Enterprise Server Model M80 Eserver pSeries 660 Model 6M1 User...

Page 367: ...mmediately insert the diagnostic CD ROM into the CD ROM drive 5 When or after the keyboard indicator appears during startup press the numeric 5 key on the keyboard 6 Enter any requested passwords Onli...

Page 368: ...ypically run from a hard disk Like the default boot list the service mode boot list can contain five entries The numeric 6 key works like the numeric 5 key with the following exceptions v The system s...

Page 369: ...e codes can be ordered with the system or added as upgrades to allow additional processors to be installed in the system and then enabled later FC 8306 This Capacity Upgrade on Demand feature code cau...

Page 370: ...line installed Electronic Service Agent available Name and address available System or feature hardware is installed Diagnostics used to verify installation Customer information is completed using co...

Page 371: ...is not the Electronic Service Agent gateway the Electronic Service Agent client code must be installed on this system and this system must be added to the list of Electronic Service Agent monitored sy...

Page 372: ...ure When the system is ready to return to normal operations enable the Capacity Upgrade on Demand feature as follows 1 Log in to the system as root user or as a user with system group privileges 2 Typ...

Page 373: ...t the system as follows shutdown Fr 6 Log in to the system as root user or as a user with system group privileges 7 Type the following at the command line chcod The following information displays Curr...

Page 374: ...d processors authorized for use do the following 1 Log in to the system as root user or as a user with system group privileges 2 Type the following command chcod Record the displayed information below...

Page 375: ...ommand to enable additional processors information about the new system configuration is added to the error log and sent through the Electronic Service Agent to the service support center 2 Shut down...

Page 376: ...358 Service Guide...

Page 377: ...minals SMS ASCII or graphics terminals Read VPD image from last system boot Y3 Read System POST Errors Y3 Read Service Processor Error Logs Y3 View Progress Indicators from last boot Y3 Power off Syst...

Page 378: ...call in see Modem Configuration Menu on page 381 the service processor menus can be accessed remotely as follows 1 With the system powered off call in from a remote terminal 2 The service processor de...

Page 379: ...processor checkpoints IPL checkpoints and or AIX configuration codes from the previous system boot This information can be useful in diagnosing system faults The progress indicator codes are listed f...

Page 380: ...or The system name an optional field is the name that your server reports in problem messages This name helps your support team for example your system administrator network administrator or service r...

Page 381: ...rvice Processor Setup Menu on page 364 for more information v System Power Control Menu See System Power Control Menu on page 368 for more information v System Information Menu See System Information...

Page 382: ...Access Password 3 Enable Disable Console Mirroring Currently Enabled 4 Start Talk Mode 5 OS Surveillance Setup Menu 6 Reset Service Processor 7 Reprogram Flash EPROM Menu 8 Serial Port Snoop Setup Me...

Page 383: ...rd to access AIX If the error threshold is reached by someone entering passwords remotely the service processor commands the server to power down to prevent potential security attacks on the server by...

Page 384: ...those who are monitoring the session to be able to communicate with each other Selecting this menu item activates the keyboards and displays for such communications while console mirroring is establi...

Page 385: ...menu select option 1 Service Processor Setup Menu then select option 8 Serial Port Snoop Setup Menu SERIAL PORT SNOOP SETUP MENU 1 System reset string Currently Unassigned 2 Snoop Serial Port Currentl...

Page 386: ...er a temporary power failure Unattended start mode can also be set through the System Management Services SMS menus It is intended to be used on servers that require automatic power on after a power f...

Page 387: ...Previous Menu 1 Reboot is the process of bringing up the system hardware for example from a system reset or power on Restart is activating the operating system after the system hardware is re initiali...

Page 388: ...enabled disabled If a restart is necessary due to a system fault you can enable the service processor to call out and report the event This option can be valuable if the number of these events becomes...

Page 389: ...Services SMS menu Service Mode Boot from Saved List This selection causes the system to perform a service mode boot using the service mode boot list saved in NVRAM If the system boots AIX from the dis...

Page 390: ...ays a number of the boot progress indicators which may include service processor checkpoints IPL checkpoints and or AIX configuration codes from the previous system boot This information can be useful...

Page 391: ...ured by system 6 5 4 1 00 Configured by system 7 6 4 2 00 Configured by system 8 7 4 3 00 Configured by system 98 Return to Previous Menu 1 Note This table is built from vital product data collected d...

Page 392: ...nt from the numbering scheme used by AIX Consult the AIX documentation before configuring or deconfiguring a processor to ensure that the correct processor is selected The AIX Documentation library is...

Page 393: ...respond to the numbers shown in Memory Riser Card 1 Memory DIMM Locations for Service Processor Menus on page 376 and Memory Riser Card 2 Memory DIMM Locations for Service Processor Menus on page 377...

Page 394: ...es is brought back online by disabling Repeat Gard it remains online if it passes testing during the boot process However if Repeat Gard is enabled the DIMM is taken offline again because of its histo...

Page 395: ...2 25 10 54 23 10 76 21 10 68 19 10 60 17 10 52 15 10 74 13 10 66 11 10 58 9 10 50 7 10 72 5 10 64 3 10 56 1 10 48 32 10 79 30 10 71 28 10 63 26 10 55 24 10 77 22 10 69 20 10 61 18 10 53 16 10 75 14 10...

Page 396: ...links in one second intervals on all secondary I O drawer operator panels All secondary I O types are 84 Nothing displays on the primary I O drawer operator panel After 20 30 seconds the Power Control...

Page 397: ...vice processor and system firmware menus and messages are displayed LANGUAGE SELECTION MENU 1 English 2 Francais 3 Deutsch 4 Italiano 5 Espanol 6 Svenska 98 Return to Previous Menu 99 Exit from Menus...

Page 398: ...election Menu see Serial Port Selection Menu on page 382 v Serial Port Speed Setup Menu see Serial Port Speed Setup Menu on page 382 v Telephone Number Setup Menu see Telephone Number Setup Menu on pa...

Page 399: ...pported on serial port 1 S1 and serial port 2 S2 Modem Configuration Menu Port 1 Modem Configuration File Name Port 2 Modem Configuration File Name To make changes First select the port and then the c...

Page 400: ...If ring indicate power on is already enabled and you try to enable call in a message prompts you for confirmation Refer to the message displayed on the screen Serial Port Speed Setup Menu This menu al...

Page 401: ...e system administration center computer catcher that receives problem calls from servers Contact your system administrator for the correct telephone number to enter here Until you have that number lea...

Page 402: ...st successful call out to one of the following numbers in the order listed 1 Service center 2 Customer administrative center 3 Pager If call out policy is set to all the service processor attempts a c...

Page 403: ...nt number enter it Otherwise leave this field unassigned v Customer RETAIN Login User ID and Customer RETAIN Login Password apply to a service function to which your service provider may or may not ha...

Page 404: ...ion User Interface Local async console Text based menus with NLS Operator Panel messages Power and Miscellaneous Power On Off Configurable Reboot Policy Status and Data Access VPD Error data SP Error...

Page 405: ...f such a condition occurs unattended start mode may not be able to restart system operation when a primary power interruption is restored v Timed power on refer to the shutdown t command on servers us...

Page 406: ...The operating system s automatic restart policy see operating system documentation indicates the operating system response to a system crash The service processor can be instructed to refer to that p...

Page 407: ...ervice Processor Enable supplemental restart policy System response False2 No No1 False2 No Yes Restarts False2 Yes1 No1 False2 Yes1 Yes True No No1 True No Yes Restarts True Yes1 No1 Restarts True Ye...

Page 408: ...abstraction services It is strongly recommended that you create a set of firmware update diskettes from the Web site as soon as possible after a system is installed As noted below the diskette images...

Page 409: ...ring the following command ls tmp fwupdate MM img The update file will have the format MMyymmdd img The MM indicates that this is an update image for a Model M80 or Model 6M1 system yy is the year mm...

Page 410: ...Insert update diskette n Notes 1 If the wrong diskette is inserted at any time or if the diskette is left in the drive after it has been read B1FD 001F is displayed indicating that the wrong diskette...

Page 411: ...ocessor to another processor and then stop the defective processor Service Processor System Monitoring Surveillance Surveillance is a function in which the service processor monitors the system and th...

Page 412: ...sor menus that are only available at bootup then surveillance is enabled by default as soon as the system boots From service aids the selection is optional Call Out Call Home The service processor can...

Page 413: ...describes the configuration for console mirroring v Service processor v Modem connected to one serial port and enabled for incoming calls v Local ASCII terminal connected to the other serial port Thi...

Page 414: ...log is coordinated universal time UTC which is also referred to as Greenwich mean time GMT The AIX error log has additional information and time stamps with local time Entering an error number provide...

Page 415: ...ess Indicator Log B0FF 0539 17 0538 17 0539 17 0538 17 0539 17 0581 0538 17 0539 12 0538 12 0539 0821 01 K1 00 0539 0728 01 R1 00 00 0539 0664 40 60 00 1 0 0539 0777 U0 2 P1 I14 E1 0539 0742 U0 2 P1 I...

Page 416: ...code areas v Service processor unattended start mode checks To assist fault recovery If unattended start mode is set the service processor automatically reboots the server The service processor does n...

Page 417: ...ssor checks to see if the previous boot attempt failed If the specified number of failures is detected the service processor displays an error code and places an outgoing call to notify an external pa...

Page 418: ...mands The service processor responds to any command issued by the system processor v Run time surveillance heartbeat monitoring If the device driver is installed and surveillance enabled the service p...

Page 419: ...will be lines of text in the form of repeated logos 3 After the banner screen is displayed the POST indicator words memory keyboard network scsi and speaker appear across the bottom of the screen Pres...

Page 420: ...stem Management Services menus After the password is set both the service processor and System Management Services automatically use the same password The password is limited to eight characters Remov...

Page 421: ...to as Greenwich Mean Time GMT The AIX error log has more information available and time stamps with your local time Remote Initial Program Load Setup This option allows you to enable and set up the re...

Page 422: ...46 162 2 Server IP Address 9 3 146 171 3 Gateway IP Address 0 0 0 0 4 Subnet Mask 255 255 255 0 X Exit To set an address using this menu do the following 1 Type the number of the selection 1 2 3 or 4...

Page 423: ...en ring 5 P1 I5 T1 0020357a9105 3 ethernet Integrated P1 E1 0060949d7ac5 4 ethernet 2 P1 I2 E1 0004ac5e692b 5 token ring 3 P1 I3 T1 0004ac634e38 X Exit PRESS ENTER AFTER MAKING A SELECTION Select an a...

Page 424: ...rated P1 E1 0060949d7ac5 4 ethernet 2 P1 I2 E1 0004ac5e692b 5 token ring 3 P1 I3 T1 0004ac634e38 X Exit PRESS ENTER AFTER MAKING A SELECTION After determining which adapter to use to ping the remote s...

Page 425: ...nger boots after setting this value access this utility again and increase the value It is also possible that adding disk drives can cause similar symptoms Changing this value changes the surge curren...

Page 426: ...mmand under AIX with the appropriate parameters See the bootlist command in your AIX documentation The AIX Documentation library is available at the following Web address http www 1 ibm com servers ai...

Page 427: ...re 3rd Boot Device 6 Configure 4th Boot Device 7 Configure 5th Boot Device X Exit Display Current Settings Lists the current order of devices in the boot list The following is an example of this scree...

Page 428: ...1 I4 E1 3 Token Ring loc P1 I5 T1 4 2 SCSI CD ROM loc P1 Z1 A1 5 3 SCSI 9100 MB Harddisk loc P1 Z1 A5 X Exit OK Prompt Provides access to the open firmware command prompt This option should only be us...

Page 429: ...n English your ASCII terminal must support the ISO 8859 character set OK Prompt This option provides access to the open firmware command prompt This option should only be used by service personnel to...

Page 430: ...412 Service Guide...

Page 431: ...ystem ensure that the power cables for those devices are unplugged before the signal cables are connected If possible disconnect all power cables from the existing system before you add a device Use o...

Page 432: ...tic bag until you are ready to install the device in the system unit v With the device still in its antistatic bag touch it to a metal frame of the system v Grasp cards and boards by the edges Hold dr...

Page 433: ...drawer power LED will start blinking at a slow rate v If a secondary I O drawer is present its power LED will go off 3 Disconnect the ac power cords dc power cords in a dc powered system from the dra...

Page 434: ...of the LEDs associated with the I O drawer PCI slots These LEDs are located at the rear of the I O drawer One LED is associated with each PCI slot 1 2 3 4 5 6 14 13 12 11 10 9 8 7 P1 LED PCI Slot LED...

Page 435: ...te B0FF displays in the primary operator panel display When the power off sequence is complete the system will go into Standby mode as evidenced by v OK displays in the primary operator panel display...

Page 436: ...lower the plastic stop over the adapter bracket Rotate the locking latch clockwise until it clicks into the locked position 10 Replace the system unit covers and return the drawer to the normal operat...

Page 437: ...s well This action prevents a service representative or user from causing an unexpected outage for system users For additional information about taking an adapter offline or removing it from the syste...

Page 438: ...lacing an adapter with an adapter that is not identical to the adapter removed go to Removing a Hot Pluggable PCI Adapter on page 419 and Installing a Hot Pluggable PCI Adapter on page 422 To replace...

Page 439: ...stop for the adapter 17 Carefully grasp the adapter by the edges and pull it straight out from the I O board 18 Replace the adapter in the adapter slot Carefully grasp the adapter by the edges and al...

Page 440: ...Drawer PCI Slot LED Definitions on page 416 9 When you are instructed to install the adapter in the adapter slot carefully grasp the adapter by the edges and align the adapter in the slot guides Inser...

Page 441: ...prevents a service representative or user from causing an unexpected outage for system users For additional information about taking an adapter offline or removing it from the system configuration see...

Page 442: ...selected prior to the actual operation The selected PCI slot will go into the Action state and finally into the On state Note The system will indicate the slot holds an Unknown device until you perfor...

Page 443: ...remove and replace functions return information to the user indicating whether the operation was successful If additional instructions are provided on the screen complete the recommended actions If th...

Page 444: ...e release latches of the memory card and carefully pull the card out of the slot 5 Locate the memory module connectors and determine which memory modules you want to remove Refer to Memory Riser Card...

Page 445: ...3 Insert the memory module firmly into the connector Chapter 10 Removal and Replacement Procedures 427...

Page 446: ...memory module with the locking tabs located at each end of the connector 5 Replace the memory card into the system unit 6 Push the CEC drawer back into the rack and replace the CEC card cage retaining...

Page 447: ...ystem on page 415 2 Remove the card cage retaining screws in the back of the CEC drawer 3 Grasp the handle located in the center rear of the CEC card cage and pull the CEC card cage out from the drawe...

Page 448: ...ex on page 159 or by a second level of support 1 Turn off power as described in Powering Off the System on page 415 2 Remove the card cage retaining screws in the back of the CEC drawer 3 Grasp the ha...

Page 449: ...spring screw raises slightly after the screw is removed Grasp the end of the processor latch bar where the spring screw was located and pull it straight up out of the card cage Rest the latch bar agai...

Page 450: ...des up and off of the contact surface Place the top of the new processor card on your work surface Carefully remove the array cover 1 from the bottom of the processor card Orient the array cover on th...

Page 451: ...gn the holes in the processor card with the guide pins on the CEC backplane and press down until the processor card is fully seated 4 Pivot the processor card latch down over the processor card 5 Inse...

Page 452: ...t bezel to the drawer 2 Grasp both sides of the front bezel and pull it off the CEC drawer 3 Remove the screws 1 connecting the front EMC shield to the CEC as shown in the following diagram 1 2 4 Remo...

Page 453: ...in reverse order Attention After hot plugging a CEC fan wait at least 5 minutes and then examine the system error logs to make sure CEC fan errors are not being logged Chapter 10 Removal and Replacem...

Page 454: ...wer supply you want to replace Do not remove both ac cords as power will be lost to the CEC forcing the system to power off 2 Remove the screw keeping the latch handle in place as shown in 1 above 3 A...

Page 455: ...to the rear of the CEC drawer 3 Disconnect all of the RIO cables attached to the rear of the CEC drawer 4 Remove the card cage retaining screws in the back of the CEC drawer 5 Grasp the handle locate...

Page 456: ...8 If you are removing the clock card remove the clock card cover 1 9 Grasp the clock card by its handle 2 and pull it straight out of the RIO bus adapter card 3 1 2 3 438 Service Guide...

Page 457: ...old CEC RIO bus adapter using the previous procedure and put it into the new CEC RIO bus adapter Do this by aligning the three pins on the CEC RIO bus adapter with the holes on the clock card Chapter...

Page 458: ...alid error code in Chapter 5 Error Code to FRU Index on page 159 or by instruction from your second level of support Removal 1 Turn off power as described in Powering Off the System on page 415 2 Remo...

Page 459: ...their locations 8 Disconnect the JTAG cable 9 Disconnect the V S COMM cable 10 Pull up on the release latches of the CEC RIO adapter card and carefully pull the card out of the slot 11 Pull up on the...

Page 460: ...rk surface These attached components will not support the weight of the CEC card cage without sustaining some damage 17 Reach in through the top of the card cage backplane assembly to remove the 6 cag...

Page 461: ...t disk drives if installed See Internal Disk Drives on page 453 6 Remove and label adapters See PCI Adapters on page 417 7 Remove two screws from each side of the assembly 8 Disconnect and label all c...

Page 462: ...3 or 4 e For the I O type type v 87 for the primary I O drawer v 84 for all secondary drawers 3 Check firmware level by checking the Version on the title of the Service Processor Main Menu If the firm...

Page 463: ...tem on page 415 2 Place the I O drawer in the rear service position as described in Rear Service Position on page 463 3 Remove the two thumbscrews and remove the rear cover Rear Cover 4 Disconnect all...

Page 464: ...ove the screw and remove the retainer bracket from the rear release latch 6 Pull up on the release latches and carefully pull the card out of the slot Replacement Replace in reverse order 446 Service...

Page 465: ...our I P cables from the I O tray 6 Remove two screws from each side of the I O drawer board assembly 7 Disconnect the miscellaneous power cable from PCI board connector J21 8 Slide the I O drawer boar...

Page 466: ...ach drawer can have up to two power supplies You can replace each power supply separately The removal and replacement procedures are the same for each power supply 2 The procedure described in this se...

Page 467: ...ply If only one fan in a fan assembly is bad the fan assembly must be replaced Power supply fan 5 is located in the primary power supply and if that fan fails the power supply must be replaced Power s...

Page 468: ...ont bezel and pull it off the drawer 4 Unplug the power cord from the power supply you are removing 5 Pull the snap button out on the power supply handle 6 Grasp the handle of the power supply and piv...

Page 469: ...Replacement Note The power supply handle must be in the down position for replacement Replace in the reverse order Chapter 10 Removal and Replacement Procedures 451...

Page 470: ...tinue with step 8 in I O Drawer Power Supplies and Power Supply Fan Assemblies on page 448 v If the LED on the front of the power supply is blinking go to the next step Test Switch 3 Use a pencil to p...

Page 471: ...thumbscrews and remove the back top cover 4 Remove the screw from the back of the disk drive carrier 5 Slide the carrier forward and remove The carrier has keyed slots 1 that engage mounting posts 2...

Page 472: ...ernal SCSI Cable Internal SCSI Cable Internal External SCSI Cable FC 3139 ID 8 jumper ID 4 jumper Alternate Internal Disk Drive Connections Term J5 DASD 1 DASD 2 External Bulkhead Connector Internal E...

Page 473: ...connectors and ID jumpers 3 When using the FC 3139 internal external cable one or more of the following external cables will also be required v FC 2118 v FC 2424 v FC 2425 For descriptions and part n...

Page 474: ...cribed in Front Service Position on page 464 3 Remove the two screws from the center top cover and remove the cover 4 Disconnect the cable from the fan controller card 5 Pull the snap button out 6 Rem...

Page 475: ...d is replaced as a unit C07 Removal 1 Turn off power as described in Powering Off the System on page 415 2 If you have not already done so open the front door of the rack unit 3 Loosen the two thumbsc...

Page 476: ...7 Remove the screws that connect the carrier to the CD ROM Replacement Replace in reverse order 458 Service Guide...

Page 477: ...ews that attach the front bezel to the I O drawer 4 Grasp both sides of the front bezel and pull it off the drawer 5 Push up on the release latch and pull the tape drive out Release Lever R 6 Disconne...

Page 478: ...e two thumbscrews that attach the front bezel to the I O drawer 4 Grasp both sides of the front bezel and pull it off the drawer 5 Pull out on the snap button and pull the diskette drive out Snap Bott...

Page 479: ...taining screws that attach the front bezel to the drawer 4 Grasp both sides of the front bezel and pull it off the drawer 5 Place the drawer in the front service position as described in Front Service...

Page 480: ...ove the VPD module from the old operator panel and insert it in the new operator panel Make sure you insert the module in the same position as it was in the old panel 1 2 1 VPD Module 2 Cable Connecto...

Page 481: ...he drawer 3 Grasp both sides of the front bezel and pull it off the drawer 4 If you have not already done so open the rear door of the rack unit 5 If present remove two screws securing the drawer to t...

Page 482: ...it 2 Loosen the two thumbscrews that attach the front bezel to the drawer 3 Grasp both sides of the front bezel and pull it off the drawer 4 Remove the screws that attach the left and right retaining...

Page 483: ...ed for your system Use of another battery may present a risk of fire or explosion The battery connector is polarized do not attempt to reverse polarity Dispose of the battery according to local regula...

Page 484: ...ushes out of the socket The spring mechanism behind the battery pushes it out Replacement Tilt the battery so that you can insert it into the battery socket Slide the battery into the battery socket t...

Page 485: ...Chapter 11 Parts Information This chapter contains parts information for the system 467...

Page 486: ...CEC Drawer Card Assembly 9 468 Service Guide...

Page 487: ...6930 24A5 Up to 2 2 way 500 MHz processor 04N6931 24A6 Up to 2 4 way 500 MHz processor 53P1089 25B4 Up to 2 2 way 750 MHz processor 53P1090 25B3 Up to 2 4 way 750 MHz processor 8 07L7729 Up to 32 32 M...

Page 488: ...CEC Drawer Backplane 5 2a 1 2 3 4 470 Service Guide...

Page 489: ...500MHz backplane stiffener assembly 2 04N3524 281D 1 750MHz backplane stiffener assembly 2a 53P5669 2 Backplane CPU standoff screw FRU kit assembly post standoff and screw 3 24L0972 1 CEC cage assembl...

Page 490: ...CEC Drawer Power Supplies 1 2 3 4 5 6 7 8 9 472 Service Guide...

Page 491: ...r EMC shield 3 1621811 4 EMC shield screw 4 90H9196 1 EMC tunnel 5 24L2643 2 EMC tunnel screw 6 90H9196 1 CEC handle rod 7 24L2643 1 CEC handle bracket 8 1621807 2 CEC handle screw 9 24L0728 44L0045 U...

Page 492: ...CEC Drawer Fan Assemblies 2 1 3 4 5 6 8 9 10 11 12 13 7 14 474 Service Guide...

Page 493: ...rness 5 1621811 4 Fan mounting screw 6 90H6284 1 Shoulder screw power harness 7 24L0883 1 Fan mounting assembly 8 44L0026 1 LED board assembly 9 1621811 4 Fan mounting screw 10 04N3345 2 Digital fan a...

Page 494: ...I O Drawer 1 2 3 4 5 6 7 8 9 10 11 16 17 18 19 20 12 14 13 13 15 21 22 23 24 26 25 27 476 Service Guide...

Page 495: ...1 Bezel dc systems 09P0751 1 Bezel OEM dc systems 13 11K0358 2 Trim ship bracket 14 03N3253 1 Bezel blank tape drive 59H4118 1 Bezel black tape drive 94H0136 1 Bezel tape drive 15 03N3253 1 Bezel blan...

Page 496: ...7 8 9 10 6 1 2 3 4 4 5 478 Service Guide...

Page 497: ...5691 1 CD ROM carrier 9 76H4091 1 Diskette drive 10 41L5688 1 Diskette drive carrier 00G1268 As required Screw M4 33G3907 As required Screw M3 Note See RS 6000 and Eserver pSeries Diagnostic Informati...

Page 498: ...Index Part Number Units Per Assy Description 1 97H7603 1 V S COMM power cable 2 97H7600 1 JTAG power cable 3 97H7472 1 Miscellaneous power cable 4 97H7471 1 Miscellaneous power cable 480 Service Guide...

Page 499: ...rd 5 V 5 V Fan 1 Fan 2 Fan 5 CD ROM DASD 2 DASD 1 Term Term Optional Media Diskette Diskette Base SPCN Base SPCN JTAG I P SCSI V S COMM B u l k h e a d Power Supply 2 or Cooling Unit Fan 3 Fan 4 Fan 6...

Page 500: ...1 Internal SCSI I O board to I P 8 41L5649 1 Operator Panel Cable I P to Op panel 9 42L5652 1 Fan Cont Card Cable PDB to FCC 10 41L5650 1 Base SPCN Cable I P to PDB 11 41L5522 1 Diskette Cable I P to...

Page 501: ...Panel Power Supply 1 3 3 V 3 3 V Ground Grd 5 V 5 V Fan 1 Fan 2 Fan 5 Term Optional Media Optional Media Base SPCN Base SPCN I P Power Supply 2 or Cooling Unit Fan 3 Fan 4 Fan 6 Fan 9 J4 J3 J2 J2 J1 M...

Page 502: ...41L5518 1 Base SPCN cable I O board to I P 4 03N3448 1 SCSI cable bulkhead to I P 5 41L5649 1 Operator panel cable I P to Op panel 6 41L5652 1 Fan cont card cable PDB to FCC 7 41L5650 1 Base SPCN cabl...

Page 503: ...7478 4 V S COMM cable standoff CEC and primary I O drawer 44H7478 8 RIO cable standoff CEC drawer 62X0388 20 Primary I O drawer parallel cable standoff debug cable standoff serial cable standoff SPCN...

Page 504: ...Zealand Argentina 1838574 9833 Line Cord Thailand and others 6952291 9834 Line Cord Uruguay Keyboards and Mouse Index FRU Part Number Units Per Assy Description 1 93H8120 1 Keyboard 101 United States...

Page 505: ...n ID 443 93H8144 1 Keyboard 102 Serbian ID 118 93H8145 1 Keyboard 102 Slovak ID 245 93H8146 1 Keyboard 102 Spanish ID 172 93H8147 1 Keyboard 102 Sweden Finland ID 153 93H8148 1 Keyboard 105 Swiss F G...

Page 506: ...458 1 Keyboard 102 French ID 189 07L9459 1 Keyboard 102 German ID 129 07L9460 1 Keyboard 102 Greek ID 319 07L9461 1 Keyboard 101 Hebrew ID 212 07L9462 1 Keyboard 102 Hungarian ID 208 07L9463 1 Keyboar...

Page 507: ...atvia ID 234 07L9479 1 Keyboard US English ISO9995 ID 103P 07L9480 1 Keyboard 106 Japan ID 194 07L9481 1 Keyboard 101 Chinese US ID 467 07L9482 1 Keyboard 103 Korea ID 413 07L9483 1 Keyboard 101 Thail...

Page 508: ...490 Service Guide...

Page 509: ...to applicable regulations IBM offers product return programs in several countries For country specific instructions refer to the following web site http www ibm com ibm environment products prp phtml...

Page 510: ...er of het servicehandboek voor informatie over de batterij De batterij moet correct worden gerecycled of weggegooid Mogelijk zijn er in uw regio geen K CA inzamelingspunten Meer informatie over het ve...

Page 511: ...manuale di assistenza per informazioni specifiche sulla batteria La batteria deve essere appropriatamente riciclata o smaltita Il servizio per il riciclaggio potrebbero non essere disponibile nella v...

Page 512: ...Detaljerad batteriinformation finns I anv ndar eller servicehandboken Batteriet m ste l mnas till tervinning eller kastas p ett milj s kert s tt Det kanske inte finns n gra tervinningsm jligheter d r...

Page 513: ...he IBM part number listed on the battery available prior to your call Environmental Design The environmental efforts that have gone into the design of this system signify IBM s commitment to improve t...

Page 514: ...ata are based on the following configuration the drawer is mounted in a 7014 Series Model T00 Rack a power distribution unit is installed in the rack and the system is operating in a normal environmen...

Page 515: ...typographical errors Changes are periodically made to the information herein these changes will be incorporated in new editions of the publication The manufacturer may make improvements and or changes...

Page 516: ...go to http www ibm com ibm environment products batteryrecycle shtml or contact your local waste disposal facility In the United States IBM has established a return process for reuse recycling or pro...

Page 517: ...ce See Service Processor Functions on page 386 7 Configure Call In Call Out See Call In Call Out Setup Menu on page 380 8 Exit the service processor menus 9 Unplug the power cord from the system 10 At...

Page 518: ...the login prompt If these tests are successful call in is working 7 Log in and type shutdown to shut down your server 8 The message No Carrier displays on your remote terminal Testing Call Out During...

Page 519: ...mit tty 5 Select add tty 6 Select RS232 7 Select Baud rate 9600 or higher 8 Select login enable and set the flow control to RTS 9 Commit the selections and set up any other needed serial ports 10 Exit...

Page 520: ...502 Service Guide...

Page 521: ...Blank spaces cannot be included in the string After CustomerInfo has been specified subsequent uses of the chcod command do not have to specify the c flag but you do have the option of changing it Cus...

Page 522: ...504 Service Guide...

Page 523: ...e the procedures beginning with Installing a System with Capacity Upgrade on Demand on page 353 to reinstall the Capacity Upgrade on Demand feature and reconfigure the hardware as appropriate Capacity...

Page 524: ...yy is the number of Capacity Upgrade on Demand enabled processors If yy is equal to 0 then Capacity Upgrade on Demand is not enabled If yy is greater than 0 then Capacity Upgrade on Demand is enabled...

Page 525: ...10 Shut down and reboot the system as follows shutdown Fr 11 Allow the system to do a normal boot Appendix E Verifying Capacity Upgrade on Demand Processors 507...

Page 526: ...508 Service Guide...

Page 527: ...firmware in the usr share modems subdirectory if your system or server is running AIX with the following names A listing of each specific file is included in this appendix Generic Modem Configuration...

Page 528: ...em command set include a test for V 42 error correction at the remote modem often called Auto Reliable Mode If Yes disable this test You can use sample configuration files usr share modem_m0 cfg or us...

Page 529: ...etries specified in the Call Out Policy Setup Menu These retries result in redundant pages Examples for Using the Generic Sample Modem Configuration Files The following table contains information to h...

Page 530: ...ds authorizations and telephone numbers from the service processor menus use the service aids to set them while you specify your customized modem configuration files To disable Auto Reliable Mode test...

Page 531: ...p CD and DSR Normal Functions 16 Up 2 Wire Leased Line Enabled Only switches 11 and 12 are changed from the factory default settings Xon Xoff Modems Some early modems assume software flow control Xon...

Page 532: ...ring successful communications and control For best formatting choose line wrap in your terminal emulator setup Recovery Procedures Situations such as line noises and power surges can sometimes cause...

Page 533: ...ter the System initialization complete message displays at the remote terminal If Yes the modem is set up correctly If No try another Dn setting for your server s modem See your modem manual for this...

Page 534: ...te terminal selected as the primary console to manifest the modem s response to DTR transitions v If a local ASCII terminal or a graphics console is to be a permanent part of your server then make one...

Page 535: ...O 10 CallDelay 120 N Call Out phone number R Return phone number PROGRAMMING NOTE No blanks between double quote marks condout send AT F E2E0T r Reset to factory defaults Reliable mode Echo off ignore...

Page 536: ...r Numberic response code Answer on 2nd ring expect 0 r timeout 2 Confirm commands successful done waitcall ignore 2 r timeout 1 Ignore first ring expect 2 r timeout 10 Pickup 2nd ring or timeout Expec...

Page 537: ...successful send ATV0S0 0 r Numeric response code Auto Answer OFF expect 0 r timeout 2 Confirm commands successful done error Handle unexpected modem responses expect 8 r or 7 r or 6 r or 4 r or 3 r d...

Page 538: ...eturn phone number PROGRAMMING NOTE No blanks between double quote marks condout send AT F E0E0 r Reset to factory defaults E0 data compression disabled E0 echo disabled ignore 0 r or OK r n timeout 2...

Page 539: ...e send ATD N R r N pager call center number commas 6sec wait time to enter paging number R return number expect 0 r or 3 r timeout 30 Confirm successful command delay 2 Wait before hanging up send Ass...

Page 540: ...Q1 Turn off responses V0 Use numeric responses S0 0 Automatic answer inhibit Escape to command mode S0 2 Answer on second ring H0 Hang up T Tone mode When used as T r it is a no op to maintain progra...

Page 541: ...er ON expect 0 r timeout 2 Confirm command successful done waitcall ignore 2 r timeout 1 Ignore first ring expect 2 r timeout 10 Pick up second ring or timeout Expect a connection response expect 16 r...

Page 542: ...error Handle unexpected modem responses expect 8 r or 7 r or 6 r or 4 r or 3 r delay 2 done 524 Service Guide...

Page 543: ...c responses S0 0 Automatic answer inhibit Escape to command mode S0 2 Answer on second ring H0 Hang up X0 0 Limit modem response codes T Tone mode When used as T r it is a no op to maintain program sy...

Page 544: ...send ATS0 2 r Set AutoAnswer ON expect 0 r timeout 2 Confirm command successful done waitcall ignore 2 r timeout 1 Ignore first ring expect 2 r timeout 10 Pick up second ring or timeout Expect a conn...

Page 545: ...done RI Power On enabled error Handle unexpected modem responses expect 8 r or 7 r or 6 r or 4 r or 3 r delay 2 done Appendix F Modem Configurations 527...

Page 546: ...responses E0 Turn echo off Q1 Turn off responses V0 Use numeric responses S0 0 Automatic answer inhibit Escape to command mode S0 2 Answer on second ring H0 Hang up X0 0 Limit modem response codes T T...

Page 547: ...onse send ATE0T r Initialize modem Echo OFF expect 0 r or OK r n timeout 2 Enable responses Numeric send ATQ0V0X0T r Limit response codes expect 0 r timeout 2 Confirm commands successful send ATS0 2 r...

Page 548: ...xtended commands and to factory default choices Fn but doesn t work properly with this setup file setup F1 is recommended Trademark of Hayes Microcomputer Products Inc C COPYRIGHT International Busine...

Page 549: ...0 r or 5 r or 1 r busy 7 r timeout 60 done retry send A Repeat the previous command Expect a connection response expect 16 r or 15 r or 14 r or 12 r or 10 r or 5 r or 1 r busy 7 r timeout 60 done disc...

Page 550: ...cessful send AT C1 D2 R1 r Detect carrier and DTR Ignore RTS expect 0 r timeout 2 Confirm command successful done RI Power On enabled error Handle unexpected modem responses expect 8 r or 7 r or 6 r o...

Page 551: ...uote marks condout send AT F1Q0T r Reset modem Select profile 1 ignore 0 r or OK r n timeout 2 Ignore modem response send ATE0T r Initialize modem Echo OFF expect 0 r or OK r n timeout 2 Enable respon...

Page 552: ...16 r or 15 r or 14 r or 12 r or 10 r or 5 r or 1 r timeout 60 done page send ATDT N R r N pager call center number Add enough commas to wait for time to enter paging number R paging number Confirm suc...

Page 553: ...ese procedures Front Drawer Stop Installation Install a drawer stop 2 part number 11K0358 on each side at the front of the rack to prevent the drawer from sliding out the front Use six screws 1 part n...

Page 554: ...rail The model S00 type rack does not have enough room on the left side of the rack for a cable guide Install a guide only on the right rails Rails for a T00 Type Rack Use one screw part number 00G126...

Page 555: ...e I O drawer and secure them with the RIO cable retainer 3 part number 11K0584 Use two screws 2 part number 00G1268 To hold the cables use the cable hanging brackets 1 part number 11K1013 as needed Ro...

Page 556: ...bracket 3 part number 11K0249 and fasten the bracket to the back of the CEC drawer Fasteners 1 push in to lock and pull out to unlock Route the cables over the cable guides and secure the cables with...

Page 557: ...the cables over the cable guides 2 and secure the cables with Velcro strips 1 part number 07H6855 or 51H9502 Leave a loop large enough so that the drawer can be pulled out the back 1 2 Appendix G Rack...

Page 558: ...540 Service Guide...

Page 559: ...regulator card 429 RIO Bus Adapter 437 CEC backplane 440 CEC fans 434 CEC power supplies 436 CEC regulator card 429 CEC RIO Bus adapter 437 chcod command 503 checkpoints 135 boot problems 155 descrip...

Page 560: ...0 CEC drawer rear 11 location code reference tables 31 logical 28 memory DIMM 19 memory riser card 19 PCI board 17 physical 28 31 primary I O drawer bay 16 primary I O drawer front 13 primary I O draw...

Page 561: ...primary I O drawer cable diagram 56 primary I O drawer operator panel locations 20 privileged user menus 361 problem determination generated error codes 347 problem determination MAP 67 78 processor c...

Page 562: ...oop setup menu 367 serial port speed setup menu 382 service processor reboot restart recovery 387 setup 499 setup checklist 499 setup menu 364 system information menu 372 system power control menu 368...

Page 563: ...in this book is Very Satisfied Satisfied Neutral Dissatisfied Very Dissatisfied Accurate h h h h h Complete h h h h h Easy to find h h h h h Easy to understand h h h h h Well organized h h h h h Appli...

Page 564: ...S 905 6C006 11501 Burnet Road Austin TX 78758 3493 _ _ _ _ _ _ _ _ _ _ _ _ _ _ _ _ _ _ _ _ _ _ _ _ _ _ _ _ _ _ _ _ _ _ _ _ _ _ _ _ _ _ _ _ _ _ _ _ _ _ _ _ _ _ _ _ _ _ _ _ _ _ _ _ _ _ _ _ _ _ _ _ _ _ _...

Page 565: ......

Page 566: ...Printed in USA September 2001 SA38 0571 01...

Page 567: ...Spine information RS 6000 Enterprise Server Model M80 Eserver pSeries 660 Model 6M1 Service Guide SA38 0571 01...

Reviews: