background image


The product has been designed for indoor use only. 

    So do not use it outdoors.    


Before use of the product, be sure to become famililar with this manual. 

    Keep the manual in a convenient place for quick and easy reference. 


This manual contains the product warranty card.  


The product exterior, design, color, and parts are subject to change 

    without prior notice.


ICI-050V/VF/VH/VHF

The Story of Cold ICE

Summary of Contents for ICI-050V

Page 1: ... product be sure to become famililar with this manual Keep the manual in a convenient place for quick and easy reference This manual contains the product warranty card The product exterior design color and parts are subject to change without prior notice ICI 050V VF VH VHF The Story of Cold ICE ...

Page 2: ...Inspection Items Safety Warning Before Calling Service Safety Cautions Specifications Part List Product Warranty Part name Cautions for Installation Installing the Product Correct Operation Cleaning Method Cleaning and Disassembling Sanitizing Procedure Ice Making and Detachment Operations Maintenance ...

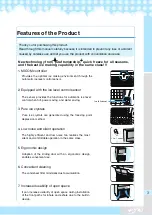
Page 3: ...he highly efficient and low noise fan realizes the most silent and comfortable operation in the same class 5 Ergonomic design Adoption of the sliding door with an ergonomic design enables convenient use Thank you for purchasing this product Read through this manual carefully because it is intended to prevent any loss or accident caused by careless use and let you use the product with convenience a...

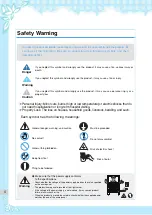
Page 4: ...shocks that do not need hospitalization or long term hospital visiting Property Loss The loss on houses household goods livestock bedding and such Each symbol has the following meanings General danger warning and caution No contact General thing forbidden Keep from fire Thing to be followed Must be grounded Do not disassemble Risk of electric shock Risk of burn Warning Make sure that the power sup...

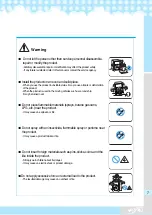
Page 5: ...ord If you pulling out the power cord it may cause damage to the cord electric shock or fire Hold the body of the plug when removing the power plug Do not insert or touch the power plug with wet hands It may cause an electric shock Check whether any foreign material is covered on the power plug and insert it fully into the outlet When the pin or contact on the power plug has dust or water or bad c...

Page 6: ...ace it but contact the service agency for it Do not pull off the power plug nor move the product while operation It may cause a failure or fire It may cause a leak of water Handling for abnormal cases When earthquake or fire occurs or strange sound or smell is detected stop operation right away and pull off the power plug from the outlet Do not use the product in a humid or damp place Do not move ...

Page 7: ...duct is used in the moving vehicles such as car and ship it may be turned over Do not place flammable materials sprays butane gas cans LPG etc near the product It may cause an explosion or fire Do not spray with an insecticide flammable spray or perfume near the product It may cause a product failure or fire Do not insert foreign materials such as pins sticks coins and the like inside the product ...

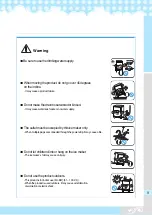
Page 8: ...rk after the operation stops more times in a month 5 to 38 41 100 4 14 22 71 12 psig and the water temperature is within 5 to 32 41 89 6 pipeline It may cause an electric shock or injury When dust is accumulated in the condenser filter ventilation is not made So it may cause low product performance excess electric charge and product failure In case of 5 41 or below it may cause winter snowing In c...

Page 9: ...use a fire Do not let children climb or hang on the ice maker The ice maker s fall may cause an injury Do not use the product outdoors This product is for indoor use 5 to 38 41 100 4 When the product is used outdoors it may cause a deformation discoloration or electric shock Warning Be sure to use the drinking water supply When moving the product do not go over 45 degrees on the incline It may cau...

Page 10: ...duct to another person transfer the user manual also When the product is not used for a long time e g long term outing stop water supply remove ices from the ice maker and pull off the power plug Do not use the product near the fireplace It may cause a fire Install the product in a sanitary place Because you can eat the ice install the product in a sanitary and clean place Caution ...

Page 11: ...ration switch If you frequently pressed the operation switch it may cause a product failure When water leak happens pull off the power plug close the water supply valve and contact the purchased site or customer center If you pull off the power plug with wet hands it may cause an electric shock Use the product in two or more hours after installation It takes the time to stabilize the refrigerant i...

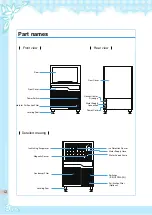
Page 12: ...r Drainage Power Cord Water Supply Connection Door Front Cover Power Switch Hole for Purification Filter Leveling Foot Ice Making Evaporator Ice Detection Sensor Water Supply Hose Water Supply Pump Switches ICE OFF WASH Purification Filter Optional Magnetic Sensor Condenser Filter Leveling Foot ...

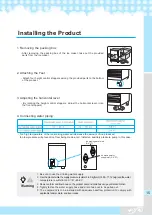
Page 13: ... to 38 Install the product in a place that has good ventilation Bad ventilation causes a bad ice making performance Install the product in an even and flat place Unstable installation causes vibration noise ice non forming and low performance Recommended incline within 1 degree Install the product in a sanitary place Because you can eat the ice install the product in a sanitary and clean place Be ...

Page 14: ...tious for preventing children s accidents Especially keep children from playing with ice in the ice manufacturer thedrainhose mustbesloppy Provided parts Drain Hose 1 EA Ice Scoop 1 EA Leveling Foot 4 EA Water Supply Connection Fitting User Manual 1 EA Clamp Drain Hose 1 EA The provided parts are in the box of the ice maker Check the amount of spare parts The water supply hose PE hose Ø9 52 must b...

Page 15: ...kgf cm2 14 22 71 12 psig and the water temperature is within 5 to 32 41 89 6 3 Dews can form and flow down on the product door and drain hose so pay attention to that 4 Tightly fasten the water supply hose and drain hose not to be pulled out 5 The equipment is to be installed with adequate backflow protection to comply with applicable federal state and local codes Installing the Product 4 Connecti...

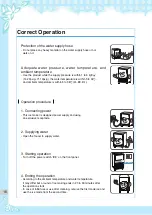
Page 16: ...9 6 1 Connecting power This ice maker is designed power supply and using an exclusive receptacle 2 Supplying water Open the faucet to supply water 3 Starting operation Turn off the power switch ICE on the front panel The Story of Cold ICE 4 Ending the operation According to the ambient temperature and water temperature it may differ but a round of ice making ends in 20 to 30 minutes after the oper...

Page 17: ... the product Do not use the soap powder benzene thinner muriatic acid petroleum boiling water and touch brush because they can cause erosion or damage to the product When using the detergent Wipe the product after soaking the soft cloth with lukewarm water or neutral detergent When using the neutral detergent be sure to wipe the product with a clean wet towel again Danger Warning Pull off the powe...

Page 18: ...ry hot So when any partof your body contacts with it it may cause a burn When the machine is cooled down enough after turning off the power start cleaning 6 Rotate three bolts on the bottom counter clockwise clockwise to release them pull out the drain hose from the drain hole and remove the water tank Remove the ice sensor from the distributor Remove scale from the nozzle hole of the distributor ...

Page 19: ...onth The Story of Cold ICE The Story of Cold ICE Clean the condenser one time every three months Caution Be careful while cleaning because the pins are very sharp Cleaning the condenser Cleaning the condenser filter 1 Release screws 2 EA at the bottom on the front panel 2 Separate the front panel by pulling it down 3 Use a vacuum cleaner or hand cleaner to remove dust from the condenser 4 After co...

Page 20: ...rinse them with drinking water dispose the first made ice and use ice made from the second time 13 For container sterilization be sure to perform it one or more times every month 6 After diluting the cleaner in water clean the ice box connection hose ice dipper Water pump Wire and water tank with the mixed solution 7 After completion insert the removed ice into the box 8 Clean the ice making part ...

Page 21: ...7 The ice damper assembly and ice scoop which can be disassembled should be removed and sanitizier with 0 264gal 1ℓ of sanitizier diluted in 5 4gal 20ℓ of water 4 To start the first Sanitizing Procedure set the main switch to WASH position The pump motor will repeat 5 cycles of running for about 90 seconds and being stopped for 30 seconds 9 When the first Sanitizing Procedure has been completed re...

Page 22: ...cute washing process 18 Remove the packing down from the inner vessel sheet downwards remove the water inside the packing down and insert it back into the vessel sheet 19 When the Sanitizing Procedure and washing processes have been completed open the water supply valve and operate the ice maker ICE position Dispose of the first ice and use the ice from the second icing cycle 14 Proceed with the t...

Page 23: ...product as mentioned in this manual If you cannot understand the installation procedure and satety instructions contact the service agency To use the product for a long time maintain the product according to the following procedure every month 2 Checking the ice maker Be sure to turn off the power first For preventing water leak check all connection parts and pipelines Be careful not to have vibra...

Page 24: ...by factory default When ice is too thick rotate the control counter clockwise for adjusting the thickness If you want to make the ice thicker rotate the control screw clockwise To make it thinner rotate the control screw counter clockwise If you rotate the control screw one round as shown in the right figure the sensor moves in the arrow direction and the ice thickness is adjusted by 0 7mm 0 03in ...

Page 25: ...Set the toggle switch to ICE 3 Check the power and use the dedicated outlet 4 Remove ice 5 Let the damper freely rotate for vertical movement 6 The ambient temperature must be 5 or above 7 Adjust the plotter level 8 Perform cleaning and sterilization 1 Open the water supply valve 2 Make correction after checking 3 Wait for water supply from the agency 1 Remove foreign materials in the water supply...

Page 26: ...20 Height 862 FOOT included Power Single Phase 230 V 50 Hz 220 V 60 Hz Package Before Weight Kg 50 After 52 Freezing capability Compressor kcal h 230 V 50 Hz 910 220 V 60 Hz 1000 Refrigerant GAS R 134a Condenser Air cooling Pin tube type Shape of Ice Dice Half dice Rated Power W 230 V 50 Hz 500 220 V 60 Hz 450 Temperature Control MICOM Time Control MICOM Operation Temperature 5 to 38 Specification...

Page 27: ...27 Part list REFRIGERATION COMPARTMENT ...

Page 28: ...R CASE ASS Y VESSEL SHEET SENSOR ICE ASS Y WATER DISTRIBUTOR ASS Y ASS Y EVAPORATOR HAND SCREW MAGNET MAGNET BIN SWITCH HOUSING WATER PUMP OUT HOSE PACKING DOWN SENSOR MAGNET HAND SCREW ICE DAMPER ASS Y PUMP MOTOR ASS Y ASS Y FLOATER ASS Y ...

Page 29: ...29 Part list DOOR FRAME ASSEMBLY DOOR FRAME GUIDE LEFT DOOR FRAME FRONT PANEL SWITCH 3L BIN DOOR ASS Y DOOR FRAME GUIDE RIGHT BRACKET AIR FILTER GUIDE AIR FILTER ...

Page 30: ...list OUT CASE ASSEMBLY OUT CASE TOP OUT CASE R OUT CASE L INNER FRONT OUT CASE SIDE COVER L INNER BASE BACK PANEL FOOT OUT CASE SIDE COVER R BASE PLATE BRACKET AIR FILTER BRACKET INNER BASE DRAIN HOSE ASSEMBLY ...

Page 31: ... caused by a natural disaster thunderbolt fire earthquake storm flood tsunami etc 9 When an expandable has been expired packing cutter knife cleaning brush etc 10 A failure caused by inserting foreign materials water beverage coffee toys etc into the product 11 A product damage or failure caused by external shock during installation and use 12 A failure caused by using the parts or expandables man...

Page 32: ...Online Internet Service http www icetro com 3240377 00 ...

Reviews: