background image

1

Installers &

User guide

Deadbolt 2S

Metal Grey.

Version 0.1     05/19

Summary of Contents for Deadbolt 2S Metal Grey

Page 1: ...1 Installers User guide Deadbolt 2S Metal Grey Version 0 1 05 19 ...

Page 2: ... Please refer to ourwebsite igloohome co support for the latestversion of the manual Welcome This guide will get you up and running with your igloohome Deadbolt 2S Metal Grey In the meantime you should follow igloohome on Facebook and Youtube Visit ourYoutube Like us on Facebook ...

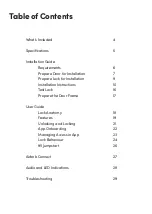
Page 3: ...tion 7 Prepare Lock for Installation 9 Installation Instructions 10 Test Lock 16 Prepare the Door Frame 17 User Guide Lock Anatomy 18 Features 19 Unlocking and Locking 21 App Onboarding 22 Managing Access in App 23 Lock Behaviour 24 9V Jumpstart 26 Airbnb Connect 27 Audio and LED Indications 28 Troubleshooting 29 ...

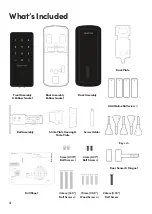
Page 4: ...Wood Screw x4 8mm 0 03 Bolt Screw x2 20mm 0 78 Bolt Screw Door Sensor Magnet Edge of the door Face of the door Fold this line 60mm 2 3 8 backset 70mm 2 3 4 backset Centerline 10mm Optional 54mm Door Thickness Drillfor Drillfor 35mm 1 3 8 Drillfor 45mm 1 3 4 Drillfor 60mm 2 3 8 Drillfor 70mm 2 3 4 backset 60mm 2 3 8 backset Drillfor Drillfor Drill a25mm 1 hole atthe center of door edge based onyour...

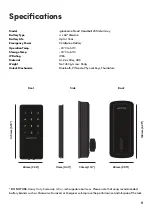
Page 5: ... Rating IP65 Material AI Zinc Alloy ABS Weight Net 450g Gross 550g Unlock Mechanism Bluetooth PIN code Physical Keys Thumbturn Front Back Side 145mm 5 70 60mm 2 36 11mm 0 43 30mm 1 18 65mm 2 55 160mm 6 29 DO NOT USE Heavy Duty Eveready GP or rechargeable batteries Please note that using recommended battery brands such as Panasonic Duracell or Energizer will improve the performance and lifespan of ...

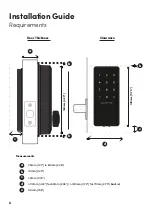
Page 6: ...n Guide 145mm 5 70 160mm 6 29 Requirements Measurements 35mm 1 37 to 60mm 2 36 10mm 0 39 20mm 0 78 110mm 4 33 for 60mm 2 36 120mm 4 72 for 70mm 2 75 backset 50mm 1 96 a b c d e a b b b c e d Clearance DoorThickness ...

Page 7: ...sure if your door is suitable send us web links to your door pictures to info igloohome co PrepareDoorforInstallation Itemsneeded Recommended Door and door frame material Wood Recommended Gap between door and door frame 3mm 0 01 Drill DrillSheet 10mm 0 39 DrillBit 54mm 2 12 HoleSaw 25mm 0 98 SpadeBit 2PhillipsScrewDriver 20mm 0 78 Chisel Hammer ...

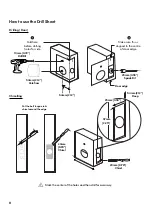
Page 8: ...or Make sure this is aligned to the centre of door edge Door edge Fold here before drilling holes for side Chiselling Put the bolt tongue in chisel around the edge 54mm 2 12 HoleSaw 10mm 0 39 DrillBit 54mm 2 12 54mm 2 12 Deep 57mm 2 25 25mm 0 98 25mm 0 98 SpadeBit 20mm 0 78 Chisel 20mm 0 78 Chisel ...

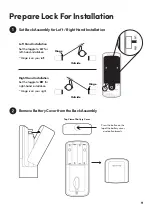
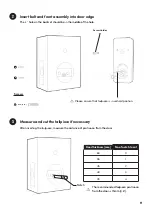
Page 9: ... Assembly Press the button on the top of the battery cover and pull outwards Set the toggle to RH for right hand installation Right Hand Installation Set the toggle to LH for left hand installation Hinge is on your left Hinge is on your right Left Hand Installation Top View of Battery Cover Hinge Outside Outside Hinge ...

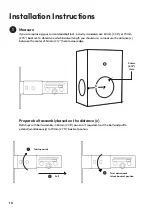
Page 10: ...t length you should use so measure the distance x between the center of 54mm 2 12 hole to door edge Prepare bolt assembly based on the distance x Bolt ships with bolt assembly in 60mm 2 36 position If required twist the bolt and pull to extend simultaneously to 70mm 2 75 backset position Twist upwards Pull Twist downwards to lock backset position X 54mm 2 12 Hole ...

Page 11: ...crews 15mm 0 59 Measure and cut the tailpiece if necessary After inserting the tailpiece measure the distance of protrusion from the door c c Please ensure that tailpiece is in vertical position Door thickness mm No of notch to cut 60 0 55 1 45 2 40 3 35 4 Notch The recommended tailpiece protrusion from the door is 15mm 0 6 ...

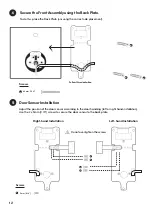
Page 12: ...installation Use the 2 x 5mm 0 19 screws to secure the door sensor to the back plate Screws 5mm 0 19 Right hand Installation Left hand Installation e d e e e e Secure the FrontAssembly using the Back Plate To do this place the Back Plate ensuring the correct side placement Follow this orientation d d d 5 Do not overtighten the screws ...

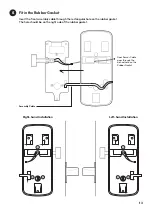
Page 13: ... Fit in the Rubber Gasket Insert the front assembly cable through the rectangular hole on the rubber gasket The hole should be on the right side of the rubber gasket Assembly Cable Door Sensor Cable goes through the arched hole on the Rubber Gasket 6 ...

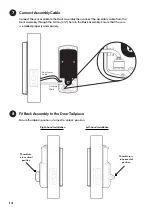
Page 14: ... 54mm 2 12 hole to the Back Assembly Ensure that the wire is installed properly and securely Fit Back Assembly to the DoorTailpiece Ensure thumbturn position is turned to unlock position Thumbturn is in vertical position Thumbturn is in horizontal position Door Sensor Cable Assembly Cable 7 8 Right hand Installation Left hand Installation ...

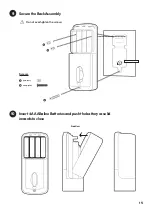
Page 15: ...15 Insert4AAAlkalineBatteriesandpushthebatterycaselid inwardstoclose SecuretheBackAssembly Screws 8mm 0 31 20mm 0 78 9 Do not overtighten the screws SideView 10 ...

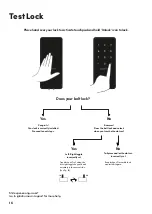
Page 16: ...installed Proceed to next steps Bummer Does the bolt lock and unlock when you turn the thumbturn Yes Left Right toggle incorrectly set RH LH No Tailpiece and or thumbturn incorrectly set Troubleshoot Try Setting the left right toggle on your back assembly to the correct side See Pg 10 Troubleshoot Dissemble lock and install it again Go to igloohome co support for more help ...

Page 17: ...tongue locks then drill a corresponding hole on door frame Chisel to fit the strike plate in as well Mark Drill Hole Secure strike plate housing and strike plate using 2x 25mm 0 98 wood screws Paste the magnet opposite the door sensor 1mm 0 0039 25mm 0 98 SpadeBit 20mm 0 78 Chisel 26mm 1 02 58mm 2 28 4 Door Sensor Magnet Door Sensor ...

Page 18: ... Back Assembly Touch Screen Keypad Unlock Key hole Cover Remove cover to access physical key unlock 9V Jumpstart Clear Thumbturn Multi Function Button Battery Cover Release Battery Cover User Guide Lock Anatomy ...

Page 19: ... 2 contact points on the Deadbolt 2S for 2 seconds Manual Locking Hold the Unlock button for 1 second to manually lock the Deadbolt 2S Lock Battery Bluetooth Master Key The igloohome Deadbolt 2S unlocks with Bluetooth via the app Master PIN Code The igloohome Deadbolt 2S unlocks with a permanent Master PIN Code User PIN Code The igloohome mobile app can generate multiple types of User Pin codes e ...

Page 20: ... keypad is being tampered User can configure number of incorrect attempts to trigger lockout Keypad Disabled Mode Masking Security Code Disable the keypad to prevent PIN code entry from outside via the Multi Function Button Enter up to 8 digits before your PIN Code to reduce risk of intruders checking fingerprints Security Alarms TamperAlarm Passage Mode The lock will sound if intruders try to pry...

Page 21: ... Basic Unlock Bluetooth Guest Key igloohome App igloohome App Thumbturn Use thumbturn at the back of lock PIN Code Physical Key Thumbturn Auto Re Lock Works only with the Re lock Sensor Physical Key Use the physical key to lock the door Unlock Key Press and hold Unlock Thumbturn Use thumbturn at the back of lock Locking Deadbolt Home Logs Settings Access Basic Warehouse Julia Deadbolt Home Android...

Page 22: ...t and login Register as a Lock User 2 Pairing 3 4 Setting Master PIN code a Select Add new igloohome lock Note For existing users with other paired locks go to Configuration select Add Locks and follow the instructions Before proceeding turn on your Bluetooth and ensure that you are within Bluetooth range of the lock Go to Access and customize your Master PIN by editing it ...

Page 23: ...Bluetooth There are 3 steps to using a Shared Bluetooth Key 1 Under Access create Access and choose Bluetooth Key under Access Type Proceed to share the key after it is created 2 Guest receives the Bluetooth Key by one of these methods Clicking the URL given and follow the instructions Claiming Bluetooth Key under Configuration 3 Guest can now use the Bluetooth Key under the Guest Bluetooth Key Se...

Page 24: ...th Unlock can be used to unlock in this mode 1stTime 2ndTime 3rd and ConsecutiveTime 30 Sec 60 Sec 90 Sec 1 Min 5 Min 10 Min Triggered SecurityAlarm Keypad Lockout 5 consecutive PIN Code attempts bydefault Configurablevia Bluetooth Keypad Security Lockout After1 5 10 Minutes or Anyotherunlocking methods Single flash when keypad is triggered Please refer to table below Triggered by Disable By Behav...

Page 25: ...ode enables you to have easy access during high human traffic flow by deactivating auto relock Method 1 Turn off auto relock under lock settings via Bluetooth Method 2 Holding on to the Multi Function Button 2 3 Holding ontothe Multi Function Button until a long beep is heard Keypad Disabled Mode Passage Mode Holding ontothe Multi Function Button until 2 quick beeps are heard or Anyotherunlocking ...

Page 26: ...ou will hear a series of beeps and the keypad will light up 2 While holding the 9V battery to the jumpstart key in your PIN code on the keypad followed by the Unlock icon 9V 9V 9V Please ensure terminals of the 9V battery are in contact with the Jump Start contact points of the lock for 2 seconds to activate your Deadbolt 2S ...

Page 27: ...isting to view or edit its details Notes If the access mail has not been sent changing your check in check out time via the app modifies the start and end time of the PIN codes to be shared with your guest If the access mail has been sent changing these details will only affect the next reservation Changing these details on the igloohome app does not update the check in check out time on the listi...

Page 28: ...outAlarm Keypad Security LockoutDeactivated LowBatteryAlert TamperAlarm Hard Reset Unpair Unlock iconflashes Blue 4fastascendingtones afterunlocked 1 long beep afterDeadbolt2S is locked 4 shortbeeps 3 sets of4 shortbeeps 6 sets of4 shortbeeps Verylong beep 2 shortbeeps Low high sirenfor30 60 90 seconds 2 long beeps 3fastdescendingtones when keypad iswoken up Keep long beep 4 slowdescendingtones Ac...

Page 29: ...se a 9V Battery to jump start the lock but was unable to The deadbolt is locking when it is supposed to unlock or unlock when it is supposed to lock Do a Bluetooth Unlock or sync and try again Make sure that the generated PIN codes are activated within the activation period before it expires I have generated my PINs from the app but it doesn t work Check if the Relock Sensor is installed correctly...

Page 30: ...30 For enquiries go to igloohome co support ...

Reviews: