


1
2
3
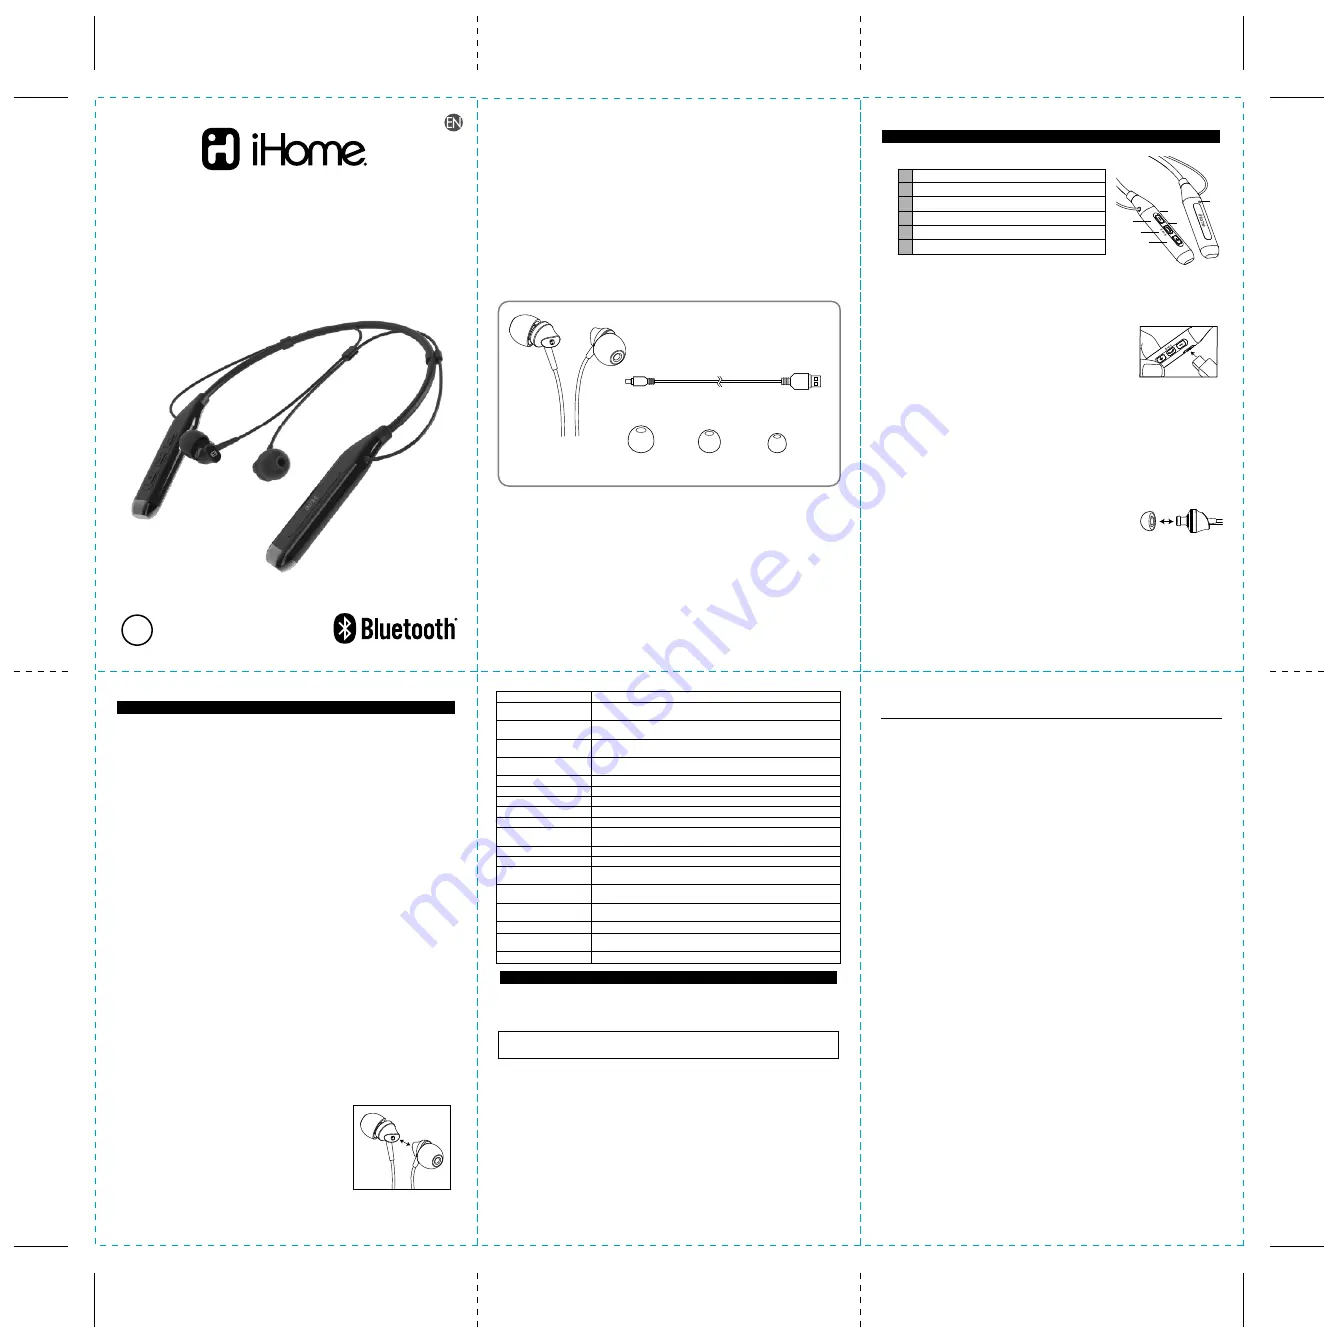
iB82 Stereo ear buds
with control dongle
USB Charging Cable
x 1
Silicon Ear Cushions
L
x 2
SIZE
M
x 2
SIZE
S
x 2
SIZE
What’s Included
Model: iB82
IB English/French (Front)
Color: 1C + 1C - Black text on white paper
Size: 270 W x 270 H (mm)
Date: Mar. 23, 2017
Limited One-Year Warranty Information
iHome Products, a division of SDI Technologies Inc. (hereafter referred to as SDI), warrants
this product to be free from defects in workmanship and materials, under normal use and
conditions, for a period of one (1) year from the date of original purchase.
Should this product fail to function in a satisfactory manner, it is best to first return it to the
store where it was originally purchased. Should this fail to resolve the matter and service
still be required by reason of any defect or malfunction during the warranty period, SDI will
repair or, at its discretion, replace this product without charge. This decision is subject to
verification of the defect or malfunction upon delivery of this product to the Factory Service
Center authorized by Customer Service.
If service is required, please call Customer Service at 1-800-288-2792 to obtain a Return
Authorization Number and shipping instructions. A copy of the sales receipt is required to
validate in-warranty coverage.
Disclaimer of Warranty
NOTE: This warranty is valid only if the product is used for the purpose for which it was
designed. It does not cover (i) products which have been damaged by negligence or willful
actions, misuse or accident, or which have been modified or repaired by unauthorized
persons; (ii) cracked or broken cabinets, or units damaged by excessive heat; (iii) damage
to digital media players, CD’s or tape cassettes (if applicable); (iv) the cost of shipping this
product to the Factory Service Center and its return to the owner.
This warranty is valid only in the United States of America and does not extend to owners
of the product other than to the original purchaser. In no event will SDI or any of its affiliates,
contractors, resellers, their officers, directors, shareholders, members or agents be liable
to you or any third party for any consequential or incidental damages, any lost profits, actual,
exemplary or punitive damages. (Some states do not allow limitations on implied warranties
or exclusion of consequential damages, so these restrictions may not apply to you.) This
warranty gives you specific legal rights, and you may also have other rights which vary from
state to state.
Your acknowledgement and agreement to fully and completely abide by the above mentioned
disclaimer of warranty is contractually binding to you upon your transfer of currency (money
order, cashier's check, or credit card) for purchase of your SDI product.
© 2017 SDI Technologies, Inc. All rights reserved.
Questions? Visit www.ihome.com
or call 1-800-288-2792 Toll Free
Bluetooth is a registered trademark of Bluetooth SIG Inc.
Bluetooth technology is incorporated under license from Bluetooth SIG Inc.
Siri is a trademark of Apple, Inc., registered in the U.S. and other countries.
Google Now is a trademark of Google, Inc.
iB82-032317-A (EN)
Printed in China
Introduction
Your new iHome Bluetooth stereo ear buds are designed to link with your Bluetooth
enabled smartphone or music player to allow you to wirelessly listen to music and answer
phone calls within the normal 10 meter (33 feet) Bluetooth operating range.
Your ear buds are supplied with 3 sizes of ear cushions to allow you to customize your
ear buds for maximum wearing comfort and stability during all kinds of exercise and
physical activities. We have also installed magnets in each of the ear buds to keep the
buds together around your neck when you have removed them from your ears.
Please review this manual carefully to make sure you are getting the maximum benefit
from all of the features of your new ear buds, and keep this manual for future reference.
Wireless Noise Isolating Earbuds
with Neckband Control
User Manual
PREPARATION FOR USE
1. Controls and Indicators
6
4
iB82
• Warning: Changes or modifications to this unit not expressly approved by the party responsible for
compliance could void the user’s authority to operate the equipment.
• NOTE: This equipment has been tested and found to comply with the limits for a Class B digital
device, pursuant to Part 15 of the FCC Rules.
These limits are designed to provide reasonable protection against harmful interference in a residential
installation. This equipment generates, uses and can radiate radio frequency energy and, if not installed
and used in accordance with the instructions, may cause harmful interference to radio communications.
However, there is no guarantee that interference will not occur in a particular installation. If this
equipment does cause harmful interference to radio or television reception, which can be determined
by turning the equipment off and on, the user is encouraged to try to correct the interference by one or
more of the following measures:
• Reorient or relocate the receiving antenna.
• Increase the separation between the equipment and receiver.
• Connect the equipment into an outlet on a circuit different from that to which the receiver is connected.
• Consult the dealer or an experienced radio/TV technician for help.
CAN ICES-3 (B)/NMB-3(B)
The device meets the exemption from the routine evaluation limits in section 2.5 of RSS 102 and
compliance with RSS-102 RF exposure, users can obtain Canadian information on RF exposure and
compliance.
This device complies with Part 15 of the FCC Rules, operation is subject to the following two conditions:
(1) This device may not cause harmful interference, and (2) this device must accept any interference
received, including interference that may cause undesired operation.
FCC ID: EMOIB82
IC: 986B-IB82
FCC/IC Information
This device complies with Industry Canada’s licence-exempt RSSs.
Operation is subject to the following two conditions:
(1) This device may not cause interference; and
(2) This device must accept any interference, including interference that may cause undesired operation
of the device.
CHARGE
BEFORE
USE
BC
1
2
3
4
5
6
– Button (Volume Down / Skip Back)
Multi-Function Control Button (MFB)
+ Button (Volume Up / Skip Forward)
Power/Pairing/Charging LED Indicators
Microphone (on back side of dongle)
USB Charging Port
3
1
2
2. Charging Your iHome Ear Buds
Your iHome Bluetooth ear buds operate on a built-in rechargeable battery. Although
the battery was fully charged when it left our factory, the battery can lose power even
during periods of non-use. Make sure to charge the battery before using the phone
for the first time.
To charge the battery connect the larger plug of the included
USB charging cable to the powered USB port of a computer or
a USB/AC adapter and then connect the smaller plug to the
USB charging port on side of the control dongle as shown in
the illustration.
The Charging Indicator will glow red while the ear buds are charging. The indicator will
turn off when the ear buds are fully charged and ready to use.
When fully charged the battery should provide up to 5 hours of talk time or music
playing time at a normal listening level. If operated at maximum volume the music
playing time will be reduced.
NOTE
: While charging, the earbud power will turn off to
conserve battery power and minimize charging time.
3. Wearing Your iHome Ear Buds
The ‘M’ size silicon tips were installed on the ear buds at our factory.
If you wish to change to either the ‘S’ or ‘L’ size tips simply pull the ‘M’ size tips off
the ear buds and replace them with the ‘S’ or ‘L’ size tips. Be
sure to push the ‘S’ or ‘L’ size tips on to the ear buds until they
are firmly seated on the tubes so that the tips do not come off
the ear buds when you remove them from your ears. Using the
proper size tips will insure that you get the best possible seal in
your ear canal and provide the best audio quality.
The recommended usage is to position the cable behind your neck before inserting
the ear buds in your ears. The ear buds should be worn with the control dongle on
your right side.
Note: Noise isolation ear buds like the iB82 are designed to provide a good seal in
your ears and block outside sounds. You should not use noise isolation ear buds in
situations that require you to hear outside warning sounds.
OPERATING INSTRUCTIONS
1. Power On / Auto Pairing/Auto-Linking Mode
The first time you power on your ear buds, they will enter pairing mode and attempt to
connect to your Bluetooth device. After that, the ear buds will attempt to auto-link to
the last paired Bluetooth device when powered on.
Auto Pairing/First Time Power ON: Make sure that Bluetooth mode on your device is
on. (refer to your device’s instructions if necessary). PRESS and HOLD the
Multi-Function Button (MFB) on the control dongle for about 2 seconds until you hear
the “Power On” voice prompt confirming the power is ‘On’. The red and blue LEDs will
flash and a voice pormpt will announce “Pairing”. Select “iHome iB82” on your device
to complete pairing.
NOTE: If your Bluetooth device asks for a Password or a PIN to complete the pairing
process, enter “0000” on the keypad of your device.
You will hear the voice prompt say “Your device is connected”, “iHome iB82
Connected” will appear on your device’s Bluetooth menu and the LED indicator will
slowly flash blue when you are successfully paired.
You are now ready to begin streaming music wirelessly from your Bluetooth device to
your iHome iB82 Bluetooth ear buds.
Auto Linking: If a device is already paired to your earbuds when powered on, the blue
LED on the unit begins flashing slowly, indicating that your ear buds are in the
Auto-Linking Mode and trying to re-link to a previously paired device as long as that
device is within the normal pairing range of approximately 33-feet. If your ear buds do
not find a previously paired device that is in range and turned ‘on’ within 3 minutes they
will switch from the Auto-Linking mode to the Power ‘Off’ mode to extend the battery
life.
2. Power Off
To shut the power ‘Off’ at any time PRESS and HOLD the Multi-Function Button (MFB)
on the control dongle for about 6 seconds. You will hear the voice prompt say “Power
Off”. The red LED flashes three times and then the power shuts off.
4. Connect Ear Buds
The ear buds connect to each other with built-in magnets
in each of the ear buds to keep the buds together around
your neck when you have removed them from your ears.
Function
Turn Ear Buds 'On'
Enter the Pairing Mode
Pairing
Play / Pause
Skip to next track
Skip to beginning of current track
Skip to beginning of previous track
Increase volume
Decrease volume
Answer an incoming phone call
Decline an incoming phone call
End a call
Call waiting/switch between calls
Transfer a call between the
phone and the ear buds
Last number redial
Clear all paired devices
Turn Ear Buds Off
Siri/Google Now function
Action Required
5. Using Your iHome Bluetooth Ear Buds
The following chart explains the basic functions and operations of your Bluetooth ear buds.
3. Manually Pairing Your iHome Ear Buds With Your Bluetooth Device
NOTE: Your ear buds must be ‘Off’’ to begin the manual pairing process.
With the ear buds in the ‘Off’ mode,
PRESS and HOLD
the Multi-Function Button
(MFB) on the control dongle for about 7 seconds. After 2 seconds you will hear the
“Power On” voice prompt, and after another 5 seconds you will hear the “Pairing”
voice prompt and the LED indicator begins alternately flashing blue and red. Release
the Multi-Function Button (MFB). “iHome iB82” will
appear on your device’s Bluetooth menu.
Touch “iHome iB82” to complete the pairing process.
When Ear Buds are 'Off Press and Hold the MFB for 3 seconds until you hear the
“Power On” voice prompt. The LED indicator flashes blue.
When Ear Buds are 'Off' Press and Hold the MFB for 7 seconds until you hear the
“Pairing” voice prompt and see the LED indicator alternately flashing red and blue.
Make sure your Bluetooth device is 'On' and in the Pairing Mode. When iHome iB82
appears on your device’s menu, select it to complete pairing.
Short press the MFB to start playback. Short press to pause playback. Short press
to resume playback.
Short press the "+" button during playback
Short press the " - " button during playback
Short press the " - " button twice during playback
Press and hold the "+" button during playback
Press and hold the " - " button during playback
Short press the MFB when you hear the incoming ring sound. NOTE: Music will
automatically pause when you are answering a call and resume when you end the call.
Press and hold the MFB for 2 seconds to decline the incoming call.
Short press the MFB to end the call and 'hang up'.
Double short press the MFB to place current call on hold and answer new call, repeat
to switch between calls
NOTE
: Call waiting function varies by carrier
Transfer a call between the phone and the ear buds. While the call is in progress press and
hold the MFB for 2 seconds to transfer the call between the phone and the ear buds.
When phone is paired with ear buds but no call is in progress double press the MFB
to redial the last number.
Press and hold both the “+” and the “ – “ buttons for 7 seconds.
Press and hold the MFB for 5 seconds until you hear the “Power Off” voice prompt.
The LED indicator flashes red and then shuts off.
Press and hold the MFB button for 2-3 seconds
5


