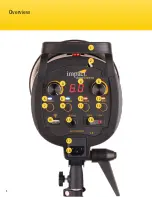
background image

Astral Extreme AS-X-400 Monolight 

INSTRUCTIONS

Summary of Contents for Astral Extreme AS-X-400

Page 1: ...Astral Extreme AS X 400 Monolight INSTRUCTIONS ...

Page 2: ...io Confirmation 14 Triggering the Flash 15 1 4 Phono 15 Wireless Optical Slave 15 Wireless Remote Control 16 Mounting Accessories 16 The Accessory Mount 16 The Umbrella Mount 17 Adjusting the Center of Gravity 18 Replacing Parts 19 Replacing the Flashtube 19 Replacing the Fuse 20 Specifications 21 One Year Limited Warranty 22 Table of Contents ...

Page 3: ...for fashion and event shooting but also for high speed photography The Astral Extreme is fast enough to capture almost any movement at its peak whether it s a bullet bursting through an apple or it s a skateboarder launching out of a half pipe Because high speed flash photography can often mean high temperatures the Astral Extreme uses a fan cooling system heat sinks and speed dedicated internal c...

Page 4: ...ge Use only the correct recommended voltage Make sure the unit is powered off when plugging it into a power source Always remove the power cord by holding the plug do not pull the cord Disconnect the power cord from the power supply when not in use Always power off and disconnect the flash from the power supply before changing the modeling lamp or flashtube Do not stare directly at the lights when...

Page 5: ...he unit with care Clean the unit with a soft dry cloth Keep this unit away from children Make sure the item is intact and that there are no missing parts All photos are for illustrative purposes only Precautions ...

Page 6: ...5 Overview 2 3 4 5 6 7 8 9 10 11 12 13 14 15 16 17 18 1 ...

Page 7: ...ut control dial 6 Modeling lamp indicator light 7 Modeling lamp button 8 Sound indicator light 9 Sound button 10 Slave indicator light 11 Slave mode button 12 Flash ready indicator light 13 Flash test button 14 Wireless remote port 15 1 4 phono socket 16 Power Switch 17 Fuse bay 18 AC power socket Legend Overview ...

Page 8: ...7 Overview 1 2 7 3 4 5 6 8 11 12 13 10 9 ...

Page 9: ...mount front 7 Optical Slave sensor 8 Mounting bracket positioning rails 9 Mounting bracket 10 Hex screw 11 Ratchet handle 12 Locking knob 13 Mounting socket 14 Transport cover 15 7 grid reflector 16 AC power cord 17 PC sync to 1 4 phono cord 18 Spare fuse installed in fuse bay 19 User manual Legend Also included 14 15 16 17 18 ...

Page 10: ...t handle Make sure to keep one hand on the monolight to hold it steady to avoid damaging the light Setting Up After mounting the Astral Extreme on your lightstand you will need to install the modeling lamp and the reflector IMPORTANT Do not touch the modeling lamp or flashtube with your bare hands Oil residue from your fingers can cause the surface of the flashtube to heat unevenly and explode Alw...

Page 11: ...lling the accessory release latch and rotating the transport cover counterclockwise 3 Remove the protective glass dome by carefully pulling it from the clips holding it in place 4 Screw the included modeling lamp into the threaded socket 5 Reinstall the protective glass dome by snapping it in place over the two bulbs Getting Started 2 3 4 1 2 3 ...

Page 12: ...lla mount located next to the accessory release latch 2 Insert the reflector into the accessory mount and rotate the reflector clockwise until it locks into place To plug in the Astral Extreme follow these steps 1 Make sure the power switch is set to the Off position 2 Plug the AC power cord into the monolight s AC power socket and then into an AC power outlet The Astral Extreme runs on the standa...

Page 13: ...e 16 To fire a test flash press the flash test button C When the flash has recycled and is ready for another flash the flash ready indicator light will glow red D The Astral Extreme s autodump feature automatically empties the capacitor to the required power setting when you lower the flash output There is a built in memory function that saves the settings on the control panel after 3 seconds The ...

Page 14: ...the modeling lamp is on the modeling lamp indicator light B will glow blue Use the modeling lamp output control dial C to steplessly adjust power output If the modeling lamp is on when you fire the flash the modeling lamp will dim and then return to its set power output level after the flash has fully recycled Note The modeling lamp will automatically turn off after 2 hours to avoid overheating Mo...

Page 15: ...flash ready indicator light which indicates the status of the flash The audio confirmation will also cause the monolight to emit a beep when you press any of the buttons or rotate the flash output control dial To turn on audio confirmation press the sound button A The sound indicator light B will glow blue when audio confirmation is turned on Audio Confirmation B A ...

Page 16: ... a wireless optical slave feature allowing you to fire the monolight remotely There are two slave modes on the Astral Extreme Instant Fire and Skip Preflash Instant Fire slave mode fires the monolight as soon as it sees a flash Skip Preflash mode ignores the preflash from the master and fires only with the main flash To set the slave mode press the slave button A repeatedly until the slave indicat...

Page 17: ...ping tools like softboxes beauty dishes and snoots as well as the included 7 reflector with an umbrella hole IMPORTANT To avoid potential damage do not leave the modeling lamp turned on for an extended period of time when using a heat sensitive accessory To mount an accessory follow these steps 1 Align your accessory s mounting pegs with the corresponding notches on the monolight s accessory mount...

Page 18: ...ing up to a 7 parabolic umbrella To mount an umbrella in the Astral Extreme insert your umbrella shaft into the umbrella mount at the front of the monolight Depending on the desired position of your umbrella and the length of its shaft the shaft may emerge from the umbrella mount at the rear of the monolight Mounting Accessories ...

Page 19: ...s causing it to tilt forward or backward To adjust the monolight s center of gravity follow these steps 1 Turn off and unplug the Astral Extreme and remove any mounted accessories 2 Use a 3 mm hex wrench to loosen the hex screw in the mounting bracket 3 Slide the mounting bracket forward or backward along its positioning rails to the desired position 4 Tighten the hex screw until secure Adjusting ...

Page 20: ...from your fingers can cause the surface of the lamp to heat unevenly and explode 1 Manually empty the capacitor by pressing the test button to fire the flash Immediately turn off the monolight by pressing the power switch to the Off position 2 Unplug the AC power cable from the monolight s AC power socket 3 Remove the reflector glass dome and modeling lamp 4 Carefully loosen the metal wire wrapped...

Page 21: ...ng the Fuse The Astral Extreme s user replaceable fuse protects the flash unit s circuitry The fuse and included spare are located in a bay mounted above the AC plug A To replace the fuse follow these steps 1 Turn off the Astral Extreme by pressing the power switch to the Off position 2 Unplug the AC power cable from the monolight s AC power socket 3 Use a flat head screwdriver or needle nose plie...

Page 22: ...nc terminal Dimensions Weight Specifications 400 W s 0 4 sec at full power 1 5000 to 1 8000 sec 6 stop range 6 0 to 1 0 in 0 1 stop increments ISO 100 213 65 m 5600 K 100 K 150 W E27 base user replaceable 110 V AC 60 Hz Test button sync cord optical slave wireless remote port 8A fuse Bowens S type 8 mm 1 4 phono 16 1 5 5 5 5 41 14 14 cm without reflector 7 15 lb 3 24 kg with flashtube modeling lam...

Page 23: ...llation or maintenance EXCEPT AS PROVIDED HEREIN THE WARRANTY PROVIDER MAKES NEITHER ANY EXPRESS WARRANTIES NOR ANY IMPLIED WARRANTIES INCLUDING BUT NOT LIMITED TO ANY IMPLIED WARRANTY OF MERCHANTABILITY OR FITNESS FOR A PARTICULAR PURPOSE This warranty provides you with specific legal rights and you may also have additional rights that vary from state to state To obtain warranty coverage contact ...

Page 24: ...GG1 ...

Reviews: