background image

Instructions for

Installation and Use

Electric built under

double oven

Contents

Introduction, 2

Safety Information, 3-4

Features, 5

Controls, 6

The electronic programmer, 7

Grill Pan and Handle, 8

Operation when using the Top Oven for Grilling, 9

Using the Top Oven as a Convection Oven,10

Operation when using the Top Oven as a
Convection Oven, 11

Using the Main Oven for Fan Cooking, 12

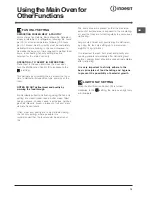
Using the Main Oven for Other Functions, 13

Temperature Conversion Chart, 14

Oven Temperature Chart - Meat, 15

Oven Temperature Charts - Baking, 16

Cooking Results Not Satisfactory, 17

Care and Cleaning, 18-20

Installation, 21-22

If Something Goes Wrong?, 23

If it Still Won't Work/ Disposal of the appliance, 24

Guarantee Information, 25

Service Information, 26

You must read these instructions prior to using
your appliance and retain them for future use.

English, 2

GB

GB

GB

GB

GB

FIU20IX/1

FIU20WH/1

FIU20BK/1

FIMU 23 IX

FIMU 23 (BK)

FIMU 23 (WH)

GB

Summary of Contents for BIMU 23 IX S

Page 1: ...n Oven for Fan Cooking 12 Using the Main Oven for Other Functions 13 Temperature Conversion Chart 14 Oven Temperature Chart Meat 15 Oven Temperature Charts Baking 16 Cooking Results Not Satisfactory 17 Care and Cleaning 18 20 Installation 21 22 If Something Goes Wrong 23 If it Still Won t Work Disposal of the appliance 24 Guarantee Information 25 Service Information 26 You must read these instruct...

Page 2: ...cident or been modified or repaired by any person other than the authorised employee or agent d Has been correctly installed This appliance conforms with the following This appliance conforms with the following This appliance conforms with the following This appliance conforms with the following This appliance conforms with the following European Economic Community directives European Economic Com...

Page 3: ...appliance Cleaning and user maintenance shall not be made by children without supervision During use the appliance becomes hot Care should be taken to avoid touching heating elements inside the oven WARNING Accessible parts may become hot during use Young children should be kept away Do not use harsh abrasive cleaners or sharp metal scrapers to clean the oven door glass since they can scratch the ...

Page 4: ...mes and extinguish the fire 3 LEAVE THE PAN TO COOL FOR AT LEAST 60 MINUTES BEFORE MOVING IT Injuries are often caused by picking up a hot pan and rushing outside with it NEVER USE A FIRE EXTINGUISHER TO PUT OUT A PAN FIRE as the force of the extinguisher is likely to tip the pan over Never use water to extinguish oil or fat fires Never Never leave children unsupervised where a cooking appliance i...

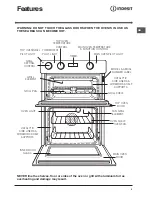
Page 5: ...OT TIMER GRILL PAN TOP OVEN DOOR OVEN LIGHT OVEN SHELF MODEL SERIAL NUMBER LABEL GRILL SETTING CONTROL GRILL ELEMENT FAN GRILL ELEMENT CATALYTIC SIDE LINERS WIREWORK SHELF SUPPORTS OVEN FAN CATALYTIC SIDE LINERS WIREWORK SHELF SUPPORTS INNER DOOR GLASS MAIN OVEN DOOR GRILL SHELF MAIN OVEN TEMPERATURE FUNCTION CONTROL MAIN OVEN PILOT LIGHT THERMOSTAT PILOT LIGHT TOP OVEN GRILL PILOT LIGHT TOP OVEN ...

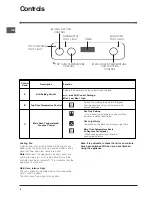
Page 6: ...Light Only When cooking select the required cooking temperature Cooling Fan A gentle flow of air will be blown below the control panel when the grill control is used and after a short period of time when the ovens are used Note Whenever the appliance has been used the cooling fan may run on or restart itself after all the controls have been turned off This indicates that the appliance is still war...

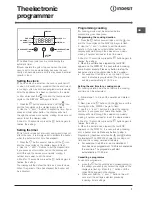
Page 7: ...button several times until the icon and the three digits on the DISPLAY begin to flash 2 Use the and buttons to set the desired duration if you press and hold either button the display will scroll through the values more quickly making it quicker and easier to set the value 3 Wait for 10 seconds or press the button again to finalise the setting 4 When the set time has elapsed the text END appears ...

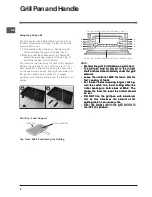
Page 8: ... control at MAX for toast and for Leave the control at MAX for toast and for fast cooking of foods fast cooking of foods fast cooking of foods fast cooking of foods fast cooking of foods For thicker foods requiring longer cooking For thicker foods requiring longer cooking For thicker foods requiring longer cooking For thicker foods requiring longer cooking For thicker foods requiring longer cookin...

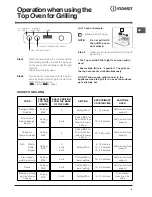
Page 9: ...and food support Fish Whole Fillets Fingers Setting MAX 3 4 or 5 4 or 5 Setting MAX 8 12 minutes 10 15 minutes 10 20 minutes Grill pan and food support Pre cooked potato products Setting MAX 4 or 5 Setting MAX or lower setting 15 20 minutes Grill pan and food support Pizzas Setting MAX 3 or 4 Setting MAX or lower setting 10 20 minutes Grill pan and food support Browning of food eg Cauliflower Chee...

Page 10: ...e from the grill pan when the pan is being used for oven cooking Always use oven gloves when basting turning or removing food from the oven Note Charts are a guide only to suit personal taste and requirements it may be necessary to increase or decrease temperatures by 10 C It may also be necessary to increase or decrease cooking times SHELF POSITIONING DO NOT PLACE FOOD UTENSILS DIRECTLY ON THE OV...

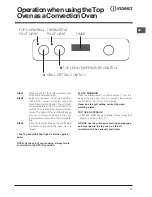
Page 11: ...lement ensuring the oven door is closed The Top oven Grill Pilot Light is lit when grill is used NOTE At the end of your cooking always return control B to the OFF O position THERMOSTAT PILOT LIGHT A GRILL SETTING CONTROL B TOP OVEN TEMPERATURE CONTROL TIMER TOP OVEN GRILL PILOT LIGHT PLATE WARMING Place the plates dishes on shelf position 1 from the base of the top oven and turn top oven temperat...

Page 12: ... Trays larger than 325mm x 250mm 13 x10 TEMPERATURE TIME When two shelves are in use to cook large quantities of food it may be necessary to increase the cooking times given in the temperature charts by a few minutes to allow for the loss of heat due to extra time taken to load the oven and the larger mass of food Baking trays should have an even gap around the oven MAIN FAN OVEN OPERATION Step 1 ...

Page 13: ... only setting are cream cream cakes butter cream filled cakes gateaux cheese cakes iced cakes quiches pastries biscuits bread croissants fruit and many delicate frozen foods If fish meat and poultry are to be defrosted using the fan only setting where possible it is recommended that the food should be small and thin The items should be placed so that the maximum amount of surface area is exposed t...

Page 14: ...gives details of comparisons of oven settings for gas conventional ovens and fan oven in degrees F and C 6 7 7 7 250 120 100 1 275 140 120 2 300 150 130 3 325 160 140 4 350 180 160 5 375 190 170 6 400 200 180 7 425 220 200 8 450 230 210 9 475 240 220 ...

Page 15: ...1lb 1 Veal Slow Roasting Yes 170 180 40 45 mins per 450g 1lb 40 mins over 1 Veal Foil Covered Yes 190 200 40 45 mins per 450g 1lb 1 Poultry Game Slow Roasting Yes 170 180 25 30 mins per 450g 1lb 25 mins over 1 Poultry Game Foil Covered Yes 190 200 25 30 mins per 450g 1lb 1 Casserole Cooking Yes 150 2 2 hrs 1 8 Rare 60 C Medium 70 C Well Done 75 C 90 C 80 C 90 C COOKING MEAT POULTRY IN THE TOP OVEN...

Page 16: ...p Oven Convection Cooking Food Pre heat Temperature C Time in mins Position from Base of Oven Scones Yes 210 220 10 15 mins 3 Small Cakes Yes 180 190 20 25 mins 3 Victoria Sandwich Yes 170 180 20 30 mins 3 Sponge Sandwich Fatless Yes 180 190 20 25 mins 3 Swiss Roll Yes 200 210 10 15 mins 3 Semi rich Fruit cakes Yes 150 160 7 inch 60 75 mins 2 Rich Fruit Cakes Yes 140 150 Depending on size 2 Shortc...

Page 17: ... or processor not to over cream soft margarine Over undercooking Refer to the cooking times and temperatures given in the Oven Temperature Charts provided however it may be necessary to increase or decrease temperatures by 10 C to suit personal taste Do not use utensils greater than 56mm 2l4 in height for roasting CookingResultsNot Satisfactory TOP OVEN BAKING Uneven cooking front to back Ensure t...

Page 18: ...cooking However if higher cooking temperatures are not used regularly it may be necessary in order to prevent heavy soiling to run the ovens without shelves or meat pan at a maximum setting for a couple of hours It should not normally be necessary to clean the panels with water If the user feels it is desirable to do so wipe them over with a clean soapy cloth followed by a wipe with a clean damp c...

Page 19: ...ity supply to the appliance is switched off and the appliance is fully cold before removing the lamp lens Open the oven door and remove the oven shelves Using a thick cloth grip the lamp lens unscrew anticlockwise and remove the lens Carefully unscrew the bulb anti clockwise Fit replacement bulb 25W 300 C SES and refit lens 5 HOW TO CLEAN THE LAMP LENS MAIN OVEN LAMP Warning To avoid electric shoc...

Page 20: ...ner glass when removing and refitting DROP DOWN DOORS Remove the door inner glass as follows 1 Open the door fully and unscrew the two screws securing the glass panel so that the securing brackets can be turned There is no need to remove the screws completely 2 Turn the brackets so that the glass can be removed and cleaned at the sink Fig 1 3 The inside of the outer door glass can now be cleaned w...

Page 21: ...inth heater Note Due to many different types of installation a mains cable is not supplied with this product The installer will fit the correct type and length of cable GENERAL The appliance is designed to be mounted on a floor between two adjacent cabinets The cabinets must be securely fixed to the wall and the cooker securely fixed to the cabinets This cooker must not be used free standing Note ...

Page 22: ...890mm Max 870mm Min 597mm min 720mm min 150mm min 170mm max 570mm to top of plinth 570 min 570mm A minimum distance of 25mm should be maintained between the front face of the cabinet side and the front face of the plinth ...

Page 23: ...under the following conditions may cause a safety device to operate a Grilling with the door closed always grill with the door open to the correct position see grilling b Grilling for an excessively long period at maximum setting see grilling guide c Grilling with inadequate ventilation in the cabinet see installation instructions r ll kee r o o88 When the Grill control A is operating at less than...

Page 24: ...Do not use them for any other purpose as you may create a safety hazard IfitStillWon tWork Disposal of your product To minimise the risk of injury to children please dispose of your product carefully and safely Remove all doors and lids Remove the mains cable where fitted by cutting off flush with the appliance and always ensure that no plug is left in a condition where it could be connected to th...

Page 25: ...or as a result of improper installation Replacement of any consumable item or accessory These included but not limited to plugs cables batteries light bulbs fluorescent tubes and starters covers and filters Replacement of any removable parts made of glass or plastic THIS GUARANTEE WILL NOT APPLY IF THE APPLIANCE HAS BEEN USED IN COMMERCIAL OR NON DOMESTIC PREMISES 5 Year Parts Guarantee Indesit al...

Page 26: ...ughout its life UK 08448 225 225 Republic of Ireland 0818 313 413 www indesitservice co uk Appliance Registration We want to give you additional benefits of Indesit ownership To activate your free 5 year parts guarantee you must register your appliance with us UK 08448 24 24 24 Republic of Ireland 01 230 0800 www indesitservice co uk Indesit Company UK Ltd Morley Way Peterborough PE2 9JB Indesit C...

Page 27: ...GB 27 ...

Page 28: ...GB 28 02 2011 195069915 02 XEROX FABRIANO ...

Reviews: