


IT
FORNO
FI 53 KC.B
FI 53 KC.B IX
FI 53 K.B
FI 53 K.B IX
FIE 53 K.B IX TD
FI 53 K.A
FI 53 K.A IX
FI 53 KC.A
FI 53 KC.A IX
Sommario
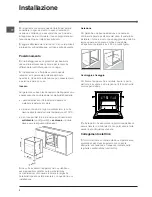
Installazione, 2-3
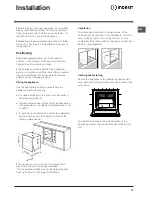
Posizionamento
Collegamento elettrico
Targhetta caratteristiche
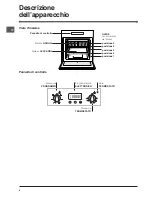
Descrizione dell’apparecchio, 4
Vista d’insieme
Pannello di controllo
Avvio e utilizzo, 5
Avviare il forno
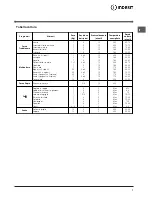
Programmi, 6-7
Programmi di cottura
Consigli pratici di cottura
Tabella cottura
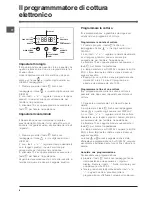
Il programmmatore di cottura elettronico,
8
Precauzioni e consigli, 9
Sicurezza generale
Smaltimento
Risparmiare e rispettare l’ambiente
Manutenzione e cura, 10
Escludere la corrente elettrica
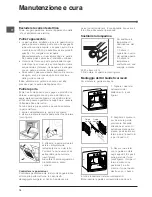
Pulire l’apparecchio
Pulire la porta
Sostituire la lampadina
Montaggio del Kit Guide Scorrevoli
Assistenza, 11
Assistenza attiva 7 giorni su 7
Italiano, 1
Français, 22
Espanol, 32
Portuges, 42
English,12
GB
IT
FR
ES
PT
Istruzioni per l’uso
Deutsch, 62
DE
Nederlands, 52
NL
Polski, 73
PL
Summary of Contents for FI 53 K.A IX/BK UK
Page 73: ...PIEKARNIK PL PL IT E S P T D E N L ...
Page 76: ...76 PL ...
Page 77: ...77 PL ...
Page 78: ...78 PL ...
Page 80: ...80 PL ...
Page 81: ...81 PL ...
Page 82: ...82 PL A B C Prowadnica lewa Prowadnica prawa Kierunek w yciągania ...
Page 83: ...83 PL D ...


