background image

TABLE OF CONTENTS

·

1

·

1.SAFETY PRECAUTIONS
2.IMPORTANT SAFETY INSTRUCTIONS
3.FEATURES
4.DEFINITION OF TERMS 
5.NAME OF PARTS

MAIN UNIT

REMOTE CONTROL

6.CONNECTIONS
7.PREPARATIONS BEFORE OPERATION

USING REMOTE CONTROL

PLAYABLE DISCS 

8.BASIC OPERATIONS 

BEFORE OPERATION

LOADING DISC

TFT PICTURE ADJUSTMENT

PLAYING DISC

PAUSE 

OSD 

DVD MENU PLAY

SELECT WITH NUMBER BUTTONS

9.FUNCTION SETTING 

MENU SETTING

10.PLAY DISCS IN VARIOUS WAYS 

AUDIO MODE

FAST PLAY 

SLOW PLAY

REPEAT PLAY

SELECT SUBTITLES

SELECT ANGLES

TIME SEARCH

BOOKMARK

ZOOM PLAY

PROGRAM PLAY

SHUFFLE OR RANDOM PLAY

DIGEST PLAY

11.MP3 OPERATION
12.OTHERS

ACCESSORIES

PRECAUTIONS FOR DISC 

TROUBLESHOOTING

TECHNICAL SPECIFICATIONS

13.USING THE BATTERY PACK

2
4
6
6
7
7
8
9

11
11

12
13
13
13
14
15
15
15
18
18
19

19-24

25
25
26
26
27
28
28
29
30
30
31
32
32
33
34
34
34
34
35
36

Summary of Contents for IDM-1731

Page 1: ... PAUSE OSD DVD MENU PLAY SELECT WITH NUMBER BUTTONS 9 FUNCTION SETTING MENU SETTING 10 PLAY DISCS IN VARIOUS WAYS AUDIO MODE FAST PLAY SLOW PLAY REPEAT PLAY SELECT SUBTITLES SELECT ANGLES TIME SEARCH BOOKMARK ZOOM PLAY PROGRAM PLAY SHUFFLE OR RANDOM PLAY DIGEST PLAY 11 MP3 OPERATION 12 OTHERS ACCESSORIES PRECAUTIONS FOR DISC TROUBLESHOOTING TECHNICAL SPECIFICATIONS 13 USING THE BATTERY PACK 2 4 6 ...

Page 2: ...filled with liquids such as vases shall be placed on the apparatus To prevent electric shock match wide blade plug to wide slot fully insert 2 WARNING CAUTION The unit employs a laser system To ensure the proper use of the unit read this manual carefully and keep it for future reference If the unit requires servicing contact the seller or our service center see troubleshooting To prevent direct ex...

Page 3: ...nit is exposed to rain or water FOR SAFETY Do not disassemble the unit for laser rays are dangerous to eyes Any service should be done by qualified service personnel 3 SAFETY PRECAUTIONS Unplug the AC adaptor to cut the power if liquid or objects get inside the unit Take care not to drop the unit or subject it to strong shocks which may cause malfunction Note When unit is in use for a long period ...

Page 4: ...rt combination should be moved with care Quick stops excessive force and uneven surfaces may cause the product and cart combination to overturn 10 Power Sources This product should be operated only from the type of power source indicated on the rear panel If you are not sure of the type of power supply to your home consult your product dealer or local power company For products intended to operate...

Page 5: ...water d If the product does not operate normally by following the operating instructions 5 IMPORTANT SAFETY INSTRUCTIONS Adjust only those controls that are covered by the operating instructions as an improper adjustment of other controls may result in damage and will often require extensive work by a qualified technician to restore the product to its normal operation e If the product has been dro...

Page 6: ...ntent clearer 7 AUDIO OUTPUT Analog audio output coaxial digital audio output can be connected with any amplifier to enjoy high quality sound effects 8 TFT color LCD chargeable batteries headphone output convenient for enjoying great pictures and beautiful music on the way 6 FEATURES DEFINITION OF TERMS TITLE The images or music of a DVD are divided into some units among which title is the biggest...

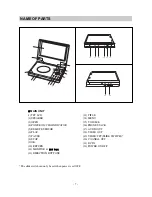
Page 7: ...5 16 17 18 19 20 POWER ON OFF DC IN 9V 21 22 MAIN UNIT 1 TFT LCD 2 SPEAKER 3 OPEN 4 POWER ON CHG INDICATOR 5 REMOTE SENSOR 6 PLAY 7 PAUSE 8 STOP 9 OK 10 RETURN 11 MONITOR 12 DIRECTION BUTTONS 13 TITLE 14 MENU 15 VOLUME 16 PHONES JACK 17 AUDIO OUT 18 VIDEO OUT 19 VIDEO TFT SLIDE SWITCH 20 COAXIAL OUT 21 DC IN 22 POWER ON OFF The slide switch can only be set when power is set OFF NAME OF PARTS 7 ...

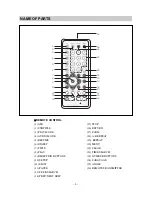
Page 8: ...5 6 7 9 8 10 2 11 13 14 16 15 12 18 19 17 21 22 23 20 25 26 24 REMOTE CONTROL 1 OSD 2 SUBTITLE 3 PLAY MODE 4 AUDIO MODE 5 RESUME 6 DIGEST 7 TITLE 8 PLAY 9 DIRECTION BUTTONS 10 SETUP 11 SLOW 12 PAUSE 13 FF FR SEARCH 14 PREV NEXT SKIP 15 STOP 16 RETURN 17 ZOOM 18 A B REPEAT 19 REPEAT 20 MENU 21 CLEAR 22 TIME SEARCH 23 NUMBER BUTTONS 24 LANGUAGE 25 ANGLE 26 REMOTE TRANSMITTER 8 NAME OF PARTS ...

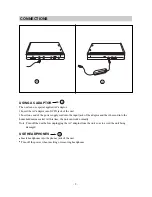
Page 9: ...t 2 Insert one end of the power supply cord into the input jack of the adaptor and the other end into the household mains socket At this time the unit can work normally Note Turn off the unit before unplugging the AC adaptor from the unit so as to avoid the unit being damaged USE HEADPHONES Insert headphones into the phones jack of the unit Turn off the power when inserting or removing headphones ...

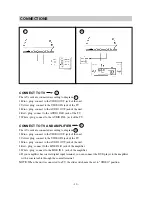
Page 10: ...connected according to diagram 1 Mini plug connect to the VIDEO OUT jack of the unit 2 Yellow plug connect to the VIDEO IN jack of the TV 3 Mini plug connect to the AUDIO OUT jack of the unit 4 Red plug connect to the LINE IN R jack of the amplifier 5 White plug connect to the LINE IN L jack of the amplifier 6 If your amplifier has coaxial digital input terminal you can connect the DVD player to t...

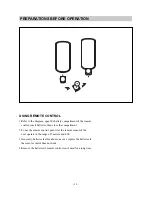
Page 11: ...compartment 2 To use the remote control point it at the remote sensor of the unit operate in the range of 5 meters and 60ß 3 Generally batteries last for about one year replace the batteries if the remote control does not work 4 Remove the batteries if remote control is not used for a long time 11 PREPARATIONS BEFORE OPERATION ...

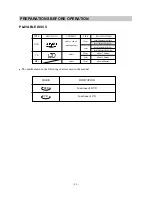
Page 12: ...m 12cm PLAYING TIME about 2hrs single side disc about 4hrs double side disc about80mins single side disc about160mins double sidedisc about 74mins about 20mins about 600mins audio audio The marks shown in the following chart are used in the manual MARK INDICATION functions of DVD functions of CD DVD CD PLAYABLE DISCS ...

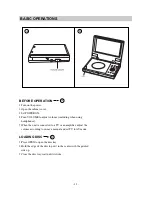
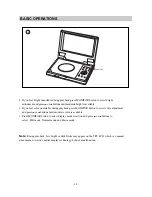
Page 13: ...V or an amplifier adjust the volume according to owner s manual and set TV to AV mode LOADING DISC 1 Press OPEN to open the disc tray 2 Hold the edge of the disc to put it in the center with the printed side up 3 Close the disc tray wait until it clicks 13 BASIC OPERATIONS A A B B MEN U RET URN TITL E MONITOR OK OPE N POW ER ON PU SH VOLU ME PH ONES AU DIO VI DEO CO AX IA L VI DE O TF T CHG OPEN ...

Page 14: ...ble 2 If you feel color unsuitable during playback press MONITOR button to select color adjustment and press or buttons until moderate color is available 3 Press MONITOR button to select display mode selection and press or buttons to select Full mode Normal mode and Zoom mode Note During playback few bright or dark flecks may appear on the TFT LCD which is a normal phenomenon in active matrix disp...

Page 15: ... remote to move through the different icons in the Display When an icon is highlighted use the or butons on the remote to scroll through the choices displayed in the text box under the icons Remember you can only access the Display when you re playing a disc Also the Display features are only available if the disc was created with that particular feature i e if you select the Subtitle icon you won...

Page 16: ... by pressing on the remote and go to the preceding chapter by pressing on the remote 16 BASIC OPERATIONS Changing the Audio Language If the disc was created with different language tracks recorded in different languages you can use the Display to temporarily change the DVD player s Audio Language setting 1 While the disc is playing press OSD on the remote to bring up the Display 2 Press the or but...

Page 17: ...ing played 3 Press the or buttons to scroll through the angle choices The angle number displayed in the text window is automatically shown 4 To make the Display disappear press the OSD button on the remote Using the Repeat Feature The default mode for the Repeat feature is off There are three Repeat options All repeats the disc that is playing Title repeats the title that is playing Chapter repeat...

Page 18: ...LAY some DVDs have title menus and chapter menus Press PLAY the screen shows the menu Press or to skip the next or previous page select with number buttons or direction buttons Example select track 13 1 Press to enter the next menu 2 Press number buttons to select direcltly 12 13 14 15 1 2 Root Menu 11 Root Menu DVD You can also do as follows 1 Press to select track 13 2 Press PLAY to start playin...

Page 19: ...o highlight Audio Setup press PLAY to enter Audio Setup Page Setup Menu Main page General Setup Audio Setup Preferences Password Setup Exit Setup Go To General Setup Page The screen shows Press direction buttons or to highlight Dolby Digital Setup and press PLAY to enter Dolby Digital Setup Page The screen shows the submenu for your selection The screen shows Press direction buttons to select Left...

Page 20: ...o Right Mono Mixed Mono D R C Audio Setup Setup Page Main Page General Setup Audio Setup Preferences Password Setup Exit Setup Go To Audio Setup Page GENERAL SETUP The setting structure is as follows TV DISPLAY 1 NORMAL PS This is selected when the unit is connected to a normal TV Wide screen images are shown on the screen but with some parts cut automatically General Setup Page TV Display Wide No...

Page 21: ...er amplifier to be connected must have Dolby Digital and MPEG decoding SPDIF PCM Select this when the DVD player is connected with a 2 channel digital stereo amplifier When a Dolby Digital or MPEG disc is played the digital port will output in PCM 2 channel format CAPTIONS ON The hidden subtitle is shown OFF The hidden subtitle is turned off SCREEN SAVER Start the screen saver the screen saver ima...

Page 22: ...NO This is the output mode of the L and R signals of the set audio output If it is set to MIXED MONO the function only works when the DVD being played is 5 1 channel D R C This is selected to adjust linear compression rate to obtain the different compression results of the signals FULL 3 4 1 2 1 4 OFF EQUALIZER This will help you to select graphic equalizer patterns according to the genre of the m...

Page 23: ...ING The setting structure is The setting structure is Password Setup Page PW Mode Off On Off Password Change Main Page Old Password New Password Confirm PWD OK PASSWORD MODE ON The password works PARENTAL is dim and can not be selected OFF The password is locked PARENTAL can be selected PASSWORD CHANGE Select this to adapt the code the screen shows PASSWORD SETUP Enter a password according to the ...

Page 24: ...age as long as it is a recorded subtitle track on the media being played PARENTAL LOCK The Parental Lock function is used to customize playback by not allowing particular rating media to be played on the IDM 1731 To set a particular rating of media to be played follow the following steps Navigate to the Parental section on the Preferences Page Select the rating that is desired and press the play b...

Page 25: ... may select the right channel or left channel or stereo from a multi channel CD WHEN PLAYING DVD Press LANGUAGE the screen shows orderly Different discs differ in languages Press AUDIO MODE the screen shows orderly WHEN PLAYING CD You may select one mode Notes Different discs differ in languages AUDIO MODE Mono Right Mix Mono Stereo Mono Left AUDIO MODE AUDIO MODE AUDIO MODE DVD CD ...

Page 26: ...playing a disc you may play it forward fast or reverse it fast to find what you want WHEN PLAYING DVD OR CD 1 Press to play forward fast Each time you press the button the screen shows orderly 2 Press to reverse the disc fast Each time you press the button the screen shows orderly 3 Press PLAY to switch to normal play while FF or FR playing DVD CD 1 8 1 4 1 8 1 16 1 2 1 16 1 2 2X 4X 8X 16X 32X 2X ...

Page 27: ... when playing a disc PLAY DVD or CD 1 Set a starting point A The screen shows 2 Set an end point B The screen shows ALL A B PLAYING A DISC REPEATEDLY DVD You may repeat a title or chapter 1 Repeat a chapter Press REPEAT the screen will show 2 Repeat a title Press REPEAT twice the screen will show 3 Repeat all Press REPEAT third time the screen shows ALL 4 Remove REPEAT function Press REPEAT until ...

Page 28: ...f the subtitles of discs can not be selected press SUBTITLE the screen shows DVD ANGLES SELECT Some discs have images with different viewing angles you may select among them For example when you watch a running train you may watch it from the front the left window or the right window without stopping it Example A DVD has four viewing angles at your option 1 Press to select ANGLE1 SCREEN 2 Press to...

Page 29: ... 00 01 38 of track 6 1 Press button 6 to select track 6 The screen shows 2 Press TIME SEARCH until the screen shows 3 Press button 0 1 3 8 to enter the time The screen shows The unit plays from 00 01 38 of track 6 after setting Press 10 0 to enter 0 Note CD discs have three options in time search function You can enter the elasped time of a disc to play You can enter the elasped time of a track to...

Page 30: ...LAY 5 Press RESUME to make the Bookmark Menu disappear from the screen and resume to normal playback Using a Bookmark 1 While a disc is playing press RESUME on the remote 2 The Bookmark Menu appears 3 Use the direction buttons to highlight the bookmarked scene you want to activate Press PLAY to go to the place you marked DVD ZOOM PLAY This function can be used to watch a motion or motionless pictu...

Page 31: ...reen shows 2 Use the number buttons on the remote to enter the track number you entered appears in the box The screen shows 3 The cursor jumps to the next spot in the program list section Make sure the box is highlighted and enter your next track 4 Continue adding tracks until your program is complete You can play you program by highlighting START and press PLAY Note If the tracks you want to prog...

Page 32: ...play When playing a DVD disc press twice When playing a CD disc press PLAY MODE Shuffle Random OR Select Digest Type Title Digest Chapter Digest Title Interval Chapter Interval DIGEST 1 2 3 4 5 6 Type Title Select 01 20 Exit Menu NEXT PLAYING DVD 1 Press DIGEST while a disc is playing The screen shows Use the or buttons to select TITLE DIGEST and press PLAY to confirm The unit begins to look throu...

Page 33: ...y previous or next songs OTHER FUNCTIONS During playback MP3 discs the unit features volume control repeat play and etc Operations are the same as CD 00 00 00 00 001 016 FOLDER wave 11 wave 12 wave 13 wave 14 wave 15 00 00 00 00 001 012 FOLDER CD01 CD02 CD03 CD04 CD05 CD06 CD02 1 Press DIGEST after the unit stops The screen shows The unit plays the first ten seconds of each track one after another...

Page 34: ...ecurely Make sure you operate the TV correctly Make sure you set the color system correctly Bad sound quality Make sure the audio output mode is set correctly Make sure the audio connection between the unit and amplifier is right Disc can not be played There is no disc in the unit Put the disc on the disc tray properly with the label side up Clean the disc Moisture has condensed in the unit Remove...

Page 35: ...ited viewing uses only unless otherwise authorized by Macrovision Corporation Reverse engineering or disassembly is prohibited Laser Video system Frequency response Signal noise ratio Audio distortion noise Channel separation Dynamic range 35 OTHERS TECHNICAL SPECIFICATIONS wavelength 650nm NTSC 20Hz 20KHz 1dB 95dB 80 1KHz 85dB 85dB Output Audio out analog audio Audio out digital audio Video out O...

Page 36: ...ay get warm when you are charging it or operating the player This is not a defect 3 The battery indicator is shown on the screen when the power in the battery pack is running low f f f f f f f f f f f f f f DETACHING THE BATTERY PACK 1 Turn the player off 2 Disconnect the AC adaptor and the power cord from the player 3 Turn the player upside down 4 Slide the battery pack s lock switch in the open ...

Reviews: