background image

USER GUIDE

Insignia Flex™ Android Tablet

NS-13T001

Summary of Contents for Flex NS-13T001

Page 1: ...USERGUIDE Insignia Flex Android Tablet NS 13T001 ...

Page 2: ... Using gestures to navigate 16 Using on screen function buttons to navigate 17 Using the keyboard 18 Status area and notifications 19 Checking for updates 20 Customizing the Home screen 21 Home screen items 22 Adding an icon to the Home screen 22 Adding a widget to the Home screen 22 Repositioning an item on the Home screen 22 Deleting an item from the Home screen 23 Changing the Home screen wallp...

Page 3: ...unt 57 Creating and sending a Gmail 58 Viewing incoming e mails 60 Deleting a Gmail 60 Connecting to the Internet 61 Viewing Web pages 61 Searching for text on a Web page 63 Copying text on a Web page 63 Checking browser history 64 Clearing browser cache and history 64 Setting the browser home page 64 Downloading apps 65 Managing bookmarks 66 Using Bluetooth 67 Using multimedia 68 Turning the came...

Page 4: ...Follow all instructions 5 Do not use this apparatus near water 6 Clean only with dry cloth 7 Do not block any ventilation openings Install in accordance with the manufacturer s instructions 8 Protect the power cord from being walked on or pinched particularly at plugs convenience receptacles and the point where they exit from the apparatus 9 Only use attachments accessories specified by the manufa...

Page 5: ...nding type plug is a Class I apparatus which needs to be grounded to prevent possible electric shock Make sure that you connect this Class I device to a grounding type three prong outlet 14 Batteries should not be exposed to excessive heat such as sunshine fire or the like Welcome Congratulations on your purchase of a high quality Insignia product Your Insignia Flex Tablet represents the state of ...

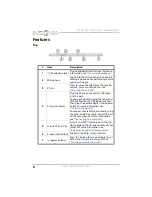
Page 6: ...charge the battery plug the other end of the cable into the USB power adapter then plug the power adapter into a power outlet For more information see Charging the battery To connect your tablet to a computer plug the other end of the cable into a USB port on the computer For more information see Connecting to a computer 5 microSD card slot Insert a microSD memory card into this slot to expand the...

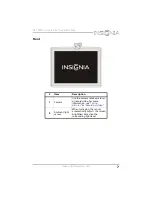
Page 7: ...ront Item Description 1 Camera Use the camera to take pictures or record video For more information see Taking pictures or Recording video 2 Ambient light sensor When turned on the sensor automatically adjusts the screen brightness based on the surrounding light level ...

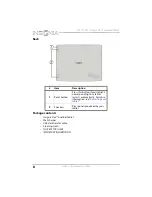
Page 8: ...Tablet Wall charger USB data transfer cable Cleaning cloth QUICK SETUP GUIDE IMPORTANT INFORMATION Item Description 1 Reset button Press this button if your tablet is not responding Your tablet restarts automatically For more information see Restarting your tablet 2 Speakers Play sounds produced by your tablet ...

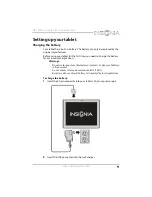
Page 9: ...t for the first time you need to charge the battery for a minimum of eight hours Warnings Do not crush puncture short external contacts or disposeof battery in fire or water Do not expose to temperatures above 60 C 140 F Recycle or dispose of used battery as stipulated by local regulations To charge the battery 1 Insert the 30 pin connector into your tablet s 30 pin connector port 2 Insert the USB...

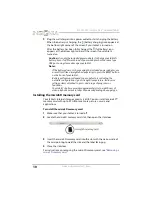
Page 10: ... RESET button on the back of your tablet Battery performance depends on many factors including the network configuration signal strength temperature features or settings items attached to ports and usage of programs or functions Your tablet s battery provides approximately six to eight hours of video playback or several days of power depending on usage type Installing the microSD memory card Your ...

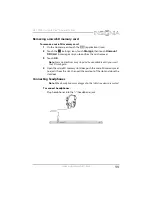
Page 11: ...d A message asks you to confirm the card removal 3 Touch OK Note Some applications may stop and be unavailable until you insert the SD card again 4 Open the microSD memory slot door push the microSD memory card to eject it from the slot then pull the card out of the slot and close the slot door Connecting headphones Note When headphones are plugged in the tablet speakers are muted To connect headp...

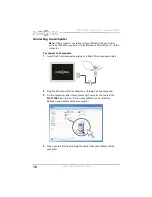
Page 12: ...1 on the computer To connect to a computer 1 Insert the 30 pin connector into your tablet s 30 pin connector port 2 Plug the other end of the cable into a USB port on the computer 3 On the computer open Computer or My Computer then select the NS 13T001 icon to view files on your tablet or to transfer files between your tablet and your computer 4 When you are finished unplug the cable from your tab...

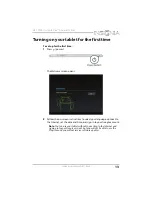
Page 13: ...he Welcome screen opens 2 Follow the on screen instructions to select your language connect to the Internet set the date and time and sign in to your Google account Note You can use your tablet without connecting to the Internet and signing in to your Google account but you will not be able to use the Playstore and you will not receive software updates ...

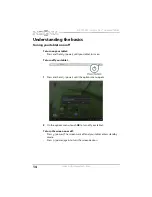
Page 14: ... your tablet Press and hold power until your tablet turns on To turn off your tablet 1 Press and hold power until the options menu opens 2 On the options menu touch OK to turn off your tablet To turn the screen on or off Press power The screen turns off and your tablet enters standby mode Press power again to turn the screen back on ...

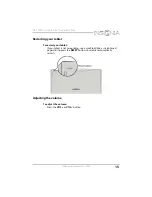
Page 15: ...s com Restarting your tablet To restart your tablet If your tablet is not responding use a small tool like a straightened paperclip to press the RESET button Your tablet automatically restarts Adjusting the volume To adjust the volume Press the VOL or VOL button ...

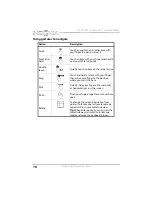
Page 16: ...n item on the screen twice Drag Touch and hold an item with your finger then move your finger to the position where you want the item Flick Quickly slide your finger either vertically or horizontally across the screen Pinch Pinch your fingers together or move them apart Rotate To change the screen orientation from portrait to landscape or from landscape to portrait turn your tablet sideways Tip Wh...

Page 17: ...te Icon Touch to Start a text search on Google Start a voice search on Google Return to the previous screen Return to the Home screen Open the list of recently used applications and running applications View all applicationsinstalled on your tablet Open the options menu Close the keyboard Open a drop down menu ...

Page 18: ...m that requires text or numbers To delete a character touch to the right of the character you want to delete then touch the delete key 5 To insert a character touch the character to the left of where you want to insert the character then touch the character you want to insert Touch to 1 Switch between number symbol mode and text mode 2 Switch between uppercase and lowercase letters 3 Enter a space...

Page 19: ... status area Notifications such as Wi Fi connection battery and time are displayed in this area To view a status item or notification 1 Touch the status bar in the lower right corner of the screen to expand the window 2 Touch again to access the notification and setting options 3 When you finish touch the home icon to return to the Home screen ...

Page 20: ...re that your tablet has the most up to date software To check for updates 1 Touch the home icon touch the applications icon then touch the settings icon The Settings screen opens 2 Drag the screen up touch About Tablet then touch System updates The Update Center screen opens and your tablet checks for updates 3 If an update is available follow the on screen instructions to download and install the...

Page 21: ... or one of the extended Home screens Like a widget an app shortcut lets you quickly access a favorite feature like the Gallery An app shortcut can also quickly open a favorite application You can add an app shortcut to any Home screen The Home screen extends beyond the screen width to provide more space for adding icons widgets and more To use the extended Home screen Slide your finger horizontall...

Page 22: ...Applications screen closes 3 Drag the icon to the location you want on any extended Home screen then release the icon Adding a widget to the Home screen To add a widget to the Home screen 1 Touch the applications icon then touch WIDGETS 2 Touch and hold the widget you want to add The Widgets screen closes 3 Drag the widget to the location you want on any extended Home screen then release the widge...

Page 23: ...er 1 On the Home screen touch the applications icon touch the settings icon touch Display then touch Wallpaper The Choose wallpaper from screen opens OR Touch and hold an empty area on the Home screen until the Choose wallpaper from screen opens 2 Touch Gallery To select a picture you captured using the camera or copied to your tablet as wallpaper Live Wallpapers To select a preset animated wallpa...

Page 24: ... time By default your tablet automatically uses the network provided date time zone and time You can manually set the date and time To manually set the date and time 1 Touch the home icon touch the applications icon then touch the settings icon The Settings screen opens 2 Drag the screen up then touch Date Time ...

Page 25: ...the Automatic date time check box then touch Set date The Set date screen opens 4 Touch S or T to change the month day or year then when you have finished touch Set 5 Touch Select time zone 6 Drag the screen up or down to scroll through the time zone list then touch the time zone you want ...

Page 26: ... PM then when you have finished touch Set 9 Touch the Use 24 hour format check box to toggle between using a 12 hour or 24 hour format 10 Touch Select date format then select how you want the date to display on your tablet The selected date format also applies to the date displayed on the clock 11 When you finish touch the home icon to return to the Home screen ...

Page 27: ...level To manually adjust the screen brightness 1 Touch the home icon touch the applications icon then touch the settings icon The Settings screen opens 2 Touch the display icon then touch Brightness The Brightness screen opens 3 If Automatic brightness is checked touch it to remove the check 4 Drag the brightness slider to the left to decrease the brightness or to the right to increase the brightn...

Page 28: ...attery power use the lowest brightness level you are comfortable with Adjusting the power saving setting After a period of inactivity your tablet automatically turns off the screen to save battery power You can specify the amount of time your tablet waits before turning off the screen To adjust the power saving setting 1 Touch the home icon touch the applications icon then touch the settings icon ...

Page 29: ...www insigniaproducts com 2 Touch the display icon then touch Sleep The Sleep screen opens 3 Touch the amount of time you want your tablet to wait before it turns off the screen 4 When you finish touch the home icon to return to the Home screen ...

Page 30: ...ze that appears on the screen To set the screen font size 1 Touch the home icon touch the applications icon then touch the settings icon The Settings screen opens 2 Touch the display icon then touch Font size The Font size screen opens 3 Touch the font size your want to use 4 When you finish touch the home icon to return to the Home screen ...

Page 31: ...signiaproducts com Selecting the notification ringtone You can select the ringtone for incoming notifications To select the notification ringtone 1 Touch the home icon touch the applications icon then touch the settings icon The Settings screen opens ...

Page 32: ... com 2 Touch the sound icon then touch Default Notification The Default notification screen opens 3 Touch a ringtone to play it Touch the ringtone you want to use then touch OK to save your setting 4 When you finish touch the home icon to return to the Home screen ...

Page 33: ...h the home icon touch the applications icon then touch the settings icon The Settings screen opens 2 Touch the sound icon The SYSTEM screen opens 3 Under System touch to select the check box for the system tones you want You can select Touch sounds Plays an audio tone when you touch your tablet screen System lock sound Plays an audio tone when you lock your tablet Vibrate on touch Vibrates the tab...

Page 34: ...you finish touch the home icon to return to the Home screen Selecting the language your tablet uses to display text To select the language your tablet uses to display text 1 Touch the home icon touch the applications icon then touch the settings icon The Settings screen opens ...

Page 35: ...d Tablet www insigniaproducts com 2 Touch Language input The Language input screen opens 3 Touch Language The Language screen opens 4 Touch the language you want to use 5 When you finish touch the home icon to return to the Home screen ...

Page 36: ...w insigniaproducts com Selecting the keyboard language To select the keyboard language 1 Touch the home icon touch the applications icon then touch the settings icon The Settings screen opens 2 Touch Language input The Language input screen opens ...

Page 37: ...roid Tablet www insigniaproducts com 3 Under Keyboard and input methods touch Default The Default keyboard language screen opens 4 Touch the language you want to use 5 When you finish touch the home icon to return to the Home screen ...

Page 38: ...ablet connects to the Internet though a Wi Fi network access point hotspot or router To turn Wi Fi on and connect to a network 1 Touch the home icon touch the applications icon then touch the settings icon The Settings screen opens 2 To turn on Wi Fi touch Wi Fi or OFF ON appears and a list of available networks opens ...

Page 39: ...uch the network you want to connect to You may be prompted to enter a password 4 Touch the Password field use the on screen keyboard to enter the password then touch Connect If the connection is successful the connection icon appears in the lower right corner of the screen ...

Page 40: ...iaproducts com Adding a Wi Fi network To add a Wi Fi network 1 Touch the home icon touch the applications icon then touch the settings icon The Settings screen opens 2 To turn on Wi Fi touch Wi Fi or OFF ON appears and a list of available networks opens ...

Page 41: ... type you want to use You can select Open No security WEP Wired Equivalent Privacy Note A passphrase is required WPA WPA2 PSK Wi Fi Protected Access Note A password is required 802 1 x EAP 802 1x Extensible Authentication Protocol Note If you are not sure which security type to select refer to your network setup documentation 5 Touch Save The network you added appears in the list of available netw...

Page 42: ...ttings screen opens 2 To turn on Wi Fi touch Wi Fi or OFF ON appears and a list of available networks opens Networks access points and hotspots appears with that status of each displayed If you are connected to a network Connected appears below the network name The network security type is displayed below each network name The icon to the right of a network name shows the signal strength informati...

Page 43: ...elephone numbers e mail addresses and home addresses Creating a contact To create a contact 1 Touch the home icon touch the applications icon then touch the people icon The list of contacts opens 2 Touch the add new contact icon then use the on screen keyboard to enter information such as telephone numbers e mail addresses and home addresses for your new contact ...

Page 44: ...as a Web site or relationship 4 When you have entered all information touch Done in the upper left corner of the screen to save your contact A list of contacts opens 5 When you finish touch the home icon to return to the Home screen Viewing contacts Touch the home icon touch the applications icon then touch the people icon The list of contacts opens ...

Page 45: ...rmat For information about creating a vcf file see the documentation that came with the program you are exporting contacts from To import contacts 1 Make sure that you have inserted a microSD memory card with contacts into the microSD memory card slot See Installing the microSD memory card 2 Touch the home icon touch the applications icon then touch the people icon The list of contacts opens ...

Page 46: ...ltiple contact files or all contact files 6 When you finish touch the home icon to return to the Home screen Backing up or syncing contacts You can backup your contact list to a microSD memory card or sync your contacts with the contacts in your Google account To back up your contact list to a microSD memory card 1 Make sure that you have inserted a microSD memory card into the microSD memory card...

Page 47: ...touch the applications icon then touch the people icon The list of contacts opens 3 Touch the options icon then touch Import Export 4 Touch Export to storage 5 Touch OK to export your contact list to your microSD memory card 6 When you finish touch the home icon to return to the Home screen ...

Page 48: ...on 3 Touch Account sync then touch the auto sync icon 4 Check the box for Sync Contacts 5 When you finish touch the home icon to return to the Home screen Syncing your data with your Google account You can sync your data such as calendars and e mail with your Google account To sync your data with your Google account 1 Make sure that Wi Fi is turned on See Turning Wi Fi on and connecting to a netwo...

Page 49: ...gnia Flex Android Tablet www insigniaproducts com 3 Touch Accounts sync then touch the auto sync icon 4 Check the boxes for items you would like to sync 5 When you finish touch the home icon to return to the Home screen ...

Page 50: ... Plus AOL and more Setting up an e mail account To set up an e mail account 1 Touch the home icon touch the applications icon then touch the e mail icon The on screen keyboard opens 2 Use the keyboard to enter your e mail address and password 3 Touch Next If the e mail account you want to set up is not in the tablet s e mail database you are prompted to manually enter the email account settings su...

Page 51: ...h Done when you have finished The Account options screen opens where you can set options such as how often you want your inbox checked and whether you want to sync from that account 4 Touch Next Give your account a name optional and enter a display name Your account syncs and your inbox opens 5 When you finish touch the home icon to return to the Home screen ...

Page 52: ...uch the options icon touch Settings then touch Add account in the upper right corner of the screen The on screen keyboard opens 3 Use the keyboard to enter your e mail address and password 4 Touch Next If the e mail account you want to set up is not in the tablet s e mail database you are prompted to manually enter the email account settings such as the type of your account email server protocol a...

Page 53: ...n set options such as how often you want your inbox checked and whether you want to sync from that account 5 Touch Next Give your account a name optional and enter a display name Your account syncs and your Inbox appears 6 When you finish touch the home icon to return to the Home screen Creating and sending an e mail To create and send an e mail 1 Touch the home icon touch the applications icon th...

Page 54: ...ferent account touch the left arrow in the upper left corner of the screen The Your Accounts screen opens where you can select a different account 2 Touch the compose icon 3 Enter the recipient s e mail address As you begin entering the address your tablet displays all your contacts that match the characters you have entered You can touch a contact or continue entering the address ...

Page 55: ... the screen to view all saved drafts then touch the draft you want to open 7 When you finish touch the home icon to return to the Home screen Viewing incoming e mails To view incoming e mails 1 Touch the home icon touch the applications icon then touch the e mail icon Your inbox opens Note If you have more than one e mail account set up your tablet displays the last account you used To access a di...

Page 56: ...touch the home icon to return to the Home screen Editing or deleting an e mail account To edit or delete an e mail account 1 Touch the home icon touch the applications icon then touch the e mail icon Your inbox opens Note If you have more than one e mail account set up your tablet displays the last account you used To access a different account touch the left arrow in the upper left corner of the ...

Page 57: ...st of options touch Remove account When you are prompted to confirm the deletion touch OK 3 When you finish touch the home icon to return to the Home screen Using Gmail Google mail is a web based e mail service that lets you check e mail directly without logging into your mail account from the Web site Setting up a Gmail account To set up a Gmail account 1 Touch the home icon touch the application...

Page 58: ... the applications icon then touch the Gmail icon Your inbox opens Note If you have more than one e mail account set up your tablet displays the last account you used To access a different account touch the left arrow in the upper left corner of the screen The Your Accounts screen opens where you can select a different account 2 Touch the compose icon ...

Page 59: ...ng the e mail to more than one recipient separate the e mail addresses with commas 4 Enter a subject in the subject field 5 Enter your message in the message area 6 When you are finished touch Send Note You can touch Save draft or touch the return key to save your e mail as a draft instead of sending it 7 To access a saved draft touch Drafts on the left side of the screen to view all saved drafts ...

Page 60: ...ss a different account touch the left arrow in the upper left corner of the screen The Your Accounts screen opens where you can select a different account 2 Touch the e mail you want to view 3 When you finish touch the home icon to return to the Home screen Deleting a Gmail To delete a Gmail 1 In the Gmail account inbox touch the check box to the left of the e mail you want to delete then touch th...

Page 61: ... on a desktop computer For optimal viewing change the screen orientation to landscape view by rotating your tablet 90 The screen automatically adjusts according to how you hold the tablet Note To lock the screen in place slide the screen rotation button to the lock position Locking the screen rotation lets you turn your tablet without changing the screen orientation ...

Page 62: ...eturn key on the on screen keyboard to go to the Web page To scroll the Web page slide your finger left right up or down To zoom in on a part of the Web page touch the Web page with your fingers together then spread your fingers apart To zoom out on a Web page touch the Web page with your fingers apart then pinch your fingers together To open a new browser window touch at the top of the browser A ...

Page 63: ...ge 2 Use the on screen keyboard to enter the search text As you enter characters matching characters on the Web page are highlighted in green Touch the up or down arrow to go to the previous or next matching item 3 Touch DONE to close the search bar at any time Copying text on a Web page To copy text on a Web page 1 Open the Web page where you want to copy text 2 Zoom out on the Web page 3 Touch a...

Page 64: ... 2 On the options menu touch Settings touch Privacy security touch Clear cache then touch OK 3 Touch Clear history then touch OK 4 When you finish touch the home icon to return to the Home screen Setting the browser home page To set the browser home page 1 Open the browser then touch the options icon at the top of the screen 2 Touch Settings touch General then touch Set homepage 3 Touch the check ...

Page 65: ...l data download applications only from trusted sources To turn on the Web application download feature 1 Touch the home icon touch the applications icon then touch the settings icon The Settings screen opens 2 Touch the security icon then touch the Unknown sources check box 3 When the Attention dialog box opens touch OK Note All downloaded applications are saved to the microSD memory card Before d...

Page 66: ... be copied from a Google Chrome browser on your computer to your tablet This add on feature must be installed on the Google Chrome browser on your computer To manage bookmarks When viewing a Web page touch the add bookmark icon to add the page to your bookmarks To open the bookmark page touch open bookmark page Touch and hold a bookmark to see a list of options ...

Page 67: ...et other devices detect your tablet 1 Touch the home icon touch the applications icon then touch the settings icon The Settings screen opens 2 Touch the Bluetooth check box to turn on Bluetooth When Bluetooth is turned on the Bluetooth icon appears in your tablet s status bar 3 Touch your tablet s name on the right to change the Bluetooth status to Visible to all nearby Bluetooth devices This sett...

Page 68: ... on the camera 1 Touch the home icon then touch the applications icon The Applications screen opens 2 Touch the camera icon The camera turns on and your tablet automatically changes to landscape mode To turn off the camera On the camera screen touch the dot to the far left on the bottom left of the screen Taking pictures ...

Page 69: ...ra icon The camera turns on and your tablet automatically changes to landscape mode 3 To use the camera Touch the blue capture button to take a picture Touch the circular dial toward the to zoom in or toward the to zoom out 4 To change camera settings touch the settings icon You can adjust The white balance by touching the white balance icon The exposure by touching the exposure icon ...

Page 70: ... share the picture Capturing an image of the current screen You can create a graphic of what you see on your tablet s screen To capture an image of the current screen Press and hold the VOL and buttons until you see the image captured on the screen Menu Functions Options Setting Store location JPEG quality Picture size Camera setting On Off Super fine fine normal 2M Pixels 1 3M Pixels 1M Pixels VG...

Page 71: ... Flex Android Tablet www insigniaproducts com To view a captured screen image 1 Touch the home icon then touch the applications icon The Applications screen opens 2 Touch the File Manager icon The File Manager screen opens ...

Page 72: ...droid Tablet www insigniaproducts com 3 Touch Internal Storage 4 Touch Pictures 5 Touch Screenshots The Screenshots folder opens 6 Touch the image you want to view 7 When you finish touch the home icon to return to the Home screen ...

Page 73: ...icon The Applications screen opens 2 Touch the camera icon The camera turns on and your tablet automatically changes to landscape mode 3 Touch the camcorder icon in the lower right corner of the screen 4 To use the camcorder Touch the red record button to start or stop recording Touch the circular dial toward the to zoom in or toward the to zoom out ...

Page 74: ...ure a video the image appears in the Preview Zoom screen at the upper right corner Touch the Preview Zoom screen to go to the Gallery to share the video Recording sound To record sound 1 Touch the home icon then touch the applications icon The Applications screen opens Menu Functions Options Setting Video format Audio encoder Video encoder Store location Camera Setting 720P WVGA DVD Video VGA QVGA...

Page 75: ...d icon to start recording 4 Touch the stop icon to stop recording 5 Touch Done to save your recording or Discard to delete the recording To play back a recording 1 Touch the home icon then touch the applications icon The Applications screen opens 2 Touch the File Manager icon 3 Touch the recording you want to play Your recording starts playing ...

Page 76: ...cts com Opening the Gallery screen The Gallery screen is where your pictures and videos are stored To open the Gallery screen 1 Touch the home icon then touch the applications icon The Applications screen opens 2 Touch the Gallery icon The Gallery screen opens ...

Page 77: ...llery screen from the Camera screen when you touch the return icon your tablet displays the Camera screen Viewing pictures Note Pictures are sorted by date To view a picture On the Gallery screen To open an album touch it To view pictures slide your finger up and down to scroll through the pictures To zoom in on a picture touch the picture with your fingers together then spread your fingers apart ...

Page 78: ...the diamond shaped handles appear drag your finger inward or outward from the center of the crop tool to resize it To move the crop tool to another area on the picture touch and hold inside the crop tool then drag it with your finger to the position you want 2 Touch CROP in the upper right corner of the screen to apply the changes to the picture The cropped picture is saved on your tablet as a cop...

Page 79: ...eating and sending a Gmail Watching video To view video 1 On the Gallery screen touch an album to open it then touch the video you want to watch to start playback 2 Touch the screen to open a playback control bar Sharing a video using e mail or Gmail To share a video using e mail or Gmail 1 On the Gallery screen touch and hold the video you want to share 2 When the options list opens touch the sha...

Page 80: ...ouch the applications icon The Applications screen opens 2 Touch the play music icon The music library screen opens Your music is organized into categories Recent Albums Artists Songs Playlists and Genres 3 Touch the drop down arrow in the upper left corner of the screen to open the list of categories then touch the category you want ...

Page 81: ...ay Creating a playlist You can create as many playlists as you want To create a playlist 1 On the music library screen touch a music category 2 Find the song you want to add to the playlist then touch and hold the song until the options menu opens 3 Touch Add to playlist The Add to playlist screen opens 4 Touch New Playlist then use the on screen keyboard to enter a playlist name 5 Touch OK to sav...

Page 82: ...ou want to move then drag the song to the position you want Release when finished moving To delete a song from a playlist touch and hold the icon to the right of the song you want to delete touch Delete When a message asks you to confirm the deletion touch OK To rename a playlist touch and hold the playlist name until the options menu opens then touch Rename Use the on screen keyboard to change th...

Page 83: ... off the screen is automatically locked Locking the screen prevents accidental screen touches when the tablet is in your bag purse or pocket To use the screen lock Press power to turn off the screen The screen lock is turned on To turn off the screen lock press power touch and hold the lock icon then drag it to the right ...

Page 84: ...to input the correct screen unlock pattern after five tries you have to wait more than 30 seconds before you can try again If you forget your screen unlock pattern touch Forgot pattern You have to sign in to your Google account and create a new screen unlock pattern before the Home screen will open To create a screen unlock pattern 1 Touch the home icon touch the applications icon then touch the s...

Page 85: ...ttern by connecting four dots then touch Continue Re draw the pattern to confirm then touch Confirm The Security screen opens Pin Enter a PIN personal identification number to unlock the screen Touch this option use the on screen number pad to enter a PIN then touch Continue Re enter the PIN to confirm then touch OK The Security screen opens Password Enter a password to unlock the screen Touch thi...

Page 86: ...Encryption take an hour or more Make sure that your battery is fully charged To encrypt your table or microSD memory card 1 Make sure that your tablet s battery is fully charged 2 Touch the home icon touch the applications icon then touch the settings icon The Settings screen opens 3 Touch Security The Security screen opens ...

Page 87: ...s com 4 Touch Encrypt tablet Note You must set a screen lock PIN or Password before you can start encryption For more information see Encrypting your tablet or microSD memory card and select Pin or Password 5 Touch Encrypt tablet The Confirm your PIN screen opens ...

Page 88: ...ww insigniaproducts com 6 Enter your screen lock PIN or password then touch Continue The Confirm encryption screen opens 7 Touch Encrypt tablet to confirm Note You must enter your PIN or password to decrypt your tablet each time you power it on ...

Page 89: ...u can view how much of your internal storage has been used and how much it still available To view storage space 1 Touch the home icon touch the applications icon then touch the settings icon The Settings screen opens 2 Touch Storage The STORAGE screen opens 3 When you finish touch the home icon to return to the Home screen ...

Page 90: ...rage by deleting application cache and data To clear application cache and data 1 Touch the home icon touch the applications icon then touch the settings icon The Settings screen opens 2 Touch Apps The Apps screen opens 3 Touch the application that has cache or data you want to clear An application information screen opens ...

Page 91: ...inish touch the home icon to return to the Home screen Uninstalling an application Caution Back up any application data files before you uninstall an application because these files will be deleted Note You cannot uninstall applications that came pre installed on your tablet To uninstall an application 1 Touch the home icon touch the applications icon then touch the settings icon The Settings scre...

Page 92: ...Apps The Apps screen opens 3 Touch the application you want to uninstall An application information screen opens 4 Touch Uninstall then touch OK to confirm The uninstall finished screen opens 5 Touch OK to exit 6 When you finish touch the home icon to return to the Home screen ...

Page 93: ...ing your tablet to the default settings Important If your tablet is not responding try using the RESET button to restart your tablet Using the RESET button does not delete data and applications For more information see Restarting your tablet Resetting the tablet deletes all data including downloaded applications and resets the tablet back to its initial state the state before you turned on the tab...

Page 94: ...m To reset your tablet to the default settings 1 Connect your tablet to a power outlet 2 Touch the home icon touch the applications icon then touch the settings icon The Settings screen opens 3 Drag the screen up then touch Backup reset The BACKUP RESET screen opens ...

Page 95: ...oting What should I do if my tablet screen freezes Press and hold the power button for 3 to 5 seconds to turn off your tablet then turn your tablet back on If your tablet is still not working after you turn it off and back on use a small tool like a straightened paperclip to press the RESET button on the back of your tablet What should I do if I cannot turn on my tablet Connect the charger and che...

Page 96: ... the on screen instructions to complete an update Wi Fi connection is required Why is there no charge indicator on the tablet screen The charge indicator appears on your tablet s screen when the battery is charging except if the battery s charge is at less than 10 of its capacity When the battery is charging and the battery charge reaches 10 of its capacity the charge indicator appears on the scre...

Page 97: ...s and prevent normal use Keep your tablet in a clean and dust free place Specifications Specifications are subject to change without notice Dimensions H W D 0 48 7 4 9 29 inches 1 24 18 9 23 6 cm Weight 1 45 lbs 0 66 kg Screen size 9 7 inch diagonal Screen resolution 1024 768 Pixel per inch PPI 132 Power supply 5V 2A Power consumption Maximum 10W Internal memory 8 GB microSD memory card Up to 32 G...

Page 98: ...ce to radio or television reception which can be determined by turning the equipment off and on the user is encouraged to try to correct the interference by one or more of the following measures Reorient or relocate the receiving antenna Increase the separation between the equipment and receiver Connect the equipment into an outlet on a circuit different from that to which the receiver is connecte...

Page 99: ...f Insignia and are not returned to you If service of Products or parts are required after the Warranty Period expires you must pay all labor and parts charges This warranty lasts as long as you own your Insignia Product during the Warranty Period Warranty coverage terminates if you sell or otherwise transfer the Product How to obtain warranty service If you purchased the Product at a retail store ...

Page 100: ... RESPECT TO THE PRODUCT ALL EXPRESS AND IMPLIED WARRANTIES FOR THE PRODUCT INCLUDING BUT NOT LIMITED TO ANY IMPLIED WARRANTIES OF AND CONDITIONS OF MERCHANTABILITY AND FITNESS FOR A PARTICULAR PURPOSE ARE LIMITED IN DURATION TO THE WARRANTY PERIOD SET FORTH ABOVE AND NO WARRANTIES WHETHER EXPRESS OR IMPLIED WILL APPLY AFTER THE WARRANTY PERIOD SOME STATES PROVINCES AND JURISDICTIONS DO NOT ALLOW L...

Page 101: ...k of BBY Solutions Inc Registered in some countries Distributed by Best Buy Purchasing LLC 7601 Penn Ave South Richfield MN 55423 U S A 2012 BBY Solutions Inc All Rights Reserved 1 877 467 4289 www insigniaproducts com ENGLISH 12 1135 ...

Reviews: