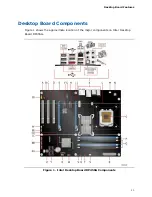
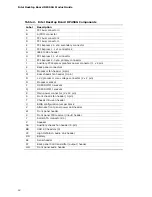
background image


Intel® Desktop Board DP45SG  
Product Guide 


Order Number:  E3001

6

-001 

Summary of Contents for BLKDP45SG - MB 1333FSB DDR3 1333 Aud+Lan RAID SATA ATX

Page 1: ...Intel Desktop Board DP45SG Product Guide Order Number E30016 001 ...

Page 2: ...rds for home or office use Canadian Department of Communications Compliance Statement This digital apparatus does not exceed the Class B limits for radio noise emissions from digital apparatus set out in the Radio Interference Regulations of the Canadian Department of Communications Le présent appareil numerique német pas de bruits radioélectriques dépassant les limites applicables aux appareils n...

Page 3: ...st equipment etc may not be supported without further evaluation by Intel Document Organization The chapters in this Product Guide are arranged as follows 1 Desktop Board Features a summary of product features 2 Installing and Replacing Desktop Board Components instructions on how to install the Desktop Board and other hardware components 3 Updating the BIOS instructions on how to update the BIOS ...

Page 4: ...e to hardware or loss of data NOTE Notes call attention to important information Terminology The table below gives descriptions of some common terms used in the product guide Term Description GB Gigabyte 1 073 741 824 bytes GHz Gigahertz one billion hertz KB Kilobyte 1024 bytes MB Megabyte 1 048 576 bytes Mb Megabit 1 048 576 bits MHz Megahertz one million hertz ...

Page 5: ...Intel Precision Cooling Technology 18 Chassis Intrusion 19 Power Management 19 Software Support 19 ACPI 19 Hardware Support 19 Power Connectors 19 Fan Headers 20 LAN Wake Capabilities 20 Instantly Available PC Technology 20 5 V Standby Power Indicator 21 Wake from USB 22 PME Signal Wake up Support 22 WAKE Signal Wake up Support 22 Wake from CIR 22 ENERGY STAR Capable 22 Speaker 22 Battery 22 Real ...

Page 6: ...ernal Headers and Connectors 44 S PDIF Connector 45 Front Panel Audio Header 45 IEEE 1394a Header 46 Consumer IR CIR Headers 46 Chassis Intrusion Header 47 Front Panel Header 47 Alternate Front Panel Power LED Header 48 HD Audio Link Header 48 USB 2 0 Headers 49 Serial Port Header 49 Connecting to the Flexible Audio System 50 Connecting Chassis Fan and Power Supply Cables 51 Connecting Chassis Fan...

Page 7: ... 73 European Union Declaration of Conformity Statement 74 Product Ecology Statements 75 Recycling Considerations 75 Lead free 2LI Pb free 2LI Board 78 Restriction of Hazardous Substances RoHS 79 EU RoHS 79 China RoHS 80 EMC Regulations 82 Ensure Electromagnetic Compatibility EMC Compliance 83 Product Certifications 84 Board Level Certification Markings 84 Chassis and Component Certifications 85 Fi...

Page 8: ...Tables 1 Feature Summary 9 2 Intel Desktop Board DP45SG Components 12 3 LAN Connector LEDs 15 4 S PDIF Connector Signal Names 45 5 Front Panel Audio Header Signal Names for HD Audio 45 6 Front Panel Audio Header Signal Names for AC 97 Audio 45 7 IEEE 1394a Header Signal Names 46 8 Front Panel CIR Receiver Input Header Signal Names 46 9 Back Panel CIR Header Emitter Output Header Signal Names 47 10...

Page 9: ...ogy Intel MST Graphics Support for multiple PCI Express graphics cards Audio Independent multi streaming 8 channel 7 1 audio and 2 channel audio subsystem featuring Intel High Definition Audio Intel HD Audio interface IDT 92HD73E audio codec HD Audio Link header Front panel header Two independent S PDIF connectors Onboard 3 pin connector Back panel optical connector Expansion Capabilities Two PCI ...

Page 10: ...sensing inputs used to monitor fan activity Intel Precision Cooling Technology fan speed control Voltage sensing to detect out of range values Supported Operating Systems Microsoft Windows Vista Ultimate Microsoft Windows Vista Enterprise Microsoft Windows Vista Business Microsoft Windows Vista Home Premium Microsoft Windows Vista Home Basic Microsoft Windows Vista Ultimate 64 bit edition Microsof...

Page 11: ...Desktop Board Features 11 Desktop Board Components Figure 1 shows the approximate location of the major components on Intel Desktop Board DP45SG Figure 1 Intel Desktop Board DP45SG Components ...

Page 12: ...ors L Processor fan header 4 pin M Rear chassis fan header 3 pin N 12 V processor core voltage connector 2 x 2 pin O Processor socket P DDR3 DIMM 0 sockets Q DDR3 DIMM 1 sockets R Main power connector 2 x 12 pin S Front chassis fan header 3 pin T Chassis intrusion header U BIOS configuration jumper block V Alternate front panel power LED header W Front panel header X Front panel CIR receiver input...

Page 13: ...rial Presence Detect SPD data structure If your memory modules do not support SPD you will see a notification to this effect on the screen at power up The BIOS will attempt to configure the memory controller for normal operation The Desktop Board supports the dual or single channel memory configurations defined below Four 240 pin Double Data Rate 3 DDR3 SDRAM Dual Inline Memory Module DIMM connect...

Page 14: ...er hub IDT 92HD73E audio codec The subsystem has the following headers and connectors Back panel audio connectors including an S PDIF optical port Front panel header that provides mic in and line out signals for front panel audio connectors High definition HD Audio or AC 97 Audio front panels can be supported HD Audio Link header used with HDMI video cards Onboard S PDIF connector that can be used...

Page 15: ...drivers go to http support intel com support motherboards desktop Two LEDs are built into the RJ 45 LAN connector located on the back panel see Figure 2 These LEDs indicate the status of the LAN Figure 2 LAN Connector LEDs Table 3 describes the LED states when the board is powered up and the LAN subsystem is operating Table 3 LAN Connector LEDs LED LED Color LED State Indicates A Off LAN link is n...

Page 16: ...ID 0 data striping RAID 1 data mirroring RAID 0 1 or RAID 10 data striping and data mirroring RAID 5 distributed parity For information on configuring your system for RAID using Intel Matrix Storage Technology go to Chapter 4 Intel Rapid Recover Technology Intel RRT The Desktop Board supports Intel Rapid Recover Technology which enables fast and easy recovery of your data in the event of a hard dr...

Page 17: ... is stored in the Serial Peripheral Interface SPI Flash device The BIOS can be updated by following the instructions on page 61 in Chapter 3 Serial ATA Auto Configuration If you install a Serial ATA device such as a hard drive in your computer the auto configuration utility in the BIOS automatically detects and configures the device for your computer You do not need to run the BIOS Setup program a...

Page 18: ...asswords are set you can enter either password to boot the computer Related Links For instructions on resetting the password go to Clearing Passwords on page 54 Hardware Management The hardware management features of Intel Desktop Board DP45SG enable the board to be compatible with the Wired for Management WfM specification The board has several hardware management features including the following...

Page 19: ...nal PME wakeup support PCI Express WAKE signal wakeup support Wake from Consumer IR Software Support ACPI ACPI gives the operating system direct control over the power management and Plug and Play functions of a computer The use of ACPI with the Desktop Board requires an operating system that provides full ACPI support Hardware Support Power Connectors ATX12V compliant power supplies can turn off ...

Page 20: ... upon detecting a Magic Packet frame it asserts a wake up signal that powers up the computer Instantly Available PC Technology CAUTIONS For Instantly Available PC technology the 5 V standby line for the power supply must be capable of delivering adequate 5 V standby current Failure to provide adequate standby current when using this feature can damage the power supply and or effect ACPI S3 sleep s...

Page 21: ...ge the board and any attached devices The Desktop Board s standby power indicator shown in Figure 3 is lit when there is standby power still present on the board even when the computer appears to be off For example when this LED is lit standby power is still present at the memory module sockets and the PCI PCI Express connectors Figure 3 Location of the Standby Power Indicator For more information...

Page 22: ...NERGY STAR Capable In 2007 the US Department of Energy and the US Environmental Protection Agency revised the ENERGY STAR requirements Intel worked directly with these two governmental agencies to define the new requirements This Desktop Board meets the ENERGY STAR Category C For information and recommendations concerning the new ENERGY STAR requirements go to the following location http intel com...

Page 23: ...Desktop Board Features 23 Real Time Clock The Desktop Board has a time of day clock and 100 year calendar The battery on the Desktop Board keeps the clock current when the computer is turned off ...

Page 24: ...Intel Desktop Board DP45SG Product Guide 24 ...

Page 25: ... power source and from any telecommunications links networks or modems before performing any of the procedures described in this chapter Failure to disconnect power telecommunications links networks or modems before you open the computer or perform any procedures can result in personal injury or equipment damage Some circuitry on the board can continue to operate even though the front panel power ...

Page 26: ...pply make sure that the calculated total current loads of all the modules within the computer is less than the output current rating of each of the power supplies output circuits Observe Safety and Regulatory Requirements Read and follow the instructions in this section and the instructions supplied with the chassis and associated modules If you do not follow these instructions and the instruction...

Page 27: ...nternal components from dust and foreign objects and promotes correct airflow within the chassis Install the I O shield before installing the Desktop Board in the chassis Place the shield inside the chassis as shown in Figure 4 Press the shield into place so that it fits tightly and securely If the shield does not fit obtain a properly sized shield from the chassis supplier Figure 4 Installing the...

Page 28: ...e before performing the procedures described here Failure to disconnect the power before you open the computer can result in personal injury or equipment damage Refer to your chassis manual for instructions on installing and removing the Desktop Board Figure 5 shows the location of the mounting screw holes for Intel Desktop Board DP45SG Figure 5 Intel Desktop Board DP45SG Mounting Screw Hole Locat...

Page 29: ...sor make sure the AC power has been removed by unplugging the power cord from the computer the standby power LED should not be lit see Figure 3 on page 21 Failure to do so could damage the processor and the board To install a processor follow these instructions 1 Observe the precautions in Before You Begin on page 25 2 Open the socket lever by pushing the lever down and away from the socket Figure...

Page 30: ...e socket contacts Figure 7 B Figure 7 Lift the Load Plate 4 Remove the plastic protective socket cover from the load plate Figure 8 Do not discard the protective socket cover Always replace the socket cover if the processor is removed from the socket Figure 8 Remove the Protective Socket Cover ...

Page 31: ...ver Always replace the processor cover if the processor is removed from the socket Figure 9 Remove the Processor from the Protective Processor Cover 6 Hold the processor with your thumb and index fingers oriented as shown in Figure 10 Make sure your fingers align to the socket cutouts Figure 10 A Align notches Figure 10 B with the socket Figure 10 C Lower the processor straight down without tiltin...

Page 32: ...Intel Desktop Board DP45SG Product Guide 32 7 Pressing down on the load plate Figure 11 A close and engage the socket lever Figure 11 B Figure 11 Close the Load Plate ...

Page 33: ... boxed processor manual Connecting the Processor Fan Heat Sink Cable Connect the processor fan heat sink cable to the 4 pin processor fan header see Figure 12 A fan with a 4 pin connector as shown in Figure 12 A is recommended however a fan with a 3 pin connector Figure 12 B can be used However since the fan with a 3 pin connector cannot use the onboard fan control the fan will always operate at f...

Page 34: ...Cover Optional To install the ICH heat sink decorative cover follow these instructions 1 Observe the precautions in Before You Begin on page 25 2 Remove the paper covering the adhesive strip on the bottom of the heat sink cover Figure 13 A 3 Place the heat sink cover on the ICH heat sink Figure 13 B Press down firmly to ensure that the adhesive adheres to the heat sink Figure 13 Installing the ICH...

Page 35: ...DIMM 1 in both Channel A and Channel B NOTE Regardless of the memory configuration used dual or single channel Channel A DIMM 0 must always be populated This is a requirement of the ICH10R Manageability Engine feature Guidelines for Dual Channel Memory Configuration Before installing DIMMs read and follow these guidelines for dual channel configuration Two or Four DIMMs Install a matched pair of D...

Page 36: ...f you want to use three DIMMs in a dual channel configuration install a matched pair of DIMMs equal in speed and size in DIMM 0 blue and DIMM 1 black of channel A Install a DIMM equal in speed and total size of the DIMMs installed in channel A in either DIMM 0 or DIMM 1 of channel B see Figure 16 Figure 16 Dual Channel Memory Configuration with Three DIMMs NOTE All other memory configurations will...

Page 37: ...acing Desktop Board Components 37 Installing DIMMs To make sure you have the correct DIMM place it on the illustration of the DDR3 DIMM in Figure 17 All the notches should match with the DDR3 DIMM Figure 17 Use DDR3 DIMMs ...

Page 38: ...re the clips at either end of the DIMM socket s are pushed outward to the open position 5 Holding the DIMM by the edges remove it from its anti static package 6 Position the DIMM above the socket Align the small notch at the bottom edge of the DIMM with the keys in the socket see inset in Figure 18 7 Insert the bottom edge of the DIMM into the socket 8 When the DIMM is inserted push down on the to...

Page 39: ...e computer 3 Remove the AC power cord from the computer 4 Remove the computer s cover 5 Gently spread the retaining clips at each end of the DIMM socket The DIMM pops out of the socket 6 Hold the DIMM by the edges lift it away from the socket and store it in an anti static package 7 Reinstall and reconnect any parts you removed or disconnected to reach the DIMM sockets 8 Replace the computer s cov...

Page 40: ...ins Depending on the over current protection of the power supply certain Desktop Board components and or traces may be damaged Installing Multiple PCI Express x16 Graphics Cards If you are installing a single PCI Express x16 graphics card install it in the PCI Express primary connector Figure 19 A for optimum performance However if you are installing two PCI Express x16 graphics cards install one ...

Page 41: ... Begin on page 25 2 Place the card in a PCI Express x16 connector Figure 20 A and press down on the card until it is completely seated in the connector and the card retention notch on the card snaps into place around the retention mechanism pin on the connector 3 Secure the card s metal bracket to the chassis back panel with a screw Figure 20 B Figure 20 Installing a PCI Express x16 Card ...

Page 42: ... the precautions in Before You Begin on page 25 2 Remove the screw Figure 21 A that secures the card s metal bracket to the chassis back panel 3 Push the card ejector lever down using the tip of a pencil or similar tool Figure 21 B in the notch This will release the card from the connector C 4 Pull the card straight up Figure 21 Removing a PCI Express x16 Card ...

Page 43: ...can be used to connect one internal SATA drive to the Desktop Board For correct cable function 1 Observe the precaution in Before You Begin on page 25 2 Attach one end of the SATA cable to one of the SATA connectors on the board Figure 22 A and attach the other end of the cable to the SATA drive Figure 22 B Figure 22 Connecting a Serial ATA Cable ...

Page 44: ... Begin on page 25 Figure 23 shows the location of the internal headers and connectors on Intel Desktop Board DP45SG Item Description Item Description A S PDIF G Alternate front panel power LED B Front panel audio H Front panel C IEEE 1394a I HD Audio Link D Back panel CIR emitter output J USB 2 0 3 E Front panel CIR receiver input K Serial F Chassis intrusion Figure 23 Internal Headers and Connect...

Page 45: ...he front panel audio header The front panel audio header supports both High Definition HD Audio and AC 97 Audio Table 5 shows the pin assignments and signal names for HD Audio and Table 6 shows the pin assignments and signal names for AC 97 Audio Table 5 Front Panel Audio Header Signal Names for HD Audio Pin Signal Name Pin Signal Name 1 PORT 1L 2 GND 3 PORT 1R 4 PRESENCE 5 PORT 2R 6 SENSE1_RETURN...

Page 46: ...ass input which the computer can use to learn to speak the infrared communication language of other user remotes The emitter header consists of two output ports which the computer can use to emulate learned infrared commands in order to control external electronic hardware NOTE The Consumer IR option must be enabled in the system BIOS before it can function Press F2 at boot to enter the system BIO...

Page 47: ...signments and signal names for the chassis intrusion header Table 10 Chassis Intrusion Header Signal Names Pin Description 1 Intruder 2 Ground Front Panel Header Figure 23 H shows the location of the front panel header Table 11 shows the pin assignments and signal names for the front panel header Table 11 Front Panel Header Signal Names Pin Description In Out Pin Description In Out Hard Drive Acti...

Page 48: ...he alternate front panel power LED header Table 12 Alternate Front Panel Power LED Header Signal Names Pin Description In Out 1 Front panel green LED Out 2 No pin 3 Front panel yellow LED Out HD Audio Link Header Figure 23 I shows the location of the HD Audio Link header Table 13 shows the pin assignments and signal names for the HD Audio Link header Table 13 HD Audio Link Header Signal Names Pin ...

Page 49: ...nd 9 Key 10 No Connection Note USB ports may be assigned as needed NOTE Computer systems that have an unshielded cable attached to a USB port might not meet FCC Class B requirements even if no device or a low speed USB device is attached to the cable Use a shielded cable that meets the requirements for a full speed USB device Serial Port Header See Figure 23 E for the location of the serial port h...

Page 50: ...ult connector assignments are shown in the table Item Description A Rear Surround Left and Right Channel B Center Channel and LFE Subwoofer C Side Surround Left and Right Line In D Line Out E Mic In F S PDIF Digital Audio Out Optical Figure 24 Back Panel Audio Connectors NOTE The back panel line out connector is designed to power either headphones or amplified speakers only Poor audio quality may ...

Page 51: ...ing Chassis Fan and Power Supply Cables Connecting Chassis Fan Cables Connect chassis fan cables to the 3 pin and 4 pin chassis fan headers on the Desktop Board Figure 25 shows the location of the chassis fan headers Figure 25 Location of the Chassis Fan Headers ...

Page 52: ...ble with ATX12V power supplies with 2 x 10 connectors Use of the 1 x 4 power connector is required with ATX12V power supplies when using PCI Express add in cards that can consume up to 75 W Figure 26 shows the location of the power connectors Figure 26 Connecting Power Supply Cables 1 Observe the precautions in Before You Begin on page 25 2 Connect the 12 V processor core voltage power supply cabl...

Page 53: ... Moving the jumper with the power on may result in unreliable computer operation Figure 27 shows the location of the Desktop Board s BIOS configuration jumper block Figure 27 Location of the BIOS Configuration Jumper Block The three pin BIOS jumper block enables all board configurations to be done in the BIOS Setup program Table 16 shows the jumper settings for the BIOS Setup program modes ...

Page 54: ... the precautions in Before You Begin on page 25 2 Turn off all peripheral devices connected to the computer Turn off the computer Disconnect the computer s power cord from the AC power source wall outlet or power adapter 3 Remove the computer cover 4 Find the configuration jumper block see Figure 27 5 Place the jumper on pins 2 3 as shown below 6 Replace the cover plug in the computer turn on the ...

Page 55: ... date and time might not be accurate Replace the battery with an equivalent one Figure 28 on page 60 shows the location of the battery CAUTION Risk of explosion if the battery is replaced with an incorrect type Batteries should be recycled where possible Disposal of used batteries must be in accordance with local environmental regulations PRECAUTION Risque d explosion si la pile usagée est remplac...

Page 56: ...elle pile usate seguire le istruzioni del produttore PRECAUCIÓN Existe peligro de explosión si la pila no se cambia de forma adecuada Utilice solamente pilas iguales o del mismo tipo que las recomendadas por el fabricante del equipo Para deshacerse de las pilas usadas siga igualmente las instrucciones del fabricante WAARSCHUWING Er bestaat ontploffingsgevaar als de batterij wordt vervangen door ee...

Page 57: ...ezetvédelmi előírásoknak megfelelően kell kiselejtezni AWAS Risiko letupan wujud jika bateri digantikan dengan jenis yang tidak betul Bateri sepatutnya dikitar semula jika boleh Pelupusan bateri terpakai mestilah mematuhi peraturan alam sekitar tempatan OSTRZEŻENIE Istnieje niebezpieczeństwo wybuchu w przypadku zastosowania niewłaściwego typu baterii Zużyte baterie należy w miarę możliwości utyliz...

Page 58: ... lahko povzroči eksplozijo Če je mogoče baterije reciklirajte Rabljene baterije zavrzite v skladu z lokalnimi okoljevarstvenimi predpisi UYARI Yanlış türde pil takıldığında patlama riski vardır Piller mümkün olduğunda geri dönüştürülmelidir Kullanılmış piller yerel çevre yasalarına uygun olarak atılmalıdır OСТОРОГА Використовуйте батареї правильного типу інакше існуватиме ризик вибуху Якщо можливо...

Page 59: ...Installing and Replacing Desktop Board Components 59 ...

Page 60: ...e computer s power cord from the AC power source wall outlet or power adapter 3 Remove the computer cover 4 Locate the battery on the board see Figure 28 5 With a medium flat bladed screwdriver gently pry the battery free from its connector Note the orientation of the and on the battery 6 Install the new battery in the connector orienting the and correctly 7 Replace the computer cover Figure 28 Re...

Page 61: ...s the functionality of the Intel Flash Memory Update Utility and the ease of use of Windows based installation wizards To update the BIOS with the Intel Express BIOS Update utility 1 Go to the Intel World Wide Web site http support intel com support motherboards desktop 2 Navigate to the Intel Desktop Board DP45SG page click view Latest BIOS updates and select the Express BIOS Update utility file ...

Page 62: ...Intel Integrator Toolkit Configuration File optional Intel Flash Memory Update Utility You can obtain either of these files through your computer supplier or by navigating to the Intel Desktop Board DP45SG page on the Intel World Wide Web site at http support intel com support motherboards desktop Navigate to the Intel Desktop Board DP45SG page click view Latest BIOS updates and select the ISO Ima...

Page 63: ...de CD ROM page press any key to confirm the BIOS upgrade operation 6 Wait for the BIOS upgrade process to complete CAUTION DO NOT POWER DOWN YOUR COMPUTER before the update is complete The update may take up to 5 minutes Updating the BIOS with the Iflash Memory Update Utility With the Iflash Memory update utility you can update the system BIOS from a bootable CD ROM bootable USB flash drive or oth...

Page 64: ...t to the USB device 3 Manually run the IFLASH EXE file from the USB device and manually update the BIOS Recovering the BIOS It is unlikely that anything will interrupt the BIOS update however if an interruption occurs the BIOS could be damaged Due to BIOS size and recovery requirements a CD R with the BIO file in the root directory will be required For more information about updating the Intel Des...

Page 65: ...and enter the RAID Configuration Utility 2 In the Intel Matrix Storage Manager option ROM Main Menu select option 1 Create RAID Volume Enter a volume name using English alphanumeric ASCII characters and press Enter 3 Use the arrow keys to select RAID 0 or RAID 1 if only two SATA drives are available RAID 5 and RAID 10 these options will only appear if three or four SATA drives are installed respec...

Page 66: ...nish the Windows installation and install all necessary drivers 4 Install the Intel Matrix Storage Console software via the Intel Express Installer Driver and Softwared DVD included with your Desktop Board or after downloading it from the Internet at http support intel com support motherboards desktop The Intel Matrix Storage Console software can be used to manage the RAID configuration Setting Up...

Page 67: ...e master drive data can be restored to a previous state by copying the data on the recovery drive back to the master drive Enabling Intel Rapid Recover Technology NOTE Intel Rapid Recover Technology does not support RAID 5 Intel Rapid Recover Technology can be Enabled or Disabled in the system BIOS menu To enable Intel Rapid Recover Technology complete following steps 1 Enter the BIOS menu by pres...

Page 68: ...s Update 2 Boot from Recovery Disk 3 Boot from Master Disk Creating a Recovery Volume Using the Intel Matrix Storage Console To create a recovery volume using the Intel Matrix Storage Console the system must be configured in RAID mode with two drives Boot the system into Microsoft Windows and open the Intel Matrix Storage Console application A recovery volume can be created in the Basic mode or th...

Page 69: ... 1 Right click on the recovery volume name and select Modify Volume 2 Select Next on the Modify Recovery Volume Wizard dialog box to continue 3 On the next screen select Continuous update 4 Select Next and then Finish to complete the operation Mounting the Recovery Disk NOTE Mounting the recovery disk will result in displaying the recovery disk in Microsoft Windows Explorer The recovery disk conte...

Page 70: ...covery disk complete the following steps 1 In the Advanced mode right click on the recovery volume name 2 Select Access Recovery Drive Files 3 Select OK on the information dialog box The recovery disk is now un mounted and reappears in Intel Matrix Storage Console ...

Page 71: ... Processor was previously shutdown due to a thermal event overheating MULTI_BIT_ECC_ERROR The firmware has detected that a Multi Bit ECC Error occurred SINGLE_BIT_ECC_ERROR The firmware has detected that a Single Bit ECC Error occurred CMOS_BATTERY_ERROR The firmware has detected that a CMOS battery failure occurred CMOS_CHECKSUM_ERROR The firmware has detected that a CMOS Checksum Error occurred ...

Page 72: ...Intel Desktop Board DP45SG Product Guide 72 ...

Page 73: ...nology Equipment Safety Part 1 General Requirements European Union IEC 60950 1 2005 Second Edition Information Technology Equipment Safety Part 1 General Requirements International Place Battery Marking There is insufficient space on this Desktop Board to provide instructions for replacing and disposing of the Lithium ion coin cell battery For system safety certification the statement below or an ...

Page 74: ...e med det europæiske direktiv 2004 108 EC 2006 95 EC Dutch Dit product is in navolging van de bepalingen van Europees Directief 2004 108 EC 2006 95 EC Eesti Antud toode vastab Euroopa direktiivides 2004 108 EC ja 2006 95 EC kehtestatud nõuetele Suomi Tämä tuote noudattaa EU direktiivin 2004 108 EC 2006 95 EC määräyksiä Français Ce produit est conforme aux exigences de la Directive Européenne 2004 ...

Page 75: ...n 2006 95 EC Svenska Denna produkt har tillverkats i enlighet med EG direktiv 2004 108 EC 2006 95 EC Türkçe Bu ürün Avrupa Birliği nin 2004 108 EC ve 2006 95 EC yönergelerine uyar Product Ecology Statements The following information is provided to address worldwide product ecology concerns and regulations Recycling Considerations As part of its commitment to environmental responsibility Intel has ...

Page 76: ...s etc Français Dans le cadre de son engagement pour la protection de l environnement Intel a mis en œuvre le programme Intel Product Recycling Program Programme de recyclage des produits Intel pour permettre aux consommateurs de produits Intel de recycler les produits usés en les retournant à des adresses spécifiées Visitez la page Web http www intel com intel other ehs product_ecology pour en sav...

Page 77: ...ecycling Program для предоставления конечным пользователям марок продукции Intel возможности возврата используемой продукции в специализированные пункты для должной утилизации Пожалуйста обратитесь на веб сайт http www intel com intel other ehs product_ecology за информацией об этой программе принимаемых продуктах местах приема инструкциях об отправке положениях и условиях и т д Türkçe Intel çevre...

Page 78: ...e Pb free means that lead has been removed where required by the RoHS legislation but still may exist as an impurity below 1000 ppm The term Lead free 2LI Pb free 2LI means lead free second level interconnect 2LI The balls leads or pads used to connect the component to a printed circuit board are lead free but the first level interconnect FLI is not lead free The use of lead in the FLI is acceptab...

Page 79: ...ot greater than 0 1 by weight 1000 ppm or or Restriction of Hazardous Substances RoHS EU RoHS EU RoHS Directive 2002 95 EC restricts the use of the following six materials in various types of electronic and electrical equipment Lead Mercury Cadmium Hexavalent chromium Polybrominated biphenyls PBB Polybrominated diphenyl ether PBDE The maximum concentrations allowed are 0 1 or 1000 ppm except for c...

Page 80: ... substances contained in each product Intel Desktop Board DP45SG is a China RoHS compliant product The required China RoHS mark indicates the product s Environmental Friendly Usage Period EFUP The EFUP is defined as the number of years for which listed controlled substances will not leak or chemically deteriorate while in the product The EFUP for Intel Desktop Boards has been determined to be 10 y...

Page 81: ...ipulates that a material Self Declaration Table SDT must be included in a product s user documentation The SDT for Intel Desktop Board DP45SG is shown in Figure 29 Figure 29 Intel Desktop Board DP45SG China RoHS Material Self Declaration Table ...

Page 82: ...ent European Union EN55022 2006 Australian Communications Authority Standard for Electromagnetic Compatibility Australia and New Zealand CISPR 22 2005 A1 2005 A2 2006 Limits and methods of measurement of Radio Disturbance Characteristics of Information Technology Equipment International CISPR 24 1997 A1 2001 A2 2002 Information Technology Equipment Immunity Characteristics Limits and Methods of Me...

Page 83: ...passed Class B EMC testing and are marked accordingly Pay close attention to the following when reading the installation instructions for the host chassis power supply and other modules Product certifications or lack of certifications External I O cable shielding and filtering Mounting grounding and bonding requirements Keying connectors when mating the wrong connectors could be hazardous If the p...

Page 84: ... Declaring compliance to European Union EU EMC directive and Low Voltage directive Australian Communications Authority ACA and New Zealand Radio Spectrum Management NZ RSM C tick mark Includes adjacent Intel supplier code number N 232 Japan VCCI Voluntary Control Council for Interference mark S Korea MIC Ministry of Information and Communication mark Includes adjacent MIC certification number CPU ...

Page 85: ...ctive as applicable should be obtained Additionally other directives such as the Radio and Telecommunications Terminal Equipment R TTE directive may also apply depending on product features In the United States A certification mark by a Nationally Recognized Testing Laboratory NRTL such as UL CSA or ETL signifies compliance with safety requirements Wiring and cables must also be UL listed or recog...

Page 86: ...Intel Desktop Board DP45SG Product Guide 86 ...

Reviews: