background image


Intel® Entry Server Chassis SC5275-E 
User Guide 


A Guide for Technically Qualified Assemblers of Intel® Identified 
Subassemblies/Products 


Order Number:  C50277-001 


Summary of Contents for C50277-001

Page 1: ...Intel Entry Server Chassis SC5275 E User Guide A Guide for Technically Qualified Assemblers of Intel Identified Subassemblies Products Order Number C50277 001...

Page 2: ...atsoever for conflicts or incompatibilities arising from future changes to them This document contains information on products in the design phase of development Do not finalize a design with this inf...

Page 3: ...ct and product diagrams to help you identify components and their locations Chapter 2 provides instructions on adding and replacing components Use this chapter for step by step instructions and diagra...

Page 4: ...Guide in the product box For the latest product information http support intel com support motherboards server chassis SC5275E Accessories or other Intel server products http www support intel com sup...

Page 5: ...offices schools computer rooms and similar commercial type locations The suitability of this product for other product categories and environments such as medical industrial telecommunications NEBS re...

Page 6: ...e stake pins on the board Safety Cautions Read all caution and safety statements in this document before performing any of the instructions See also Intel Server Boards and Server Chassis Safety Infor...

Page 7: ...if the system has been running Also there may be sharp pins and edges on some board and chassis parts Contact should be made with care Consider wearing protective gloves Danger of explosion if the ba...

Page 8: ...ontiertes Geh use ein Nachdem Sie die oben erw hnten ersten sechs SICHERHEITSSCHRITTE durchgef hrt haben k nnen Sie die Abdeckung abnehmen indem Sie 1 ffnen und entfernen Sie die Verschlu einrichtung...

Page 9: ...Stromanschlu des Produkts haupts chlich ber die Kabel unterbrochen wird http support intel com support motherboards server safecert htm Intel Server Boards and Server Chassis Safety Information Intel...

Page 10: ...dommager ses pi ces Pour installer les panneaux proc dez comme suit 1 Assurez vous de ne pas avoir oubli d outils ou de pi ces d mont es dans le syst me 2 Assurez vous que les c bles les cartes d exte...

Page 11: ...la pared o desconectar la fuente de alimentaci n INSTRUCCIONES DE SEGURIDAD Cuando extraiga la tapa del chasis para acceder al interior del sistema siga las siguientes instrucciones 1 Apague todos los...

Page 12: ...a un lugar Limpio y libre de part culas en suspensi n salvo el polvo normal Bien ventilado y alejado de fuentes de calor incluida la luz solar directa Alejado de fuentes de vibraci n Aislado de campos...

Page 13: ...ponenti dentro il sistema 2 Controllare che i cavi dei supporti aggiuntivi ed altri componenti siano stati installati appropriatamente 3 Attaccare le coperture al telaio con le viti tolte in precedenz...

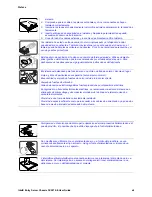
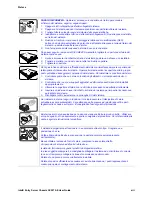
Page 14: ...Preface Intel Entry Server Chassis SC5275 E User Guide xiv...

Page 15: ...Installation Safety Instructions 9 Safety Before You Remove the Access Covers 9 Warnings and Cautions 10 Remove the Access Cover 11 Remove the Front Bezel 12 Install the I O Shield 13 Install the Ser...

Page 16: ...ce 45 Product EMC Compliance Class A Compliance 45 Certifications Registrations Declarations 46 Product Regulatory Compliance Markings 46 Electromagnetic Compatibility Notices 47 FCC USA 47 Industry C...

Page 17: ...igure 16 Installing the Access Cover 27 Figure 17 Replacing the Front System Fan in a Standard Drive Cage 31 Figure 18 Replacing the AC Power Supply 33 Figure 19 Front Panel Board Access 34 Figure 20...

Page 18: ...Contents Intel Entry Server Chassis SC5275 E User Guide xviii...

Page 19: ...ry Feature Description Drive Bays One 3 5 inch diskette drive bay accessible from front Two 5 25 inch wide bays that are externally accessible designed to hold half height standard removable media dev...

Page 20: ...s SC5275 E User Guide 2 Chassis Front View TP00053 A B C E F D A Front panel controls and indicators B 5 25 inch removable media drive bays C 3 5 inch removable media drive bay D Internal hard drive b...

Page 21: ...dition Description Power Sleep LED Green ON Power on Amber ON Sleep S1 OFF Power off or Sleep S4 LAN 1 Link Act Green ON Linked BLINK LAN activity OFF Disconnected LAN 2 Link Act Green ON Linked BLINK...

Page 22: ...te Serial B port knockout B Alternate ICMB or external SCSI knockout C AC input power connector D Power supply E Fan F I O ports G Expansion slot covers H ICMB or external SCSI knockout I Serial B por...

Page 23: ...ve bay upgrade supports up to six 3 5 inch SCSI hot swap hard drives Five bays are included with the upgrade kit If no drive is installed in a carrier a plastic air baffle must be installed to ensure...

Page 24: ...ks showing certification by an agency acceptable in your region The connector that plugs into the AC receptacle on the power supply must be an IEC 320 sheet C13 type female connector In Europe the cor...

Page 25: ...t bezel has a two position lock to prevent access to the hard drives and the interior of the chassis A padlock loop is included with the chassis and can be installed at the rear of the chassis TP00055...

Page 26: ...1 Chassis Description Intel Entry Server Chassis SC5275 E User Guide 8...

Page 27: ...d and adhere to all of these instructions and the instructions supplied with this assembly If you do not follow these instructions the UL listing will be void and the product will most likely be non c...

Page 28: ...ble parts inside it servicing should be done by technically qualified personnel CAUTIONS ESD can damage disk drives boards and other parts Perform all procedures in this chapter only at an ESD worksta...

Page 29: ...1 If the shipping screws are installed remove them number 1 in the figure below 2 Slide the thumb latches to the left to the unlocked position number 2 in the figure 3 Slide the cover backward a shor...

Page 30: ...the left side of the bezel forward to disengage the tabs facing up in the following figure See number 1 in the figure 2 Remove the bezel from the tabs at the right side of the chassis facing down in t...

Page 31: ...that match the external I O connectors e g keyboard and mouse 1 If an EMI gasket was provided with your server board install it now 2 Install the shield from the inside of the chassis Orient the shie...

Page 32: ...and bumper placement Install a 3 5 inch Floppy Drive 1 Use the finger cutouts on the EMI shield to grasp the shield and remove it from the chassis 2 Remove the plastic filler panel from the bezel TP0...

Page 33: ...s are required at the left side of the chassis to secure the device to the chassis Tighten the screws firmly 10 Connect the data and power cables to the drive TP00060 B Figure 7 Installing a Floppy Dr...

Page 34: ...option does not make the interrupt available Installing a 5 25 inch Removable Media Device Two 5 25 inch half height bays provide space for tape backup CD ROM or other removable media drives NOTE Save...

Page 35: ...Set any jumpers or switches on the drive according to the drive manufacturer s instructions 6 Using four screws of the appropriate size and length attach two slide rails to the drive Note that the lef...

Page 36: ...guide rails Push the drive into the bay until the slide rails are flush with the chassis 8 Use two screws for each slide rail to attach the device at the front of the chassis 9 Connect the data and p...

Page 37: ...and follow the instructions provided with the server board Quick Start User s Guide These instructions will guide you through preparing the board processors and memory for installation 4 Tilt the boa...

Page 38: ...power budget When installing more than four drives a Y cable may be needed for the power connectors 1 If the hard drive bay cage is not already removed remove and save the four screws that secure the...

Page 39: ...ors must face out the open side of the cage 7 Push the drive in until the drive connectors are flush with the rear of the cage 8 Line up the screws holes in the sides of the cage with the screw holes...

Page 40: ...the cage into the chassis making sure the arrow and the screw tabs point toward the top of the chassis 11 Insert and tighten the four screws removed in Step 1 12 Attach data and power cables to the d...

Page 41: ...nector on the server board 2 Connect the front panel cable to the server board 3 Connect the USB cable to the server board 4 Connect the fan cables to the server board 5 Connect the IDE cable s to the...

Page 42: ...areful not to touch the components or gold edge connectors Place board on an antistatic surface 4 Record the type and serial number of the add in board in your equipment log 5 Set jumpers or switches...

Page 43: ...2 Setting Up the Chassis Intel Entry Server Chassis SC5275 E User Guide 25 OM11961 A B C A Snap in slot cover B Tapered foot C Slot Figure 14 Installing an Add in Board...

Page 44: ...e of the bezel facing down in the figure below into the corresponding slots in the chassis See number 2 in the figure 3 Rotate the left side of the bezel facing up in the figure below over the side of...

Page 45: ...e slots on the server The cover should be flush against the chassis 2 Slide the cover forward until it stops letter A in the figure below 3 Slide the two thumb latches to the right to the lock positio...

Page 46: ......

Page 47: ...lectrostatic discharge ESD protection by wearing an antistatic wrist strap attached to chassis ground any unpainted metal surface when handling components Warnings and Cautions These warnings and caut...

Page 48: ...to ESD Hold boards only by their edges Do not touch the connector contacts After removing a board from its protective wrapper or from the server place the board component side up on a grounded static...

Page 49: ...removed It is not necessary to remove the hard drives from the cage 1 Remove the left access cover 2 Remove the bezel 3 Disconnect the fan cable from the server board 4 Disconnect the cables from all...

Page 50: ...he access cover Replacing a Rear System Fan 1 Remove the left access cover 2 Disconnect the fan cable from the server board 3 Remove the fan from the bracket No tools are necessary the fan snaps in an...

Page 51: ...the power cables inside the chassis 4 Remove and save the four screws that hold the power supply to the back of the chassis 5 Remove the two screws holding the front of the power supply to the bottom...

Page 52: ...assis provides access to the front panel board TP00069 A B A Right side of chassis access cover removed B Access to Front Panel Board Figure 19 Front Panel Board Access 5 Disconnect the front panel ca...

Page 53: ...e cable before installing the new front panel board into the chassis to ensure the cable pins line up correctly TP00082 Figure 21 Attaching the Front Panel Cable 9 Place the new front panel board in t...

Page 54: ...d in board retention bracket at the front of the chassis to disengage it 7 Tip the retention bracket slightly forward to create a gap between the top of the device and the chassis frame 8 Slide the US...

Page 55: ...3 Maintaining Your Server Intel Entry Server Chassis SC5275 E User Guide 37...

Page 56: ......

Page 57: ...that your loads do not exceed the combined total wattage of 600 Watts For information about calculating the power usage for your configuration see page 43 Table 4 Power Supply System Output Capability...

Page 58: ...d 0 5 C for every 1000 ft 305 m to a maximum of 10 000 ft Humidity Non operating 95 relative humidity non condensing at 30 C Shock Operating Packaged 2 0 g 11 msec 1 2 sine Operational after an 18 fre...

Page 59: ...server You will need some of this information when you run the SSU Item Manufacturer Name and Model Number Serial Number Date Installed Chassis Server Board Processor Speed and Cache Memory Video Disp...

Page 60: ...Equipment Log and Worksheets Intel Entry Server Chassis SC5275 E User Guide 42 Equipment Log continued Item Manufacturer Name and Model Number Serial Number Date Installed...

Page 61: ...oards and peripherals see your vendor documents Worksheet Calculating DC Power Usage Table 6 Power Usage Worksheet 1 Current maximum at voltage level Device 3 3 V 5 V 5 V 12 V 12 V 5 V Standby Baseboa...

Page 62: ...l to arrive at the total combined power usage for the power subsystem Table 7 Power Usage Worksheet 2 Voltage level and total current V X A W Total Watts for each voltage level 3 3 V X ______ A ______...

Page 63: ...Compliance The Entry Server Chassis SC5275 E has been has been tested and verified to comply with the following electromagnetic compatibility EMC regulations when installed a compatible Intel host sys...

Page 64: ...on of Conformity New Zealand BSMI Certification Taiwan GOST R Certification License Russia Belarus Certification License Belarus RRL Certification Korea IRAM Certification Argentina CNCA Certification...

Page 65: ...ectromagnetic Compatibility Notices FCC USA This device complies with Part 15 of the FCC Rules Operation is subject to the following two conditions 1 this device may not cause harmful interference and...

Page 66: ...f this device could void the user s authority to operate the equipment The customer is responsible for ensuring compliance of the modified product Only peripherals computer input output devices termin...

Page 67: ...erference Install and use the equipment according to the instruction manual BSMI Taiwan The BSMI Certification Marking and EMC warning is located on the outside rear area of the product Korean RRL Com...

Page 68: ...act your local Intel representative Server Chassis base chassis is provided with power supply and fans UL listed Server board you must use an Intel server board UL recognized Add in boards must have a...

Page 69: ...6 Belgium 02 714 3182 Finland 9 693 79297 Denmark 38 487077 Norway 23 1620 50 Sweden 08 445 1251 Holland 020 487 4562 In Asia Pacific region Australia 1800 649931 Hong Kong 852 2 844 4456 Korea 822 76...

Page 70: ...dial 800 843 4481 Chile Mainland and Juan contact AT T USA by dialing 800 225 288 once connected dial 800 843 4481 Ecuador Andimate contact AT T USA by dialing 1 999 119 once connected dial 800 843 4...

Page 71: ...duct is defective transportation charges for the return of Product to buyer within the USA will be paid by Intel For all other locations the warranty excludes all costs of shipping customs clearance a...

Page 72: ...uential damages resulting from any breach of warranty under another legal theory including but not limited to lost profits downtime goodwill damage to or replacement of equipment and property and any...

Page 73: ...rope and in Asia Contact your original authorized distributor for warranty service Any replacement Product is warranted under this written warranty and is subject to the same limitations and exclusion...

Reviews: