background image

CompactPCI

®

Multi-Function Adapters


 Installation and User’s Guide

Order Number ITI-90-100250
Version 1.2 (Second Publication)

LSI Logic Copyright 2000

Summary of Contents for ITI-8001

Page 1: ...CompactPCI Multi Function Adapters Installation and User s Guide Order Number ITI 90 100250 Version 1 2 Second Publication LSI Logic Copyright 2000 ...

Page 2: ...tice and should not be construed as a commitment by LSI Logic IntraServer Technology Inc LSI Logic IntraServer Technology Inc assumes no responsibility for any errors that may appear in this document Version Date Comments Version 1 1 January 2000 First Version Version 1 2 August 2000 Added SunCluster Cable Configurations ...

Page 3: ...ied by IntraServer Technology Inc or its affiliated companies Copyright IntraServer Technology Inc 2000 All Rights Reserved The Reader s Comment form at the end of this document requests your critical evaluation to assist in preparing future documentation The following are trademarks of IntraServer Technology Inc ITIpciTM ClusterReady IntraServer and the IntraServer logo All other trademarks and r...

Page 4: ... the equipment is operated in a commercial environment This equipment generates uses and can radiate radio frequency energy and if not installed and used in accordance with the instruction manual may cause harmful interference to radio communications Operation of this equipment in a residential area may cause harmful interference if not installed properly in which case the user will be required to...

Page 5: ...omply with the requirements of FCC part 15 class A as defined under paragraph 2 909 of these rules This declaration covers products identified with ITI 8241 ITI 8240 ITI 8200 ITI 8040 and ITI 8001 on the product label A copy of the test report substantiating compliance is available on request from Corporate EMC Manager IntraServer Technology Inc Seven October Hill Road Holliston MA 01746 ...

Page 6: ...O 20 Configuring the Video for Rear I O 21 Configuring Ethernet for Rear I O 22 CONFIGURING THE SCSI BUS 24 TERMINATION 24 AUTOMATIC SCSI TERMINATION 24 SCSI IDS 26 CABLING SCSI DEVICES 27 ITI 8000 SERIES LVD SE SCSI CABLE SELECTION GUIDE 28 CONNECTING INTERNAL SCSI DEVICES 29 Attaching Ultra2 LVD Devices 29 Attaching SE non Ultra2 LVD Devices 31 HARD DISK ACTIVITY LIGHT 32 CONNECTING EXTERNAL SCS...

Page 7: ...s to your Boot Install Server 55 Booting the Client using ITHPS ITSPS drivers 56 CONFIGURING THE DRIVER SOFTWARE 58 Configuring Host Files 58 Installing the software for the ITI 8241C S qfe adapter entry 58 Booting from the Network Using Solaris 59 Customizing the Installation 60 Network Hubs that do not send Link Pulses 60 Configuring Driver Parameters 60 Increasing TCP IP performance 61 Manually...

Page 8: ...Page 8 of 83 END USER LICENSE AGREEMENT FOR SOFTWARE 77 PRODUCT WARRANTY 81 READER S COMMENTS 83 ...

Page 9: ...ISC SCRIPTS multiport SCSI controller to minimize system overhead and maximize data throughput Four integrated Fast Ethernet channels provide high performance network connectivity with full compatibility with the Sun Solaris QFE driver An integrated ATI Rage2C graphics engine provides high performance graphics capability without the need for an additional CompactPCI slot IntraServer provides the h...

Page 10: ...I Combination Adapter with Two Ultra2 SCSI ports and Four Fast Ethernet Ports ITI 8200C S IntraServer CompactPCI Adapter with two Ultra2 SCSI ports ITI 8040C S IntraServer CompactPCI Adapter with four Fast Ethernet Ports ITI 8001C S IntraServer CompactPCI Adapter with one Video Port Table 1 Hardware Covered by this Guide The following variations are available for the adapters above The variations ...

Page 11: ...included in the software driver section of this guide Support is currently available for the following operating systems Operating System Intel SPARC Sun Solaris Version 2 6 No Yes1 Sun Solaris Version 7 0 No Yes1 Sun Solaris Version 8 0 No Yes2 WindowsNT Windows95 98 No N A Linux No N A Notes 1 No Hot Swap 2 Currently in qualification Contact IntraServer Sales for more information Table 3 Operati...

Page 12: ...umentation Organization This manual is organized into the following sections Adapter Configuration and Installation BIOS and Firmware Configuration Testing the Installation Software Driver Installation and Configuration ...

Page 13: ...ou first understand the basic rules of the SCSI bus and correctly configure the termination based on the position of the IntraServer CompactPCI adapter on the bus In order for a SCSI bus to operate it must be electrically terminated at both ends The terminators for LVD SE and SE on the ITI 8000 Series adapters are fully automatic and in normal circumstances need no manual intervention for correct ...

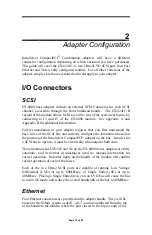
Page 14: ... next four available qfe numbers if there are existing qfe ports in your system Video A 15 pin D standard VGA connector is provided on the module handle Plug your VGA monitor into this connector and your system keyboard and mouse to the CPU keyboard and mouse port Solaris will automatically recognize the ATI video subsystem under the m64 driver ...

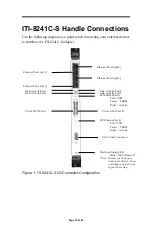
Page 15: ...SI Port A Ultra2 SCSI Port B Ethernet Port 0 qfe0 Ethernet Port 1 qfe1 Ethernet Port 2 qfe2 Ethernet Port 3 qfe3 Link Activity Port 0 Link Activity Port 2 Link Activity Port 1 Link Activity Port 3 SCSI Status Port A Left LVD Center TERM Right Activity Hot Swap Status LED Blue OK to Remove Note Contact your Software Vendor for details Some operating systems do not support hot swap SCSI Status Port ...

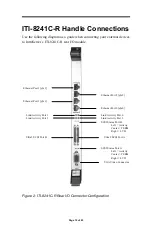
Page 16: ...I 8241C R Rear I O Connector Configuration VGA Video Connector Ultra2 SCSI Port B Ultra2 SCSI Port A Ethernet Port 0 qfe0 Ethernet Port 1 qfe1 Ethernet Port 2 qfe2 Ethernet Port 3 qfe3 Link Activity Port 0 Link Activity Port 2 Link Activity Port 1 Link Activity Port 3 SCSI Status Port B Left Activity Center TERM Right LVD SCSI Status Port A Left Activity Center TERM Right LVD ...

Page 17: ...nfiguration The following diagram can be used to locate the major components and option jumpers on the ITI 8241C S adapter Figure 3 ITI 8241C S Configuration Jumper and Header Location HDR 5 HDR 4 J 10 HDR 1002 J 11 J 6 7 8 9 HDR 1 6 3 7 ...

Page 18: ...Disable HDR 6 Bus A External Termination Invert HDR 7 Bus B External Termination Invert HDR 1002 Hot Swap Register Disable J 6 Ethernet Port 0 Front Rear Select J 7 Ethernet Port 1 Front Rear Select J 8 Ethernet Port 2 Front Rear Select J 9 Ethernet Port 3 Front Rear Select J 11 Video Front Rear J 10 Video Front Rear Table 4 Configuration Headers and Jumpers ...

Page 19: ...Page 19 of 83 ITI 8241C R Rear I O Transition Module Figure 4 IntraServer ITI 8241C R Rear I O Transition Module ...

Page 20: ...gure your ITI 8241C S adapter to select rear or front output for the Video and Ethernet functions Configuring SCSI for Rear I O The ITI 8241C S SCSI ports on the front and rear are all active at the same time If the Front ports are used alone or the rear ports are used alone the module will terminate the SCSI bus If the rear and front SCSI port on either the A or B SCSI channel are used together t...

Page 21: ...Locate J10 and J11 See Figure 2 for jumper locations Move each of the jumpers on J10 and J11 from the F position to the R position Figure 5 Video Configured for Front I O Figure 6 Video Configured for Rear I O The Video connector on the ITI 8241C R rear I O module will now be active and the front Video connector on the ITI 8241C R module will be inactive F F R R J11 J10 F F R R J11 J10 ...

Page 22: ...rocedure Locate J6 J7 J8 and J9 See Figure 2 for jumper locations Move the jumpers for each port to the Front F or Rear R position Each port can be configured for front I O or rear I O J9 Port 3 J8 Port 2 J7 Port 1 J6 Port 0 Figure 7 Ethernet Configured for Front I O J9 Port 3 J8 Port 2 J7 Port 1 J6 Port 0 Figure 8 Ethernet Configured for Rear I O R F R F R F R F R F R F R F R F ...

Page 23: ...em s documentation 5 Locate a free CompactPCI expansion slot and remove the screws and metal cover for the selected slot Be certain not to install the adapter in a CPU slot 6 Install the adapter in the selected slot The module should fit without forcing and should line up with the I O bulkhead Be certain that the adapter is fully seated in the slot 7 Tighten the retaining screws 8 Connect any SCSI...

Page 24: ...ENABLED 2 Devices not at the END of the bus have TERMINATION DISABLED 3 Use LVD SE termination on the Ultra2 buses 4 Use active termination for Ultra Wide SCSI Automatic SCSI Termination All IntraServer s ITI 8000 Series adapters employ automatic termination In normal cases no operator action is required to correctly terminate the SCSI bus provided the following rules are observed Each SCSI bus mu...

Page 25: ...t install a jumper on the invert termination headers HDR1 and HDR3 see Figure 2 this will force the module NOT to terminate the bus This situation could arise in a SCSI cluster If a Y cable is used on the REAR external connector placing the ITI 8000 Series adapter in the middle of the LVD SCSI bus you must install a jumper on the invert termination headers HDR6 and HDR7 see Figure 2 this will forc...

Page 26: ...nge the SCSI ID of one or more of the adapters in a SCSI Clustered system because there will be more than one IntraServer CompactPCI adapter on the same SCSI bus On a 16 bit WIDE SCSI bus each device must have a unique SCSI ID from 0 15 All IntraServer CompactPCI adapters default to ID 7 All other devices on the bus should be given Ids from 0 6 or 8 15 Refer to the target devices documentation set...

Page 27: ...mended that the total bus cable module etch length be kept to 1 5 meters It is highly recommended that a high quality SCSI cable be selected for all device connections due to the importance of optimal signal integrity and to ensure compliance with regulatory agency approval for system emissions Most problems encountered during the initial installation of a SCSI system can be traced to improper or ...

Page 28: ...ensity 50 401030 External 68 pin high density to 68 pin micro 16 Bit LVD External 1 0 68 pin high density micro 68 pin high density male rt angle 50 500175 External Adapter Cable 68 pin micro to 68 position high density receptacle 16 Bit LVD External 0 2 68 pin micro 68 pin high density receptacle 50 500170 External 68 pin high density one end right angle cable exit NOTE Extends 50 500170 16 Bit L...

Page 29: ...us is not running in LVD mode This is a quick check to indicate if a non Ultra2 LVD device is on the LVD segment of the card Attaching Ultra2 LVD Devices A differential internal cable 50 401030 can be used to attach internal LVD disks to the ITI 8241C R rear I O module The LVD cable should be plugged into one of the LVD SE connectors on the rear I O adapter J7 or J8 All internal LVD devices should...

Page 30: ...Page 30 of 83 LVD bus segment The adapter will terminate the other end of the bus automatically ...

Page 31: ...nsure the SCSI bus is only terminated at the end and that a high quality terminator is being used Set the device to a unique SCSI ID 0 6 or 8 15 the host adapter default is 7 Plug the end of the SCSI cable into the J7 or J8 connector on the ITI 8241C R adapter making sure pin 1 usually marked on the cable with a red stripe corresponds to pin 1 on the connector Plug one connector on the ribbon cabl...

Page 32: ...or your application You will need to know the type of connector you require on each end of the cable and the length of cable required Apply the same rules for ID and termination as for internal devices Only the end device on the bus last device on the cable should have termination enabled Each device must have a unique SCSI ID All IntraServer ITI 8000 Series modules will automatically enable or di...

Page 33: ...connected only to the Ultra2 LVD connectors If Ultra SE devices must be connected to the adapter put them all on one bus SE drives will cause the bus they are on to run at Ultra speeds and limit the bus performance to 40MB sec The maximum cable length end to end of the LVD bus must be 12 meters or less for multi drop connections The maximum cable length end to end of any bus running in SE mode mus...

Page 34: ...he controller end Figure 9 Internal Ultra2 LVD Devices Using ITI 8241C R Rear I O This example shows correct cabling of internal LVD devices to SCSI bus B of the ITI 8241C R Rear I O module Note In this configuration external drives connected to the bus B rear I O connector are not supported Ultra2 SCSI LVD SE Internal Connector Ultra2 SCSI LVD SE Terminator Ultra2 SCSI LVD SE Internal Cable Ultra...

Page 35: ... the bus is running in Single Ended Mode or 6M Ultra2 LVD Mode and needs correct termination at each end of the cable There is a short internal cable inside the box which connects the IntraServer rear transition card internal connector to the Cable adapter at the rear end of the HDD see the cabling diagrams below There is ONE external cable per SCSI channel which connects the two System boxes SCSI...

Page 36: ...ler cards are physically located in Node 0 and Node 1 Table 6 shows the recommended termination scheme and SCSI ID settings for one mirrored drive configuration Table 6 can also be applied to the second mirrored drive configuration Figure 11 Dual Rear SCSI Cabling in Side by Side Layout one disk per node using SCA adapter ...

Page 37: ...Page 37 of 83 Figure 12 Dual Rear SCSI Cabling in Side by Side Layout two disks per node using SCA adapter ...

Page 38: ...Page 38 of 83 Figure 13 Dual Rear SCSI Cabling in Side by Side Layout one disk per node using internal SCSI cable with terminator ...

Page 39: ...Page 39 of 83 Figure 14 Dual Rear SCSI Cabling in Side by Side Layout two disks per node using internal SCSI cable with terminator ...

Page 40: ...nd Node0 Micro connector SCSI external cable External Cable Other end Node1 Micro connector SCSI external cable ITI 8241C R Node1 The rear I O Transition card has a SCSI channel A internal connector and an external micro connector This card is plugged at the rear of t he ITI 82141C S Internal Cable Node1 SCSI 68 pin ultra wide cable 8 long that connects between SCA adapter IN and ITI 8241C R chann...

Page 41: ...ysical layer specification Four switchable 10BASE T 100BASE TX Ethernet channels with auto negotiation Conforms to IEEE 802 3 Ethernet standard Up to 100 meters of twisted pair without the use of repeaters Four independent Ethernet channels can run at either 10Mbps or 100Mbps Support for half duplex or full duplex operation Multiple 48 bit IEEE 802 3 style media access control MAC identifiers one ...

Page 42: ...ing Solaris 2 6 and above Environments OpenBoot PROM OBP Release 3 0 or later Note For up to date technical information visit IntraServer s web site at http www intraserver com Checking the OpenBoot PROM Revision Level You can use the OpenBoot command version to display your system s OpenBoot PROM revision level Displaying the OpenBoot PROM Revision Level At the ok prompt type version to check you...

Page 43: ...l duplex 10Mbps half duplex When the system is booted the IntraServer CompactPCI adapter advertises these capabilities to the Link Partner at the other end of the link a hub switch or another network interface card NIC in a host system If the Link Partner also supports auto negotiation it will advertise its capabilities over the link the common highest priority mode supported by both sides will be...

Page 44: ...s in the list of devices similar to the example below Ports identified as pci 1f 2000 pci 2 IntraServer qfe 0 1 are the IntraServer fast Ethernet ports on the ITI 8241C S adapter Your system will vary significantly from the example below depending on your system configuration ok show devs pci 1f 2000 pci 2 IntraServer qfe 0 1 pci 1f 2000 pci 2 IntraServer qfe 1 1 pci 1f 2000 pci 2 IntraServer qfe ...

Page 45: ...nce Manual for more information on the test and test all commands The selftest exercises most functionality of the adapter and checks for the following conditions Isolates faulty devices Checks that no hardware fault exists Checks connectivity during adapter card installation Verifies that all components are functional Use the following example to run selftest using the test command ok setenv diag...

Page 46: ... PHY Loopback 100MBit TP Loopback 10MBit XCVR Loopback Note To test other channels of the adapter you will need to execute the test command separately on each channel Note After testing is complete use the following command ok setenv diag switch False to turn off diagnostic mode If diag switch is left as true the time for the system to initialize will increase ...

Page 47: ...k passed Looking for Ethernet Packets is a Good Packet X is a Bad Packet Type any key to stop ok Note full path name of the qfe interface in the example above is the full path name of the qfe found with the show devs command at the ok prompt For example pci 1f 0 pci 1 pci 2 IntraServer qfe 0 1 pci 1f 0 pci 1 pci 2 IntraServer qfe 1 1 pci 1f 0 pci 1 pci 2 IntraServer qfe 2 1 pci 1f 0 pci 1 pci 2 In...

Page 48: ...ution media NOTE It is highly recommended that you make a backup of your system disk before installing any software Failure to back up all files on your system may result in unrecoverable loss of data Installation for Sun SPARC Solaris Ultra2 SCSI Options ITI 8200 Series IntraServer s ITI 8000 Series adapters offer the highest possible performance on Sun Solaris systems IntraServer s Ultra2 SCSI d...

Page 49: ...on contiguous LUN support Supports scatter gather Supports wide devices and tagged command queuing Supports multiprocessors System Requirements Your SPARC Solaris system must have the following available resources in order to install the ITI 8000 Series Ultra2 SCSI adapter Resource Requirement Host Bus Slot Sun Solaris system with available CompactPCI 6U slot Operating system Solaris 2 6 release o...

Page 50: ...aServer Ultra2 scsi 0 1 tape pci 1f 0 pci 1 pci 1 IntraServer Ultra2 scsi 0 1 disk pci 1f 0 pci 1 pci 1 IntraServer Ultra2 scsi 0 tape pci 1f 0 pci 1 pci 1 IntraServer Ultra2 scsi 0 disk pci 1f 0 pci 1 1 network 3 1 pci 1f 0 pci 1 1 scsi 2 pci 1f 0 pci 1 1 network 1 1 pci 1f 0 pci 1 1 ebus 1 ok pci 1f 0 pci 1 pci 1 IntraServer Ultra2 scsi 0 identifies the FIRST SCSI interface on an IntraServer ITI...

Page 51: ...ver Ultra2 scsi 0 Target 0 Unit 0 Disk IBM DDRS 34560D DC1B Target 1 Unit 0 Disk IBM DDRS 34560D DC1B If the SCSI disks on your IntraServer adapter are not identified by your system check the following 1 Does each disk have a unique SCSI ID 2 Does each disk have an ID that does not conflict with the ID of the IntraServer adapter Default id 7 3 Is the bus correctly terminated The IntraServer adapte...

Page 52: ...00000 00140000 00000000 00040000 compatible ithps version 1 0 0 model IntraServer ITI82xx wide device_type scsi 2 clock frequency 02faf080 reg 00036800 00000000 00000000 00000000 00000000 01036810 00000000 00000000 00000000 00000100 02036814 00000000 00000000 00000000 00000400 0203681c 00000000 00000000 00000000 00002000 02036830 00000000 00000000 00000000 00040000 arc identifier NCRC810 name Intr...

Page 53: ...on using an IntraServer adapter for your SYSTEM DISK you MUST use the NETWORK install procedure in order to load the device driver during installation Existing System Installation These instructions provide details to install the IntraServer ITHPS driver to an existing Solaris operating system installation Note You must be logged on as root to perform the installation Floppy Disk Install If you re...

Page 54: ...em to detect and correctly install your new disks Network Installation Procedure If you are using your IntraServer adapter to support your SPARC Solaris system disk you must install the Solaris operating system using a network install This section describes a complete installation of Solaris to a client system using IntraServer SCSI adapters for the system disk The method described in this section...

Page 55: ...lcheck command to ensure the system sees the floppy 2 Change directory to the root of the floppy cd floppy floppy0 3 Execute the install sh shell script to add the ITHPS and ITSPS drivers to the boot installation area install sh n export home install Solaris_2 6 Note For Solaris 2 7 boot files the directory would be export home install Solaris_2 7 Note The message major number maximum based on ser...

Page 56: ... Solaris to the client target machine via the boot and install server On the client machine boot the network install kit you created in the preceding steps as follows ok boot net v Note It is important to choose Manual Reboot rather than Auto Reboot during the installation of Solaris on the target machine If you choose Auto Reboot you will not have the opportunity to complete the installation of t...

Page 57: ...wer saving automatic shutdown You must answer no to this question if you are using the IntraServer adapter to support your boot disk If you change the disk drive configuration of your machine it may be necessary to issue the command touch reconfigure and then reboot the system in order for the system to detect and correctly install your new disks ...

Page 58: ...hostname qfe0 file The number 0 following qfe represents the first instance of the qfe device Use channel qfe1 for a second Ethernet channel and so on Do not create etc hostname qfe num files for the IntraServer qfe channels if any you do not plan to use The etc hostname qfe num file must contain the hostname for the appropriate network interface The hostname should have an IP address and should b...

Page 59: ...ork Using Solaris You can use the qfe driver on your ITI 8241C S adapter to boot over the network using the following example Find the hme device from the ok prompt ok show devs Find the full name of the hme you want to boot for example pci 1f 0 pci 1 pci 2 IntraServer qfe 0 1 pci 1f 0 pci 1 pci 2 IntraServer qfe 1 1 pci 1f 0 pci 1 pci 2 IntraServer qfe 2 1 pci 1f 0 pci 1 pci 2 IntraServer qfe 3 1...

Page 60: ... banner 1 apply disable link pulse pci 1f 0 pci 1 pci 2 IntraServer qfe 0 1 Press the Control C keys after typing pci 1f 0 pci 1 pci 2 IntraServer qfe 0 1 Type ok nvstore ok setenv use nvramrc true Reboot your system Configuring Driver Parameters The qfe device driver controls the IntraServer ITI 8241C S qfe Ethernet Device The device driver automatically selects the link speed using the auto nego...

Page 61: ...t dev tcp tcp_recv_hiwat 65535 ndd set dev tcp tcp_cwnd_max 65534 The changes will take effect immediately and affect all system networking interfaces Manually Specifying 10Mbps or 100Mbps Connection If you need to manually specify the speed of the network your ITI 8241C S adapter is on use the following process at the ok prompt Find the hme device from the ok prompt ok show devs Find the full nam...

Page 62: ...fter the Openboot PROM probes the adapter s FCode PROM a local mac address property is created in the adapter s device node The property s value corresponds to the Ethernet number that can be used with the adapter The device driver or any other qfe adapter utility can use this local mac address property for configuring that Ethernet interface Conflicts With FastEthernet Switches There are two FAST...

Page 63: ...Forwarding Routing Protocols The Solaris operating system will by default configure systems with more than one network interface to be an IP forwarding router Installing an ITI 8241C S in a system will make this occur An Application Server which might be running a Database or NFS file services is typically multihomed which means that that they contain more than one network interface but do not run...

Page 64: ...roperly configure the PCI device ITHPS n Hardware not properly enabled by system cmd xxxxh The system has not properly enabled the configuration resources that ITHPS needs in order to use this hardware The cmd xxxxh value needs to be reported to technical support ITHPS n Ignored invalid scsi initiator id value x The ithps conf file has an invalid scsi initiator id value as displayed in the error m...

Page 65: ... one of the previous two errors this adapter could not be attached to the I O subsystem and will not be accessable See the previous error message and solve that problem ITHPS n Unable to obtain soft state structure The driver was unable to initialize a required data structure and therefore did not load Please call technical support ITHPS n Failed to attach interrupt handler The driver was unable t...

Page 66: ...perating system You may need to update your driver ITHPS n Failed to allocate memory The driver was unable to allocate the memory needed during initialization You may have run out of available memory ITHPS n Unbind failed The driver had a problem when attempting to unload itself This is a fatal error ...

Page 67: ...tiple Access Collision Detect Protocol for carrier transmission access in Ethernet networks EISA Extended ISA Performance Enhanced ISA Ethernet IEEE standard data link protocol that specifies how data is placed on and retrieved from a common transmission medium Fast Ethernet 100Mbps technology based on the 10BaseT Ethernet CSMA CD network access method FAST SCSI SCSI clocked at 10 MHz 10 Mbytes se...

Page 68: ...ower On Self Test RJ 45 The 8 conductor version of an RJ 11 telephone but wider Router Component which receives and transmits and forwards packets to their destinations via the shortest route possible SCAM SCSI Configured AutoMatically Most SCSI devices do not yet support SCAM SCSI Small Computer Storage Interconnect SE Single Ended Ultra SCSI Standard Switch Hardware that routes packets across a ...

Page 69: ...Page 69 of 83 Wide SCSI 16 Bit SCSI Table 8 Glossary of Terms ...

Page 70: ...y standard 15 pin D connector and is wired as follows Figure 15 Video Connector Connection Signal Connection Signal 1 Red 9 5V 2 Green 10 Sync Ground 3 Blue 11 Ground 4 Ground 12 Bidirectional data 5 DDC Ground 13 Horiz Sync 6 Red Ground 14 Vert Sync 7 Green Ground 15 Data timing 8 Blue Ground Table 9 Video Connector Pinout ...

Page 71: ... Number Signal Name 1 Transmit TX 2 Transmit TX 3 Receive RX 4 No Connection NC 5 No Connection NC 6 Receive RX 7 No Connection NC 8 No Connection NC Table 10 8 Pin MJ Connector Pin Assignments Connection from the ITI 8241C S adapter to a network hub must be made as shown Straight Through Adapter Pin Hub Pin TX 1 ßà 1 RX TX 2 ßà 2 RX RX 3 ßà 3 TX 4 4 5 5 RX 6 ßà 6 TX 7 7 8 8 87654321 ...

Page 72: ...Network Cabling Requirements In order for your network to operate properly you must use a category of network cabling that is appropriate for the data rate of the channel For 10Mb s operation Category 3 or 5 cable is appropriate When operating in 100Mb s or 100Mb s Full Duplex a Category 5 cable should be used The maximum cable segment length supported at 100Mb sec speed on Category 5 cable is 100...

Page 73: ...x B Block Diagram Figure 17 ITI 8241C S Block Diagram 64 bit PCI PCI Bridge Ethernet Port0 Ethernet Port1 Ethernet Port3 Ethernet Port2 Graphics J1 4MB Graphics Memory Dual Port SCSI J2 J3 J5 Dual External SCSIConnector Video Connector Quad Ethernet Connector ...

Page 74: ...TERMPWR 14 A_DIFFSENS 5V GND LVDA_SD13 LVDA_SD13 13 LVDA_SD0 LVDA_SD0 GND LVDA_SD12 LVDA_SD12 12 LVDA_SD1 LVDA_SD1 INT_LVDA_1 LVDA_SD14 LVDA_SD14 11 LVDA_SD4 LVDA_SD4 GND LVDA_SDP1 LVDA_SDP1 10 LVDA_SD3 LVDA_SD3 GND LVDA_SD15 LVDA_SD15 9 LVDA_SD6 LVDA_SD6 BA_ACTIVE_LED LVDA_SD2 LVDA_SD2 8 LVDA_SD7 LVDA_SD7 GND LVDA_SD5 LVDA_SD5 7 LVDA_SATN LVDA_SATN GND LVDA_SDP0 LVDA_SDP0 6 LVDA_SBSY LVDA_SBSY BA...

Page 75: ..._SD1 LVDB_SD1 INT_LVDB_1 LVDB_SD14 LVDB_SD14 11 LVDB_SD4 LVDB_SD4 GND LVDB_SDP1 LVDB_SDP1 10 LVDB_SD3 LVDB_SD3 GND LVDB_SD15 LVDB_SD15 9 LVDB_SD6 LVDB_SD6 BB_ACTIVE_LED LVDB_SD2 LVDB_SD2 8 LVDB_SD7 LVDB_SD7 GND LVDB_SD5 LVDB_SD5 7 LVDB_SATN LVDB_SATN GND LVDB_SDP0 LVDB_SDP0 6 LVDB_SBSY LVDB_SBSY BB_TERM_LED LVDB_SRST LVDB_SRST 5 LVDB_SACK LVDB_SACK GND LVDB_SMSG LVDB_SMSG 4 LVDB_SC_D LVDB_SC_D GND...

Page 76: ... 13 Dual Rear SCSI Cabling in Side by Side Layout one disk per node using internal SCSI cable with terminator 38 Figure 14 Dual Rear SCSI Cabling in Side by Side Layout two disks per node using internal SCSI cable with terminator 39 Figure 15 Video Connector 70 Figure 16 8 Pin MJ Connector Front 71 Figure 17 ITI 8241C S Block Diagram 73 List of Tables Table 1 Hardware Covered by this Guide 10 Tabl...

Page 77: ...E PRODUCT you agree to bound by the terms of this EULA If you do not agree to the terms of this EULA ITI is unwilling to license the SOFTWARE PRODUCT to you In such event you may not use or copy the SOFTWARE PRODUCT and you should promptly contact ITI or your reseller for instructions on return of the Host Adapter and Software for a refund SOFTWARE PRODUCT LICENSE The SOFTWARE PRODUCT is owned by ...

Page 78: ...vices of the server The basic network services are more fully described in the printed materials accompanying the SOFTWARE PRODUCT Storage and Network Use You may also store or install a copy of the computer software portion of the SOFTWARE PRODUCT on the Computer to allow you other computers to use the SOFTWARE PRODUCT over an internal network However you must acquire and dedicate a license for t...

Page 79: ...ent or lease the SOFTWARE PRODUCT apart from the Host Adapter The renting or leasing of a complete computer system containing both the SOFTWARE PRODUCT and the Host Adapter is allowed however Software Transfer You may permanently transfer all of your rights under this EULA only as part of a sale transfer of the Host Adapter provided you retain no copies you transfer your rights in the SOFTWARE PRO...

Page 80: ...ur single Computer You may not loan rent lease or otherwise transfer the other medium to another user except for a permanent transfer as provided above of your rights in the SOFTWARE PRODUCT 5 PRODUCT SUPPORT Product support for the SOFTWARE PRODUCT is provided by ITI its resellers and OEMs For support please call 1 508 429 0425 technical support in the U S A between 8 30 AM and 5 30PM EST 6 U S G...

Page 81: ...NTY ITI warrants to only the original licensee that the Host Adapter is free of defects in materials and workmanship under normal use for a period of three years from the date of purchase In the event of a defect in Host Adapter material or workmanship during such warranty period ITI at its discretion will repair or replace the defective product when the defective product is returned to ITI by the...

Page 82: ...ill not accept any Host Adapter that does not include an RMA number on the package LIMITATIONS EXCEPT FOR THE WARRANTIES STATED IN THIS LIMITED PRODUCT WARRANTY ITI SPECIFICLALY DISCLAIMS ALL OTHER WARRANTIES OR REPRESENTATIONS EXPRESSED OR IMPLIED INCLUDING BUT NOT LIMITED TO IMPLIED WARRANTIES OR MERCHANTABILITY AND FITNESS FOR A PARTICULAR PURPOSE IN NO EVENT SHALL ITI BE LIABLE FOR ANY LOSS OF...

Page 83: ...__________________________________________________________________________ Additional comments or suggestions to improve this manual ___________________________________________________________________________________ ___________________________________________________________________________________ ___________________________________________________________________________________ For software ma...

Reviews: