
CU-07A Tracer unit
1/4
MKW51604
CU-07 A TRACER unit
1. Unit description
The
CU-07 A Tracer unit
is a device which uses a GPS receiver to
detect the position of a car, a motorcycle or cargo. The position can be
ascertained any time via a single SMS command or it can be sent
during the journey via the GSM network to the mass storage server of
the web application where data are managed for online monitoring
and the trace log. Simply said, the unit can be used both for passive
locating when it only answers a single command, and for the
continuous transmission of real-time data to a data-collection server. If
the attempt to send the data fails, the unit saves it in its internal
memory and sends it later.
Start of the journey –
The accelerometer triggers the GPS
module when car starts moving. It starts immediately with locating.
The start of the journey is indicated by a permanently lit LED until
the journey is finished (optional parameter).
End of the journey –
The journey is finished automatically with
a 5 minute delay from the moment the car stops. If the car
continues with the journey during this 5 minute interval then the
journey won´t be split into independent traces. This eliminates
splitting the traces because of waiting at crossroads for example.
2. Unit installation and connection
2.1. Unit installation
The unit should be installed in the vehicle interior by a professional
company. It is suitable for vehicles with a 12 V or 24 V power supply
and a negative earth.
Disconnect the battery before installation. Nobody should be inside
a vehicle equipped with airbags while handling the battery. Some
devices equipped with a memory (clock, configurations, etc) could be
erased when the battery is disconnected. Avoid drilling into metal parts
of the car body during installation. The manufacturer shall not be held
liable for any damage caused by incorrect or unsuitable installation of
the product.
2.2. Unit installation in the car
We recommend installing the unit on or under the dashboard or at a
place where it has a good view towards the sky.
It is true for the
correct functioning of the GPS module that the wider the angle
through which the antenna can see the sky through the
windscreen, the more precise the GPS location function is.
There
must not be any other metal objects under or above antenna. Always
install the unit according to the described orientation which means the
lettering pointing down towards the ground.
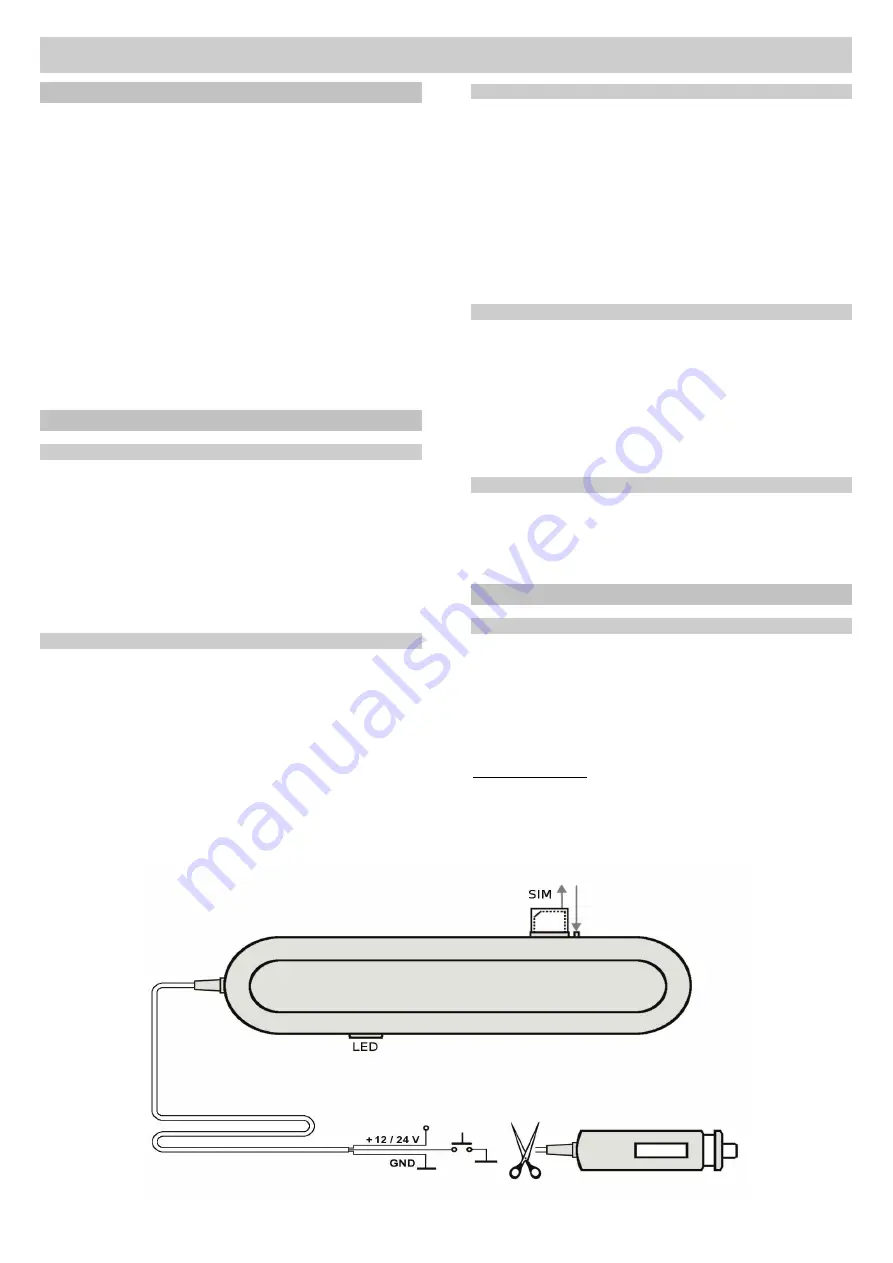
2.3. Wire connections
Visibly installed unit can be easily connected to circuits of the car
via the connector into the car socket for car lighter. If the unit is
installed as a hidden or is permanently used in one car, we
recommend to cut the connector and wires connected directly to
the electric installation of the car.
•
Black - ground
– connect to the original earthing point.
•
Red - +12 V (+24 V) power supply
- connect to a cable leading
from the battery.
The
power supply should only be connected after
a thorough inspection of the whole installation!
•
White – panic input
, reacts to grounding to the GND wire.
Default: not used.
2.4. Status indication with an LED indicator
The unit indicates its status with an LED indicator.
Slow flashing
Logging into the system or the GPS
signal has been lost
Rapid flashing
The unit is waiting for configuration
SOS flashing (...---...)
Unit failure
Permanently lit
Motion indication, the journey is being
monitored
The LED is off
Journey termination or the unit’s power
supply has been disconnected
2.5. SIM card
The SIM card is first inserted into its moveable holder then into
the fixed holder on the PCB from the side of the unit. The
moveable SIM card holder ejects when yellow button is pressed in
the direction of the arrow visible on the unit. Mind the correct
orientation of the SIM card and press the holder to the stop.
3. Basic unit configuration
3.1. Language selection
The basic unit language is English, but every unit has its
language kit. For more infomation about language kits see
www.jablotron.com, or contact your distributor. When a new
language is selected, all texts will be set to the defaults of the
chosen language. The rest of the unit‘s configuration is not
changed..
Command format: MCcode LANGUAGE CZ/EN
Command example:
1234 LANGUAGE CZ (new language is Czech)
The following languages are supported by the factory default
settings: Czech CZ, German DE, English EN, Spanish ES,
Polish PL, Portuguese PT, Slovak SK, Serbian SR


