background image

INSTRUCTION BOOK

Summary of Contents for 15

Page 1: ...INSTRUCTION BOOK ...

Page 2: ......

Page 3: ... grasp the plug not the cord 10 Keep fingers away from all moving parts Special care is required around the sewing machine needle and or cutting blade 11 Always use the proper needle plate The wrong plate can cause the needle to break 12 Do not use bent needles 13 Do not pull or push fabric while stitching It may deflect the needle causing it to break 14 Switch this sewing machine off O when makin...

Page 4: ...4 Selecting the Stitch Pattern 15 Stitch Length Dial 15 Adjusting Stretch Stitch Balance 16 Balancing Needle Thread Tension 17 SECTION 3 BASIC SEWING Straight Stitch 18 Changing the Sewing Direction 18 Using the Seam Guide Lines 19 Turning a Square Corner 19 SECTION 4 UTILITY STITCHES Basic Zigzag 20 Overcasting 20 Knit Stitch 21 Tricot Stitch 21 Straight Stretch Stitch 22 Zigzag Stretch Stitch 22...

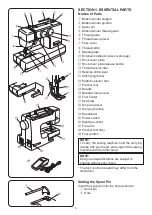
Page 5: ...t y u i o 8 7 2 6 5 4 3 1 0 9 8 7 6 5 4 3 2 1 0 9 Bobbin winder stopper Bobbin winder spindle Spool pin Bobbin winder thread guide Thread guide Thread take up lever Face cover Thread cutter Needle plate Extension table Accessory storage Hook cover plate Hook cover plate release button Thread tension dial Reverse stitch lever Stitch length dial Pattern selector dial Presser foot Needle Needle clamp...

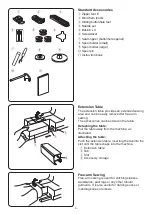
Page 6: ... removed for free arm sewing The accessories can be stored in the table Detaching the table Pull the table away from the machine as illustrated Attaching the table Push the extension table inserting the tab into the slot until the table snaps into the machine q Extension table w Tab e Slot r Accessory storage Free arm Sewing Free arm sewing is used for stitching sleeves waistbands pant legs or any...

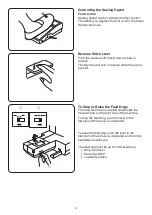
Page 7: ...o not touch any moving parts such as the thread take up lever handwheel or needle Always turn off the power switch and unplug from the power supply when leaving the machine unattended when attaching or removing parts when cleaning the machine Do not place anything on the foot control otherwise the machine will run intermittently q w e r t Operating Instructions The symbol O of a switch indicates t...

Page 8: ... reverse while the lever is pushed To Drop or Raise the Feed Dogs The drop feed lever is located underneath the free arm bed on the front side of the machine To drop the feed dog push the lever in the direction of the arrow as illustrated To raise the feed dog push the lever in the direction of the arrow as illustrated and turn the handwheel toward you The feed dog must be up for normal sewing q D...

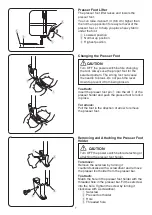
Page 9: ... the lever down to prevent it from being broken To attach Insert the presser foot pin q into the slit w of the presser holder and push the presser foot to lock it in place To remove Pull the foot in the direction of arrow to remove the presser foot CAUTION Turn OFF the power switch before detaching or attaching the presser foot holder To remove Remove the setscrew by turning it counterclockwise wi...

Page 10: ...ove the needle from the clamp q Needle clamp screw x Insert a new needle into the needle clamp with the flat side of the needle to the rear When inserting the needle into the needle clamp push it up against the stopper pin and tighten the needle clamp screw firmly w Stopper pin e Flat side To check needle straightness place the flat side of the needle onto something flat a needle plate glass etc T...

Page 11: ... Chart For general sewing use needle size 11 75 or 14 90 A fine thread and needle should be used for sewing lightweight fabrics so the fabric will not be marred Heavy fabrics require a needle large enough to pierce the fabric without fraying the needle thread Always test the needle size on a small scrap of the fabric that will be used for actual sewing In general use the same thread for the needle...

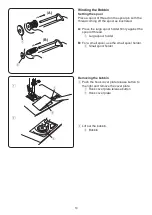
Page 12: ...d A Press the large spool holder firmly against the spool of thread q Large spool holder B For a small spool use the small spool holder w Small spool holder Removing the bobbin z Push the hook cover plate release button to the right and remove the cover plate q Hook cover plate release button w Hook cover plate x Lift out the bobbin e Bobbin q w ...

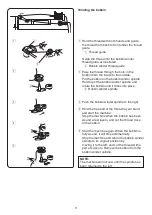
Page 13: ...ith a pair of scissors Remove the bobbin from the bobbin winder spindle NOTE The machine will not sew until the spindle has been returned to the left Winding the bobbin z Hold the thread with both hands and guide the thread from back to front under the thread guide q Thread guide Guide the thread into the bobbin winder thread guide as illustrated w Bobbin winder thread guide x Pass the thread thro...

Page 14: ... the thread to the left sliding it between the tension spring blades w Front notch e Tension spring blade c Continue to draw the thread lightly until the thread slips into the side notch r Side notch v Pull out about 4 10 cm of thread Attach the hook cover plate Check the threading by referring to the chart shown on the hook cover plate t Thread y Hook cover plate q w e r z x c v 10 1 8 3 8 5 8 t ...

Page 15: ...und the bottom of the thread guide plate Pull the thread up along the left channel w Right channel e Thread guide plate r Left channel c Firmly draw the thread from right to left over the thread take up lever and down into the take up lever eye t Thread take up lever v Draw the thread down along the left channel and slip the thread behind the needle bar thread guide from the left y Needle bar thre...

Page 16: ...the needle thread lightly with your left hand q Needle thread x Turn the handwheel slowly toward you one complete turn Bring the bobbin thread up by pulling the needle thread as illustrated w Bobbin thread c Pull 4 10 cm of both threads back and under the presser foot q w q ...

Page 17: ...he needle may bend or break To select the stretch stitch patterns set the stitch length dial at S S e Stretch stitch patterns Stitch Length Dial Turn the stitch length dial to set the desired stitch length number at the setting mark The higher the number the longer the stitch The mark shows the adjustment range when sewing the buttonhole r Setting mark t Stitch length dial Selecting the Stitch Pat...

Page 18: ...ch patterns are uneven when you sew on a particular fabric correct them by turning the stitch length dial If the patterns are drawn out correct them by setting the dial to the side If the patterns are compressed correct them by setting the dial to the side ...

Page 19: ...fabric and the needle thread shows slightly on the wrong side bottom side of the fabric w Needle thread Top thread e Bobbin thread Bottom thread r Right side Top side of fabric t Wrong side Bottom side of fabric Needle thread tension is too tight The bobbin thread bottom thread will appear on the right side top side of the fabric Loosen the needle thread tension by moving the dial to a lower numbe...

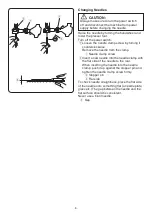
Page 20: ...cut them with the thread cutter The threads are now the proper length to begin sewing the next seam CAUTION Do not place fingers near to the presser foot when guiding fabric or the needle clamp screw may strike and injure your fingers Changing the Sewing Direction Stop the machine and turn the handwheel toward you to bring the needle down into the fabric Raise the presser foot Pivot the fabric aro...

Page 21: ...sition Turning a Square Corner The cornering guide helps you maintain a 5 8 1 6 cm seam allowance when sewing a corner When the fabric edge facing you lines up with the cornering guide as illustrated stop stitching and lower the needle into the fabric by turning the handwheel toward you Raise the presser foot and pivot the fabric so the edge of the fabric will align with the 5 8 1 6 cm seam guide ...

Page 22: ...and knits to prevent puckering SECTION 4 UTILITY STITCHES The zigzag stitch is used on the seam allowance to prevent fabric from fraying at raw edges Basic Zigzag Machine setting q Stitch selector C w Presser foot Zigzag foot A e Thread tension 2 5 r Stitch length 0 5 4 Overcasting Machine setting q Stitch selector C w Presser foot Zigzag foot A e Thread tension 2 5 r Stitch length 0 5 4 ...

Page 23: ...ics and other fabrics that tend to pucker Place the fabric to leave a 5 8 1 6 cm allowance Trim the extra allowance after sewing It is also used for mending tears Use a short stitch length 0 1 for mending tears Knit Stitch Machine setting q Stitch selector G w Presser foot Zigzag foot A e Thread tension 3 7 r Stitch length S S t Stitch width 5 Tricot Stitch Machine setting q Stitch selector D w Pr...

Page 24: ...ly guide the fabric while sewing as the fabric moves back and forth Sew on stretch fabrics in any area that you might use a zigzag stitch This stitch is used as a decorative topstitch as well Straight Stretch Stitch Machine setting q Stitch selector A or B w Presser foot Zigzag foot A e Thread tension 3 7 r Stitch length S S Zigzag Stretch Stitch Machine setting q Stitch selector C w Presser foot ...

Page 25: ... íà ëàïêå Ñâåðõó íà ëàïêó ïîëîæèòå áóëàâêó òîáû ñôîðìèðîâàòü íîæêó Ïðîâåðüòå òîáû èãëà ñìîãëà ïðîéòè ñêâîçü îáà îòâåðñòèÿ â ïóãîâèöå 1 Áóëàâêà Çàïðàâüòå íèòü â èãëó è ïðîøåéòå 10 ñòåæêîâ Îáðåæüòå îáå íèòè â íà àëå Ïîäíèìèòå ëàïêó è ñíèìèòå òêàíü Îáðåæüòå èãîëüíóþ è øïóëüíóþ íèòè îñòàâëÿÿ õâîñòèêè ïî 20 ñì Âûâåäèòå èãîëüíóþ íèòü ìåæäó ïóãîâèöåé è òêàíüþ åðåç îòâåðñòèå â ïóãîâèöå Ïîòÿíèòå çà èãîëüíó...

Page 26: ...JRODUH OD GHQVLWj GHO SXQWR DG RFFKLHOOR x c v n VHJQR VXSHULRUH w VXO FXUVRUH FRUULVSRQGD DO VHJQR GL SDUWHQ D q OOLQHDUH L VHJQL VXO SLHGLQR DO VHJQR VXSHULRUH GHO WHVVXWR EEDVVDUH LO SLHGLQR q 6HJQR GL SDUWHQ D w 6HJQR VXSHULRUH e LOR GHOO DJR r LOR GHOOD VSROLQD 127 D VFDOD VXO FXUVRUH q LQGLFDWD LQ FHQWLPHWUL x PSRVWDUH LO TXDGUDQWH VHOHWWRUH GL PRWLYL VX XFLUH LQ DYDQWL ILQFKp VL UDJJLXQJH L...

Page 27: ... VHOHWWRUH GL PRWLYL VX XFLUH DOFXQH EDVWH H VROOHYDUH O DJR GDO WHVVXWR PSRVWDUH LO FRPDQGR GHOOD OXQJKH D GHO SXQWR VX H LO VHOHWWRUH GL PRWLYL VX FXFLWXUD GLULWWD XFLUH DOFXQL SXQWL GL FKLXVXUD n 7RJOLHUH LO WHVVXWR GDOOD PDFFKLQD H WDJOLDUH LO ILOR GL FXFLWXUD QVHULUH XQR VSLOOR QHOOD EDVWD 4XLQGL WDJOLDUH O DSHUWXUD FRQ XQ GLYDULFDWRUH DUH DWWHQ LRQH D QRQ WDJOLDUH L SXQWL z q w e r t y u i n...

Page 28: ...th u Zipper tape i Wrong side of the fabric o End of the opening x Place the right top sides of the fabric together Sew a bottom seam 5 8 2 cm from the right edge to the zipper bottom stop position Sew a few stitches in reverse to lock Increase the stitch length to 4 set needle thread tension to 1 and baste the entire length of the fabric 0 5 8 2 cm 1 Basting 2 Reverse stitch 3 End of the opening ...

Page 29: ...h next to margin edge and baste the zipper tape to the lower fabric layer Align zipper foot with margin edge Return thread tension and stitch length to original settings Sew a seam the entire length of zipper tape c Stop the machine 2 5 cm before reaching the slider with needle in the fabric and raise the foot then unzip a few inches to clear a path for stitching o Slider 0 2 5 cm v Remove fabric ...

Page 30: ...w a seam the entire length of the zipper tape Before reaching the slider stop the machine with needle in fabric and raise the foot Use seam ripper to open a few inches of basting stitch 3 Unstitch basting 4 3 8 1 cm n Unzip a few inches to clear a path for stitching At end of seam sew a few stitches in reverse to lock Once both sides of zipper are sewn use the seam ripper to open the basting stitc...

Page 31: ... to align the guide on the foot with the folded edge so that the needle just pierces the fold If the needle pierces too far left move the guide slightly to the left If the needle misses the fold move the guide slightly to the right Sew slowly while guiding the folded edge along the guide e Screw r Guide t Folded edge v Open and press the fabric after sewing is finished y Right side of the fabric N...

Page 32: ...1 cm apart across the area to be smocked q 3 8 1 cm x Knot the threads along one end From the other end pull the bobbin threads to distribute gathers evenly and secure the threads Return the thread tension to the original setting c Sew rows of the smocking stitch between the gathering stitches Remove the gathering stitches after finished q z x c Smocking Machine setting q Stitch selector D w Press...

Page 33: ...t fabric tricot for example Fold and stitch on the bias When the needle swings to the right allow the needle to just clear the folded edge of the fabric After stitching open the fabric and iron press the tacks flat to one side NOTE Increase the needle thread tension to form prominent tucks Pin Tucking Machine setting q Stitch selector A w Presser foot Blind hemming foot G e Thread tension 2 6 r St...

Page 34: ...pattern along the seam line q Right side of the fabric q q Patchwork Machine setting q Stitch selector D w Presser foot Zigzag foot A e Thread tension 1 4 r Stitch length 1 3 Decorative stretch patterns are used for adding a creative and personalized touch to items Carefully guide the fabric while sewing as the fabric moves back and forth Decorative Stretch Stitches Machine setting q Stitch select...

Page 35: ...it w Bobbin holder NOTE Do not dismantle the machine other than as explained in this section Do not store the machine in a high humidity area near a heat radiator or in direct sunlight Clean the outside of the machine with a soft cloth and mild soap c Brush out dust and lint e Lint brush v Clean the feed dogs and hook area with the lint brush r Feed dogs b Wipe the hook race with a soft dry cloth ...

Page 36: ...he bobbin holder into the hook race x Make sure the knob of the bobbin holder fits next to the stopper on the race q Knob w Stopper c Replace the bobbin Attach the needle plate Tighten the screw firmly with the screwdriver e Screw q w e z x c ...

Page 37: ...h very fine fabrics and synthetics 4 The needle thread is not threaded properly 5 A poor quality needle is used Page 8 Page 9 Page 9 Page 13 Change the needle Seam puckering 1 The needle thread tension is too tight 2 The needle thread or bobbin thread is not threaded properly 3 The needle is too heavy for the fabric being sewn 4 The stitch length is too long for the fabric Use a stabilizer for ver...

Page 38: ......

Page 39: ......

Page 40: ...Printed in Thailand 508 800 764 ENG ...

Reviews: