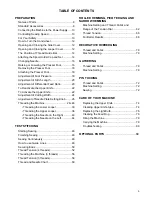
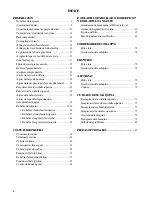
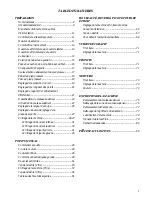
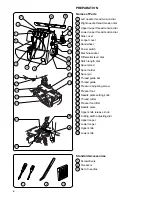
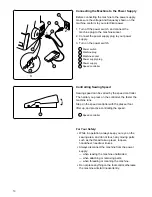
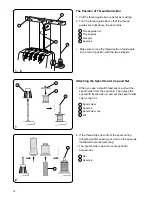
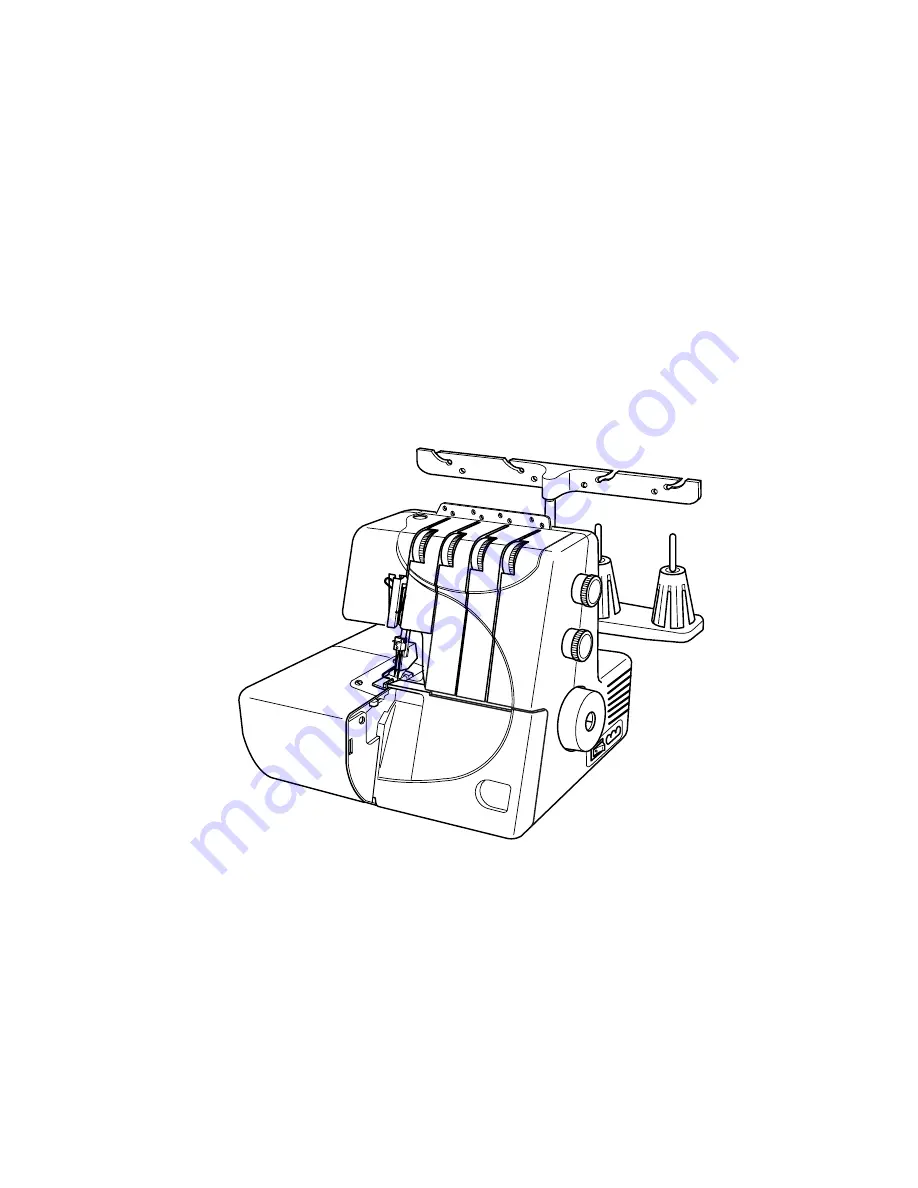
background image

INSTRUCTION BOOK

MANUAL DE INSTRUCCIONES
LIVRET D’INSTRUCTIONS

MODEL

MODELO
MODÈLE

9102D

Summary of Contents for 9102D -

Page 1: ...INSTRUCTION BOOK MANUAL DE INSTRUCCIONES LIVRET D INSTRUCTIONS MODEL MODELO MOD LE 9102D...

Page 2: ...unasolamanera Sielenchufenoencajaperfectamenteeneltomacorriente inviertael enchufe Si todav a no encaja llame a un electricista calificado para que instale el tomacorrienteapropiado Nomodifiqueelenchu...

Page 3: ...nto water Return the appliance to the nearest authorized dealer or service center for examination repair electrical or mechanical adjustment 4 Never operate the appliance with any air opening blocked...

Page 4: ...ibuidor autorizadom scercano oalcentrodeservicioparaqueloexaminen reparen olehaganajustesel ctricos omec nicos 4 Nuncahagafuncionarestam quinacuandoalgunaentradadeaireest tapada Mantengalasaperturasde...

Page 5: ...lle est tombee dans l eau Retourner la machine a coudre au commer ant autorise ou au centre de reparation le plus pres a des fins d examen de reparations ou d ajustment electrique ou mecanique 4 Ne ja...

Page 6: ...Lors de la r paration de la machine ou lors du retrait des couvercles ou du changement des ampoules la machine doit tre d branch e du bloc d alimentation en retirant la prise du socle 4 Ne rien placer...

Page 7: ...ing the Lower Looper 30 Threading the Upper Looper 36 Threading the Needle on the Right 40 Threading the Needle on the Left 44 TEST STITCHING Starting Sewing 48 Finishing Sewing 48 Sewing Continuously...

Page 8: ...hebrarelenhebradorsuperior 37 Enhebrarlaagujadeladerecha 41 Enhebrarlaagujadelaizquierda 45 COSTURADEPRUEBA Comenzarlacostura 49 Terminarlacostura 49 Costuracontinua 49 C mousarlasl neasgu a 49 C moas...

Page 9: ...Enfilageduboucleurinf rieur 31 Enfilageduboucleursup rieur 37 Enfilage de l aiguille droite 41 Enfilage de l aiguille gauche 45 POINTSD ESSAI Commencer coudre 49 Fin de la couture 49 Couturecontinue...

Page 10: ...ol stand 13 Spool holder 14 Spool pin 15 Thread guide bar 16 Thread guide 17 Pressure adjusting screw 18 Presser foot 19 Needle plate setting knob 20 Thread cutter 21 Presser foot lifter 22 Needle pla...

Page 11: ...7 Cuchillasuperior 28 Cuchilla inferior Accesorios est ndar 1 Destornilladores 2 Pinzas 3 Juego de agujas PREPARACI N Nom des pi ces 1 Cadran de tension du fil de l aiguille gauche 2 Cadran de tension...

Page 12: ...achine runs Step on the speed controller with the presser foot lifter up and practice controlling the speed For Your Safety While in operation always keep your eye on the sewing area and do not touch...

Page 13: ...ntrol pues la m quina podn a comenzar a funcionar inadvertidmate Branchementdelamachineaublocd alimentation 1 teindre l interrupteur et brancher la prise de la machine dans la douille de la machine 2...

Page 14: ...ver to the right 1 Side cover Opening and Closing the Looper Cover To open A While pushing with the thumb to the right as far as it will go pull the looper cover toward you To close B Lift the looper...

Page 15: ...alylacubiertadel enhebradorcuandolam quinaest funcionando Comment tourner le volant Tourner toujours le volant vers soi dans le sens antihoraire 1 Volant Ouverture et fermeture du couvercle lat ral Po...

Page 16: ...ull out the spool holder from the spool pin Then place the spool with its slit side up and put the spool holder cap on top of it 2 If the thread slips down from the spool during threading and or sewin...

Page 17: ...ede Latapaylareddelportacarretesonaccesorios opcionales 1 Red 2 Espigadelcarrete Position de la barre de guide fil 1 Tirer la barre de guide fil aussi haut que possible 2 Tourner la barre de guide fil...

Page 18: ...Needle clamp screw on the right Use HA 1SP 14 Needle or 11 To attach the needle on the right Insert a new needle into the needle clamp with the flat side to the back until the top of the needle touche...

Page 19: ...e prensatelaest levantado 1 Pieprensatela 2 Elevadordelpieprensatela Changement de l aiguille teindre l interrupteur et d brancher la machine Soulever l aiguille sa position la plus haute Desserrer la...

Page 20: ...oving the Presser Foot 1 Turn off the power switch and unplug the machine 2 Raise the needle and the presser foot 3 Press the lever located on the back of the foot holder The presser foot will drop of...

Page 21: ...tar 2 Paradisminuir 3 Tornillodeajuste 4 Partesuperiordelam quina Retrait du pied presseur 1 teindre l interrupteur et d brancher la machine 2 Soulever l aiguille et le pied presseur 3 Appuyer sur le...

Page 22: ...ustment of Differential Feed Ratio The differential feed ratio can be altered by turning the dial The number on the dial indicates the ratio between the main and the sub feed motion 1 0 indicates the...

Page 23: ...la tela cosida se frunce voltee el regulador en el sentidodelreloj hacia0 5 1 Estirada 2 Fruncida R glage de la longueur des points Pour s lectionner la longueur des points tourner le cadran Plus le c...

Page 24: ...osition 4 Close the looper cover and side cover 1 Upper knife release knob 2 Stopper pin 3 Upper Knife To Activate the Upper Knife 1 Turn off the power switch and unplug the machine 2 Open both the lo...

Page 25: ...bradorylateral 1 Perillaparasoltarlacuchillasuperior 2 Espigaderet n D sactivation du couteau sup rieur 1 teindre l interrupteur et d brancher la machine 2 Ouvrir le couvercle du boucleur et le couver...

Page 26: ...ard setting The cutting width of this model can be adjusted approximately 3 0 to 5 0 mm from the right needle position depending upon your sewing needs or the fabric being used The cutting width shoul...

Page 27: ...lateral R glage de la largeur de coupe Lorsque la largeur de coupe est trop troite ou trop large par rapport la largeur de la couture la r gler comme suit 1 teindre l interrupteur et d brancher la mac...

Page 28: ...Hemming Release the cutting width adjusting dial to the left gently 5 Set the upper knife to up position 6 Close the looper cover and side cover 1 Chaining finger 2 Guide line 3 Cutting width adjustin...

Page 29: ...oruedo angosto R glage du bouton de r glage de la plaque aiguille Changementpourlesurfilagestandardoulerouleaut 1 teindre l interrupteur et d brancher la machine 2 Ouvrir le couvercle du boucleur et l...

Page 30: ...re coming out from under the back of the presser foot 3 However stop drawing the needle threads when the knots reach just before the needle eye Cut the knots and thread the needle eye 4 Before startin...

Page 31: ...r sunos10cm 4pulgadas pordebajo delpieprensatela Enfilage de la machine L illustration de gauche montre conditions d enfilage termin des quatre fils 1 Fil du boucleur inf rieur 2 Fil du boucleur sup r...

Page 32: ...laced on the machine body inside the looper cover 1 Draw the thread through the right side thread guide from back to front A If the thread is coming out from the thread guide groove pass the thread th...

Page 33: ...hilo 2 Pase el hilo a trav s de los agujeros en el lado derechodelaplacagu a hiloscomosemuestraen la figura 2 Placagu a hilos Enfilage du boucleur inf rieur Ouvrir le couvercle du boucleur et le couve...

Page 34: ...er looper thread guide 3 5 Lower looper thread guide 1 6 Looper thread take up lever lower 7 Lower looper thread guide 2 8 Lower looper thread guide 3 9 Turn the handwheel toward you until the lower l...

Page 35: ...ner le volant vers soi pour d placer le boucleur inf rieur vers la droite 9 Guide filduboucleurinf rieur 4 1 Fil du boucleur inf rieur 2 Enfileurduboucleur 3 Sujete el hilo em ambos extremos y lo hala...

Page 36: ...e thread from the right side of lower looper thread guide 4 with a pair of tweezers And draw the thread through the hole on the lower looper 10 cm 4 or more with a pair of tweezers 10 Lower looper 1 L...

Page 37: ...poli sterporelenhebradorinferior 1 Enhebradorinferior 2 Hilocorriente 3 Hilodelanadenailon poli ster 10 Tirer l enfileur pour passer le fil dans le trou du guide fil du boucleur inf rieur 4 Retirer l...

Page 38: ...body inside the looper cover 1 Draw the thread through the thread guide second from the right from back to front A 1 Thread guide 2 Pass the thread through the holes in the second row from the right o...

Page 39: ...egundopardeagujeros en el lado derecho de la placa gu a hilos como se muestraenlafigura 2 Placagu a hilos Enfilage du boucleur sup rieur Poser la bobine de fil sur la deuxi me broche bobine partir de...

Page 40: ...hread tension dial 4 Hook the thread on the corner B and then pass the thread through the looper thread guide 4 Looper thread guide 5 Pass the thread through the looper thread take up lever upper 5 Lo...

Page 41: ...ebradorsuperior Enhebreelenhebradorsuperior 1 Hilodelenhebradorinferior 2 Enhebradorsuperior 3 Tenir le fil aux deux extr mit s et tirer d licatement pour s assurer que le fil soit ins r correctement...

Page 42: ...body inside the looper cover 1 Draw the thread through the thread guide second from the left from back to front A 1 Thread guide 2 Pass the thread through the holes in the second row from the left of...

Page 43: ...Paseelhiloporlosagujerosdelsegundoparde agujerosenlaizquierda de la placa gu a hilos comosemuestra 2 Placa gu a hilos Placer la bobine de f il sur la deuxi me broche bobine partir de la gauche Les poi...

Page 44: ...cover from right to left 7 Guide the thread over the front cover thread guide 3 4 Front cover thread guide 1 5 Front cover thread guide 2 6 Take up lever cover 7 Front cover thread guide 3 8 Insert th...

Page 45: ...a 9 Gu a hilodelabarradeaguja 10 Agujaderecha 3 Tenir le fil aux deux extr mit s et tirer d licatement pour s assurer que le fil soit ins r correctement entre les disques de tension Si le releveur de...

Page 46: ...the machine body inside the looper cover 1 Draw the thread through the thread guide on the left from back to front A 1 Thread guide 2 Pass the thread through the holes on the left of thread guide plat...

Page 47: ...B 1 Gu a hilo 2 Pase el hilo por los agujeros de la izquierda de la placagu a hilos comosemuestraenlailustraci n 2 Placagu a hilos Enfilage de l aiguille gauche Placer la bobine de fil sur la broche...

Page 48: ...ead guide 3 7 Insert the thread into the left slot of the needle thread guide plate 8 Raise the needle to its highest point and pass the thread through the needle bar thread guide from left to right 9...

Page 49: ...eparaci nparacoser 3 Tenir le fil aux deux extr mit s et tirer d licatement pour s assurer que le fil soit ins r correctement entre les disques de tension Si le releveur de pied presseur est soulev le...

Page 50: ...s illustrated leaving about 5 cm 2 thread chain from the end of the fabric 1 Thread cutter The thread cutter becomes blunt as loose threads build up Remove the loose threads collected in the thread cu...

Page 51: ...ea gu a y la posici n de la aguja es 1 6 cm 5 8 de pulgada POINTSD ESSAI Commencer coudre 1 Ins rer le tissu sous le pied Il n est pas n cessaire de soulever le pied 2 Tourner doucement le volant vers...

Page 52: ...the needle 2 Put your fabric on the machine Then serge a few stitches and stop 3 Raise the presser foot and bring the thread chain from the left around and under the presser foot 4 Place the thread ch...

Page 53: ...fueradelatela Nouer les extr mit s Pour viter tout effilochage il est n cessaire de laisser une cha ne de fils d environ 5 cm 2 de longueur au d but et la fin de la couture Pour bien arr ter le d but...

Page 54: ...n balance on the test piece is not satis factory you can adjust the thread tension with the thread tension dial 7 Thread tension dial 8 Setting mark 9 Loosen 10 Tighten Left needle thread tension is t...

Page 55: ...ja Soluci n Ajustelatensi ndelhilodelaagujaderecha 12 Reguladordelatensi ndelhilodelaagujaderecha Tension des fils 4 fils Bonne tension L illustration gauche montre les r sultats de couture avec les b...

Page 56: ...le thread 5 Upper looper thread 6 Lower looper thread 13 Upper looper thread tension dial 14 Lower looper thread tension dial Looper thread tension is out of balance 2 The illustration shows sewing re...

Page 57: ...dor superior 14 Reguladordelatensi ndelhilodelenhebrador inferior La tension du fil du boucleur est de l quilibr e 1 L illustration montre les r sultats de couture lorsque la tension du fil du boucleu...

Page 58: ...needle clamp screw on the left to prevent losing the screw 1 Needle on the right 2 Needle clamp screw on the left Using the needle on the left only for wide three thread serging Turn off the power sw...

Page 59: ...va a ajustareltornillodesujeci ndelaagujaenladerecha paranoperdereltornillo 1 Aguja de la izquierda 2 Tornillo de sujeci n de la aguja de la derecha Enfilage de la machine 3 fils Utilisationdel aiguil...

Page 60: ...nsion is too loose Remedy Tighten needle thread tension 10 Left needle thread tension dial 11 Right needle thread tension dial Looper thread tension is out of balance 1 The illustration shows sewing r...

Page 61: ...uperior 13 Reguladordelatensi ndelhilodelenhebradorinferior Tension des fils 3 fils Bonnetension L illustration gauche montre les r sultats de couture avec les bons r glages de tension Cependant un r...

Page 62: ...ndy Georgette Lawn Crepe de chine Lining Lightweight Heavyweight Knitted fabric Knits Tweed Coating Denim Doeskin Thick fabric Cotton No 60 80 Synthetic No 60 90 Woolly nylon For looper thread Woolly...

Page 63: ...ar HA 1 SP N 11 N 14 Tipode hilos Agujas Largo de puntada Proporci n del avancedeferencial HA 1SP N 11 14 HA 1SP N 14 HA 1SP N 11 14 0 5 a 1 0 2 0 3 0 2 5 3 5 3 0 4 0 2 5 4 0 1 0 1 0 1 0 a 2 2 Coton l...

Page 64: ...ic Needle thread Using the needle on the right HA 1 SP No 11 Synthetic No 80 100 Synthetic No 60 100 Silk No 50 100 Lightweight fabric such as Organdy Crepe de chine Lawn and Georgette Woolly nylon Wo...

Page 65: ...100 Sint tico N 60 100 Seda N 50 100 Lana de nailon Lana de poli ster Sint tico N 80 100 Tela liviana tal como organd crep de china batista y crep georgette Tensi ndelhilode agujaderecha R Tensi ndel...

Page 66: ...Synth tique N 80 100 ROULEAUT REVERSAPICOTETOURLET TROIT R glage de la machine et fil tissu et port e du cadran de tension Le r glage des cadrans de tension peut varier selon le tissu l paisseur du ti...

Page 67: ...65 Blank page...

Page 68: ...llustration shows the sewing results when the right needle thread tension is too loose Remedy Tighten the right needle thread tension 6 Right needle thread tension dial Upper looper thread tension is...

Page 69: ...fil du boucleur inf rieur 7 Cadran de la tension du fil du boucleur sup rieur 8 Cadran de la tension du fil du boucleur inf rieur Tensi n del hilo Para el dobladillo enrollado y el borde picot Tensi...

Page 70: ...icot edging Pull the fabric lightly to the back while sewing 1 Fabric For narrow hemming Correct tension The illustration at left shows sewing results with correct tension settings 1 Wrong side of fab...

Page 71: ...echa 4 Hilodelenhebradorsuperior 5 Hilodelenhebradorinferior Rem tasealap gina59parahacerlas modificaciones Pour obtenir les meilleurs r sultats Rouleaut Tirer l extr mit de la cha ne de fils l g reme...

Page 72: ...o 50 80 Buttonhole twist Light weight wool yarn Synthetic No 60 80 Silk No 50 80 Thread Machine Setting 1 Needle plate setting knob S 2 Upper knife up GATHERING Refer to pages 52 54 58 for thread tens...

Page 73: ...60 80 Seda N 50 80 Hilodelenhebradorsuperior Hilodelenhebradorinferior Sint tico N 60 80 Seda N 50 80 Se r f rer aux pages 53 55 59 pour le r glage de l quilibre de la tension des fils Pour obtenir l...

Page 74: ...g knob R 3 Upper knife Down Sewing Turn off the power switch Remove the needle on the left hand side Deactivate the upper knife Turn on the power switch then sew the folded edge while guiding along th...

Page 75: ...cha Sint tico N 60 80 Seda N 50 80 Hilodelenhebradorsuperior Hilodelenhebradorinferior Sint tico N 60 100 Seda N 50 100 Fil et tissu NERVURE Se r f rer aux pages 64 ourlet troit pour le r glage de l q...

Page 76: ...position Loosen the hexagonal bolt and adjust the position of the upper knife so that the edge of the upper knife overlaps 0 8 to 1 5 mm 3 64 from the edge of lower knife as illustrated Then tighten t...

Page 77: ...emplazartanto la cuchilla superior como la inferior al mismo tiempo ENTRETIENDELAMACHINE Remplacement du couteau sup rieur Retrait 1 teindre l interrupteur et d brancher la machine 2 Ouvrir le couverc...

Page 78: ...WATT maximum light bulb The light bulb will be HOT Protect your fingers when you handle it Cleaning the Feed Dog 1 Turn off the power switch and unplug the machine 2 Open the looper cover and side co...

Page 79: ...satelaylasagujas Cierrelascubiertasdelenhebradorylateral 3 Dientesdeavance Remplacementdel ampoule 1 teindre l interrupteur et d brancher la machine 2 Desserrer la vis de r glage de la plaque frontale...

Page 80: ...s indicated with arrows It is recommended to apply oil once a week in normal use once in ten hours in continuous use Open the side cover and apply oil Open the looper cover and apply oil Carrying the...

Page 81: ...enelhuecoposteriordelam quina comosemuestraenlafigura Lubrificationde lamachine Poser quelques gouttes d huile de bonne qualit pour machine coudre sur les sections indiqu es par des fl ches Il est rec...

Page 82: ...correctly adjusted 2 The machine is not correctly threaded 3 The needle and or the thread are not suitable for the fabric being sewn 4 The thread is not between the tension discs 1 The needle or loope...

Page 83: ...ensi ndelhilodelaagujaodelenhebrador est muyajustada 3 Laagujaest malintroducida 4 Laagujaest dobladaodespuntada 1 Laagujaest dobladaodespuntada 2 Lam quinaest enhebradaincorrectamente 3 Laagujaest ma...

Page 84: ...ent pas au tissu cousu 4 Le fil n est pas entre les disques de tension 1 La tension du fil de l aiguille ou du boucleur est trop serr e 2 La machine n est pas bien enfil e 3 Le cadran de l entra nemen...

Page 85: ...83 Blank page...

Page 86: ...Use to sew decorative cording Use to sew decorative cording Use for decorating cloth wide cord decoration cording etc Use when sewing sleeves cuffs collars etc Use for elastic taping decorative taping...

Page 87: ...1 8 Piepara cordoncillo 3 16 Enhebradorde aguja Pieparafruncido 1 2 3 4 5 6 7 8 11 12 9 10 PIECESFACULTATIVES Pourcoudredespoints invisibles sur un revers de pantalon ou une jupe Pour coudre un ruban...

Page 88: ...Printed in Taiwan Impreso en Taiw n Imprim Taiwan 793 800 007 E S F...

Reviews: