background image

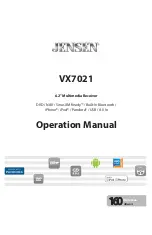
VX7021

6.2

Multimedia Receiver

DVD / NAV / SiriusXM Ready™ / Built-In B

luetooth / 

iPhone® - iPod® / Pandora® / USB / AV In

Operation Manual

160

W

atts 

P

eak

40

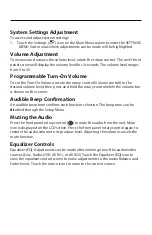
w

 x 4

Summary of Contents for VX7021

Page 1: ...VX7021 6 2 MultimediaReceiver DVD NAV SiriusXM Ready Built In Bluetooth iPhone iPod Pandora USB AV In Operation Manual 160Watts Peak 40w x 4 ...

Page 2: ... or iPhone may affect wireless performance Android is a trademark of Google Inc The Bluetooth word mark and logos are registered trademarks owned by Bluetooth SIG Inc and any use of such marks by the Dual Electronics Corporation is under license Other trademarks and trade names are those of their respective owners microSD is a trademark or registered trademark of SD 3C LLC in the United States oth...

Page 3: ...RATION 27 RADIO TUNER OPERATION 39 USB OPERATION 44 iPod iPhone OPERATION 49 AV In1 AV In2 OPERATION 52 BLUETOOTH OPERATION 53 REAR CAMERA OPERATION 60 STEERING WHEEL CONTROLS SWC OPERATION 61 PANDORA RADIO OPERATION 62 SiriusXM RADIO OPERATION 66 WALLPAPER 78 SPECIFICATIONS 84 TROUBLESHOOTING 79 BLUETOOTHCALL WHILE NAVIGATING 59 COMMON REPLACEMENT PARTS 86 ...

Page 4: ...on This equipment generates uses and can radiate radio frequency energy and if not installed and used in accordance with the instructions may cause harmful interference to radio communications However there is no guarantee that interference will not occur in a particular installation If this equipment does cause harmful interference to radio or television reception which can be determined by turni...

Page 5: ...zer Next Chapter and Previous Chapter Play Pause Track Direct Entry Disc Menu Selection Repeat Track Repeat Disc Audio Disc Language Picture Control CD MP3 WMA CD Text Compatible ID3 Tag Compatible Directory Search MP3 WMA Only Audible Forward Reverse Track Search CD DA Only Random Repeat and Intro Play Pause Stop Next Track and Previous Track AM FM USA China Japan Europe Europe LW and Orient OIRT...

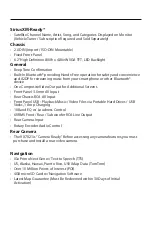
Page 6: ...t for Additional Screens Front Panel 3 5mm AV Input Rear Chassis RCA AV Input Front Panel USB Playback Music Video Files via Portable Hard Drives USB Sticks 1 Amp Charging 10 Band EQ w Loudness Control 6VRMS Front Rear Subwoofer RCA Line Output Rear Camera Input Rotary Encoder Audio Control Rear Camera The VX7021 is Camera Ready Beforeaccessinganycamerafeatures youmust purchase and install a rear ...

Page 7: ...amera do not view the video display while driving the vehicle This is a violation of federal state local laws in most states Never disassemble or adjust the unit No user serviceable parts inside To prevent injury from electric shock or fire never expose this unit to moisture or water Never use irregular sized discs Using an improper fuse may cause damage to the unit and result in fire ...

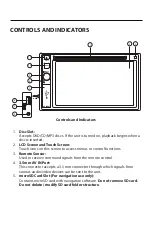
Page 8: ... Touch icons on this screen to access menus or control functions 3 Remote Sensor Used to receive command signals from the remote control 4 3 5mm AV IN Port This connector accepts a 3 5 mm connector through which signals from various audio video devices can be sent to the unit 5 microSD Card Slot For navigation use only Contains microSD card with navigation software Do not remove SD card Do not del...

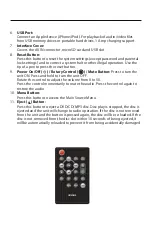
Page 9: ...ess to turn the unit ON Press and hold to turn the unit OFF Rotate the control to adjust the volume from 0 to 50 Press the control momentarily to mute the audio Press the control again to restore the audio 10 Menu Button Press this button to access the Main Source Menu 11 Eject Button Press this button to eject a DVD CD MP3 disc Disc play is stopped the disc is ejected and the unit will change to ...

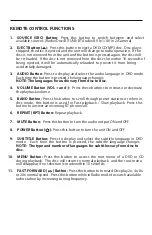
Page 10: ...or decrease the playback volume 5 BAND Button Press this button to scroll though preset stations or when in disc mode this button is used for Fast playback Slow playback Press this button to answer an incoming BT phone call 6 REPEAT RPT Button Repeat playback 7 MUTE Button Press this button to turn the audio output ON and OFF 8 POWER Button Press this button to turn the unit ON and OFF 9 SUBTITLE ...

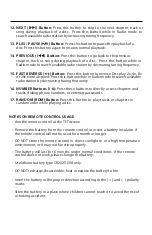
Page 11: ...MBER Buttons 1 6 Press these buttons to directly access chapters and tracks dialing phone numbers or entering passwords 17 RANDOM RDM Button Press this button to play tracks or chapters in random order while playing a disc NOTES ON REMOTE CONTROL USAGE Aim the remote control at the TFT screen Remove the battery from the remote control or insert a battery insulator if the remote control will not be...

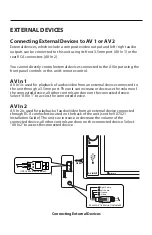
Page 12: ...it through a 3 5mm port The unit can increase or decrease the volume of the connected device all other controls are done on the connected device Select AV In 1 to access the connected device AV In 2 AV In 2 is used for playback of audio video from an external device connected through RCA connectors located on the back of the unit see the VX7021 Installation Guide The unit can increase or decrease ...

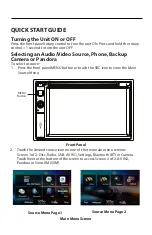
Page 13: ...dora or SiriusXM SXM Source Menu Page 1 Source Menu Page 2 Main Menu Screen QUICK START GUIDE Turning the Unit ON or OFF Press the front panel rotary control to turn the unit ON Press and hold the rotary control 1 second to turn the unit OFF Selecting an Audio Video Source Phone Backup Camera or Pandora To select a source 1 Press the front panel MENU button or touch the SRC icon to view the Main S...

Page 14: ... while the volume bar is shown on the screen Audible Beep Confirmation An audible beep tone confirms each function selection The beep tone can be di disabled through the Setup Menu Muting the Audio Press the front panel rotary control to mute the audio from the unit Mute icon is displayed on the LCD screen Press the front panel rotary control again to restore the audio volume to its previous level...

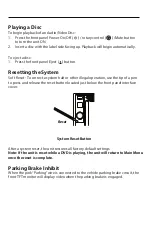
Page 15: ...tem halt or other illegal operation use the tip of a pen to press and release the reset button located just below the front panel interface cover Reset System Reset Button After a system reset the unit restores all factory default settings Note If the unit is reset while a DVD is playing the unit will return to Main Menu once the reset is complete Parking Brake Inhibit When the pink Parking wire i...

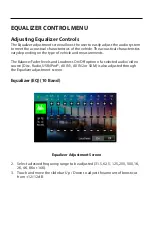
Page 16: ... type of vehicle and measurements The Balance Fader levels and Loudness On Off option of a selected audio video source Disc Radio USB iPod AV IN1 AV IN2 or SXM is also adjusted through the Equalizer adjustment screen Equalizer EQ 10 Band Equalizer Adjustment Screen 2 Select a desired frequency range to be adjusted 31 5 62 5 125 250 500 1K 2K 4K 8K or 16K 3 Touch and move the slide bar Up Down to a...

Page 17: ...feature is used to balance the audio output levels between the left and right side of the vehicle Touch the or icons to change the balance control settings 20 Left to 20 Right The setting can also be changed by touching screen within the grid to move the sphere Fader This feature is used to fade the audio output levels between the front and rear of the vehicle Touch the or icons to change the fade...

Page 18: ...f applicable An options list appears on the right 3 Touch the desired feature option once to make selection then touch again to confirm the selection General Sub Menu Features Radio Region Frequency Spacing USA FM 200kHz AM 10kHz China FM 50kHz AM 9kHz Japan FM 100kHz AM 9kHz Europe FM 50kHz AM 9kHz Europe LW FM 50kHz AM 9kHz LW 30kHz OIRT FM 50kHz AM 9kHz OIRT 30kHz Radio Lo Dx Touch the Distance...

Page 19: ...te the touch screen as this will damage the panel 1 Touch the calibrate icon and the first screen will appear with instructions 2 Follow the instructions on the screen touching and momentarily holding finger or a stylus to the center of the target for 2 seconds Repeat as the target moves to each corner of the screen and finally to the center Calibration Screen 3 The second screen will appear Calib...

Page 20: ...l display to the selected color UI Color Touch to select the user interface color Touch again to confirm and set the color Demo Touch On Off to turn the Demonstration Mode On or Off The factory default setting is On This mode is useful when the unit is mounted in a display for sales opportunities ...

Page 21: ...lter LPF Time Sub Menu Features The clock appears in the top right corner of the screen during certain operations Note The AM PM indication will change as you continue to adjust the hour past 12 Time Sub Menu Screen Date Touch the Date icon and use the p or q icons to set the day month and year After setting the date touch Save The date will appear to the right of the Date option Clock Mode Touch ...

Page 22: ... will appear to the right of the Date option Date Settings Time Settings Date and Time Setting Screens Language Sub Menu Features If a DVD supports more than one Subtitle or Audio language all the languages are available for selection during playback If the selected language is not supported by the DVD then the default language is used ...

Page 23: ...turn the Bluetooth Auto Connect function ON or OFF Auto Answer Touch ON or OFF to turn the Bluetooth Auto Answer function ON or OFF Pairing This feature allows the user to create a unique 4 digit code for pairing Bluetooth devices to the unit The factory default pairing code is 5309 1 Touch the Paring Code icon and the Pairing Code entry screen will appear 2 Use the keyboard to enter a unique 4 di...

Page 24: ...tivate the Rating option 1 Touch the Set Password Code icon and the Password entry screen will appear 2 Use the keyboard enter a unique 4 digit Password NOTE If a wrong digit is entered touching the green arrow will remove the number 3 Touch OK to confirm 4 digit Password Password Entry Screen Password Confirm tion Screen DVD Password Screens Rating Level Select the appropriate rating level for th...

Page 25: ...on Volume Sub Menu Features The Volume Sub Menu allows the user to increase or decrease the relative volume of the audio output of each source individually Volume Sub Menu Screen 1 Volume Sub Menu Screen 2 Volume Sub Menu Screens DVD Touch the DVD icon to enter the setting then use the p or q icons increase or decrease the relative volume level between 6 to 6 USB Touch the USB icon to enter the se...

Page 26: ...e level between 6 to 6 iPod Touch the iPod icon to enter the setting then use the p or q icons to increase or decrease the relative volume level between 6 to 6 SXM Touch the SXM icon to enter the setting then use the p or q icons to increase or decrease the relative volume level between 6 to 6 The default relative volume level setting for all available sources is 0 Version Sub Menu Features The Ve...

Page 27: ...talled DVD video cannot be displayed on the main TFT screen unless the parking brake is applied If you attempt to play a DVD while the vehicle is moving the TFT screen displays Warning It is illegal to view video while driving or operating a motor vehicle Set parking brake to view video From the Main Menu Screen touch the DISC Icon or insert a disc into the disc slot label side up Playback begins ...

Page 28: ...his icon to play the previous track Play Pause Touch this icon to begin disc playback Touch this icon again to pause disc playback Next Touch this icon to play the next track Direct Entry Touch this icon to the display the Direct Entry Screen Menu Touch this icon to view the DVD root menu A B Touch to repeat a specific portion from point A to point B of the disc During playback touch A B to set th...

Page 29: ...tle and chapter will repeat Touch the icon again the repeat function will be cancelled The icon on the main TFT LCD screen will dim and playback of the remainder of the disc will resume PIC When the PIC icon is touched the picture adjust screen appears Touch this icon during playback to adjust the color brightness contrast saturation and hue The levels can be adjusted to suit the users preferences...

Page 30: ...tal Lock Rating is activated and the disc inserted is not authorized the 4 digit code must be entered and or the disc must be authorized See DVD Sub Menu Features on page 29 Note DVD R and DVD RW will not play unless the recording session is finalized and the DVD is closed Ejecting a Disc Press the Eject button on the front of the unit to eject the disc The unit automatically reverts to Tuner mode...

Page 31: ...would like the subtitles to appear Playback Information During DVD and VCD playback touch the TFT LCD screen to display playback information on the screen including the current playback time DVD Playback Information DVD Video Format of current disc Time 00 01 30 00 36 10 Indicates the playback time of the current track Title 5 08 Indicates the fifth of 8 titles on the DVD is currently playing Chap...

Page 32: ...le languages available on the disc maximum of 32 Number of angles provided maximum of 9 Aspect ratios available LB stands for Letter Box and PS stands for Pan Scan In the example on the left the 16 9 video can be converted to Letter Box video Indicates the region code where the disc can be played Region 1 USA Canada East Pacific Ocean Islands Region 2 Japan Western Europe Northern Europe Egypt Sou...

Page 33: ...Number Lists the current track playing and the total number of tracks contained on the disc Time Display This indicator displays the time as entered by the user in the Settings Menu CD Disc Information Display Displays the artist the title of the track and the title of the album More p q Touch the p q icons to display the next or previous page of the Disc menu Previous Touch this icon to play the ...

Page 34: ... the album will repeat The icon on the TFT LCD screen will light and small letter a will appear below the icon and the album will repeat Touch the icon again the repeat function will be cancelled The icon on the TFT LCD screen will dim and playback of the remainder of the disc will resume EQ Equalizer Touch this icon to access the Equalizer Control Menu See Adjusting Equalizer Controls on page 21 ...

Page 35: ...n again to confirm and playback will begin Video Files Touch the video file icon to display the video files Touch the video file icon to select a video file Touch the video file icon again to confirm and playback will begin Image Files JPEG etc Touch the image icon to display a folder or individual JPEG files Touch the image icon to select a folder or an individual JPEG file In the case of a JPEG ...

Page 36: ... off The unit will remain off after the disc is ejected Resetting the Loading Mechanism If the disc loads abnormally or an abnormal core mechanism operation occurs press and hold the Eject button on the front of the unit to reset the loading mechanism Normal operation resumes Pausing Playback Touch the Play Pause icon to suspend or resume disc play Moving Through Tracks Touch the Next icon to adva...

Page 37: ...ming formats listed below are compatible with this unit ISO 9660 file name 12 characters file extension 3 characters ISO 9660 file name 31 characters file extension 3 characters Joliet 64 characters If the file or folder name does not conform to ISO 9660 file system standards it may not be displayed or played back correctly Use the following settings when compressing audio data for your MP3 disc T...

Page 38: ...rectory Note When burning MP3 WMA files onto a DVD disc use the 2X or 4X burning option if available This slower burning speed will help eliminate buffer errors and increase disc reading reliability Also use folders when burning large numbers of songs files to a disc for easy music navigation Select the Disc at Once option and close your disc Note CD R and CD RW will not play unless the recording ...

Page 39: ...y presets Local Distance Displays the Local Distance setting RT Radio Text Allows a radio station to transmit a 64 character free form text that can be either static such as station slogans or in sync with the programming such as the title and artist of the currently playing song PS Program Service An eight character static display that represents the call letters or station identity name Most RDS...

Page 40: ...Default mode is resumed after 10 seconds of inactivity Band Touch to change between AM FM bands Option Touch this icon to display the Options screen Save Touch this icon to save a radio station frequency in one or all six preset stations on FM band 1 2 3 or AM band 1 and 2 Local Distance Touch to select and activate local and distant station reception When the Local function is on only radio stati...

Page 41: ...ding small amounts of digital information in conventional FM radio broadcasts CT ON OFF Clock Time Some stations broadcast the time and date within the encoded RDS signal The clock time is automatically adjusted when CT is set to ON Note Stations broadcasting close to time zones may not broadcast the correct time in your particular area In this case turn CT Off and manually set the time PTY The Pr...

Page 42: ...een arrow will remove the number After touching OK the radio will tune to the entered station Playback will begin Radio Direct Entry Screen Using Preset Stations Six numbered preset icons store and recall stations for each band All six stored stations P1 through P6 for the current band appear on the screen Storing a Station 1 Select a band if needed then tune to a desired radio station frequency 2...

Page 43: ... when travelling in an area where you are not familiar with the local stations 1 Select a band if needed 2 Touch the AS icon to activate the Auto Store function FM Band 1 will be filled if enough stations are detected The AM Bands function in a similar manner As new stations are found they will replace stations already stored in that band Note If stations have already been set as favorites activat...

Page 44: ...ng a USB Device To insert a USB device 1 Locate the Interface Cover on the front of the radio AV INPUT OPEN 3 5mm A V Cable not included Video Left Audio Right Audio Ground 1 2 3 4 USB Cable not included USB Slot and microSD Card Slot Location 2 Lift the protective cover to reveal the USB slot 3 Insert the USB device into the USB port Note The microSD card is used for navigation only Do not modify...

Page 45: ...ack playing and the total number of audio tracks in audio mode Lists the current video folder and the total number of video folders in video mode Time Display This indicator displays the time as entered by the user in the Settings Menu More p q Touch the p q icons to display the next or previous page of the USB menu Previous Touch this icon to play the previous track Play Pause Touch this icon to ...

Page 46: ...r below the icon Touch the icon again the repeat function will be cancelled The icon on the main TFT LCD screen will dim and playback of the remainder of the tracks will resume In video mode touch this icon during playback to repeat the current track The icon on the main TFT LCD screen will light and small number 1 will appear below the icon and the track will repeat Touch the icon again to repeat...

Page 47: ...to select a track Touch the audio file icon again to confirm and playback will begin Video Files Touch the video file icon to display the video files Touch the video file icon to select a video file Touch the video file icon again to confirm and playback will begin Image Files JPEG etc Touch the image icon and the following message will appear Use the USB to control select photos Touch screen to r...

Page 48: ...icon to move to the previous track on the USB device Pausing Playback Touch the Play Pause icon to suspend or resume playback PIC When the PIC icon is touched the picture adjust screen appears Touch this icon during playback to adjust the color brightness contrast saturation and hue The levels can be adjusted to suit the users preferences The adjustments are accomplished by touching the or icons t...

Page 49: ...onnected to the front panel USB connector iPod iPhone Main Menu The on screen icons and touch key areas are outlined below iPod iPhone Main Menu SRC Icon Touch this icon to return to the Main Menu Screen iPod Displays the current source Track Number Lists the current audio track playing and the total number of audio tracks in audio mode Lists the current video folder and the total number of video ...

Page 50: ...appear below the icon and the all the audio tracks will repeat Touch this icon again and single track will repeat The icon on the TFT will display and small number 1 will appear below the icon Touch the icon again the repeat function will be cancelled The icon on the main TFT LCD screen will dim and playback of the remainder of the tracks will resume EQ Equalizer Touch this icon to access the Equa...

Page 51: ...con again to confirm and open the file Controlling Playback Direct Entry When the Direct Entry icon is touched the Direct Entry Screen appears The user can manually select a track by touching the corresponding number After entering the track numbers touch the OK icon If a wrong digit is entered touching the arrow will remove the number After touching OK playback will begin iPod iPhone Track Direct...

Page 52: ...nectors located on the back of the unit The unit can increase or decrease the volume of the connected device All other controls are done on the connected device AV In2 Screen No Signal Note Audio Video device must be connected to the unit using an audio video adapter cable that is available separately Note The unit cannot directly control external devices Please refer to theowner s manual that cam...

Page 53: ...oth Adhere to the following guidelines for successful operation Before using Bluetooth functions you must pair your mobile phone to the VX7021 unit see Pairing the Your Mobile Phone with the Unit on page 62 To ensure the best reception for pairing and re connection please make sure the mobile phone battery is fully charged before you begin Try to perform pairing within a few minutes of the mobile ...

Page 54: ... Bluetooth enabled device Pairing the Your Mobile Phone with the Unit To connect your Bluetooth phone to the unit the user needs to pair the phone to the unit Pairing only needs to be done once per phone The user can pair up to five 5 phones Use your mobile phone to begin the Bluetooth pairing process 1 Touch the MENU on the front panel to access the source menu 2 Touch the Bluetooth icon on the s...

Page 55: ...ng successful should appear Another prompt should appear asking connect to the unit Yes or No Touch Yes The mobile phone and the unit should connect The mobile phone should display a message similar to Device Connected and the mobile phone and the unit are now connected VX7021 will appear on the mobile phone list of devices Managing Incoming Calls When connected to a Bluetooth mobile phone the uni...

Page 56: ...ng Call Touch the Transfer to Phone icon to reject an incoming call The call will revert to your mobile phone and be left for voice mail Volume Control To increase or decrease the volume level of an incoming call turn the rotary knob on the front panel or press the VOL VOL icons on the remote control Direct Dialing 1 2 Select Bluetooth function Handset icon from the Bluetooth Home Menu Press Optio...

Page 57: ...t touch the call s name Touch the phone number and it will be dialed Received Calls The Received Calls list retrieves the received numbers stored on your wireless phone if your wireless phone allows the function To access the Received list touch the Received Calls menu option The last received number is the first number on the list To make a call from the Received Calls list touch the name A new s...

Page 58: ...A2DP profile for streaming music from a mobile phone or a portable multimedia player PMP sometimes referred to as a MP3 player The unit allows you to play back audio files from your mobile phone or a PMP using a Bluetooth connection Note Please quit A2DP mode before attempting to make a phone call as unexpected results may occur depending on your mobile phone model The unit can control a Bluetooth...

Page 59: ...ary greatly Please refer to the instruction manual that came with your Bluetooth audio player When there is an incoming call the song will be paused After the incoming call is finished the screen will return to the music function screen and playback will continue Bluetooth Call While Navigating When navigating and a Bluetooth call comes in the user interface UI will automatically switch to the Blu...

Page 60: ... accessed by the gear selector being placed in reverse or by the unit s menu the message No Signal will be displayed and the following screen will appear Rear Camera Screen When the camera is installed the rear view image of what is behind the vehicle will appear when the vehicle is placed in reverse gear When leaving reverse gear the unit displays the previous screen ...

Page 61: ...ek Track 7 Preset 10 BT Send 2 Volume Down 8 5 Preset 11 BT End 3 Mute 6 Source 9 Band 12 PTT PAC SWI RC Installation Hints 1 Set Radio Select Switch Set the SWI RC to position 7 Pioneer Other Sony 2 Programming Use the Pioneer Sony Other radio function mapping order for Jensen branded head units 3 When programming the SWI RC if a function is not supported or not desired then the function MUST be ...

Page 62: ... indicators and touch key areas for Pandora Radio functions are outlined below Pandora Radio User Interface Screen SRC Icon Touch this icon to return to the Main Menu Screen Pandora Displays the current source Time Display This indicator displays the time as entered by the user in the Settings Menu Pandora Radio Information Display Displays the Pandora station artist song and album information Ela...

Page 63: ...Press thumbs down to tell Pandora not to play this track Pandora will skip to the next track If the skip limit has been reached Pandora will continue to play but your feedback will be recorded Station List Icon Press this icon to access the Station List Screen Bookmark Sub Menu Pandora Bookmark Sub Menu Touch the Bookmark Track icon to bookmark a track Touch the Bookmark Artist icon to bookmark an...

Page 64: ...xt page in the list or the Scroll Up p icon to view the previous page Touch the Return to Now Playing icon to return to the Pandora Radio user interface screen To Launch Stop Pandora Radio 1 Launch the Pandora app on the iPhone iPod or Android device 2 Touch the Pandora icon on the main menu screen If only one device is connected to the radio the Pandora Radio user interface screen appears Pandora...

Page 65: ... could not be bookmarked please try again in a moment BookMark Artist Error Software Error The song could not be bookmarked please try again in a moment Thumbs Up Down Error Error Track Rating Software Error Song feedback could not be sent please try again in a moment No Active Station Error Software Error This account has no stations in it Please visit Pandora com and login to your account and ad...

Page 66: ...ct SiriusXM mode You should be able to hear the SiriusXM preview channel on Channel 1 After you can hear the Preview channel tune to Channel 0 to find the Radio ID of your tuner Note The SiriusXM Radio ID does not include the letters I O S or F In the USA you can activate online or by calling SiriusXM Listener care Visit www siriusxm com activatenow Call SiriusXM Listener Care at 1 866 635 2349 Fo...

Page 67: ...m Information Channel Number Channel numbers are used to designate the channel along with the channel name and are useful for identifying loading a channel via the direct entry method Channel Name The channel name is used to identify the channel and is usually related to that channel s musical content Category Name A category may contain one or more channels grouped by their similar content into a...

Page 68: ... Page 2 More Icon Touch to go to SiriusXM Menu Page 1 Band Icon Touch to select a band of preset channels Three bands are available SXM1 SXM2 and SXM3 Each band can store up to ten preset channels Preset channels are accessed from the List icon Mem Icon Touch to display screen used to enter current channel into preset memory Scan Icon Touch to scan all channels starting at channel 1 The tuner will...

Page 69: ...1 SXM2 and SXM3 Seek Tuning To fast seek the next higher channel touch and hold the icon To fast seek the next lower channel touch and hold the icon Direct Tuning To enter a SiriusXM radio channel directly 1 On the SiriusXM menu page 1 touch the Direct Entry icon to display the Direct Entry Menu SXM Direct Entry Screen 2 Enter the desired SiriusXM radio channel using the on screen number pad then ...

Page 70: ...et number P1 through P10 in which you would like to store the current channel or touch the Back icon to cancel and close the menu The channel will be stored and displayed in that preset Touch the or icon to scroll up or down the list 4 Touch the Back icon to return to the SXM Menu screen Recalling a Channel 1 Touch the List icon 2 Touch the Preset icon to access the Recall Preset Channel Screen Re...

Page 71: ...nel Touch the or icon to scroll up or down the list Search by Category Categories group music by type such as jazz rock classical etc To search by category 1 On the SirusXM menu page 1 touch the Category Channel icon if needed to select Category 2 Touch List to display the Category Search Screen Category Search Screen 3 Touch a category item A channel list screen appears 4 Touch a channel to tune ...

Page 72: ... appear in the channel listing with a lock icon but will not be tunable unless the parental lockout password is correctly entered Lock Mature Channels To lock mature channels 1 On the SirusXM menu page 2 touch the Lock icon The following screen appears Enter Lock Password Screen 2 Enter your 4 digit password and then press the OK icon The following screen appears Lock Screen 3 Touch the Lock Matur...

Page 73: ...ont panel of radio turns the Radio off This mode is useful for listening to mature adult content on a temporary basis allowing you to listen on a locked channel without having to disable the global Mature Lock To temporarily unlock a mature channel 1 Tune to a mature channel If the channel is locked Ch Locked Code will appear on the SiriusXM User Interface tuner screen Channel Locked Screen 2 Ente...

Page 74: ...nnels On the SirusXM menu page 2 touch the Lock icon The following screen appears Enter Lock Password Screen 3 Enter your 4 digit password and then press the Ok icon The following screen appears 4 Touch the Unlock All icon All channels are now unlocked ...

Page 75: ...t Locking a Channel To lock an individual channel 1 On the SirusXM menu page 2 touch the Lock icon The following screen appears Enter Lock Password Screen 2 Enter your 4 digit password and then press the OK icon The following screen appears Lock Screen 3 Touch an unlocked icon The icon is replaced by a lock icon The channel is now locked ...

Page 76: ...replaced by an unlocked icon The channel is now locked Change Lock Password The Change Lock Password option allows you to change the password from the default or current custom password to another password NOTE The default password is 0 0 0 0 To change a password 1 Touch the CHGPWD icon The following screen appears Change Password Screen 2 Enter your 4 digit password and press the OK icon 3 Enter ...

Page 77: ... No SXM Signal The vehicle must be outside and the antenna must have a clear view of the southern sky The magnetic antenna must be mounted on the outside of the vehicle for the best reception Channel Not Subscribed This channel is not included in your SiriusXM subscription plan Call 1 866 635 2349 to subscribe Channel Not Available This channel is not a valid SiriusXM channel The channel number ha...

Page 78: ...Uploading User Wallpaper Only one user wallpaper can be loaded at a time into the VX7021 However the user wallpaper can be loaded an infinite amount of times 1 Take out and set aside the navigation microSD card that came in the VX7021 Do not delete or modify the folder structure Insert a microSD card with wallpaper images into the microSD card slot 2 Go to Settings General Wallpaper Custom 3 Selec...

Page 79: ...ncrease volume level Improper MUTE connection Review wiring diagram and check MUTE connection Speakers damaged Replace speakers Heavily biased volume balance Adjust the channel balance to the center position Speaker wiring is in contact with metal part of car Insulate all speaker wiring connections Poor sound quality or distortion Pirated disc is in use Use original copy Speaker power rating not c...

Page 80: ...heck wiring and correct Prolonged image or improper height width ratio display Improper aspect ratio setup Use correct aspect ratio setting TUNER Weak station searching Auto antenna is not fully extended Extend antenna fully or connect the auto antenna control cable properly Auto antenna not properly connected Connect the auto antenna control cable properly LOCAL function is activated Turn LOCAL f...

Page 81: ...atible disc is used Use compatible disc Disc rating exceeds Parental Lock rating limit Change Parental Lock settings to lower restriction Disc region code is not compatible with unit Use disc with proper region code Disc is inserted upside down Insert disc with label side up MP3 Interruption occurred during playback Disc is dirty or scratched Clean disc or replace File is damaged bad recording Rec...

Page 82: ...abel side up Disc not present in loading compartment Insert disc Bad Disc Disc is dirty Clean disc with soft cloth Disc is upside down Insert disc with label side up Unknown disc Disc format is not compatible with this unit Region Error DVD is not compatible with region code of unit Error Illegal mechanism operation Press EJECT button for 5 seconds to reset loading mechanism ...

Page 83: ...aged by foreign objects 5 Do not attempt to use a 8 cm 3 CD Single disc in this unit either with or without an adaptor as damage to the player and or disc may occur Such damage is not covered by the Warranty on this product 6 The CD player may not operate properly in extreme hot or cold If such conditions occur allow the interior of the vehicle to reach a normal temperature before using player 7 W...

Page 84: ...ction Output 1Vp p 75 Ohm Input 1Vp p 75 Ohm FM Tuner Tuning Range 87 5MHz 107 9MHz Mono Sensitivity 30dB 9dBf Quieting Sensitivity 50dB 15dBf Alternate Channel Selectivity 70dB Signal to Noise Ratio 1kHz 58dB Image Rejection 80dB Stereo Separation 1kHz 30dB Frequency Response 30Hz 15kHz 3db AM Tuner Tuning Range 530kHz 1720kHz Sensitivity 20dB 15uV Signal to Noise Ratio 1kHz 50dB Image Rejection ...

Page 85: ...C 65C 32F 149F Fuse 15 Amp ATO Type Chassis Dimensions 7 x 7 x 4 178mm x 178mm x 100mm CEA Power Ratings Power Output 13 Watts RMS x 4 Channels Into 4 Ohms 1 THD N Signal to Noise Ratio 70dBA Below Reference Reference 1 Watt 4 Ohms Frequency Response 20Hz 20kHz 3dB Aux Input Used as Reference Input Reference Supply Voltage 14 4VDC Specifications Subject to Change Without Notice ...

Page 86: ...l 30714230 Hardware Kit 30513950 Operation manuals and other material online at www jensenmobile com Dual Electronics Corporation Heathrow FL 32746 Technical Assistance 888 921 4088 www jensenmobile com 2016 VX7021 Common Replacement Parts Mounting Sleeve Side Brackets and Hardware 30114000 ...

Reviews: