background image


RDJ 310-M 

RDJ 310-T 

RDJ 310HH-M 

RDJ 310HH-T 


RDJ 410-M 

RDJ 410-T 

RDJ 410HH-M 

RDJ 410HH-T 

Raboteuse / Dégauchisseuse 

Planer / Thicknesser


User Manual - EN 


TOOL France SAS 

9 Rue des Pyrénées 

ZA du Bois Chaland 

91090 LISSES 


Tel: 01.69.11.37.37 

Fax: 01.60.86.32.39 

www.promac.fr 


Summary of Contents for RDJ 310-M

Page 1: ... RDJ 310HH T RDJ 410 M RDJ 410 T RDJ 410HH M RDJ 410HH T Raboteuse Dégauchisseuse Planer Thicknesser User Manual EN TOOL France SAS 9 Rue des Pyrénées ZA du Bois Chaland 91090 LISSES Tel 01 69 11 37 37 Fax 01 60 86 32 39 www promac fr ...

Page 2: ... Dimensions 7 RDJ 310 Dimensions with mortising machine Option 8 RDJ 310 Technical Data 9 RDJ 410 Dimensions 10 RDJ 410 Dimensions with mortising machine 11 RDJ 410 Technical Data 12 Transport and commissioning 13 Electrical connection 14 Surface planer Thicknesser Mortising machine 16 Planer fence 20 Surface planing protection 20 Mortiser available as an option 22 Maintenance 24 ...

Page 3: ...working with the machine Many types of masks and filters are available to prevent inhalation of wood dust Correct selection and application are important to ensure proper operation Never remove wood residues by hand while the engine is running Only do so when the machine is completely switched off In determining the health risk it should be taken into account that when using for example MDFs vario...

Page 4: ...at are required for a safe use The user should also follow the operating instructions to avoid accidents 1 Training of machine operators It is essential that machine operators receive adequate training in the operation adjustment and handling of the machine In particular a risks associated with the use of the machine b principles of operation correct use and adjustment of the machine c right choic...

Page 5: ...d hygiene rules latent risks still exist when working with the surface planning and thicknessing machine Risk of accident in the unsecured area around the tool Risk of injury when changing tools Risk of injury caused by the wood itself or by thrown out chips Risk of crushing fingers Risk of dropping the piece of wood Health risks due to prolonged inhalation of dust particles especially from oak be...

Page 6: ...hort bits to avoid vibrations Explanation of measurements SOUND LEVEL Measurements according to NBN EN ISO 3746 2011 NBN EN ISO 11202 2010 Measurements made by Vinçotte nv at the operator s workstation Sound level Noise exposure Thicknessing 103 9 dB A 95 1 dB A Mortising machine max 93 8 dB A 88 1 dB A DUST EMISSION VALUES The machine produces dust and should therefore always be connected to a va...

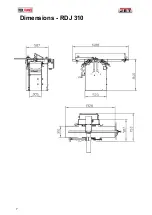
Page 7: ...7 Dimensions RDJ 310 ...

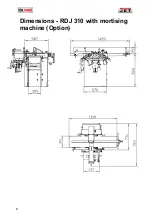
Page 8: ...8 Dimensions RDJ 310 with mortising machine Option ...

Page 9: ... Dimensions of the blades 310 x 25 x 3 mm Shaft speed 5500 RPM Planer fence dimensions 1300 x 150 mm Planer fence tilt angle 90 45 Maximum removal 4 mm Motor power 3 7 kW S6 three phase 2 2 kW S6 single phase Planer Table dimensions 430 x 310 mm Passage height 230 mm Diameter of drive rollers 30 mm Drive speed 6 m min Mortising machine optional Chuck 0 16 mm Travels 165 x 140 x 85 mm ...

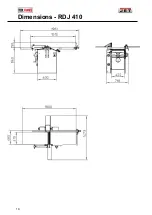
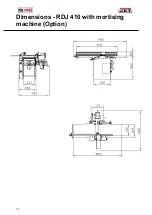
Page 10: ...10 Dimensions RDJ 410 ...

Page 11: ...11 Dimensions RDJ 410 with mortising machine Option ...

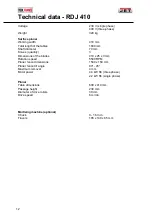
Page 12: ...y 3 Dimensions of the blades 410 x 25 x 3 mm Rotation speed 5500 RPM Planer fence dimensions 1500 x 150 mm Planer fence tilt angle 90 45 Maximum removal 4 mm Motor power 4 4 kW S6 three phase 2 2 kW S6 single phase Planer Table dimensions 600 x 410 mm Passage height 230 mm Diameter of drive rollers 30 mm Drive speed 6 m min Mortising machine optional Chuck 0 16 mm Travels 165 x 140 x 85 mm ...

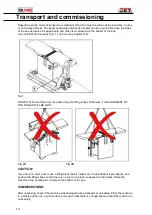
Page 13: ...ine from the pallet using the lifting straps Otherwise THE ALIGNMENT OF THE TABLES WILL BE LOST Fig 2A Fig 2B CAUTION If you have no choice but to use a lifting block hoist make sure it has sufficient load capacity and position the lifting straps so that there is no too much pressure applied on the tables Raise the machine a few centimetres to remove the bottom of the box COMMISSIONING After unpac...

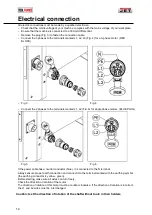
Page 14: ...he terminals marked L1 L2 Fig 6 for single phase motors BLUE PLUG Fig 5 Fig 6 If the power cable has a neutral conductor blue it is connected to the N terminal Always ensure proper earth connection and connect it to the terminal marked with the earthing symbol the earthing conductor is yellow green Before starting make sure all axles can turn freely Check the direction of rotation of the motor The...

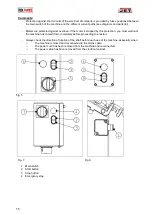
Page 15: ...by this protection you must wait until the machine has cooled down completely before proceeding to a restart Always check the direction of rotation of the shaft before each use of the machine especially when o The machine is moved and reconnected to the mains cable o The power cord has been removed from the machine and reconnected o The power cable has been removed from the electrical cabinet Fig ...

Page 16: ... Fig 9 Fig 10 Table adjustment 1 The planing outfeed table should be set at the same height as the blades 2 To do this use a wooden batten placed on the outfeed table just above a blade Both tables have a clamping lever Fig 11 1 and an adjusting screw Fig 11 2 To adjust the height the table must be set correctly using the adjusting screw 3 During this adjustment manually turn the planer shaft unti...

Page 17: ...s Swing the suction guard cover back over the planer shaft Pull the clamp Fig 13 and tilt the cover Fig 12 4 onto the planer spindle 3 Then pull down the hinge locking pins Fig 11 3 Fig 14 to close the tables Fig 11 Fig 12 Fig 13 Fig 14 ...

Page 18: ...long spiral grooves The helical shaft reduces pull out produces smaller chips and is less noisy than a conventional cutting tool When the cutting edge of a knife is dull or nicked just turn 90 in a few seconds so that the cutting head is like new again This enables to significantly reduce downtimes Only replace the inserts when all four edges are dull You don t have to replace all the blades at on...

Page 19: ...ckwise remove the screw lubricate the thread with a light machine oil 4 Brush or blow off any chips or dust from the insert seat Seats should be as clean as possible to avoid a breakage of the insert or cutting edges 4 Turn the insert 90 degrees clockwise or insert a new carbide insert at the start position Fig 19 Place the screw in the hole turn the screw downwards with your finger 5 Press the ca...

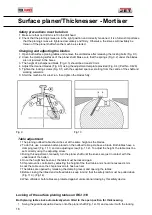
Page 20: ...not inflexible The flattened shape of the bridge enables the workpiece to be pushed onto the planer shaft Fig 24 with the left hand in a smooth movement thus avoiding marks due to a repositioning of the workpiece The bridge is moved sideways by loosening the knob Fig 24 3 To plane straight workpieces at 90 or 45 the guard is placed on the surface table and the bridge is moved along the longitudina...

Page 21: ...it one sixth of a turn to the left and retighten the nut 2 The table height should be adjusted so that there is a maximum gap of 1 mm between the top of the workpiece and the connecting rod between the two ball bearing housings 3 The thicknesser is equipped with a kickback protection 4 The feed rollers can be engaged by pushing the lever fig 25 4 to the left The drive wheel is then pressed against...

Page 22: ...t to a 4mm adjustment 2 Two levers located on the table enable to move the table in all directions 3 The longitudinal travel is achieved with the lever 3 the crosswise travel with the lever 4 4 The lever can constitute a major difficulty when processing large sheets Therefore this lever can be removed very easily 5 The depth stop 5 and both length stops 6 enable several identical holes to be made ...

Page 23: ...threads of the drill head and the threads of the planer shaft are perfectly clean before installing them Fig 29 Caution the mortising head has a left hand thread M24 x 1 5 Screw the drill head completely onto the planer spindle then position the 2 pressure screws fig 29 1 using the Allen key supplied with the machine These pressure screws must be well positioned in the spindle groove to prevent th...

Page 24: ...the motor To do this simply remove the plate under the electrical control panel to access the motor Maintenance of the drive system Fig 30 31 In the case of frequent use it may be necessary to adjust the tension of the drive belts The tension of the 2 drive belts of the planer motor can be adjusted by loosening the 4 motor fixing screws The weight of the motor is lowered and the belts are tightene...

Page 25: ...ng with wet wood the machine must be very well lubricated and maintained Problems Causes and solutions 1 The machine does not start after pressing the start button The switch is incorrectly positioned check and move it to the correct position 2 The main fuse is blown Motor overload due to dull tools excessive chip removal or to the fact that wood was pushed through the tool too fast sharpen the to...

Reviews: