background image

Designed in Brooklyn  |  Made in China 

Bolt

Folding Electric Ride-On.

A guide for your ride. 

IMPORTANT: READ CAREFULLY AND RETAIN FOR FUTURE REFERENCE. 
MODEL:  JBOLT-BLK

Summary of Contents for JBOLT-BLK

Page 1: ...Designed in Brooklyn Made in China Bolt Folding Electric Ride On Aguideforyourride IMPORTANT READ CAREFULLY AND RETAIN FOR FUTURE REFERENCE MODEL JBOLT BLK...

Page 2: ......

Page 3: ...ct Overview Specs Features Attaching the Seat Attaching the Foot Rests Attaching the Rear Fender Charging the Battery Unfolding the Handlebar Operating the Bolt Helmet Safety Riding the Bolt Care Main...

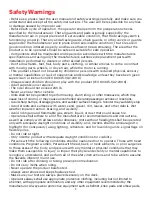
Page 4: ...uvers which may cause loss of control or may cause uncontrolled operator passenger actions or reactions Avoid sharp bumps drainage grates and sudden surface changes Scooter may suddenly stop Avoid str...

Page 5: ...demonstration that such operators can understand and operate all components of the unit before use Recommended for indoor use Use caution when charging Do not operate charger near flammable materials...

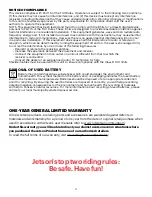
Page 6: ...ent and receiver Connect the equipment into an outlet on a circuit different from that to which the receiver is connected Consult the dealer or an experienced radio TV technician for help Shielded cab...

Page 7: ...dlebar 6 Carrying Handle 7 Seat 8 Seat Clamp 9 Taillight 10 Rear Fender 11 Rear Disc Brake 12 Rear Tire 13 Kickstand 14 Foot Rest 15 Front Fender 16 Charging Cable 17 Charger CAUTION Before operating...

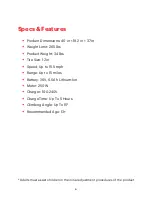
Page 8: ...Weight 34 lbs Tire Size 12 in Speed Up to 15 5 mph Range Up to 15 miles Battery 36V 6 0Ah Lithium Ion Motor 250W Charger 100 240V Charge Time Up To 5 Hours Climbing Angle Up To 15 Recommended Age 13...

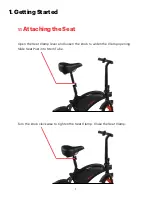
Page 9: ...Started 1 1 Attaching the Seat Open the Seat Clamp lever and loosen the knob to widen the Clamp opening Slide Seat Post into Stem Tube Turn the knob clockwise to tighten the Seat Clamp Close the Seat...

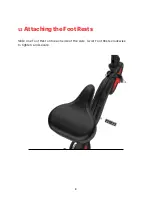
Page 10: ...1 2 Attaching the Foot Rests Slide one Foot Rest onto each side of the Axle Twist Foot Rests clockwise to tighten and secure 8...

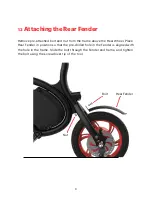
Page 11: ...the frame above the Rear Wheel Place Rear Fender in position so that the pre drilled hole in the Fender is aligned with the hole in the frame Slide the bolt through the Fender and frame and tighten th...

Page 12: ...ging into the Charging Port Do not turn on the Bolt while it s charging Charge the battery until it is fully charged up to 5 hours Replace the cover over the Charging Port when done Never leave the Bo...

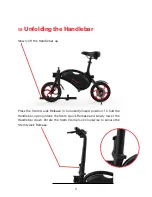
Page 13: ...the Handlebar up Press the Stem Quick Release in to locked closed position To fold the Handlebar open unlock the Stem Quick Release and slowly lower the Handlebar down Rotate the Stem Clamp lock clock...

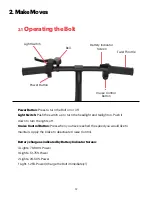
Page 14: ...Button Press when you have reached the speed you would like to maintain Apply the brake to deactivate Cruise Control Battery charge as indicated by Battery Indicator Screen 4 Lights 76 100 Power 3 Lig...

Page 15: ...e wheels Closed toe flat shoes are recommended Wear an ASTM F1492 approved helmet and protective gear to prevent injury in the event of an accident 2 2 Helmet Safety IMPROPER POSITIONING The forehead...

Page 16: ...n the Foot Rests Do not ride with your feet dangling over the sides Always stay seated while riding Gently rotate the Twist Throttle to accelerate The more you rotate the Throttle the faster the bike...

Page 17: ...ry with a dry cloth Do not apply water directly onto the Bolt as the electrical systems and electronics may get wet which could result in a malfunction that leads to personal injury Battery Safety Mea...

Page 18: ...o learn about fantastic offers giveaways and all the latest Jetson news MakeMoves ridejetson com support ridejetson com chat To exercise your product s 1 year limited warranty or inquire about warrant...

Page 19: ......

Page 20: ...ITE EN CARTON RECYCLABLE CA FR JP TW CAJA DE CART N RECICLABLE MX ES KR FR ES CN Date Code 07 2022 v02 2022 Manufactured in Shenzhen China Imported by Jetson Electric Bikes LLC P O Box 320149 775 4th...

Reviews: