background image

- 0 -

Operation Instruction

www.jgaurora3d.com

Read it carefully before printing and keep it properly.

JGAURORA 3D Printer

Model:Z-603S

Summary of Contents for Z-603S

Page 1: ... 0 Operation Instruction www jgaurora3d com Read it carefully before printing and keep it properly JGAURORA 3D Printer Model Z 603S ...

Page 2: ...Shenzhen Aurora Technology Co Ltd 3D printer operation instruction 1 CONTENTS Introduction 2 ...

Page 3: ...drawn characteristics CNC laser cutting Metal body transmit by belt and screw rod linear bear in X Y Z axis which construction make printing much more table and high precision with less shake Special note 1 All content in this manual is strictly checked if any printing errors or misunderstandings on the content Shenzhen Aurora reserves the rights of interpretation 2 Any update information will not...

Page 4: ...ut your hand into machine when printing in case of crushing The power supply use 110V 220V 50HZ alternating current the tripod socket must be grounded don t add another power in case of fire or electric shock We suggest you wear safety goggles when tear off supports of models Put the machine at a drafty room some smells from the material may let you uncomfortable especially ABS material Please rea...

Page 5: ... axis position accuracy 0 015mm Gross weight 20KG Printing material ABS PLA TPU PA Build size 280 180 180mm Material tendency PLA LCD screen Yes Filament diameter 1 75mm Offline printing USB Software language Multi Language File format STL G Code OBJ Function of support automatically OS windows linux mac Software Cura Working condition 10 30 Humidity 20 50 2 Name of machine parts Pic 1 Extruder XY...

Page 6: ...Shenzhen Aurora Technology Co Ltd 3D printer operation instruction 5 3 Extruder drawing Pic 3 Pic 3 4 Tool list Pic 2 Pic 4 ...

Page 7: ...ura14 07 installation a Where can I find the software 1 SD card with shipment 2 download from internet b installation process 1 From SD card with shipment Insert SD card and open the file Pic 7 2 Download from internet Official website https ultimaker com en cura software list Pic 5 Pic 6 ...

Page 8: ...hen Aurora Technology Co Ltd 3D printer operation instruction 7 Select the right version as per your company system b Software installation process Double click and follow the steps to install it Pic 9 Pic 8 ...

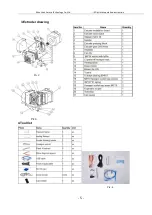
Page 9: ...Shenzhen Aurora Technology Co Ltd 3D printer operation instruction 8 Pic 10 Pic 11 ...

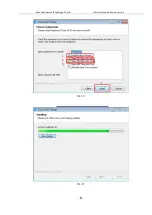
Page 10: ...Shenzhen Aurora Technology Co Ltd 3D printer operation instruction 9 Pic 12 Pic 13 ...

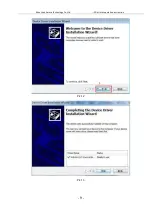
Page 11: ...Shenzhen Aurora Technology Co Ltd 3D printer operation instruction 10 Pic 14 Pic 15 ...

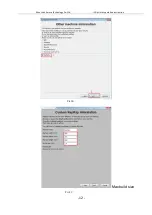
Page 12: ...Shenzhen Aurora Technology Co Ltd 3D printer operation instruction 11 Pic 16 Pic 17 ...

Page 13: ...Shenzhen Aurora Technology Co Ltd 3D printer operation instruction 12 Max build size Pic 18 Pic 19 ...

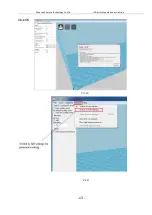
Page 14: ...Shenzhen Aurora Technology Co Ltd 3D printer operation instruction 13 Click OK Pic 21 Pic 20 ...

Page 15: ...on instruction 14 Configurations loading as per below 1 2 step Position of configuration file Computer SD card Software installation file myamps1 4 ini suggestion keep this file copy to your computer Pic 22 Pic 23 Open configuration file SD card you keep ...

Page 16: ... Aurora Technology Co Ltd 3D printer operation instruction 15 After Loading the basic and advanced configuration will be changed to the Z 603S regular printing configuration Pic 24 Set print all at once Pic 25 ...

Page 17: ...Shenzhen Aurora Technology Co Ltd 3D printer operation instruction 16 2 Cura software setting Layer height setting Pic 26 Pic 27 ...

Page 18: ...Shenzhen Aurora Technology Co Ltd 3D printer operation instruction 17 pic 28 Pic 29 ...

Page 19: ...Shenzhen Aurora Technology Co Ltd 3D printer operation instruction 18 Pic 30 Speed and temperature setting Pic 31 ...

Page 20: ...Shenzhen Aurora Technology Co Ltd 3D printer operation instruction 19 Pic 32 Pic 33 ...

Page 21: ...Shenzhen Aurora Technology Co Ltd 3D printer operation instruction 20 Pic 35 Pic 34 ...

Page 22: ...Shenzhen Aurora Technology Co Ltd 3D printer operation instruction 21 Pic 36 Pic 37 ...

Page 23: ...Shenzhen Aurora Technology Co Ltd 3D printer operation instruction 22 Basic setting of model in the software Pic 38 Pic 39 ...

Page 24: ...Shenzhen Aurora Technology Co Ltd 3D printer operation instruction 23 Pic 40 Pic 41 ...

Page 25: ...Shenzhen Aurora Technology Co Ltd 3D printer operation instruction 24 Pic 42 Pic 43 ...

Page 26: ...Shenzhen Aurora Technology Co Ltd 3D printer operation instruction 25 1 Software expert mode Pic 44 Pic 45 ...

Page 27: ...Shenzhen Aurora Technology Co Ltd 3D printer operation instruction 26 Pic 46 Pic 47 ...

Page 28: ...Shenzhen Aurora Technology Co Ltd 3D printer operation instruction 27 Pic 48 Pic 49 ...

Page 29: ...Shenzhen Aurora Technology Co Ltd 3D printer operation instruction 28 Pic 50 Pic 51 ...

Page 30: ...Shenzhen Aurora Technology Co Ltd 3D printer operation instruction 29 Pic 52 ...

Page 31: ...Shenzhen Aurora Technology Co Ltd 3D printer operation instruction 30 C Printer Operating 1 LCD display interface Pic 53 Pic 53 ...

Page 32: ...echnology Co Ltd 3D printer operation instruction 31 2 Platform leveling A press rotation button choice Prepare Auto let all axis go to home point B when motor stop twist rotation button choice Prepare Disable steppers ...

Page 33: ...heck the distance between platform and nozzle D put one A4 paper on printing area and let it under nozzle when move A4 paper should have little friction force If too loose mean too far twist screw anti clockwise direction If too tight mean too close twist screw clockwise direction Check four corners of the distance ...

Page 34: ...ra Technology Co Ltd 3D printer operation instruction 33 E after adjust A4 can be withdrawn with little friction force The distance between nozzle and platform is about 0 15mm move extruder will not scratch platform ...

Page 35: ...Shenzhen Aurora Technology Co Ltd 3D printer operation instruction 34 3 Filament Feeding Press button Prepare Preheat PLA Pic 55 Pic 54 ...

Page 36: ...n instruction 35 Pic 54 Pic 56 Pic 57 Pic 58 Straighten the filament and Insert it into feeding hole press the lock nut down by another hand Put filament to filament holder Filament pass this tube to extruder Cut a small bevel angle at the tip of filament ...

Page 37: ...Shenzhen Aurora Technology Co Ltd 3D printer operation instruction 36 Pic 60 Filament changed notice Pic 61 After filament loaded press filament make it come out from nozzle evenly ...

Page 38: ...Shenzhen Aurora Technology Co Ltd 3D printer operation instruction 37 4 Printing 1 Offline printing by SD card Pic 66 Pic 67 G code generating ...

Page 39: ...Shenzhen Aurora Technology Co Ltd 3D printer operation instruction 38 Pic 68 Pic 69 ...

Page 40: ...hen press the rotary button the printer will automatically work up It will heat up to the temp which been setted in the slice software Remark The distance between nozzle and platform is one of the most important factor that effects printing result a Far distance Fine round uneven gap and tilt In this case printed model will be not good and uneasy to move shown as picture Pic 71 ...

Page 41: ...eration instruction 40 b Close distance the path is too flat and the side of path is upwrap what s more it will damage the nozzle shown as pic 72 c Right distance Flat skinning gapless shown as picture 73 2 Online printing by USB cable Pic 72 Pic 73 ...

Page 42: ...y Co Ltd 3D printer operation instruction 41 Click print Extruder and hotbed is heating Pic 74 Pic 75 Modifying Serial port Number Serial port is according to computer and Baudrate setting 115200 B Online printing Pic 76 Pic 77 ...

Page 43: ...Shenzhen Aurora Technology Co Ltd 3D printer operation instruction 42 Printing The progress of printing Pic 78 ...

Page 44: ...Co Ltd 3D printer operation instruction 43 E FAQ and Solutions Extruder Plugged Tip Electric fan should be took off before doing maintenance as picture shown Situation A only little filament leave down and cannot pull out Pic 79 ...

Page 45: ...n press the lock nut down by another hand and pull it out rapidly Situation B filament do not feed into feeding mouth Keep heating use allen wrench to dismantle fan and heat sank part and use smallest hexagon wrech in tool box as picture to press the remain filament till it out from nozzle competely Pic 81 Pic 80 ...

Page 46: ...Shenzhen Aurora Technology Co Ltd 3D printer operation instruction 45 Pic 82 Pic 83 ...

Page 47: ...p Is unusual Broken temp sensor Change the sensor 4 Different shape as STL Motor Pulley Screw loose Check and Lock the screws 5 The model is warped The hot bed is not at a level Adjust hot bed level 6 G code gerating failed Wrong setting or wrong save path Choose the right machine type and change the right path 7 Software Installation failed Different OS Reset OS ...

Page 48: ...ing do preparation of hot bed adjustment first c When finished printing the filament should keep sealing avoid moisture d Preheat the extruder at the beginning of 2nd time printing let extruder auto push filament for a while e Machine should do some regular maintenance drop some lubricating oil on thread rod polished rod and bearings to avoid fatigue wear f Do not let the fan and air condition blo...

Page 49: ...td 3D printer operation instruction 48 G AFTER SALES SERVICE Shenzhen Aurora Technology Co Ltd Add 5F No 17th Chiling Rd Chiling County Gaofeng community Dalang street Longhua District Shenzhen China 518109 Website www jgaurora3d com ...

Reviews: