background image

1

ENGLISH

INSTRUCTION MANUAL

AMS-224EN6060 / IP-420

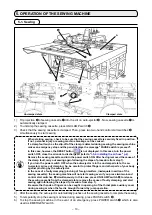
  *   This Instruction Manual only describes the functions which are different from those of the 

AMS-224EN/IP-420. In order to use the AMS-224EN6060 safely, please be sure to read not 

only this Instruction Manual but also that for the AMS-224EN/IP-420 before using your AMS-

224EN6060.

  *   "CompactFlash(TM)" is the registered trademark of SanDisk Corporation, U.S.A.

Summary of Contents for AMS-224EN6060/IP-420

Page 1: ...ions which are different from those of the AMS 224EN IP 420 In order to use the AMS 224EN6060 safely please be sure to read not only this Instruction Manual but also that for the AMS 224EN IP 420 before using your AMS 224EN6060 CompactFlash TM is the registered trademark of SanDisk Corporation U S A ...

Page 2: ...read tension 9 4 7 Intermediate presser height 9 4 8 Adjusting the thread take up spring 9 5 OPERATION OF THE SEWING MACHINE 10 5 1 Sewing 10 5 2 Needle thread clamp device 11 II OPERATION SECTION WITH REGARD TO THE PANEL 11 1 PREFACE 11 2 WHEN USING IP 420 2 1 Name of each section of IP 420 2 2 Buttons to be used in common 2 3 Basic operation of IP 420 2 4 LCD display section at the time of sewin...

Page 3: ...ern button 2 19 Copying pattern button 2 20 Changing sewing mode 2 21 LCD display section at the time of combination sewing 1 Pattern input screen 2 Sewing screen 2 22 Performing combination sewing 1 Selection of combination data 2 Creating procedure of the combination data 3 Deleting procedure of the combination data 4 Deleting procedure of the step of the combination data 2 23 Using the simple o...

Page 4: ... vertical stroke of the intermediate presser 14 1 5 The moving knife and counter knife 14 1 6 Needle thread clamp device 14 1 7 Thread breakage detector plate 14 1 8 Draining waste oil 14 1 9 Needle cooler unit 15 1 10 Amount of oil supplied to the hook 16 1 11 Replacing the fuse 16 1 12 Changing the voltage of 100 200V 16 1 13 Replenishing the designated places with grease 16 1 Points to be appli...

Page 5: ...imes 0 1 steps 17 Enlarging Reducing method Pattern enlargement reduction can be done by increasing decreasing either stitch length or the number of stitches Increasing decreasing stitch length only can be performed when pattern button is selected 18 Max sewing speed limitation 200 to 2 000 sti min Scale 100 sti min steps 19 Pattern selection facility Pattern No selection method Main body 1 999 Me...

Page 6: ... head Thread stand Operation panel IP 420 Auto ejector Power switch also used as the emergency stop switch Two hand control start switch Auto ejector unclamp switch Air regulator Intermediate presser Sewing cassette Control box ...

Page 7: ...NSTALLATION 3 1 Installation of the sewing machine Refer to I 3 4 Installing the thread stand p 6 in the Instruction Manual for the AMS 224EN The thread stand components are supplied with the machine in the accessory box 1 Once the place of installation of the sewing ma chine is determined place vibration preventing rubber 40123512 under adjusting bolt The vibration preventing rubber is supplied w...

Page 8: ...g cassette is separately available by special order When you would like to prepare a sewing cassette by yourself prepare the sewing cassette shown in the figure above When you have prepared a custom ordered sewing cassette read from 2 3 5 Preparing the sewing cassette Sewing cassette Operator side Weight 9 5 kg or less Width 860 mm reference Depth 680 m m reference Height 12 mm or less 250m m 22mm...

Page 9: ...the positioning block Then fix posi tioning block with the setscrew Repeat unclamping and clamping operations several times to check whether the position ing block is fully clamped Check the clearance in B section with the posi tioning block clamped If there is a clearance loosen setscrew and move plates at two locations on the right and left in the direction of arrow C to adjust the clearance to ...

Page 10: ...l for the AMS 224EN The sewing area can be broadened to 600 mm in longitudinal direction according to the memory switch setting It should be remembered however there arises the area in which sewing and jump are disabled So carefully set the sewing area Area in which sewing and jump are disabled Origin 600mm 300mm 300mm 200mm 200mm 200mm Area in which sewing and jump are disabled The sewing area ha...

Page 11: ...HE SEWING MACHINE 4 1 Lubrication WARNING Turn OFF the power before starting the work so as to prevent accidents caused by abrupt start of the sewing machine 4 3 Threading the machine head WARNING Turn OFF the power before starting the work so as to prevent accidents caused by abrupt start of the sewing machine CAUTION When handling the lubricating oil or grease wear safety goggles and protective ...

Page 12: ...oning material with a new one if it has peeled off or has any de fect Strut Switch No Part No Part name 40123402 CUSHION 1 40123403 CUSHION 2 40123404 CUSHION 3 40123401 CUSHION Block 40123405 CUSHION 4 40123406 CUSHION 5 Carefully protect against personal in jury caused by a possible contact with the sewing machine strut switch etc Strut Strut 4 5 Installing the bobbin Refer to I 4 5 Installing t...

Page 13: ... set value of the intermediate presser height is 3 mm or less the intermediate presser can interfere with the needle hole guide A B The actual height of the intermediate presser is 3 mm lower than the value entered with the TEN keys Example Value entered with the TEN keys Actual height 7mm 4mm 4mm 1mm 3mm 0mm Enter the value of the intermediate presser height that does not cause interference betwe...

Page 14: ...ng again following the steps of procedure from step 1 If you turn the power switch OFF when the auto ejector is in the unclamped state the au to ejector carries out clamping So be careful to protect fingers and other parts of your body against pinching by the auto ejector In the case of a faulty clamping pinching of foreign matters inadequate insertion of the sewing cassette the sewing machine wil...

Page 15: ...EGARD TO THE PANEL Refer to II OPERATION SECTION WITH REGARD TO THE PANEL p 15 in the Instruc tion Manual for the AMS 224EN for the additional information 1 PREFACE The media supplied with the unit contains the following service patterns The operation panel for the AMS 224EN comes in the following four types 5 2 Needle thread clamp device The thread clamp device has been factory set to OFF at the ...

Page 16: ... stroke Loosen needle bar connection screw and adjust so that the upper marker line engraved on the needle bar aligns with the bottom end of the needle bar bushing lower 2 As illustrated in the above figure change the adjusting position in accordance with the needle count The standard needle count is DP x 17 B point 24 If sewing problems such as stitch skipping and thread breakage when the needle ...

Page 17: ...stment turn shuttle race adjust ing shaft clockwise or counterclockwise to provide a 0 05 to 0 1 mm clearance between needle and the blade point of shuttle 5 After adjusting the longitudinal position of shuttle race further adjust to provide a 8 mm clearance between the needle and the shuttle race Then tighten screw of shuttle race The cushioning materials are adhered on the sewing machine strut s...

Page 18: ...nstruction Manual for the AMS 224EN Refer to III 1 6 The moving knife and counter knife p 106 in the Instruction Manual for the AMS 224EN Refer to III 1 7 Needle thread clamp device p 107 in the Instruction Manual for the AMS 224EN The thread clamp device has been factory set to OFF at the time of shipment Leave it in the OFF state when using the sewing machine Refer to III 1 8 Thread breakage det...

Page 19: ...The needle cooler unit blows compressed air to the needle through air nozzle and stops blowing simultaneously with the completion of sewing 2 Turn flow regulating valve to fully open it then give it two turns in the reverse direction This procedure is the reference for the adjust ment of the amount of air blow that does not swing the thread ...

Page 20: ...n the Instruction Manual for the AMS 224EN Refer to III 1 12 Changing the voltage of 100 200V p 109 in the Instruction Manual for the AMS 224EN Refer to III 1 13 Replenishing the designated places with grease p 110 1 Points to be applied with JUKI Grease A p 111 and 2 Points to be applied with JUKI Grease B p 112 in the Instruction Manual for the AMS 224EN When the sewing machine has run out of gr...

Page 21: ...ied with grease 1 14 Troubles and corrective measures Sewing conditions Refer to III 1 14 Troubles and corrective measures Sewing conditions p 113 in the Instruction Manual for the AMS 224EN Disk cam and pin Slot and pin Slant face of the disk cam and pin ...

Page 22: ...assette press the UNCLAMP switch To re check press the FEEDING FRAME BACKWARD button to re check the needle entry points The sewing machine feed mech anism is driven Stop Thread trimming Auto ejector unclamp jig is jumped out Sewing One cycle operation of the sewing machine is completed Display the data display screen Call the sewing shape selection screen Select the target type of sewing shape Th...

Page 23: ... 1 Table of Needle hole guide 3 OPTIONAL 3 2 Silicon oil tank 3 3 Bar code reader 3 4 Tension controller No 3 Refer to III 2 1 Table of Needle hole guide p 115 in the Instruction Manual for the AMS 224EN Refer to III 2 3 Bar code reader p 116 in the Instruction Manual for the AMS 224EN When the thread is not adequately tensed use the tension controller No 3 40072310 WARNING Turn OFF the power befo...

Reviews: