background image

LYT1776-001A

ESP

AÑOL

ENGLISH

EN SP

INSTRUCTIONS
MANUAL DE INSTRUCCIONES

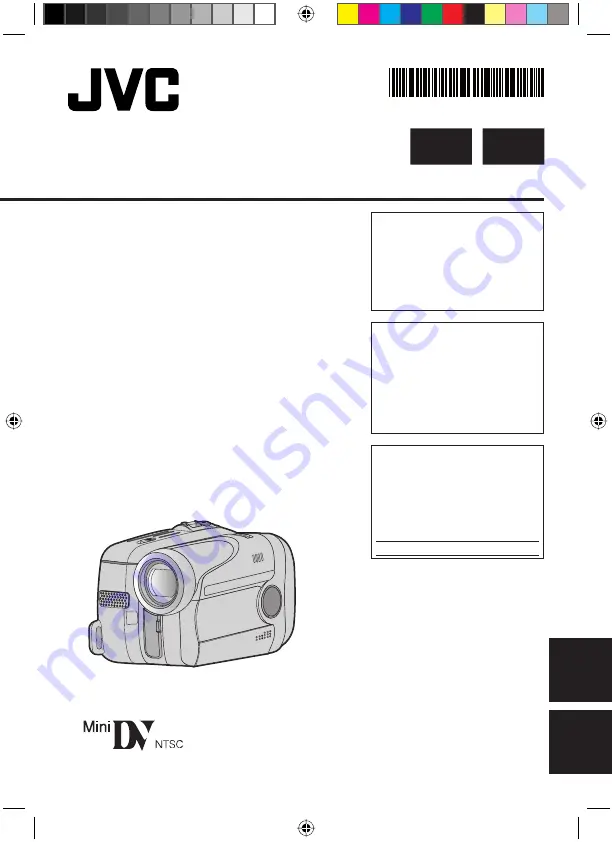
DIGITAL VIDEO CAMERA
VIDEOCÁMARA DIGITAL

GR-DA30U

Dear Customer,

Thank you for purchasing this 
digital video camera. Before 
use, please read the safety 
information and precautions 
contained in pages 2 – 4 to 
ensure safe use of this product.

Estimado cliente:

Gracias por comprar esta 
videocámara digital. Antes de 
usarla, lea la información de 
seguridad y las precauciones 
contenidas en las páginas 2 – 4 
para garantizar un uso seguro 
de este producto.

For Customer Use:

Enter below the Model No. and 
Serial No. which is located on 
the bottom of the camcorder. 
Retain this information for future 
reference.

Model No.
Serial No.

GR-DA30US_EN.indb   1

GR-DA30US_EN.indb   1

7/11/2007   6:00:14 PM

7/11/2007   6:00:14 PM

Summary of Contents for GR-DA30U

Page 1: ...e safe use of this product Estimado cliente Gracias por comprar esta videocámara digital Antes de usarla lea la información de seguridad y las precauciones contenidas en las páginas 2 4 para garantizar un uso seguro de este producto For Customer Use Enter below the Model No and Serial No which is located on the bottom of the camcorder Retain this information for future reference Model No Serial No...

Page 2: ...t is recommended that you use JVC brand cassette tapes Your camcorder is compatible with all brands of commercially available cassette tapes complying with the MiniDV standard but JVC brand cassette tapes are designed and optimized to maximize the performance of your camcorder Remember that this camcorder is intended for private consumer use only Any commercial use without proper permission is pro...

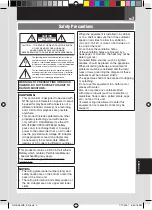
Page 3: ...dangerous voltage within the product s enclosure that may be of sufficient magnitude to constitute a risk of electric shock to persons The exclamation point within an equilateral triangle is intended to alert the user to the presence of important operating and maintenance servicing instructions in the literature accompanying the appliance WARNING TO PREVENT FIRE OR SHOCK HAZARD DO NOT EXPOSE THIS ...

Page 4: ...s plug shall remain readily operable IMPORTANT SAFETY INSTRUCTIONS 1 Read these instructions 2 Keep these instructions 3 Heed all warnings 4 Follow all instructions 5 Do not use this apparatus near water 6 Clean only with dry cloth 7 Do not block any ventilation openings Install in accordance with the manufacturer s instructions 8 Do not install near any heat sources such as radiators heat registe...

Page 5: ...ording 24 Manual Focus 24 Exposure Control 24 Iris Lock 25 Backlight Compensation 25 Spot Exposure Control 25 White Balance Adjustment 26 Manual White Balance Adjustment 26 Wipe Or Fader Effects 27 Program AE Effects And Shutter Effects 27 Editing 28 Dubbing To A VCR 28 Dubbing To Or From A Video Unit Equipped With A DV Connector Digital Dubbing 29 Connection To A Personal Computer 30 References 3...

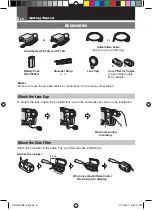
Page 6: ...h the Lens Cap To protect the lens attach the provided lens cap to the camcorder as shown in the illustration Place here during recording or Attach the Core Filter Attach the core filter to the cable The core filter reduces interference Wind once Audio Video Cable Wind twice AC Adapter Release the stopper 3 cm Core Filter for Cables A Audio Video Cable B AC Adapter A B GR DA30US_EN indb 6 GR DA30U...

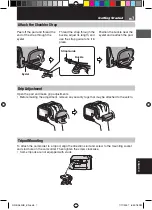
Page 7: ... the pad Tripod Mounting To attach the camcorder to a tripod align the direction stud and screw to the mounting socket and stud hole on the camcorder Then tighten the screw clockwise Some tripods are not equipped with studs Grip Adjustment Open the pad and make grip adjustments Before making the adjustment remove any security tags that may be attached to the velcro Eyelet Strap Guide Buckle GR DA3...

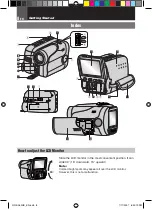
Page 8: ...dex How to adjust the LCD Monitor Slide the LCD monitor in the most convenient position It can slide 30 15 downward 15 upward Note Colored bright spots may appear all over the LCD monitor However this is not a malfunction GR DA30US_EN indb 8 GR DA30US_EN indb 8 7 11 2007 6 00 19 PM 7 11 2007 6 00 19 PM ...

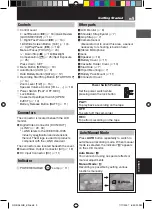
Page 9: ...he cover b Audio Video Output Connector AV 18 c DC Input Connector DC 11 Indicator N POWER CHARGE Lamp 11 Other parts O LCD Monitor 8 P Shoulder Strap Eyelet 7 Q Grip Strap 7 R Camera Sensor Be careful not to cover this area a sensor necessary for shooting is built in here S Stereo Microphone T Lens U Speaker 16 V Battery Cover 11 W Cassette Holder Cover 13 X Stud Hole 7 Y Tripod Mounting 7 Z Batt...

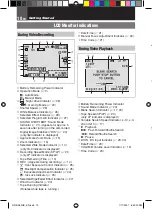
Page 10: ...d Recording Speed Mode SP LP 21 only LP indicator is displayed 0 Tape Remaining Time 14 1 REC Appears during recording 14 2 Spot Exposure Control Indicator 25 Backlight Compensation Indicator 25 Exposure Adjustment Indicator 24 C Iris Lock Indicator 25 3 Selected Wipe Fader Effect Indicator 27 4 Wind Cut Indicator 20 5 Tape Running Indicator Rotates while tape is running 6 Date Time 21 7 Manual Fo...

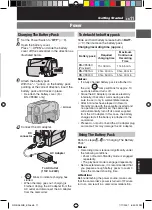
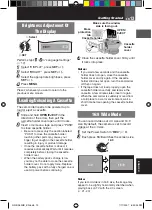
Page 11: ...es If a fully charged battery pack is attached to the unit lamp will blink for approx 10 seconds before it turns off Since the AC Adapter processes electricity internally it becomes warm during use Be sure to use it only in well ventilated areas After 5 minutes have elapsed in Record Standby mode with the cassette inserted and no operation is performed the camcorder will automatically turn off its...

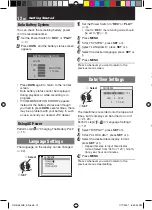
Page 12: ...ng The Battery Pack 11 Language Settings The language on the display can be changed 22 1 1 Set the Power Switch to REC or PLAY 9 If set to REC the recording mode should be set to M 9 2 Press MENU 3 Select SYSTEM press SET or 4 Select LANGUAGE press SET or 5 5 Select the desired language press SET or 6 6 Press MENU Press whenever you want to return to the previous menu screen The date time is recor...

Page 13: ...he cassette holder cover Do not apply force Replace the battery pack with a fully charged one or use AC power before continuing Cassette holder OPEN EJECT Cassette holder cover Make sure the window side is facing out Erase protection tab 3 3 Close the cassette holder cover firmly until it locks into place 16 9 Wide Mode You can record videos at 4 3 size and 16 9 size By default the camera is set t...

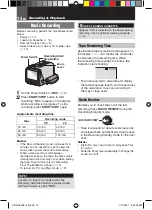
Page 14: ...y mode 21 Tape Remaining Time Approximate tape remaining time appears on the display min means the camcorder is calculating the remaining time When the remaining time reaches 2 minutes the indication starts blinking The time required to calculate and display the remaining tape length and the accuracy of the calculation may vary according to the type of tape used Quick Review Enables you to check t...

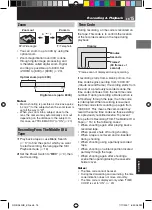
Page 15: ... second Frames are not displayed during recording If recording starts from a blank portion the time code begins counting from 00 00 00 minute second frame If recording starts from the end of a previously recorded scene the time code continues from the last time code number If during recording a blank portion is left partway through the tape the time code is interrupted When recording is resumed th...

Page 16: ...k picture can be viewed in the LCD monitor or on a connected TV 18 If Stop mode continues for 5 minutes when power is supplied from a battery the camcorder shuts off automatically When a cable is connected to the AV connector the sound is not heard from the speaker Still Playback Pauses during video playback 1 Press 6 during playback 2 To resume normal playback press 6 again If still playback cont...

Page 17: ...der searches in the reverse direction If the current position is at a recorded portion the camcorder searches in the forward direction If the beginning or end of the tape is reached during Blank Search the camcorder stops automatically A blank portion which is shorter than 5 seconds of tape may not be detected The detected blank portion may be located between recorded scenes Before you start recor...

Page 18: ...g displays appear on the connected TV Date Time Set DATE TIME to ON or OFF 21 Time Code Set TIME CODE to ON or OFF 21 On Screen Set ON SCREEN to OFF LCD or LCD TV 21 Notes It is recommended to use the AC Adapter as the power supply instead of the battery pack 11 To monitor the picture and sound from the camcorder without inserting a tape set the camcorder s Power Switch to REC then set your TV to ...

Page 19: ... For Video Playback Menu Set the Power Switch to PLAY 9 2 2 Press MENU The Menu Screen appears 3 3 Select the desired function press SET or The selected function menu appears Example FUNCTION menu Screen for Video Recording Menu Screen for Video Playback Menu Current Setting 4 4 Select the desired selection press SET or Example WIPE FADER menu 5 5 Select the desired setting press SET or Selection ...

Page 20: ...N You can shoot a subject as large as possible at a distance of approx 40 cm 1 4 ft Depending on the zoom position the lens may go out of focus DIS OFF Disables the function DIS disable icon appears ON To compensate for unstable images caused by camera shake particularly at high magnification Notes Accurate stabilization may not be possible if hand shake is excessive or depending on the shooting c...

Page 21: ...ISPLAY settings except CLOCK ADJ 16 9 OUTPUT and BRIGHT are effective only for shooting Menus Settings Factory preset DISPLAY ON SCREEN LCD Keeps the camcorder s display except the date time and time code from appearing on the connected TV screen LCD TV Makes the camcorder s display appear on screen when the camcorder is connected to a TV DATE TIME OFF The date time does not appear ON The date tim...

Page 22: ...inutes after the Power Switch is set to REC Performing any operation during the demonstration stops the demonstration temporarily If no operation is performed for more than 3 minutes after that the demonstration will resume Note If a cassette is in the camcorder the demonstration cannot be turned on CAM RESET CANCEL Does not reset all settings to the factory preset EXECUTE Resets all settings to t...

Page 23: ...d is output on both L and R channels in stereo SOUND L Sound from the L channel is output SOUND R Sound from the R channel is output BLANK SEARCH CANCEL EXECUTE 17 Blank Search Each setting except OFF in ON SCREEN DATE TIME and TIME CODE is linked with DISPLAY which appears when the Power Switch is set to REC The parameters except OFF in ON SCREEN setting are the same as in the description on 21 M...

Page 24: ... patterns that are regularly repeated When the scene is affected by sunbeams or light reflecting off the surface of a body of water When shooting a scene with a high contrast background The following low contrast warnings appear blinking 9 and A Exposure Control Manual exposure control is recommended in the following situations When shooting using reverse lighting or when the background is too bri...

Page 25: ...ris contracts in well lit environments to keep too much light from entering and dilates in dim environments to allow in more light Use this function in the following situations When shooting a moving subject When the distance to the subject changes so its size in the LCD monitor changes such as when the subject is backing away When shooting on a reflective natural background such as at the beach o...

Page 26: ...r is turned off or the battery removed White Balance cannot be activated simultaneously with TWILIGHT in PROGRAM AE 27 White Balance cannot be activated if the SEPIA or MONOTONE mode is activated White Balance Adjustment The white balance refers to the correctness of color reproduction under various lighting If the white balance is correct all other colors will be accurately reproduced The white b...

Page 27: ...ffect will be shown for approx 2 seconds before the camcorder returns to the menu screen Notes Shutter Effects cannot be used during NIGHT When a subject is too bright or reflective a vertical streak may appear smear phenomenon Smear phenomenon tends to occur when SPORTS or any mode of SHUTTER 1 500 1 4000 is selected PROGRAM AE OFF Disables the function SPORTS H Variable Shutter Speed 1 250 1 400...

Page 28: ...lack bands that usually appear when shooting a TV screen become narrower 1 100 SHUTTER 1 100 The shutter speed is fixed at 1 100th of a second The flickering that occurs when shooting under a fluorescent light or mercury vapour lamp is reduced SHUTTER 1 500 SHUTTER 1 4000 Refer to PROGRAM AE SPORTS H mode Factory preset Dubbing To A VCR To use this camcorder as a player 1 1 Following the illustrat...

Page 29: ...step 4 4 If this occurs turn off the power and make connections again When using a DV cable be sure to use the optional JVC VC VDV204U or VC VDV206U DV cable To use this camcorder as a recorder 1 Make sure all units are turned off 2 2 Connect this camcorder to a video unit equipped with a DV output connector using a DV cable as shown in the illustration 3 3 Set the camcorder s Power Switch to PLAY...

Page 30: ...elp for the Windows Messenger Notes It is recommended to use the AC Adapter as the power supply instead of the battery pack 11 When using a DV cable be sure to use the optional JVC VC VDV206U or VC VDV204U DV cable depending on the type of DV connector 4 or 6 pins on the PC The date time information cannot be captured into the PC Refer to the instruction manuals of the PC and Software The system m...

Page 31: ...GAIN UP to AGC or OFF 20 Images on the LCD monitor appear dark or whitish In places subject to low temperature images become dark due to the characteristics of the LCD monitor This is not a malfunction Adjust the brightness and angle of the LCD monitor 8 13 Picture does not appear on the LCD monitor The LCD monitor s brightness setting is too dark Adjust the brightness of the LCD monitor 13 Aspect...

Page 32: ... Backlight Compensation or Manual Focus while in AUTO mode A 9 TAPE END Appears when the tape ends during recording or playback LENS CAP Appears for 5 seconds after power is turned on if the lens cap is attached or when it is dark SET DATE TIME Appears when the date time is not set 12 The built in clock battery has run out and the previously set date time has been erased Consult your nearest JVC d...

Page 33: ...r a long period time remove from charger or powered unit when not in use as some machines use current even when switched off The Benefits Of Lithium Ion Batteries Lithium ion battery packs are small but have a large power capacity However when one is exposed to cold temperatures below 10 C 50 F its usage time becomes shorter and it may cease to function If this happens place the battery pack in yo...

Page 34: ...c in places subject to extremely high over 40 C or 104 F or extremely low under 0 C or 32 F temperatures DO NOT leave the unit in places of over 50 C 122 F in places where humidity is extremely low below 35 or extremely high above 80 in direct sunlight in a closed car in summer near a heater To protect the unit DO NOT allow it to become wet drop the unit or strike it against hard objects subject i...

Page 35: ...rs stop using the unit immediately and consult your local JVC dealer The camcorder is a microcomputer controlled device External noise and interference from a TV a radio etc might prevent it from functioning properly In such cases first disconnect its power supply unit battery pack AC Adapter etc and wait a few minutes and then re connect it and proceed as usual from the beginning Changes or modif...

Page 36: ...rix system Speaker Monaural For Digital Video Camera Format DV format SD mode Signal format NTSC standard Recording Playback format Video Digital component recording Audio PCM digital recording 32 kHz 4 channel 12 BIT 48 kHz 2 channel 16 BIT Cassette Mini DV cassette Tape speed SP 18 8 mm s LP 12 5 mm s Maximum recording time using 80 min cassette SP 80 min LP 120 min For Connectors AV Video outpu...

Page 37: ...t 28 Exposure Control 24 G Gain Up 20 I Iris Lock 25 L Language 22 LCD Monitor 8 Loading A Cassette 13 M Manual Focus 24 Melody 22 N Narration 23 Night Alive 28 O On Screen 21 23 P Program AE 27 Q Quick Review 14 R Rec Mode 21 23 Recording Capacity Tape 14 S Shutter Effects 28 Sound L R 23 Sound Mode 21 Speaker Volume 16 Specifications 36 Spot Exposure Control 25 T Tape Speed REC MODE 21 23 Tele M...

Page 38: ...e la videocámara no es compatible con otros formatos de video digital Se recomienda utilizar cintas de la marca JVC Su videocámara es compatible con todas las marcas de cintas disponibles en el mercado y homologadas conforme al estándar MiniDV pero las cintas de la marca JVC han sido diseñadas para optimizar el funcionamiento de su videocámara Recuerde que la videocámara es para usuarios privados ...

Page 39: ...oque ningún envase lleno de agua o líquidos tales como cosméticos o medicinas floreros macetas vasos etc en la parte superior de la unidad Si penetra agua o líquidos en la unidad podrá producirse electrocuciones o incendios ADVERTENCIA PARA EVITAR RIESGO DE INCENDIOS O ELECTROCUCIONES NO EXPONGA ESTE APARATO A LA LLUVIA O HUMEDAD PRECAUCIONES Esta videocámara está diseñada para ser utilizada con s...

Page 40: ... red eléctrica debe permanecer fácilmente operable INSTRUCCIONES IMPORTANTES DE SEGURIDAD 1 Lea estas instrucciones 2 Conserve estas instrucciones 3 Preste atención a las advertencias 4 Siga todas las instrucciones 5 No utilice este aparato cerca del agua 6 Limpie sólo con paño seco 7 No bloquee ninguna abertura de ventilación Instale de acuerdo con las instrucciones del fabricante 8 No lo instale...

Page 41: ...ol de exposición 24 Bloqueo del diafragma 25 Compensación de contraluz 25 Control de exposición puntual 25 Ajuste del balance del blanco 26 Ajuste manual del balance del blanco 26 Efectos de reemplazo cortinilla o fundido de imagen 27 Programa AE efectos y efectos de obturación 27 Edición 28 Copia en grabadora de vídeo 28 Copia en o desde un aparato de vídeo equipado con un conector DV Copia digit...

Page 42: ...Para proteger el objetivo coloque la tapa del objetivo suministrada en la videocámara como se muestra en la ilustración Coloque aquí durante la filmación o bien Coloque el filtro de núcleo Conecte los filtros de núcleo a los cables El filtro de núcleo reduce la interferencia Dé una vuelta Cable de audio vídeo Dé dos vueltas Adaptador de CA Libere la traba 3 cm Filtros de núcleo para cables A Cable...

Page 43: ...ntar la videocámara sobre un trípode alinee el tornillo y el perno de dirección al zócalo de fijación y al agujero para el perno de la videocámara Luego apriete el tornillo en el sentido de las agujas del reloj Algunos trípodes no vienen equipados con pernos Ajuste de la empuñadura Abra el velcro y ajuste la empuñadura Antes de hacer el ajuste quite cualquier etiqueta de seguridad que esté adherid...

Page 44: ...tor LCD Deslice el monitor LCD a la posición más conveniente Puede deslizarse 30 15 hacia abajo 15 hacia arriba Nota Pueden aparecer puntos de color claro por todo el monitor LCD o en el visor No obstante esto no es un fallo de funcionamiento GR DA30US_SP indb 8 GR DA30US_SP indb 8 7 11 2007 6 05 02 PM 7 11 2007 6 05 02 PM ...

Page 45: ...to a las tapas b Conector de salida de Audio Vídeo AV 18 c Conector de entrada de CC DC 11 Indicadores N Lámpara POWER CHARGE 11 Otras piezas O Monitor LCD 8 P Ojal de correa hombrera 7 Q Correa de empuñadura 7 R Sensor de cámara Tenga cuidado para no tapar esta zona que lleva incorporado un sensor necesario para las tomas S Micrófono estereofónico T Objetivo U Altavoz 16 V Tapa de las pilas W Tap...

Page 46: ...LP es mostrado 0 Tiempo restante de cinta 14 1 GRAB Aparece durante la grabación 14 2 Indicador de control de exposición puntual 25 Indicador de compensación de contraluz 25 Indicador de ajuste de exposición 24 C Indicador de bloqueo del diafragma 25 3 Indicador de efecto de cortinilla fundido de imagen seleccionado 27 4 Indicador de reducción de viento 20 5 Indicador de cinta en funcionamiento Gi...

Page 47: ...i un paquete de batería totalmente cargado es conectado a la unidad el indicador titilará durante aprox 10 segundos antes de apagarse Dado que el adaptador de CA procesa la electricidad internamente se calienta con el uso Asegúrese de utilizarlo solamente en zonas bien ventiladas Cuando transcurran más de 5 minutos en el modo de espera de grabación con el cassette insertado y sin ningún tipo de op...

Page 48: ... de Carga de la batería 11 Configuración de idioma Se puede cambiar el idioma de la pantalla 22 1 1 Ajuste el interruptor de alimentación en REC o PLAY 9 Si está puesto en REC el modo de grabación debería estar en M 9 2 Pulse MENU 3 3 Seleccione SISTEMA SYSTEM pulse SET o 4 Seleccione LANGUAGE pulse SET o 5 5 Seleccione el idioma deseado pulse SET o 6 6 Pulse MENU Pulse cuando quiera volver a la p...

Page 49: ...Cambie la batería por una totalmente cargada o utilice la alimentación de CA antes de continuar Portacintas OPEN EJECT Tapa del portacintas Asegúrese de que el lateral de la ventana mira hacia afuera Lengüeta de protección contra borrado 3 3 Cierre con fuerza la tapa del portacintas hasta que encaje bien Modo Ancho 16 9 Usted puede grabar vídeos con un tamaño de 4 3 y de 16 9 Por defecto la cámara...

Page 50: ... 21 Tiempo restante de cinta Aparece en la pantalla el tiempo restante de cinta aproximado min significa que la videocámara está calculando el tiempo restante Cuando el tiempo restante llega a los 2 minutos la indicación empieza a parpadear El tiempo necesario para calcular y visualizar la duración restante de cinta así como la precisión del cálculo pueden variar según el tipo de cinta utilizada R...

Page 51: ...amas no se visualizan durante la grabación Si la grabación comienza desde una parte en blanco el código de tiempo empieza a contar desde 00 00 00 minuto segundo fotograma Si la grabación comienza desde el final de una escena grabada anteriormente el código de tiempo sigue desde el último número de código de tiempo Si durante la grabación se deja una parte en blanco en un punto intermedio de la cin...

Page 52: ... reproducción puede verse en el monitor LCD o un televisor conectado 18 Si el modo stop continúa durante 5 minutos cuando la alimentación es suministrada por una batería la videocámara se cierra automáticamente Cuando hay un cable conectado al conector AV el altavoz no emite sonido Reproducción de imagen fija Se hace pausa durante la reproducción de vídeo 1 Pulse 6 durante la reproducción 2 Para r...

Page 53: ...ocámara busca en la dirección de retroceso Si la posición actual está en una parte grabada la videocámara busca en la dirección de avance Si se llega al comienzo o al final de la cinta durante la búsqueda de partes en blanco la videocámara se detiene automáticamente Una parte en blanco inferior a 5 segundos de cinta puede no ser detectada La parte en blanco detectada puede estar situada entre esce...

Page 54: ...4 3 TV 21 23 Para decidir si las siguientes indicaciones aparecen o no en el televisor conectado Fecha hora Ajuste FECHA HORA en ON o OFF 21 Código de tiempo Ajuste CÓD TIEMPO en ON o OFF 21 En Pant Ajuste EN PANT en OFF LCD o LCD TV 21 Notas Se recomienda utilizar el adaptador de CA como fuente de alimentación en lugar de la batería 11 Para controlar la imagen y el sonido de la videocámara sin in...

Page 55: ...imentación en PLAY 9 2 2 Pulse MENU Aparece la pantalla de menú 3 3 Seleccione la función deseada pulse SET o Aparece el menú de función seleccionado Ejemplo Menú FUNCIÓN Pantalla para menú de grabación de vídeo Pantalla para menú de reproducción de vídeo Configuración actual 4 4 Seleccione la opción deseada pulse SET o Ejemplo Menú CORT FUND 5 5 Seleccione el ajuste deseado pulse SET o La selecci...

Page 56: ...e puede filmar un motivo de máximo tamaño a una distancia de aproximadamente 40 cm Según la posición del zoom el objetivo se puede desenfocar DIS OFF Desactive esta función Aparece el icono DIS desactivado ON Para compensar las imágenes inestables ocasionadas por sacudidas de la cámara especialmente en casos de gran amplificación Notas Puede resultar imposible efectuar una estabilización precisa s...

Page 57: ... BRILLO son válidos sólo para fotografiar Menús Ajustes Preajuste de fábrica INDICACIONES CÁMARA EN PANT LCD Impide que los datos de visualización de la videocámara excepto fecha hora y código de tiempo aparezcan en la pantalla del televisor conectado LCD TV Hace que los datos de visualización de la videocámara aparezcan en la pantalla cuando la videocámara está conectada a un televisor FECHA HORA...

Page 58: ...ruptor de alimentación en REC La realización de cualquier operación durante la demostración interrumpe temporalmente la demostración Si no se realiza ninguna operación durante más de 3 minutos después de eso la demostración se reanudará Nota Si hay una cinta en la videocámara la demostración no podrá activarse REAJUSTAR CANCELAR No reajusta todas las configuraciones en los valores preajustados en ...

Page 59: ...ales izquierdo y derecho L y R AUDIO I El sonido sale por el canal izquierdo L AUDIO D El sonido sale por el canal derecho R BÚS BLANCO CANCELAR EJECUTAR 17 Búsqueda de partes en blanco Cada ajuste excepto OFF en EN PANT FECHA HORA y CÓD TIEMPO está vinculado a INDICACIONES CÁMARA que aparece cuando el interruptor de encendido está puesto en REC Los parámetros excepto el ajuste OFF en EN PANT son ...

Page 60: ...tor LCD Cuando la escena contiene detalles mínimos o idénticos que se repiten con frecuencia Cuando la escena resulta afectada por la luz solar o la luz reflejada en una superficie de agua Cuando se toma una escena con un fondo muy contrastado Aparecen parpadeando las siguientes advertencias de bajo contraste 9 y A Control de exposición Se recomienda el control de exposición manual en las siguient...

Page 61: ...o el diafragma se contrae en entornos bien iluminados para impedir la entrada de luz excesiva y se dilata en entornos poco iluminados para permitir la entrada de más luz Utilice esta función en las situaciones siguientes Cuando filme un sujeto en movimiento Cuando cambie la distancia con respecto al sujeto de modo que cambia su tamaño en el monitor LCD por ejemplo cuando el sujeto retrocede Cuando...

Page 62: ... batería El balance del blanco no puede ser activado simultáneamente con ATARDECER en PROGRAMA AE 27 El balance del blanco no puede ser activado si el modo SEPIA o MONOCROMO están activados Ajuste del balance del blanco El balance del blanco se refiere a la correcta reproducción de colores con distintas iluminaciones Si el balance del blanco es correcto todos los demás colores se reproducirán con ...

Page 63: ...ROGRAMA AE o OBTUR en menú FUNCIÓN 20 El efecto seleccionado será mostrado durante aprox 2 segundos antes de que la videocámara vuelva a la pantalla de menú Notas Los efectos del obturador no pueden ser usados durante NOCHE Cuando el motivo es demasiado brillante o reflectante puede aparecer un destello vertical fenómeno de corrimiento El fenómeno de corrimiento tiende a ocurrir cuando se seleccio...

Page 64: ...cer cuando se filma una pantalla de TV se estrechan 1 100 OBTUR 1 100 La velocidad de obturación se fija en 1 100 de segundo Se reduce el parpadeo que se produce al filmar bajo luz fluorescente o lámpara de vapores de mercurio OBTUR 1 500 OBTUR 1 4000 Consulte los modos PROGRAMA AE DEPORTE H Preajuste de fábrica Copia en grabadora de vídeo Para usar esta videocámara como reproductor 1 1 Tal como s...

Page 65: ...ague la alimentación y realice de nuevo las conexiones Cuando utilice un cable DV asegúrese de utilizar el cable DV opcional JVC VC VDV204U o VC VDV206U DV Para usar esta videocámara como grabadora 1 1 Compruebe que todos los equipos están apagados 2 2 Conecte esta videocámara a un aparato de vídeo equipado con un conector de salida DV mediante un cable DV como se muestra en la ilustración 3 3 Aju...

Page 66: ...ndows Messenger Notas Se recomienda utilizar el adaptador de CA como fuente de alimentación en lugar de la batería 11 Cuando utilice un cable DV asegúrese de utilizar el cable DV opcional JVC VC VDV206U o VC VDV204U según el tipo de conector DV 4 ó 6 patillas del PC La información de fecha hora no puede transferirse al PC Consulte los manuales de instrucciones del PC y del software Es posible que ...

Page 67: ... enfoque 24 La imagen parece indicar que la velocidad del obturador es demasiado lenta Cuando se filma en la oscuridad el aparato se vuelve muy sensible a la luz cuando GANANCIA se ajusta en AUTO Si desea que la iluminación parezca más natural ajuste GANANCIA en AGC o OFF 20 Las imágenes aparecen oscuras o blancuzcas en el monitor LCD En lugares sometidos a baja temperatura las imágenes se oscurec...

Page 68: ... está agotada el aparato se apaga automáticamente PONER M MANUAL Aparece al intentar cambiar las opciones Configuracion de menus Compensacion de contraluz Enfoque manual en el modo A AUTO 9 FIN DE CINTA Aparece cuando la cinta se termina durante la grabación o la reproducción TAPA DEL OBJETIVO Aparece durante 5 segundos al encenderse el aparato si la tapa del objetivo está acoplada o si está oscur...

Page 69: ... meses cuando se guarde la batería durante un periodo de tiempo prolongado cuando no se utilice se debe retirar del cargador o dispositivo eléctrico pues algunas máquinas utilizan corriente incluso estando apagadas Ventajas de las baterías de ion de litio Las baterías de ion de litio son pequeñas pero de gran potencia No obstante cuando se exponen a bajas temperaturas inferiores a 10 C su tiempo d...

Page 70: ...ltas superiores a 40 C o extremadamente bajas inferiores a 0 C NO deje el aparato en lugares con más de 50 C en lugares con humedad extremadamente baja inferior al 35 o extremadamente alta superior al 80 bajo luz solar directa en un coche cerrado en verano cerca de una calefacción Para proteger el aparato NO DEBE permitir que se humedezca dejar caer el aparato ni golpearlo contra objetos duros som...

Page 71: ...ente el aparato y consulte con su distribuidor local de JVC La videocámara es un dispositivo controlado por microcomputadora El ruido externo y las interferencias de un televisor una radio etc podrían impedir su correcto funcionamiento En tales casos desconecte primero su dispositivo de suministro de energía batería adaptador de CA etc espere unos minutos y a continuación vuelva a conectarlo y sig...

Page 72: ... Formato Formato DV modo SD Formato de señal Norma NTSC Formato de grabación reproducción Video grabación de componente digital Audio grabación digital PCM 4 canales de 32 kHz 12 BITS 2 canales de 48 kHz 16 BITS Cinta de casete Cinta Mini DV Velocidad de cinta SP 18 8 mm s LP 12 5 mm s Tiempo máximo de grabación con cinta de 80 minutos SP 80 min LP 120 min Para conectores AV Salida de vídeo 1 0 V ...

Page 73: ...ual 25 Copia 28 29 E Efecto 28 Efectos de obturación 28 Efectos de reemplazo cortinilla o fundido de imagen 27 Enfoque manual 24 En pant 21 23 En pantalla 21 23 Especificaciones 36 Estabilización de image digital DIS 20 F Filmación nocturna 28 I Idioma 22 M Melodía 22 Modo demo 22 Modo de sonido 21 Modo manual automático 9 Monitor LCD 8 P Programa AE 27 R Restaurador de cámara 22 Revisión rápida 1...

Page 74: ...MEMO GR DA30US_SP indb 38 GR DA30US_SP indb 38 7 11 2007 6 05 22 PM 7 11 2007 6 05 22 PM ...

Page 75: ...MEMO GR DA30US_SP indb 39 GR DA30US_SP indb 39 7 11 2007 6 05 22 PM 7 11 2007 6 05 22 PM ...

Page 76: ... 2007 Victor Company of Japan Limited Printed in Malaysia 0707YDR NF MP US GR DA30US_SP indb 40 GR DA30US_SP indb 40 7 11 2007 6 05 22 PM 7 11 2007 6 05 22 PM ...

Reviews: